Swagger是一个有用web界面的提供实体模型结构展示,接口展示,调测等的一个工具,使用它可以提高开发者开发效率,特别是前后端配合开发时,大大省去了沟通接口耗费的时间:服务端开发完接口发布后,UI端直接就可以通过Swagger提供的文档信息就能很容易理解哪些接口需要传递哪些参数,以及参数是否必填,参数类型等。
上边只是提到了个人使用过程中,感受到的优势,就这些优势足够吸引开发者使用该工具,使用Swagger需要完整一下几步操作:
1)新建SpringBoot工程,并还引入swagger ui依赖包;
2)在SpringBoot中添加Swagger配置类,启用swagger,并设置配置项;
3)定义实体类,实体类加上文档注解;
4)定义Restful Api接口,并添加文档注解;
5)发布访问。
下边针对上边的步骤进行详细介绍:
1)新建SpringBoot工程,并还引入swagger ui依赖包;
修改maven工程后,引入springboot parent,引入swagger ui相关依赖包。修改后的pom.xml如下:


<?xml version="1.0" encoding="UTF-8"?>

<project xmlns="http://maven.apache.org/POM/4.0.0" xmlns:xsi="http://www.w3.org/2001/XMLSchema-instance"
         xsi:schemaLocation="http://maven.apache.org/POM/4.0.0 http://maven.apache.org/xsd/maven-4.0.0.xsd">
    <modelVersion>4.0.0</modelVersion>

    <groupId>com.dx.sort</groupId>
    <artifactId>springboot-with-fastjson</artifactId>
    <version>1.0-SNAPSHOT</version>

    <name>springboot-with-fastjson</name>
    <!-- FIXME change it to the project's website -->
    <url>http://www.example.com</url>

    <properties>
        <project.build.sourceEncoding>UTF-8</project.build.sourceEncoding>
        <maven.compiler.source>1.8</maven.compiler.source>
        <maven.compiler.target>1.8</maven.compiler.target>
    </properties>

    <parent>
        <groupId>org.springframework.boot</groupId>
        <artifactId>spring-boot-starter-parent</artifactId>
        <version>2.1.1.RELEASE</version>
        <relativePath/> <!-- lookup parent from repository -->
    </parent>

    <dependencies>
        <!-- springboot web组件依赖 -->
        <dependency>
            <groupId>org.springframework.boot</groupId>
            <artifactId>spring-boot-starter-web</artifactId>
        </dependency>
        <!-- fastjson -->
        <dependency>
            <groupId>com.alibaba</groupId>
            <artifactId>fastjson</artifactId>
            <version>1.2.56</version>
        </dependency>

        <dependency>
            <groupId>io.springfox</groupId>
            <artifactId>springfox-swagger2</artifactId>
            <version>2.9.2</version>
        </dependency>
        <dependency>
            <groupId>io.springfox</groupId>
            <artifactId>springfox-swagger-ui</artifactId>
            <version>2.9.2</version>
        </dependency>
        <dependency>
            <groupId>com.github.xiaoymin</groupId>
            <artifactId>swagger-bootstrap-ui</artifactId>
            <version>1.9.6</version>
        </dependency>
        <dependency>
            <groupId>io.swagger</groupId>
            <artifactId>swagger-models</artifactId>
            <version>1.5.24</version>
        </dependency>
        <dependency>
            <groupId>io.swagger</groupId>
            <artifactId>swagger-annotations</artifactId>
            <version>1.5.24</version>
        </dependency>

        <dependency>
            <groupId>junit</groupId>
            <artifactId>junit</artifactId>
            <version>4.11</version>
            <scope>test</scope>
        </dependency>
    </dependencies>

    <build>
        <pluginManagement><!-- lock down plugins versions to avoid using Maven defaults (may be moved to parent pom) -->
            <plugins>
                <!-- clean lifecycle, see https://maven.apache.org/ref/current/maven-core/lifecycles.html#clean_Lifecycle -->
                <plugin>
                    <artifactId>maven-clean-plugin</artifactId>
                    <version>3.1.0</version>
                </plugin>
                <!-- default lifecycle, jar packaging: see https://maven.apache.org/ref/current/maven-core/default-bindings.html#Plugin_bindings_for_jar_packaging -->
                <plugin>
                    <artifactId>maven-resources-plugin</artifactId>
                    <version>3.0.2</version>
                </plugin>
                <plugin>
                    <artifactId>maven-compiler-plugin</artifactId>
                    <version>3.8.0</version>
                </plugin>
                <plugin>
                    <artifactId>maven-surefire-plugin</artifactId>
                    <version>2.22.1</version>
                </plugin>
                <plugin>
                    <artifactId>maven-jar-plugin</artifactId>
                    <version>3.0.2</version>
                </plugin>
                <plugin>
                    <artifactId>maven-install-plugin</artifactId>
                    <version>2.5.2</version>
                </plugin>
                <plugin>
                    <artifactId>maven-deploy-plugin</artifactId>
                    <version>2.8.2</version>
                </plugin>
                <!-- site lifecycle, see https://maven.apache.org/ref/current/maven-core/lifecycles.html#site_Lifecycle -->
                <plugin>
                    <artifactId>maven-site-plugin</artifactId>
                    <version>3.7.1</version>
                </plugin>
                <plugin>
                    <artifactId>maven-project-info-reports-plugin</artifactId>
                    <version>3.0.0</version>
                </plugin>
            </plugins>
        </pluginManagement>
    </build>
</project>
修改springboot入口函数:
package com.dx.test.app;

import org.springframework.boot.SpringApplication;
import org.springframework.boot.autoconfigure.SpringBootApplication;

/**
 * Hello world!
 */
@SpringBootApplication(scanBasePackages = {"com.dx.test"})
public class App {
    public static void main(String[] args) {
        SpringApplication.run(App.class, args);
    }
}
在src/main下添加resources资源文件夹,在resources文件夹下添加application.yml文件,文件内容为:
server:
  port: 8080
配置服务器运行端口为8080。
2)在SpringBoot中添加Swagger配置类,启用swagger,并设置配置项;
在项目中新建Swagger2Configuration类,并修改该类为如下:
package com.dx.test.web.config;

import com.github.xiaoymin.swaggerbootstrapui.annotations.EnableSwaggerBootstrapUI;
import org.springframework.context.annotation.Bean;
import org.springframework.context.annotation.Configuration;
import org.springframework.web.servlet.config.annotation.ResourceHandlerRegistry;
import org.springframework.web.servlet.config.annotation.WebMvcConfigurer;
import springfox.documentation.builders.ApiInfoBuilder;
import springfox.documentation.builders.PathSelectors;
import springfox.documentation.builders.RequestHandlerSelectors;
import springfox.documentation.service.ApiInfo;
import springfox.documentation.service.Contact;
import springfox.documentation.spi.DocumentationType;
import springfox.documentation.spring.web.plugins.Docket;
import springfox.documentation.swagger2.annotations.EnableSwagger2;

@Configuration
@EnableSwagger2
@EnableSwaggerBootstrapUI
public class Swagger2Configuration implements WebMvcConfigurer {
    @Bean
    public Docket createDocApi() {
        return new Docket(DocumentationType.SWAGGER_2)
                .groupName("default") // 默认就是 default
                .apiInfo(createApiInfo())
                .select()
                .apis(RequestHandlerSelectors.basePackage("com.dx.test"))
                .paths(PathSelectors.any())
                .build();
    }

    private ApiInfo createApiInfo(){
        return new ApiInfoBuilder()
                .title("Dx系统Restful Apis")
                .description("Dx系统Restful Apis详细说明")
                .license("")
                .licenseUrl("")
                .termsOfServiceUrl("")
                .contact(new Contact("dx","http://xxx.com","dx@xx.com.cn"))
                .version("1.0.0")
                .build();
    }

    @Override
    public void addResourceHandlers(ResourceHandlerRegistry registry) {
        registry.addResourceHandler("/**")
                .addResourceLocations("classpath:/static/");
        registry.addResourceHandler("swagger-ui.html")
                .addResourceLocations("classpath:/META-INF/resources/");
        registry.addResourceHandler("/webjars/**")
                .addResourceLocations("classpath:/META-INF/resources/webjars/");
        registry.addResourceHandler("doc.html")
                .addResourceLocations("classpath:/META-INF/resources/");
    }
}
3)定义实体类,实体类加上文档注解;
添加文章实体Article类,并对文章实体属性添加swagger文档注解,以及对字段显示顺序进行排序。
package com.dx.test.module;

import io.swagger.annotations.ApiModel;
import io.swagger.annotations.ApiModelProperty;
import io.swagger.annotations.ApiSort;

import java.io.Serializable;
import java.util.Date;

@ApiModel(value = "文章实体")
public class Article implements Serializable {
    @ApiModelProperty(value = "文章id", position = 0)
    private Long id;
    @ApiModelProperty(value = "标题", position = 1)
    private String title;
    @ApiModelProperty(value = "作者", position = 2)
    private String author;
    @ApiModelProperty(value = "内容", position = 3)
    private String content;
    @ApiModelProperty(value = "创建人", position = 4)
    private String createUser;
    @ApiModelProperty(value = "创建人id", position = 5)
    private String createUserId;
    @ApiModelProperty(value = "创建时间", position = 6)
    private Date createTime;
    @ApiModelProperty(value = "修改人", position = 7)
    private String modifyUser;
    @ApiModelProperty(value = "修改人id", position = 8)
    private String modifyUserId;
    @ApiModelProperty(value = "修改时间", position = 9)
    private Date modifyTime;

    public Article(Long id, String title, String author, String content, Date createTime) {
        this.id = id;
        this.title = title;
        this.author = author;
        this.content = content;
        this.createTime = createTime;
    }

    /**
     * @return the id
     */
    public Long getId() {
        return id;
    }

    /**
     * @param id the id to set
     */
    public void setId(Long id) {
        this.id = id;
    }

    /**
     * @return the title
     */
    public String getTitle() {
        return title;
    }

    /**
     * @param title the title to set
     */
    public void setTitle(String title) {
        this.title = title;
    }

    /**
     * @return the author
     */
    public String getAuthor() {
        return author;
    }

    /**
     * @param author the author to set
     */
    public void setAuthor(String author) {
        this.author = author;
    }

    /**
     * @return the content
     */
    public String getContent() {
        return content;
    }

    /**
     * @param content the content to set
     */
    public void setContent(String content) {
        this.content = content;
    }

    /**
     * @return the createTime
     */
    public Date getCreateTime() {
        return createTime;
    }

    /**
     * @param createTime the createTime to set
     */
    public void setCreateTime(Date createTime) {
        this.createTime = createTime;
    }

    /**
     * @return the modifyTime
     */
    public Date getModifyTime() {
        return modifyTime;
    }

    /**
     * @param modifyTime the modifyTime to set
     */
    public void setModifyTime(Date modifyTime) {
        this.modifyTime = modifyTime;
    }

    /**
     * @return the createUser
     */
    public String getCreateUser() {
        return createUser;
    }

    /**
     * @param createUser the createUser to set
     */
    public void setCreateUser(String createUser) {
        this.createUser = createUser;
    }

    /**
     * @return the createUserId
     */
    public String getCreateUserId() {
        return createUserId;
    }

    /**
     * @param createUserId the createUserId to set
     */
    public void setCreateUserId(String createUserId) {
        this.createUserId = createUserId;
    }

    /**
     * @return the modifyUser
     */
    public String getModifyUser() {
        return modifyUser;
    }

    /**
     * @param modifyUser the modifyUser to set
     */
    public void setModifyUser(String modifyUser) {
        this.modifyUser = modifyUser;
    }

    /**
     * @return the modifyUserId
     */
    public String getModifyUserId() {
        return modifyUserId;
    }

    /**
     * @param modifyUserId the modifyUserId to set
     */
    public void setModifyUserId(String modifyUserId) {
        this.modifyUserId = modifyUserId;
    }
}
其中字段属性注解@ApiModelProperty的value值就是文档显示该字段的意义,position是该文档属性显示顺序。
为了能正常访问接口,对接口中date类型参数、@RequestHeader的header参数中文进行解码、对返回接口数据为json数据(采用fastjson)需要添加WebMvcConfig配置类:
package com.dx.test.web.config;

import com.dx.test.web.converter.HandlerHeaderMethodArgumentResolver;
import com.dx.test.web.converter.RequestHeaderDecodeConverter;
import com.dx.test.web.converter.StringToDateConverter;
import com.dx.test.web.converter.StringToEnumConverterFactory;
import org.springframework.beans.factory.annotation.Autowired;
import org.springframework.beans.factory.config.ConfigurableBeanFactory;
import org.springframework.boot.autoconfigure.http.HttpMessageConverters;
import org.springframework.boot.autoconfigure.web.servlet.WebMvcAutoConfiguration;
import org.springframework.context.annotation.*;
import org.springframework.http.converter.AbstractHttpMessageConverter;
import org.springframework.http.converter.HttpMessageConverter;
import org.springframework.stereotype.Controller;
import com.alibaba.fastjson.serializer.SerializerFeature;
import com.alibaba.fastjson.support.config.FastJsonConfig;
import com.alibaba.fastjson.support.spring.FastJsonHttpMessageConverter;
import org.springframework.http.MediaType;
import org.springframework.web.servlet.config.annotation.WebMvcConfigurer;

import java.nio.charset.Charset;
import java.util.ArrayList;
import java.util.List;

/**
 * WebMvcConfigurerAdapter 这个类在SpringBoot2.0已过时,官方推荐直接实现 WebMvcConfigurer 这个接口
 */
@Configuration
@Import({WebMvcAutoConfiguration.class})
@ComponentScan(
        value = "com.dx.test.web",
        includeFilters = {
                @ComponentScan.Filter(type = FilterType.ANNOTATION, value = Controller.class)
        })
public class WebMvcConfig implements WebMvcConfigurer {
    @Bean
    public RequestHeaderDecodeConverter requestHeaderDecodeConverter() {
        return new RequestHeaderDecodeConverter(null);
    }

    @Bean
    public StringToDateConverter stringToDateConverter() {
        return new StringToDateConverter();
    }

    /**
     * 使用 fastjson 代替 jackson
     *
     * @param converters
     */
    @Override
    public void configureMessageConverters(List<HttpMessageConverter<?>> converters) {
        /*
         先把JackSon的消息转换器删除.
         备注:(1)源码分析可知,返回json的过程为:
                 Controller调用结束后返回一个数据对象,for循环遍历conventers,找到支持application/json的HttpMessageConverter,然后将返回的数据序列化成json。
                 具体参考org.springframework.web.servlet.mvc.method.annotation.AbstractMessageConverterMethodProcessor的writeWithMessageConverters方法
             (2)由于是list结构,我们添加的fastjson在最后。因此必须要将jackson的转换器删除,不然会先匹配上jackson,导致没使用 fastjson
        */
//        for (int i = converters.size() - 1; i >= 0; i--) {
//            if (converters.get(i) instanceof MappingJackson2HttpMessageConverter) {
//                converters.remove(i);
//            }
//        }
//
//        FastJsonHttpMessageConverter fastJsonHttpMessageConverter = new FastJsonHttpMessageConverter();
//        //自定义fastjson配置
//        FastJsonConfig config = new FastJsonConfig();
//        config.setSerializerFeatures(
//                SerializerFeature.WriteMapNullValue,        // 是否输出值为null的字段,默认为false,我们将它打开
//                SerializerFeature.WriteNullListAsEmpty,     // 将Collection类型字段的字段空值输出为[]
//                SerializerFeature.WriteNullStringAsEmpty,   // 将字符串类型字段的空值输出为空字符串
//                SerializerFeature.WriteNullNumberAsZero,    // 将数值类型字段的空值输出为0
//                SerializerFeature.WriteDateUseDateFormat,
//                SerializerFeature.DisableCircularReferenceDetect    // 禁用循环引用
//        );
//        fastJsonHttpMessageConverter.setFastJsonConfig(config);
//
//        // 添加支持的MediaTypes;不添加时默认为*/*,也就是默认支持全部
//        // 但是MappingJackson2HttpMessageConverter里面支持的MediaTypes为application/json
//        // 参考它的做法, fastjson也只添加application/json的MediaType
//        List<MediaType> fastMediaTypes = new ArrayList<>();
//        fastMediaTypes.add(MediaType.APPLICATION_JSON_UTF8);
//        fastJsonHttpMessageConverter.setSupportedMediaTypes(fastMediaTypes);
//        converters.add(fastJsonHttpMessageConverter);
    }

    /**
     * +支持fastjson的HttpMessageConverter
     *
     * @return HttpMessageConverters
     */
    @Bean
    public HttpMessageConverters fastJsonHttpMessageConverters() {
        AbstractHttpMessageConverter abstractHttpMessageConverter = null;
        //1.需要定义一个convert转换消息的对象;
        FastJsonHttpMessageConverter fastJsonHttpMessageConverter = new FastJsonHttpMessageConverter();

        //2:添加fastJson的配置信息;
        FastJsonConfig fastJsonConfig = new FastJsonConfig();
        fastJsonConfig.setSerializerFeatures(
                SerializerFeature.WriteMapNullValue,
                SerializerFeature.WriteDateUseDateFormat,
                SerializerFeature.DisableCircularReferenceDetect);
        fastJsonConfig.setCharset(Charset.forName("utf-8"));

        //3处理中文乱码问题
        List<MediaType> fastMediaTypes = new ArrayList<>();
        fastMediaTypes.add(MediaType.APPLICATION_JSON_UTF8);

        //4.在convert中添加配置信息.
        fastJsonHttpMessageConverter.setSupportedMediaTypes(fastMediaTypes);
        fastJsonHttpMessageConverter.setFastJsonConfig(fastJsonConfig);

        HttpMessageConverter<?> converter = fastJsonHttpMessageConverter;

        return new HttpMessageConverters(converter);
    }

}
WebMvcConfig中的StringToDateConverter(对date参数类型转化)在上篇文章中有它的源码;RequestHeaderDecodeConverter是实现对header中中文进行解码使用,在上篇文章中也有其源码。
4)定义Restful Api接口,并添加文档注解;
添加ArticleController类,并在接口上添加文档注解:
package com.dx.test.web.controller;

import com.dx.test.module.Article;
import com.dx.test.module.ArticleType;
import com.dx.test.web.annonations.HeaderTestArgument;
import io.swagger.annotations.*;
import org.springframework.http.MediaType;
import org.springframework.web.bind.annotation.*;

import java.util.ArrayList;
import java.util.Date;
import java.util.List;
import java.util.stream.Collectors;

@Api(value = "文章管理", tags = {"文章管理:增、删、改、查"})
@ApiSort(value = 1)
@RestController
@RequestMapping(value = "/api/v1")
public class ArticleController {
    @ApiOperation(value = "根据文章id,查询文章详情", code = 200, httpMethod = "GET", produces = "application/json", notes = "queryById方法定义说明:根据数据库中article表的自增id,查询article信息。")
    @ApiImplicitParams(value = {
            @ApiImplicitParam(name = "userId", paramType = "header", value = "操作用户id", required = false, dataType = "String"),
            @ApiImplicitParam(name = "userName", paramType = "header", value = "操作用户", required = false, dataType = "String"),
            @ApiImplicitParam(name = "id", paramType = "path", value = "文章id", required = true, dataType = "Long")
    })
    @RequestMapping(value = {"/article/{id}"}, method = {RequestMethod.GET}, produces = {MediaType.APPLICATION_JSON_VALUE})
    @ResponseBody
    public Article getById(
            @RequestHeader(value = "userId", required = false) String userId,
            @RequestHeader(value = "userName", required = false) String userName,
            @PathVariable(value = "id", required = true) Long id,
            Article article) {
        List<Article> articles = new ArrayList<>();
        articles.add(new Article(1L, "文章1", "", "", new Date()));
        articles.add(new Article(2L, "文章2", "", "", new Date()));
        articles.add(new Article(3L, "文章3", "", "", new Date()));
        articles.add(new Article(4L, "文章4", "", "", new Date()));
        System.out.println(userName);
        return articles.get(0);
    }

    @ApiOperation(value = "查询文章列表", code = 200, httpMethod = "GET", produces = "application/json", notes = "queryById方法定义说明:根据title检索文章,返回文章列表。")
    @ApiImplicitParams(value = {
            @ApiImplicitParam(name = "userId", paramType = "header", value = "操作用户id", required = false, dataType = "String"),
            @ApiImplicitParam(name = "userName", paramType = "header", value = "操作用户", required = false, dataType = "String"),
            @ApiImplicitParam(name = "title", paramType = "query", value = "文章标题检索值", required = false, dataType = "String"),
            @ApiImplicitParam(name = "articleType", paramType = "query", value = "文章类型", required = false, dataType = "ArticleType"),
            @ApiImplicitParam(name = "createTime", paramType = "query", value = "文章发布时间", required = false, dataType = "Date")
    })
    @RequestMapping(value = {"/articles"}, method = {RequestMethod.GET}, produces = {MediaType.APPLICATION_JSON_VALUE})
    @ResponseBody
    public List<Article> queryList(
            @RequestHeader(value = "userId", required = false) String userId,
            @RequestHeader(value = "userName", required = false) String userName,
            @RequestParam(value = "title", required = false) String title,
            @RequestParam(value = "articleType",required = false) ArticleType articleType,
            @RequestParam(value = "createTime", required = false) Date createTime) {
        System.out.println(createTime);
        List<Article> articles = new ArrayList<>();
        articles.add(new Article(1L, "文章1", "", "", new Date()));
        articles.add(new Article(2L, "文章2", "", "", new Date()));
        articles.add(new Article(3L, "文章3", "", "", new Date()));
        articles.add(new Article(4L, "文章4", "", "", new Date()));

        return articles.stream().filter(s -> s.getTitle().contains(title)).collect(Collectors.toList());
    }

    @ApiOperation(value = "删除文章", code = 200, httpMethod = "HEAD", produces = "application/json", notes = "queryById方法定义说明:删除文章")
    @ApiImplicitParams(value = {
            @ApiImplicitParam(name = "userId", paramType = "header", value = "操作用户id", required = false, dataType = "String"),
            @ApiImplicitParam(name = "userName", paramType = "header", value = "操作用户", required = false, dataType = "String"),
            @ApiImplicitParam(name = "id", paramType = "query", value = "文章id", required = true, dataType = "Long")
    })
    @RequestMapping(value = {"/article/delete"}, method = {RequestMethod.HEAD}, produces = {MediaType.APPLICATION_JSON_VALUE})
    @ResponseBody
    public Integer delete(@RequestHeader(value = "userId", required = false) String userId,
                          @RequestHeader(value = "userName", required = false) String userName,
                          @RequestParam(value = "id", required = true) Long id) {
        return 1;
    }
}
5)发布访问。
打开App入口类,右键运行,运行起来后,在浏览器中输入http://localhost:8080/doc.html,回车会显示如下界面:
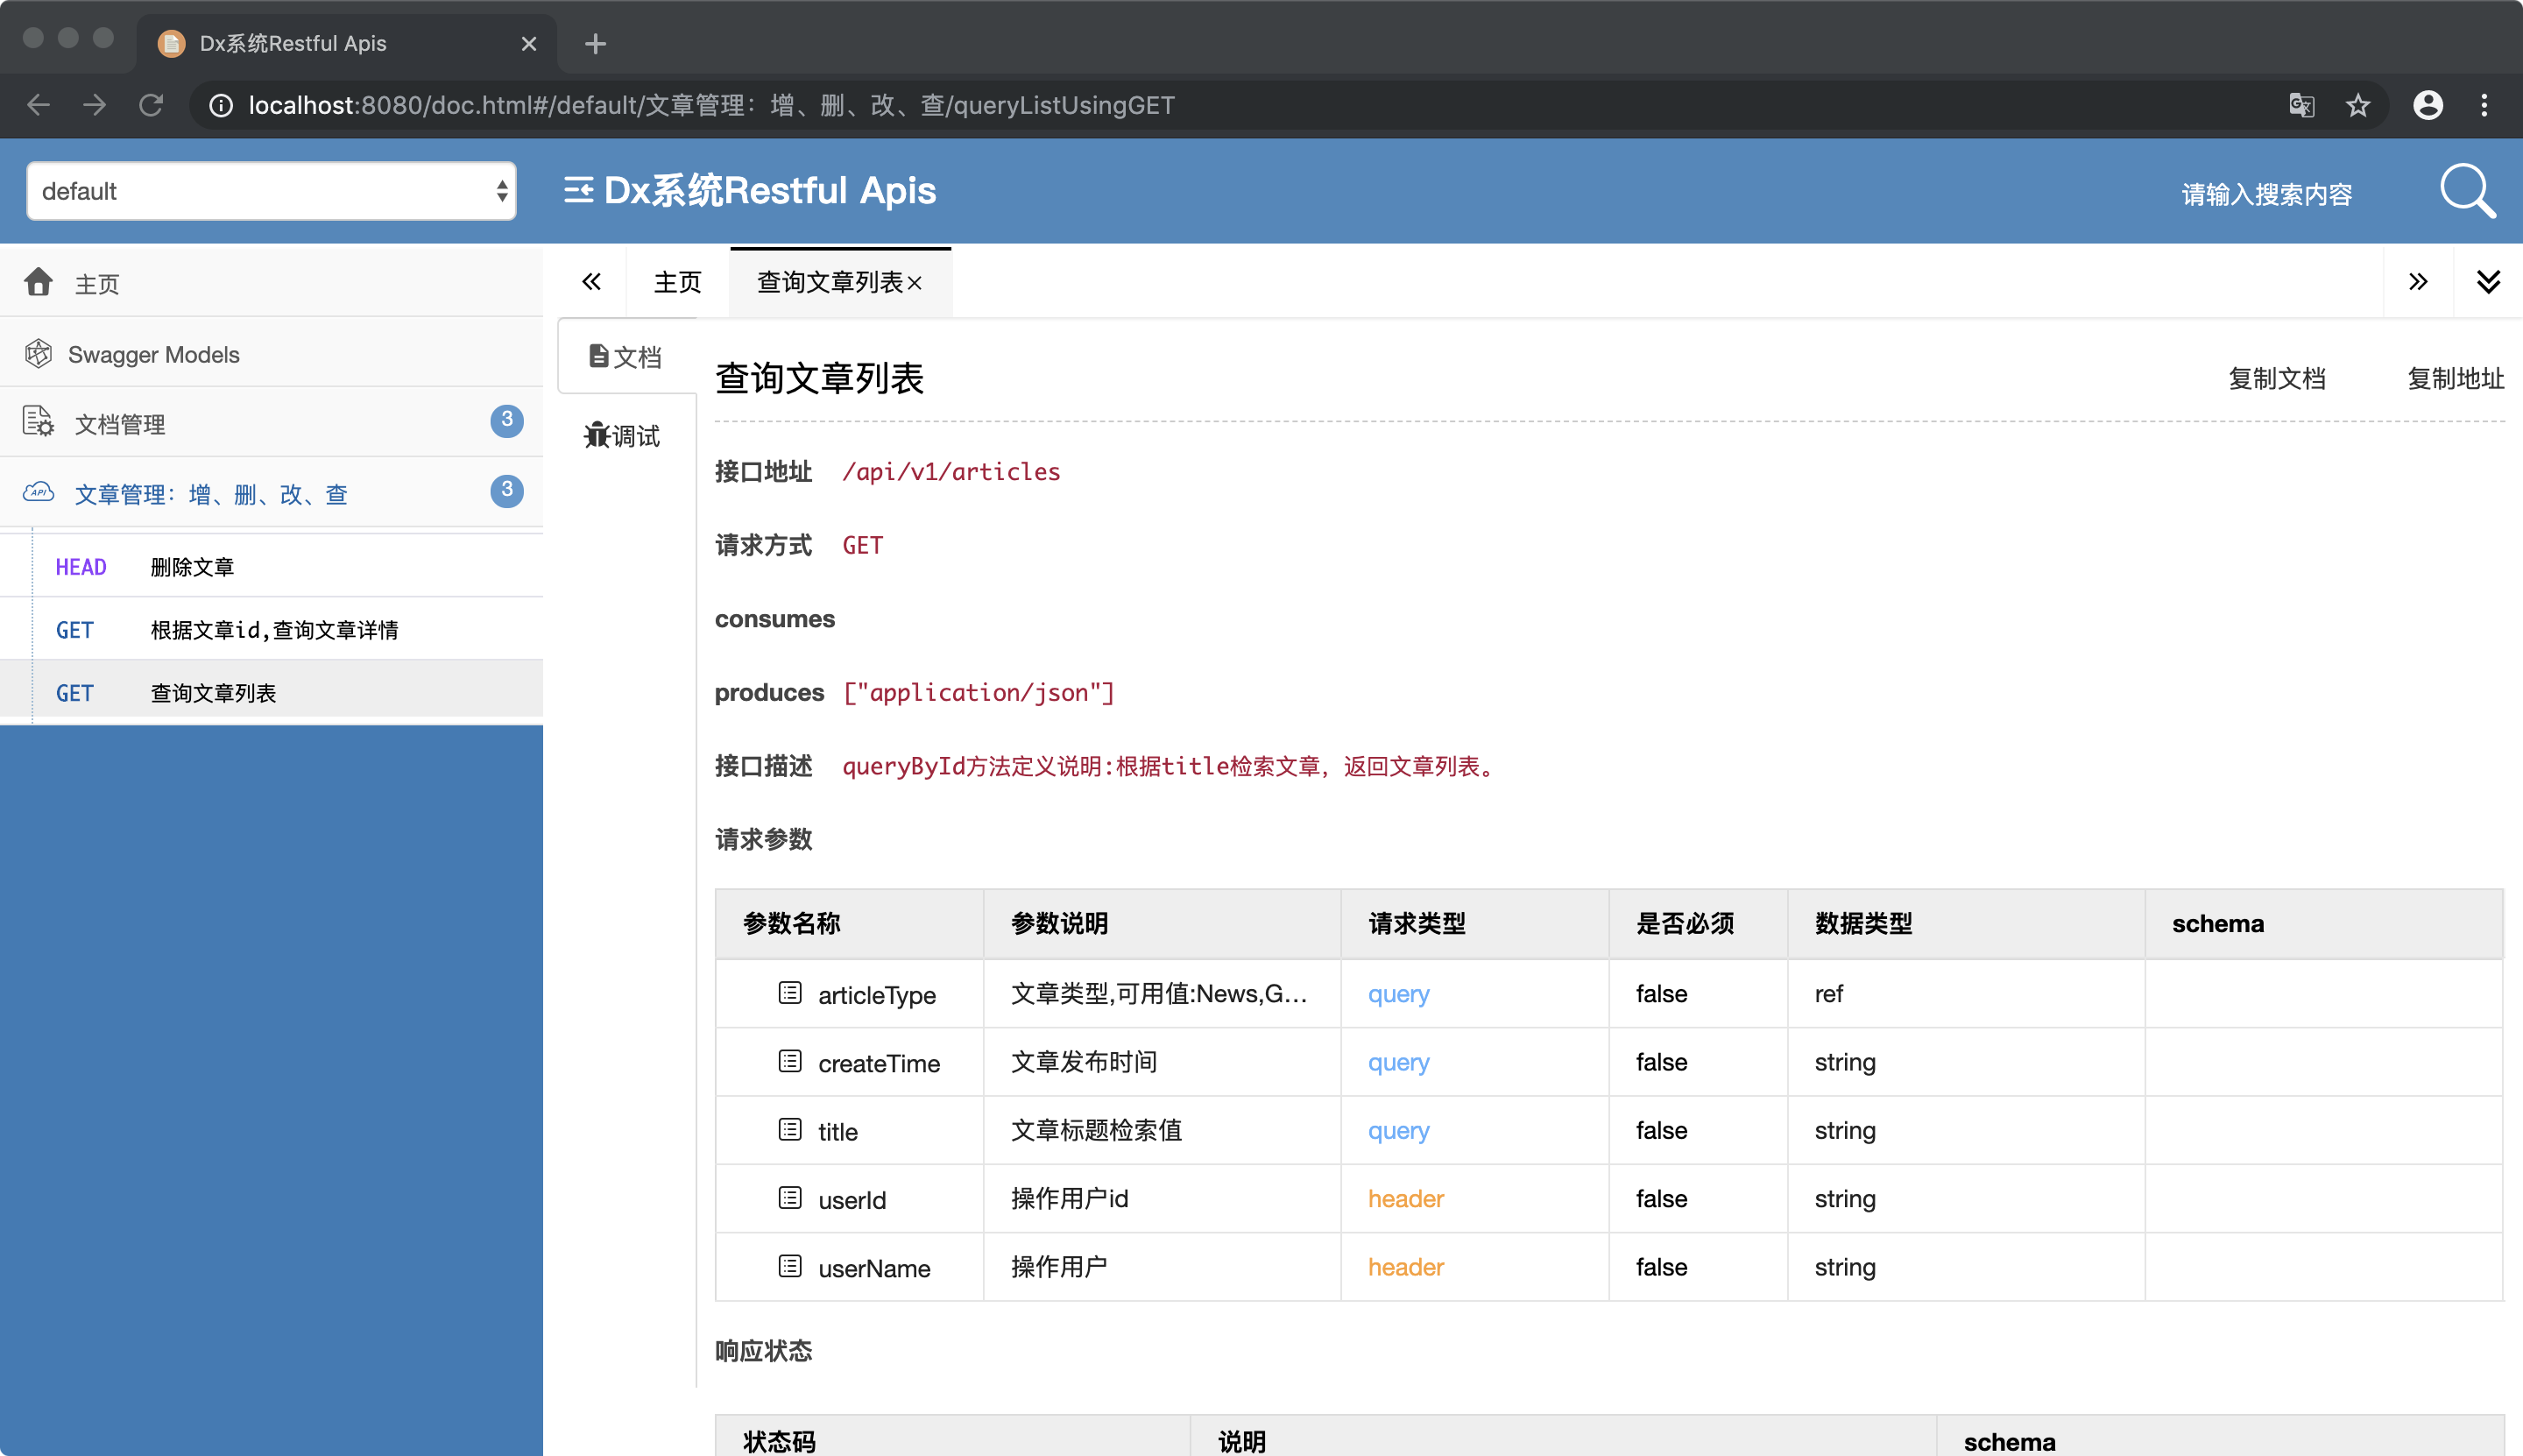
到此本篇文章已经结束,应该按照这些步骤都可以配置成功。
如果swagger启动后,点击swagger页面出现错误“java.lang.NumberFormatException: For input string: ""”,解决方案请参考《https://www.bookstack.cn/read/swagger-bootstrap-ui/39.md》