本篇文章主要用来阐述Spring Security渲染默认登录表单页面流程。在默认登录表单页面渲染过程中主要涉及到以下3个拦截器:
1)FilterSecurityInterceptor:该拦截器主要用来:获取所配置资源访问的授权信息,根据SecurityContextHolder中存储的用户信息来决定其是否有权限;
2)ExceptionTranslationFilter:该拦截器主要用来:异常转换过滤器位于整个springSecurityFilterChain的后方,用来转换整个链路中出现的异常;
3)DefaultLoginPageGeneratingFilter:如果没有在配置文件中指定认证页面,则由该过滤器生成一个默认认证页面。
在FilterSecurityInterceptor主要用来判断当前用户(如果没有登录账户:系统会默认登录账户为匿名用户:
)是否有权限访问特定资源,其内部是使用了AccessDecisionManager投票机制来实现。
新建Spring Security项目
新建一个spring boot项目
在maven中引入:
    <parent>
        <groupId>org.springframework.boot</groupId>
        <artifactId>spring-boot-starter-parent</artifactId>
        <version>2.0.2.RELEASE</version>
    </parent>
    <dependencies>
        <dependency>
            <groupId>org.springframework.boot</groupId>
            <artifactId>spring-boot-starter-test</artifactId>
            <scope>test</scope>
        </dependency>
        <dependency>
            <groupId>org.springframework.boot</groupId>
            <artifactId>spring-boot-starter-aop</artifactId>
        </dependency>
        <dependency>
            <groupId>org.springframework.boot</groupId>
            <artifactId>spring-boot-starter-actuator</artifactId>
        </dependency>
        <dependency>
            <groupId>org.springframework.boot</groupId>
            <artifactId>spring-boot-starter-web</artifactId>
        </dependency>
        <dependency>
            <groupId>org.springframework.boot</groupId>
            <artifactId>spring-boot-starter-security</artifactId>
        </dependency>
        。。。
    </dependencies>
设置Spring Security配置类
@EnableGlobalMethodSecurity(prePostEnabled = true)
public class SecurityConfig extends WebSecurityConfigurerAdapter {

    @Autowired
    private AuthenticationSuccessHandler authenticationSuccessHandler;
    @Autowired
    private AuthenticationFailureHandler authenticationFailureHandler;
    @Autowired
    private LogoutSuccessHandler logoutSuccessHandler;
    @Autowired
    private AuthenticationEntryPoint authenticationEntryPoint;
    @Autowired
    private UserDetailsService userDetailsService;
    @Autowired
    private TokenFilter tokenFilter;

    @Bean
    public BCryptPasswordEncoder bCryptPasswordEncoder() {
        return new BCryptPasswordEncoder();
    }

    @Override
    protected void configure(HttpSecurity http) throws Exception {
        http.csrf().disable();

        // 基于token,所以不需要session
        http.sessionManagement().sessionCreationPolicy(SessionCreationPolicy.STATELESS);

        http.authorizeRequests()
                .antMatchers("/", "/*.html", "/favicon.ico", "/css/**", "/js/**", "/fonts/**", "/layui/**", "/img/**",
                        "/v2/api-docs/**", "/swagger-resources/**", "/webjars/**", "/pages/**", "/druid/**",
                        "/statics/**")
                .permitAll().anyRequest().authenticated();
        http.formLogin()/*.loginPage("/login.html")*/.loginProcessingUrl("/login")
                .successHandler(authenticationSuccessHandler).failureHandler(authenticationFailureHandler);
                //.and().exceptionHandling().authenticationEntryPoint(authenticationEntryPoint);
        http.logout().logoutUrl("/logout").logoutSuccessHandler(logoutSuccessHandler);
        // 解决不允许显示在iframe的问题
        http.headers().frameOptions().disable();
        http.headers().cacheControl();

        http.addFilterBefore(tokenFilter, UsernamePasswordAuthenticationFilter.class);
    }
  。。。
}
需要注意:
1)在config(HttpSecurity http)中并未配置"http.formLogin().loginPage(String loginPage)",那么DefaultLoginPageGeneratingFilter就会渲染默认的登录表单;否则,会根据自定义的登录表单去渲染。
2)在config(HttpSecurity http)中注释掉了http.formLogin()的".and().exceptionHandling().authenticationEntryPoint(authenticationEntryPoint);",这时候当filter链执行过程中抛出AccessDeniedException后,就会被ExceptionTranslationFilter拦截到异常,在异常处理时会执行ExceptionTranslationFilter#authenticationEntryPoint.commence(request, response, reason)中的authenticationEntryPoint就是LoginUrlAuthenticationEntryPoint的实例。
3)在config(HttpSecurity http)中如果打开http.formLogin()注释的".and().exceptionHandling().authenticationEntryPoint(authenticationEntryPoint);",那么,Bean(authenticationEntryPoint)就会通过配置来覆盖默认authenticationEntryPoint对象,其中Bean(authenticationEntryPoint)的注入实现:
    /**
     * 未登录,返回401
     *
     * @return
     */
    @Bean
    public AuthenticationEntryPoint authenticationEntryPoint() {
        return new AuthenticationEntryPoint() {

            @Override
            public void commence(HttpServletRequest request, HttpServletResponse response,
                    AuthenticationException authException) throws IOException, ServletException {
                ResponseInfo info = new ResponseInfo(HttpStatus.UNAUTHORIZED.value() + "", "请先登录");
                ResponseUtil.responseJson(response, HttpStatus.UNAUTHORIZED.value(), info);
            }
        };
    }
此时,如果是访问权限不足抛出AccessDeniedException异常时,在ExceptionTranslationFilter处理就会执行该bean,界面抛异常内容是一个json:
{"code":"401","message":"请先登录"}
下边的代码流程分析都是以上看到代码为准。
添加需要访问权限的接口
@Api(tags = "用户")
@RestController
@RequestMapping("/users")
public class UserController {
    private static final Logger log = LoggerFactory.getLogger("adminLogger");

    @Autowired
    private UserService userService;
    @Autowired
    private UserDao userDao;

    。。。

    @GetMapping
    @ApiOperation(value = "用户列表")
    @PreAuthorize("hasAuthority('sys:user:query')")
    public PageTableResponse listUsers(PageTableRequest request) {
        return new PageTableHandler(new CountHandler() {

            @Override
            public int count(PageTableRequest request) {
                return userDao.count(request.getParams());
            }
        }, new ListHandler() {

            @Override
            public List<SysUser> list(PageTableRequest request) {
                List<SysUser> list = userDao.list(request.getParams(), request.getOffset(), request.getLimit());
                return list;
            }
        }).handle(request);
    }
}
这里http://localhost:8080/users/listUsers,就会需要特定权限才能访问。
如果项目启动后直接访问http://localhost:8080/users/listUsers,就会自动跳转到http://localhost:8080/login页面,到此测试项目已经搭建完成。接下来会结合代码逐步进行分析认证:认证失败后如何跳转并渲染默认登录表单页面流程?
过滤链入口FilterChainProxy
在访问http://localhost:8080/users/listUsers时,系统会进入到filter链执行入口类:FilterChainProxy#doFilter(HttpRequest request,HttpResponse response)
 从filters中的filter就是Spring Security的核心过滤链。
FilterSecurityInterceptor是过滤器链中最后一个过滤器,主要用于判断请求能否通过,内部通过AccessDecisionManager 进行投票判断,那么接下来我们来分析下FilterSecurityInterceptor的执行逻辑。
FilterSecurityInterceptor分析
FilterSecurityInterceptor源码:
public class FilterSecurityInterceptor extends AbstractSecurityInterceptor implements Filter {
    private static final String FILTER_APPLIED = "__spring_security_filterSecurityInterceptor_filterApplied";
    private FilterInvocationSecurityMetadataSource securityMetadataSource;
    private boolean observeOncePerRequest = true;

    public FilterSecurityInterceptor() {
    }

    public void init(FilterConfig arg0) throws ServletException {
    }

    public void destroy() {
    }

    public void doFilter(ServletRequest request, ServletResponse response, FilterChain chain) throws IOException, ServletException {
        FilterInvocation fi = new FilterInvocation(request, response, chain);
        this.invoke(fi);
    }

    public FilterInvocationSecurityMetadataSource getSecurityMetadataSource() {
        return this.securityMetadataSource;
    }

    public SecurityMetadataSource obtainSecurityMetadataSource() {
        return this.securityMetadataSource;
    }

    public void setSecurityMetadataSource(FilterInvocationSecurityMetadataSource newSource) {
        this.securityMetadataSource = newSource;
    }

    public Class<?> getSecureObjectClass() {
        return FilterInvocation.class;
    }

    public void invoke(FilterInvocation fi) throws IOException, ServletException {
        if (fi.getRequest() != null && fi.getRequest().getAttribute("__spring_security_filterSecurityInterceptor_filterApplied") != null && this.observeOncePerRequest) {
            fi.getChain().doFilter(fi.getRequest(), fi.getResponse());
        } else {
            if (fi.getRequest() != null && this.observeOncePerRequest) {
                fi.getRequest().setAttribute("__spring_security_filterSecurityInterceptor_filterApplied", Boolean.TRUE);
            }

            InterceptorStatusToken token = super.beforeInvocation(fi);

            try {
                fi.getChain().doFilter(fi.getRequest(), fi.getResponse());
            } finally {
                super.finallyInvocation(token);
            }

            super.afterInvocation(token, (Object)null);
        }

    }

    public boolean isObserveOncePerRequest() {
        return this.observeOncePerRequest;
    }

    public void setObserveOncePerRequest(boolean observeOncePerRequest) {
        this.observeOncePerRequest = observeOncePerRequest;
    }
}
当filter链执行到FilterSecurityInterceptor#doFilter(...)时,重要逻辑在FilterSecurityInterceptor#invoke(...):
1)InterceptorStatusToken token = super.beforeInvocation(fi);是调用了FilterSecurityInterceptor父类AbstractSecurityInterceptor#beforeInvocation(...);
2)这段代码其实内部会验证用户是否有权限去访问当前请求的资源的权限,如果有权限会继续向下执行"fi.getChain().doFilter(fi.getRequest(), fi.getResponse());",否则将会在内部抛出异常,之后异常被ExceptionTranslationFilter拦截到。
这里的beforeInvocation(...)的实现是定义在FilterSecurityInterceptor的父类AbstractSecurityInterceptor中,beforeInvocation 方法内部是通过 accessDecisionManager 去做决定的:
protected InterceptorStatusToken beforeInvocation(Object object) {
    Assert.notNull(object, "Object was null");
    boolean debug = this.logger.isDebugEnabled();
    if (!this.getSecureObjectClass().isAssignableFrom(object.getClass())) {
        throw new IllegalArgumentException("Security invocation attempted for object " + object.getClass().getName() + " but AbstractSecurityInterceptor only configured to support secure objects of type: " + this.getSecureObjectClass());
    } else {
        Collection<ConfigAttribute> attributes = this.obtainSecurityMetadataSource().getAttributes(object);
        if (attributes != null && !attributes.isEmpty()) {
            if (debug) {
                this.logger.debug("Secure object: " + object + "; Attributes: " + attributes);
            }

            if (SecurityContextHolder.getContext().getAuthentication() == null) {
                this.credentialsNotFound(this.messages.getMessage("AbstractSecurityInterceptor.authenticationNotFound", "An Authentication object was not found in the SecurityContext"), object, attributes);
            }

            Authentication authenticated = this.authenticateIfRequired();

            try {
                this.accessDecisionManager.decide(authenticated, object, attributes);
            } catch (AccessDeniedException var7) {
                this.publishEvent(new AuthorizationFailureEvent(object, attributes, authenticated, var7));
                throw var7;
            }

              。。。
        }
    }
}
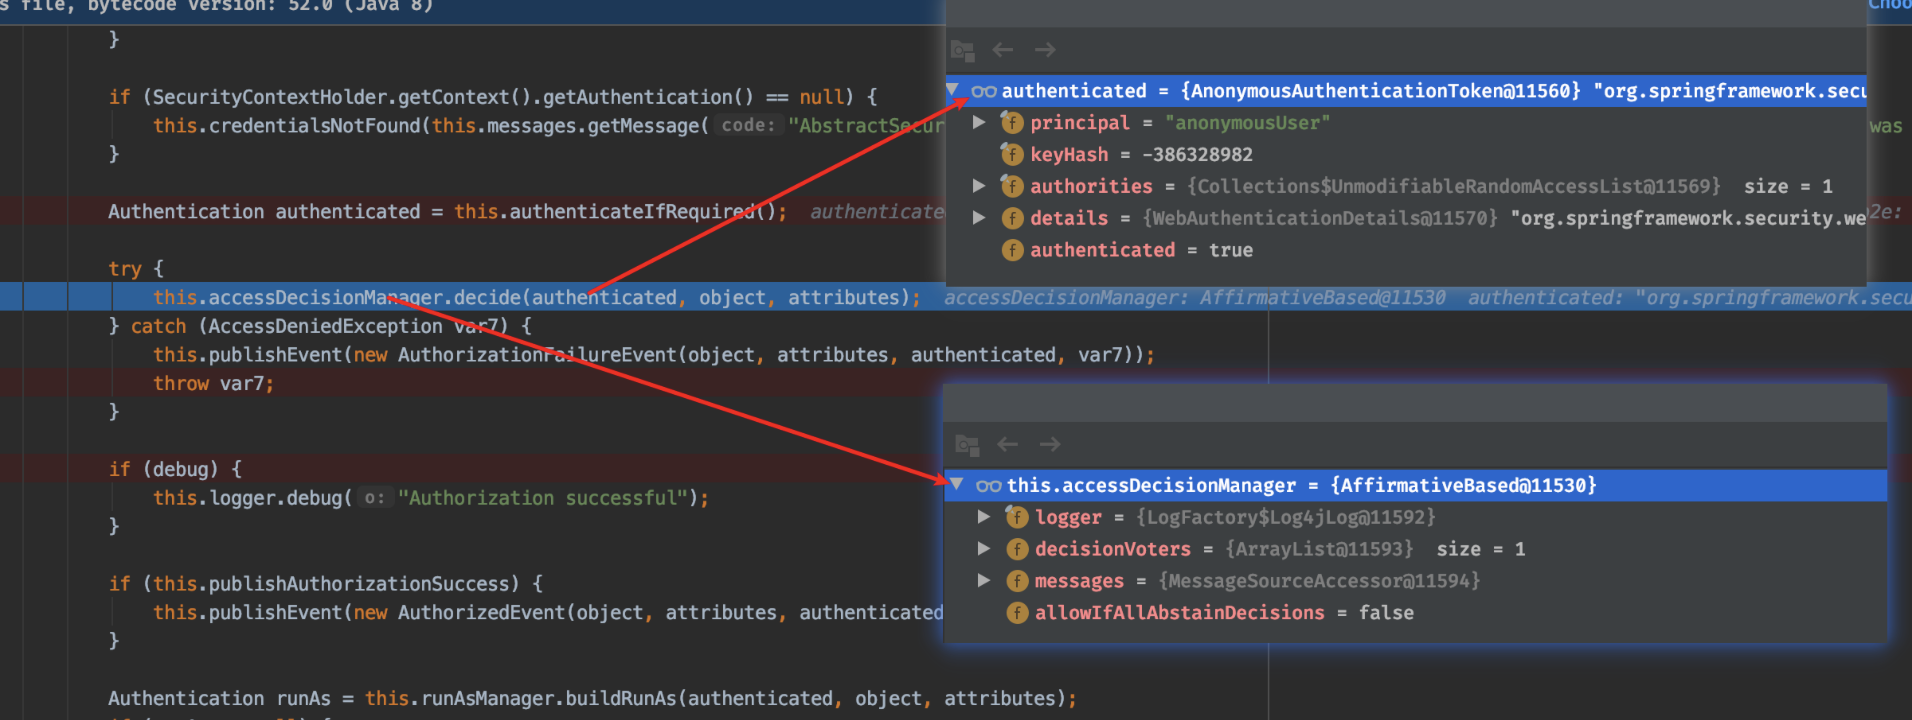
从上边运行结果可以得知:
1)当用户未登陆时,发送请求过程中Spring Security会自动装配一个内置的用户authenticated=AnonymousAuthenticationToken(这是一个匿名用户);
2)accessDecisionManager其实就是选取类,Spring Security已经内置了几个基于投票的AccessDecisionManager包括(AffirmativeBased ,ConsensusBased ,UnanimousBased)当然如果需要你也可以实现自己的AccessDecisionManager。这里它的实现类是:AffirmativeBase,其他AccessDecisionManager的实现结构如下:

- AffirmativeBased: 一票通过,只要有一个投票器通过就允许访问,否则抛出AccessDeniedException;
- UnanimousBased: 所有投票器都通过才允许访问,否则抛出AccessDeniedException。
使用这种方式,一系列的AccessDecisionVoter将会被AccessDecisionManager用来对Authentication是否有权访问受保护对象进行投票,然后再根据投票结果来决定是否要抛出AccessDeniedException。具体可以以AffrmativeBased#decide(...):
public void decide(Authentication authentication, Object object, Collection<ConfigAttribute> configAttributes) throws AccessDeniedException {
    int deny = 0;
    Iterator var5 = this.getDecisionVoters().iterator();

    while(var5.hasNext()) {
        AccessDecisionVoter voter = (AccessDecisionVoter)var5.next();
        int result = voter.vote(authentication, object, configAttributes);
        if (this.logger.isDebugEnabled()) {
            this.logger.debug("Voter: " + voter + ", returned: " + result);
        }

        switch(result) {
        case -1:
            ++deny;
            break;
        case 1:
            return;
        }
    }

    if (deny > 0) {
        throw new AccessDeniedException(this.messages.getMessage("AbstractAccessDecisionManager.accessDenied", "Access is denied"));
    } else {
        this.checkAllowIfAllAbstainDecisions();
    }
}
AffrmativeBased#decide(...)内部逻辑:
(1)只要有AccessDecisionVoter的投票为ACCESS_GRANTED则同意用户进行访问;
(2)如果全部弃权也表示通过;
(3)如果没有一个人投赞成票,但是有人投反对票,则将抛出AccessDeniedException。
public void doFilter(ServletRequest req, ServletResponse res, FilterChain chain) throws IOException, ServletException {
    HttpServletRequest request = (HttpServletRequest)req;
    HttpServletResponse response = (HttpServletResponse)res;

    try {
        chain.doFilter(request, response);
        this.logger.debug("Chain processed normally");
    } catch (IOException var9) {
        throw var9;
    } catch (Exception var10) {
        Throwable[] causeChain = this.throwableAnalyzer.determineCauseChain(var10);
        RuntimeException ase = (AuthenticationException)this.throwableAnalyzer.getFirstThrowableOfType(AuthenticationException.class, causeChain);
        if (ase == null) {
            ase = (AccessDeniedException)this.throwableAnalyzer.getFirstThrowableOfType(AccessDeniedException.class, causeChain);
        }

        if (ase == null) {
            if (var10 instanceof ServletException) {
                throw (ServletException)var10;
            }

            if (var10 instanceof RuntimeException) {
                throw (RuntimeException)var10;
            }

            throw new RuntimeException(var10);
        }

        if (response.isCommitted()) {
            throw new ServletException("Unable to handle the Spring Security Exception because the response is already committed.", var10);
        }

        this.handleSpringSecurityException(request, response, chain, (RuntimeException)ase);
    }

}
通过代码分析和调试可以发现,一旦ExceptionTranslationFilter捕获到AccessDeniedException异常之后会调用“this.handleSpringSecurityException(request, response, chain, (RuntimeException)ase);”,handleSpringSecurityException(...)源码如下:
private void handleSpringSecurityException(HttpServletRequest request, HttpServletResponse response, FilterChain chain, RuntimeException exception) throws IOException, ServletException {
    if (exception instanceof AuthenticationException) {
        this.logger.debug("Authentication exception occurred; redirecting to authentication entry point", exception);
        this.sendStartAuthentication(request, response, chain, (AuthenticationException)exception);
    } else if (exception instanceof AccessDeniedException) {
        Authentication authentication = SecurityContextHolder.getContext().getAuthentication();
        if (!this.authenticationTrustResolver.isAnonymous(authentication) && !this.authenticationTrustResolver.isRememberMe(authentication)) {
            this.logger.debug("Access is denied (user is not anonymous); delegating to AccessDeniedHandler", exception);
            this.accessDeniedHandler.handle(request, response, (AccessDeniedException)exception);
        } else {
            this.logger.debug("Access is denied (user is " + (this.authenticationTrustResolver.isAnonymous(authentication) ? "anonymous" : "not fully authenticated") + "); redirecting to authentication entry point", exception);
            this.sendStartAuthentication(request, response, chain, new InsufficientAuthenticationException(this.messages.getMessage("ExceptionTranslationFilter.insufficientAuthentication", "Full authentication is required to access this resource")));
        }
    }

}
1)如果异常类型是AuthenticationException,就执行: this.sendStartAuthentication(request, response, chain, (AuthenticationException)exception);
2)如果异常类型是AccessDeniedException,分支判断:
2.1)如果当前登录用户非匿名用户且非‘记住我’时,会执行: this.accessDeniedHandler.handle(request, response, (AccessDeniedException)exception);
2.2)否则,执行 this.sendStartAuthentication(request, response, chain, new InsufficientAuthenticationException(this.messages.getMessage("ExceptionTranslationFilter.insufficientAuthentication", "Full authentication is required to access this resource")));
从上边断点分析可以知道在我们未登录时,请求一个需要认证后才能访问的资源时,Spring Security会装配一个内置的用户authenticated=AnonymousAuthenticationToken(这是一个匿名用户),因此这里代码会执行到2.2)分支的方法:this.sendStartAuthentication(...)。sendStartAuthentication(...)源码试下如下:
protected void sendStartAuthentication(HttpServletRequest request, HttpServletResponse response, FilterChain chain, AuthenticationException reason) throws ServletException, IOException {
    SecurityContextHolder.getContext().setAuthentication((Authentication)null);
    this.requestCache.saveRequest(request, response);
    this.logger.debug("Calling Authentication entry point.");
    this.authenticationEntryPoint.commence(request, response, reason);
}
代码分析:
1)重定向登录页面之前会保存当前访问的路径,这就是为什么我们访问 http://localhost:8080/roles/listRoles接口后,再登录成功后又会跳转到 http://localhost:8080/roles/listRoles接口,因为在重定向到/login接口前 这里进行了保存 requestCache.saveRequest(request, response);
2)断点进入该方法,发现这的authenticationEntryPoint实现类就是:LoginUrlAuthenticationEntryPoint。
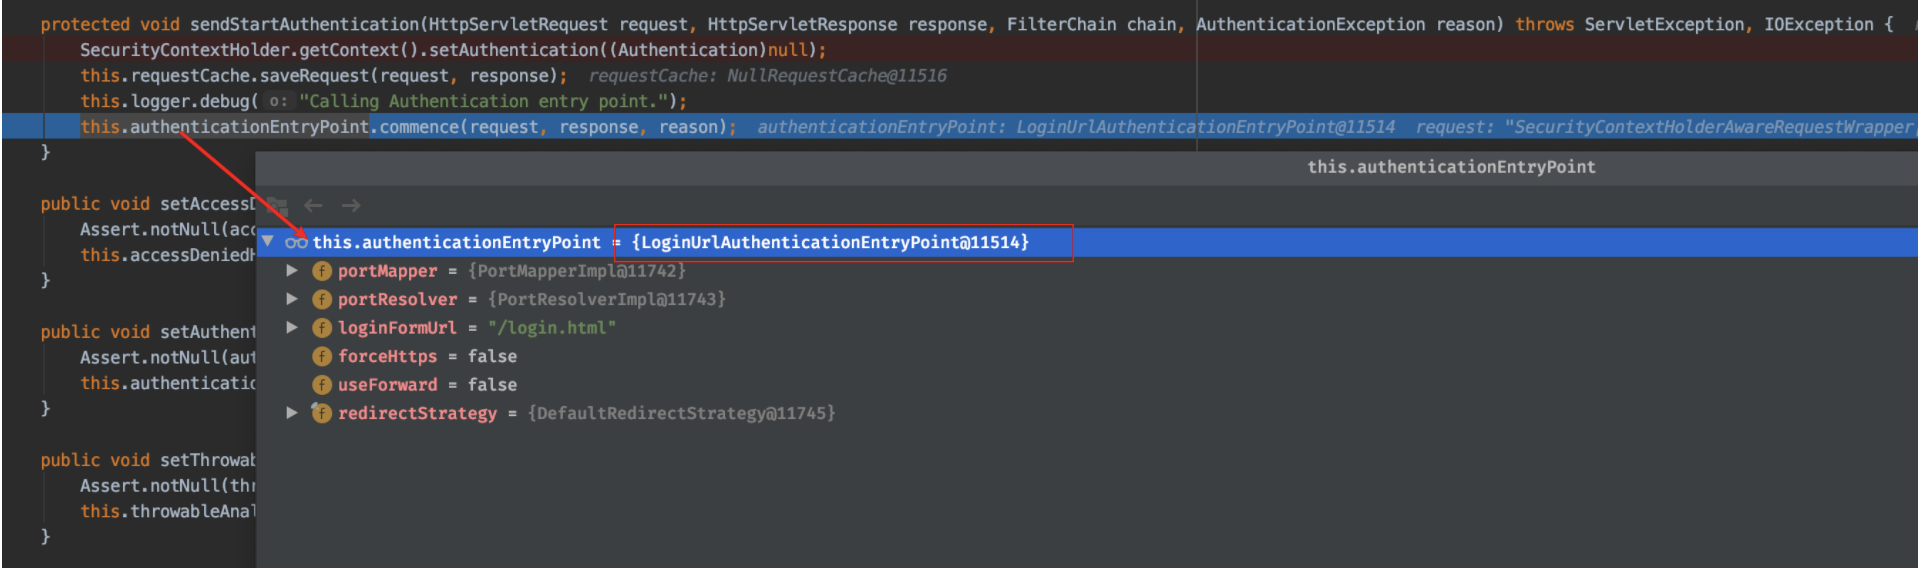
接来下到我们来分析LoginUrlAuthenticationEntryPoint 的 commence方法:
public void commence(HttpServletRequest request, HttpServletResponse response, AuthenticationException authException) throws IOException, ServletException {
    String redirectUrl = null;
    if (this.useForward) {
        if (this.forceHttps && "http".equals(request.getScheme())) {
            redirectUrl = this.buildHttpsRedirectUrlForRequest(request);
        }

        if (redirectUrl == null) {
            String loginForm = this.determineUrlToUseForThisRequest(request, response, authException);
            if (logger.isDebugEnabled()) {
                logger.debug("Server side forward to: " + loginForm);
            }

            RequestDispatcher dispatcher = request.getRequestDispatcher(loginForm);
            dispatcher.forward(request, response);
            return;
        }
    } else {
        redirectUrl = this.buildRedirectUrlToLoginPage(request, response, authException);
    }

    this.redirectStrategy.sendRedirect(request, response, redirectUrl);
}
1)在Spring Security项目中Spring Security配置类config(HttpSecurity http)内部配置了http.formLogin().loginPage("/login.html"),这里的redirectUrl为:http://localhost:18080/login.html,这就是实现自定义登录页面的其中拦截后跳转登录页面实现中必不可少的一个配置。
2)当然你在自定
义了登录页面后,希望拦截到的未登录时自动跳转到登录页面,也可以不配置,从前端可以实现,每个页面中都包含一个js验证(如果返回401就跳转到login.html):
$.ajaxSetup({
   cache : false,
   headers : {
      "token" : localStorage.getItem("token")
   },
   error : function(xhr, textStatus, errorThrown) {
      var msg = xhr.responseText;
      var response = JSON.parse(msg);
      var code = response.code;
      var message = response.message;
      if (code == 400) {
         layer.msg(message);
      } else if (code == 401) {
         localStorage.removeItem("token");
         location.href = '/login.html';
      } else if (code == 403) {
         console.log("未授权:" + message);
         layer.msg('未授权');
      } else if (code == 500) {
         layer.msg('系统错误:' + message);
      }
   }
});
同样需要在Spring Security配置类config(HttpSecurity http)内部配置了http.formLogin()中配置.and().exceptionHandling().authenticationEntryPoint(authenticationEntryPoint);authenticationEntryPoint注入bean代码实现:
/**
 * 未登录,返回401
 *
 * @return
 */
@Bean
public AuthenticationEntryPoint authenticationEntryPoint() {
   return new AuthenticationEntryPoint() {

      @Override
      public void commence(HttpServletRequest request, HttpServletResponse response,
            AuthenticationException authException) throws IOException, ServletException {
         ResponseInfo info = new ResponseInfo(HttpStatus.UNAUTHORIZED.value() + "", "请先登录");
         ResponseUtil.responseJson(response, HttpStatus.UNAUTHORIZED.value(), info);
      }
   };
}
这样的话,ExceptionTranslationFilter捕获AccessDeniedException异常执行this.authenticationEntryPoint.commence(request, response, reason);时,就会执行上边代码抛出json异常信息。前端拿到异常401后,会自动跳转到登录页面。
public void doFilter(ServletRequest req, ServletResponse res, FilterChain chain) throws IOException, ServletException {
    HttpServletRequest request = (HttpServletRequest)req;
    HttpServletResponse response = (HttpServletResponse)res;
    boolean loginError = this.isErrorPage(request);
    boolean logoutSuccess = this.isLogoutSuccess(request);
    if (!this.isLoginUrlRequest(request) && !loginError && !logoutSuccess) {
        chain.doFilter(request, response);
    } else {
        String loginPageHtml = this.generateLoginPageHtml(request, loginError, logoutSuccess);
        response.setContentType("text/html;charset=UTF-8");
        response.setContentLength(loginPageHtml.getBytes(StandardCharsets.UTF_8).length);
        response.getWriter().write(loginPageHtml);
    }
}
其中isLoginUrlRequest(...)用来验证是否请求为/login,
private boolean isLoginUrlRequest(HttpServletRequest request) {
    return this.matches(request, this.loginPageUrl);
}
由于在Spring Security的配置类的config(HttpSecurity http)中并未配置http.formLogin().loginPage(...),因此这里loginPageUrl默认为:/login。
根据前边分析,当验证没有权限访问时,会抛出AccessDeniedException异常,之后被ExceptionTranslationFilter拦截到会发送一个/loign请求,被DefaultLoginPageGeneratingFilter拦截到。因此这里代码会执行else代码块中的逻辑。
调用String loginPageHtml = generateLoginPageHtml(request, loginError, logoutSuccess);生成登录表单页面:
private String generateLoginPageHtml(HttpServletRequest request, boolean loginError, boolean logoutSuccess) {
    String errorMsg = "none";
    if (loginError) {
        HttpSession session = request.getSession(false);
        if (session != null) {
            AuthenticationException ex = (AuthenticationException)session.getAttribute("SPRING_SECURITY_LAST_EXCEPTION");
            errorMsg = ex != null ? ex.getMessage() : "none";
        }
    }

    StringBuilder sb = new StringBuilder();
    sb.append("<html><head><title>Login Page</title></head>");
    if (this.formLoginEnabled) {
        sb.append("<body onload='document.f.").append(this.usernameParameter).append(".focus();'>
");
    }

    if (loginError) {
        sb.append("<p style='color:red;'>Your login attempt was not successful, try again.<br/><br/>Reason: ");
        sb.append(errorMsg);
        sb.append("</p>");
    }

    if (logoutSuccess) {
        sb.append("<p style='color:green;'>You have been logged out</p>");
    }

    if (this.formLoginEnabled) {
        sb.append("<h3>Login with Username and Password</h3>");
        sb.append("<form name='f' action='").append(request.getContextPath()).append(this.authenticationUrl).append("' method='POST'>
");
        sb.append("<table>
");
        sb.append("	<tr><td>User:</td><td><input type='text' name='");
        sb.append(this.usernameParameter).append("' value='").append("'></td></tr>
");
        sb.append("	<tr><td>Password:</td><td><input type='password' name='").append(this.passwordParameter).append("'/></td></tr>
");
        if (this.rememberMeParameter != null) {
            sb.append("	<tr><td><input type='checkbox' name='").append(this.rememberMeParameter).append("'/></td><td>Remember me on this computer.</td></tr>
");
        }

        sb.append("	<tr><td colspan='2'><input name="submit" type="submit" value="Login"/></td></tr>
");
        this.renderHiddenInputs(sb, request);
        sb.append("</table>
");
        sb.append("</form>");
    }

    if (this.openIdEnabled) {
        sb.append("<h3>Login with OpenID Identity</h3>");
        sb.append("<form name='oidf' action='").append(request.getContextPath()).append(this.openIDauthenticationUrl).append("' method='POST'>
");
        sb.append("<table>
");
        sb.append("	<tr><td>Identity:</td><td><input type='text' size='30' name='");
        sb.append(this.openIDusernameParameter).append("'/></td></tr>
");
        if (this.openIDrememberMeParameter != null) {
            sb.append("	<tr><td><input type='checkbox' name='").append(this.openIDrememberMeParameter).append("'></td><td>Remember me on this computer.</td></tr>
");
        }

        sb.append("	<tr><td colspan='2'><input name="submit" type="submit" value="Login"/></td></tr>
");
        sb.append("</table>
");
        this.renderHiddenInputs(sb, request);
        sb.append("</form>");
    }

    if (this.oauth2LoginEnabled) {
        sb.append("<h3>Login with OAuth 2.0</h3>");
        sb.append("<table>
");
        Iterator var9 = this.oauth2AuthenticationUrlToClientName.entrySet().iterator();

        while(var9.hasNext()) {
            Entry<String, String> clientAuthenticationUrlToClientName = (Entry)var9.next();
            sb.append(" <tr><td>");
            sb.append("<a href="").append(request.getContextPath()).append((String)clientAuthenticationUrlToClientName.getKey()).append("">");
            sb.append((String)clientAuthenticationUrlToClientName.getValue());
            sb.append("</a>");
            sb.append("</td></tr>
");
        }

        sb.append("</table>
");
    }

    sb.append("</body></html>");
    return sb.toString();
}
通过response.getWriter().write(loginPageHtml);渲染登录页面到浏览器。
至此 SpringSecurity 默认表单登录页展示流程源码部分已经全部讲解完毕。
参考:
《Spring Security(15)——权限鉴定结构(https://www.iteye.com/blog/elim-2247057)》
《SpringSecurity 默认表单登录页展示流程源码( https://www.cnblogs.com/askajohnny/p/12227881.html)》