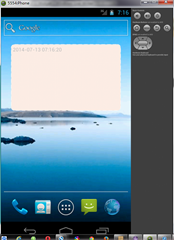
AppWidget 就是HomeScreen上显示的小部件,提供直观的交互操作。通过在HomeScreen中长按,在弹出的对话框中选择Widget部件来进行创建,长按部件后并拖动到垃圾箱里进行删除。同一个Widget部件可以同时创建多个。
AppWidget的实现主要涉及到以下类:
- AppWidgetProvider
- RemoteViews
- AppWidgetManager
布局
首先需要提供一个定义了Widget界面布局的XML文件,需要注意的是使用的组件必须是RemoteViews所支持的,目前原生API中支持的组件如下:
FrameLayout/LinearLayout/RelativeLayout/AnalogClock/Button/Chronmeter/ImageButton/ImageView/ProgressBar/TextView
注意:如果使用了除此之外的组件,则在Widget创建时会导致android.view.InflateExceptionn异常。
<?xml version="1.0" encoding="utf-8"?>
<LinearLayout xmlns:android="http://schemas.android.com/apk/res/android"
    android:layout_width="match_parent"
    android:layout_height="match_parent"
    android:orientation="vertical"
    android:background="@drawable/rectangle" >
    <TextView
        android:layout_width="match_parent"
        android:layout_height="match_parent"
        android:id="@+id/tv"
        android:text="lalala"/>

</LinearLayout>
属性
需要提供一个xml文件来定义Widget的基本属性,放置到res/xml/..目录下。操作:
- 在res/目录下创建xml/目录
- 创建xml文件(名字可任意),选择类型为AppWidgetProvider
- 在弹出的便捷界面进行参数设置
主要设置的参数如下:
minWidth: 定义Wdiget组件的宽度
minHeight: 定义Wdiget组件的高度
updatePeriodMillis: 更新的时间周期
initialLayout: Widget的布局文件
configure: 如果需要在启动前先启动一个Activity进行设置,在这里给出Activity的完整类名(后面会说到,与一般Activity的实现有些许差别)
<?xml version="1.0" encoding="utf-8"?>
<appwidget-provider xmlns:android="http://schemas.android.com/apk/res/android"
    android:initialLayout="@layout/time_appwidget"
    android:minHeight="72dp"
    android:minWidth="294dp"
    android:updatePeriodMillis="0" >

</appwidget-provider>
周期
xml都定义好后,接下来就是创建一个继承自AppWidgetProvider的子类,AppWidgetProvider实际上就是一个BroadcastReceiver,里面提供了以下函数:
onReceive(Context, Intent)
onUpdate(Context , AppWidgetManager, int[] appWidgetIds)
onEnabled(Context)
onDeleted(Context, int[] appWidgetIds)
onDisabled(Context)
可通过重写以上函数来监听Widget状态的变化并进行相应的处理。
- 启动 - 无confiure Activity
onReceive –> onEnabled —— 第一个widget被显示 –> onReceive –> onUpdate —— 刷新界面
- 启动 - 带confiuration Activity
onReceive –> onUpdate
- 拖动
<无状态变化>
- 周期更新
onReceive –> onUpdate
- 删除
onReceive –> onDeleted —— widget被删除 –> onReceive –> onDisabled —— 最后一个widget被移除
- 启动时位置不够
onReceive –> onEnabled –> onReceive –> onUpdate –> onReceive –> onDeleted –> onReceive –> onDisabled
配置
<receiver android:name=".WidgetsStudy" >
            <intent-filter >
                <action android:name="android.appwidget.action.APPWIDGET_UPDATE" />
            </intent-filter>
            <meta-data android:name="android.appwidget.provider"
                android:resource="@xml/appwidget_info"/>
        </receiver>
        <service android:name=".TimeService"></service>
代码
在服务中更新Widget中的内容:
public class TimeService extends Service {

    private Timer timer;

    @Override
    public IBinder onBind(Intent intent) {
        // TODO 自动生成的方法存根
        return null;
    }

    @Override
    public void onCreate() {
        timer = new Timer();
        timer.scheduleAtFixedRate(new TimeUpdateTask(), 0, 1000);
        super.onCreate();
    }

    private final class TimeUpdateTask extends TimerTask {

        @Override
        public void run() {
            SimpleDateFormat dateFormat = new SimpleDateFormat(
                    "yyyy-MM-dd HH:mm:ss");
            String time = dateFormat.format(new Date());
            RemoteViews rom = new RemoteViews(getPackageName(),
                    R.layout.time_appwidget);
            rom.setTextViewText(R.id.tv, time);
            AppWidgetManager awm = AppWidgetManager
                    .getInstance(getApplicationContext());
            awm.updateAppWidget(new ComponentName(getApplicationContext(),
                    WidgetsStudy.class), rom);
        }

    }

    @Override
    public void onDestroy() {
        timer.cancel();
        timer = null;
        super.onDestroy();
    }

}
AppWidgetProvider中:
public class WidgetsStudy extends AppWidgetProvider {

    @Override
    public void onUpdate(Context context, AppWidgetManager appWidgetManager,
            int[] appWidgetIds) {

        super.onUpdate(context, appWidgetManager, appWidgetIds);
    }

    @Override
    public void onDeleted(Context context, int[] appWidgetIds) {
        // TODO 自动生成的方法存根
        super.onDeleted(context, appWidgetIds);
    }

    @Override
    public void onEnabled(Context context) {
        context.startService(new Intent(context, TimeService.class));
        super.onEnabled(context);
    }

    @Override
    public void onDisabled(Context context) {
        context.stopService(new Intent(context, TimeService.class));
        super.onDisabled(context);
    }

}
我是天王盖地虎的分割线
源代码:http://pan.baidu.com/s/1dD1Qx01
Widgets学习.zip
转载请注明出处:http://www.cnblogs.com/yydcdut
