DecorView
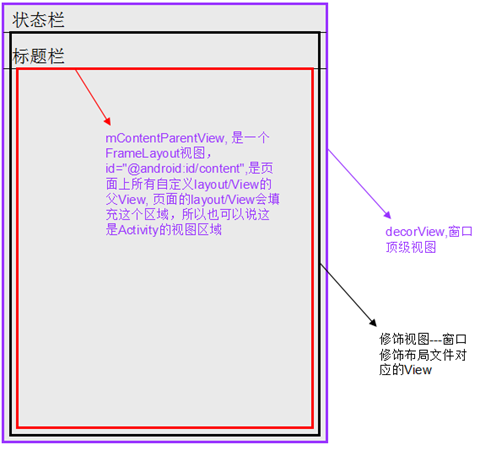
开发中,通常都是在onCreate()中调用setContentView(R.layout.custom_layout)来实现想要的页面布局。页面都是依附在窗口之上的,而DecorView即是窗口最顶层的视图。Android frameworks中,与窗口视图处理相关的类,主要是Window及其实现类PhoneWindow
public class PhoneWindow extends Window implements MenuBuilder.Callback {

  //...

  //窗口顶层View
   private DecorView mDecor;

  //所有自定义View的根View, id="@android:id/content"
   private ViewGroup mContentParent;

  //...

}
DecorView其实是PhoneWindow中的一个内部类,本质上也是一个View,其只是扩展了FrameLayout的实现
private final class DecorView extends FrameLayout implements RootViewSurfaceTaker
添加至窗口流程
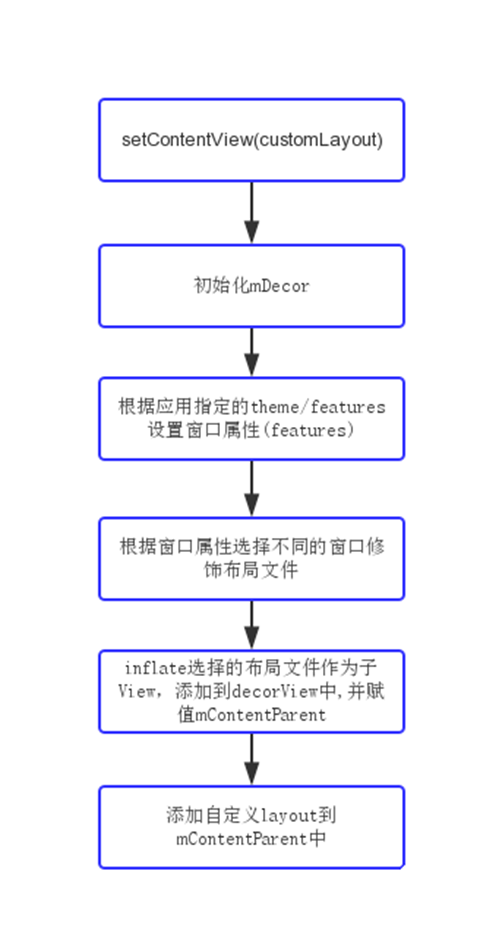
- Activity中调用setContentView(R.layout.custom_layout), 具体实现为PhoneWindow中的同名方法
public void setContentView(int layoutResID) {

  //getWindow()获取的即是PhoneWindow对象
  getWindow().setContentView(layoutResID);
 }
看一下window类
public abstract class Window {
    //...
    //指定Activity窗口的风格类型
    public static final int FEATURE_NO_TITLE = 1;
    public static final int FEATURE_INDETERMINATE_PROGRESS = 5;

    //设置布局文件
    public abstract void setContentView(int layoutResID);

    public abstract void setContentView(View view);

    //请求指定Activity窗口的风格类型
    public boolean requestFeature(int featureId) {
        final int flag = 1<<featureId;
        mFeatures |= flag;
        mLocalFeatures |= mContainer != null ? (flag&~mContainer.mFeatures) : flag;
        return (mFeatures&flag) != 0;
    }
    //...
}
- PhoneWindow执行setContentView(int layoutResource)
PhoneWindow该类继承于Window类,是Window类的具体实现,即我们可以通过该类具体去绘制窗口。并且,该类内部包含了一个DecorView对象,该DectorView对象是所有应用窗口(Activity界面)的根View。 简而言之,PhoneWindow类是把一个FrameLayout类即DecorView对象进行一定的包装,将它作为应用窗口的根View,并提供一组通用的窗口操作接口。
public void setContentView(int layoutResID) {
  //初始,mContentParent为空
  if (mContentParent == null) {
    installDecor();
  } else {
    mContentParent.removeAllViews();
  }
  //inflate自定义layout, 并将mContentParent作为其根视图
  mLayoutInflater.inflate(layoutResID, mContentParent);

  //...
}
该方法根据首先判断是否已经由setContentView()了获取mContentParent即View对象, 即是否是第一次调用该PhoneWindow对象setContentView()方法。如果是第一次调用,则调用installDecor()方法,否则,移除该mContentParent内所有的所有子View。最后将我们的资源文件通过LayoutInflater对象转换为View树,并且添加至mContentParent视图中(在应用程序里,我们可以多次调用setContentView()来显示我们的界面。)。
- PhoneWindow.installDecor()
private void installDecor() {
   if (mDecor == null) {
     //new一个DecorView
     mDecor = generateDecor();
     mDecor.setDescendantFocusability(ViewGroup.FOCUS_AFTER_DESCENDANTS);
     mDecor.setIsRootNamespace(true);
     if (!mInvalidatePanelMenuPosted && mInvalidatePanelMenuFeatures != 0) {
       mDecor.postOnAnimation(mInvalidatePanelMenuRunnable);
     }
   }
   if (mContentParent == null) {
     //这一步会设置窗口的修饰文件,并将id为ID_ANDROID_CONTENT的view find出来作为返回值赋值给mContentParent
     mContentParent = generateLayout(mDecor);

        //...
}
- PhoneWindow.generateLayout(DecorView decor)
protected ViewGroup generateLayout(DecorView decor) {
  //1,获取<Application android:theme=""/>, <Activity/>节点指定的themes或者代码requestWindowFeature()中指定的Features, 并设置
  TypedArray a = getWindowStyle();
  //...

  //2,获取窗口Features, 设置相应的修饰布局文件,这些xml文件位于frameworks/base/core/res/res/layout下
  int layoutResource;
  int features = getLocalFeatures();
  if ((features & ((1 << FEATURE_LEFT_ICON) | (1 << FEATURE_RIGHT_ICON))) != 0) {
    if (mIsFloating) {
      TypedValue res = new TypedValue();
      getContext().getTheme().resolveAttribute(com.android.internal.R.attr.dialogTitleIconsDecorLayout, res, true);
      layoutResource = res.resourceId;
    } else {
      layoutResource = com.android.internal.R.layout.screen_title_icons;
  }
  removeFeature(FEATURE_ACTION_BAR);
  } else if ((features & ((1 << FEATURE_PROGRESS) | (1 << FEATURE_INDETERMINATE_PROGRESS))) != 0 && (features & (1 << FEATURE_ACTION_BAR)) == 0) {
  layoutResource = com.android.internal.R.layout.screen_progress;
  //...

  mDecor.startChanging();
  //3, 将上面选定的布局文件inflate为View树,添加到decorView中
  View in = mLayoutInflater.inflate(layoutResource, null);
  decor.addView(in, new ViewGroup.LayoutParams(MATCH_PARENT, MATCH_PARENT));
  //将窗口修饰布局文件中id="@android:id/content"的View赋值给mContentParent, 后续自定义的view/layout都将是其子View
  ViewGroup contentParent = (ViewGroup)findViewById(ID_ANDROID_CONTENT);
  if (contentParent == null) {
    throw new RuntimeException("Window couldn't find content container view");
  }
  //...
}
该方法会做如下事情:
根据窗口的风格修饰类型为该窗口选择不同的窗口布局文件(根视图)。这些窗口修饰布局文件指定一个用来存放Activity自定义布局文件的ViewGroup视图,一般为FrameLayout 其id 为: android:id="@android:id/content"。
例如窗口修饰类型包括FullScreen(全屏)、NoTitleBar(不含标题栏)等。选定窗口修饰类型有两种:
①指定requestFeature()指定窗口修饰符,PhoneWindow对象调用getLocalFeature()方法获取值;
②为我们的Activity配置相应属性,即android:theme=“”,PhoneWindow对象调用getWindowStyle()方法获取值。
举例如下,隐藏标题栏有如下方法:
requestWindowFeature(Window.FEATURE_NO_TITLE);
或者为Activity配置xml属性:
android:theme="@android:style/Theme.NoTitleBar"
因此,在Activity中必须在setContentView之前调用requestFeature()方法。
确定好窗口风格之后,选定该风格对应的布局文件,这些布局文件位于 frameworks/base/core/res/layout/ ,
典型的窗口布局文件有:
R.layout.dialog_titile_icons                          R.layout.screen_title_icons

R.layout.screen_progress                             R.layout.dialog_custom_title

R.layout.dialog_title

R.layout.screen_title         // 最常用的Activity窗口修饰布局文件

R.layout.screen_simple    //全屏的Activity窗口布局文件
- 最后页面中设置的自定义layout会被添加到mContentParent中
mLayoutInflater.inflate(layoutResID, mContentParent);
整个过程主要是如何把Activity的布局文件添加至窗口里,上面的过程可以概括为:
- 创建一个DecorView对象,该对象将作为整个应用窗口的根视图
- 创建不同的窗口修饰布局文件,并且获取Activity的布局文件该存放的地方,由该窗口修饰布局文件内id为content的FrameLayout指定 。
- 将Activity的布局文件添加至id为content的FrameLayout内。
最后,当AMS(ActivityManagerService)准备resume一个Activity时,会回调该Activity的handleResumeActivity()方法,该方法会调用Activity的makeVisible方法 ,显示我们刚才创建的mDecor 视图族。
//系统resume一个Activity时,调用此方法
final void handleResumeActivity(IBinder token, boolean clearHide, boolean isForward) {
    ActivityRecord r = performResumeActivity(token, clearHide);
    //...
     if (r.activity.mVisibleFromClient) {
         r.activity.makeVisible();
     }
}
void makeVisible() {
    if (!mWindowAdded) {
        ViewManager wm = getWindowManager();   // 获取WindowManager对象
        wm.addView(mDecor, getWindow().getAttributes());
        mWindowAdded = true;
    }
    mDecor.setVisibility(View.VISIBLE); //使其处于显示状况
}
布局层次结构
干货
@Override
protected void onCreate(Bundle savedInstanceState) {
  //设置窗口无标题栏
  requestWindowFeature(Window.FEATURE_NO_TITLE);
  super.onCreate(savedInstanceState);
  setContentView(R.layout.activity_decor);
}
activity_decor.xml:
<RelativeLayout xmlns:android="http://schemas.android.com/apk/res/android"
    xmlns:tools="http://schemas.android.com/tools"
    android:layout_width="match_parent"
    android:layout_height="match_parent"
    android:paddingLeft="@dimen/activity_horizontal_margin"
    android:paddingRight="@dimen/activity_horizontal_margin"
    android:paddingTop="@dimen/activity_vertical_margin"
    android:paddingBottom="@dimen/activity_vertical_margin"
    tools:context=".DecorActivity">

    <TextView
        android:text="@string/hello_world"
        android:layout_width="wrap_content"
        android:layout_height="wrap_content" />

    <TextView
        android:text="@string/hello_world"
        android:layout_width="wrap_content"
        android:layout_height="wrap_content"
        android:layout_alignParentBottom="true"/>

</RelativeLayout>
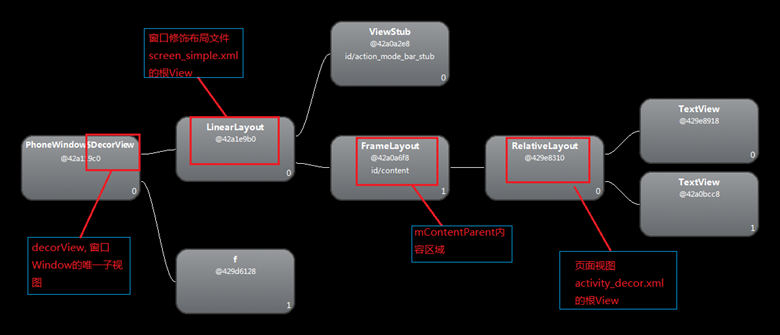
onCreate()中设置的Window.FEATURE_NO_TITLE对应的窗口修饰布局文件为screen_simple.xml, 源码如下
<LinearLayout xmlns:android="http://schemas.android.com/apk/res/android"
    android:layout_width="match_parent"
    android:layout_height="match_parent"
    android:fitsSystemWindows="true"
    android:orientation="vertical">
    <ViewStub android:id="@+id/action_mode_bar_stub"
              android:inflatedId="@+id/action_mode_bar"
              android:layout="@layout/action_mode_bar"
              android:layout_width="match_parent"
              android:layout_height="wrap_content" />
    <FrameLayout
         android:id="@android:id/content"
         android:layout_width="match_parent"
         android:layout_height="match_parent"
         android:foregroundInsidePadding="false"
         android:foregroundGravity="fill_horizontal|top"
         android:foreground="?android:attr/windowContentOverlay" />
</LinearLayout>
源码中id为"@android:id/content"的FrameLayout就是内容区域,在整个流程中,其会赋值给PhoneWindow类中的属性mContentParent, 运行应用后,使用SDK提供的hierarchyviewer工具查看页面的ViewTree结构,可以看到结构如下:
我是天王盖地虎的分割线
参考:http://www.cnblogs.com/yogin/p/4061050.html


