CentOS6开机启动流程
1.加电自检(BIOS检测硬件)
2.MBR引导
3.GRUB菜单(选择系统)
4.进入系统(运行init)
- 找/etc/inittab
- id:3:initdefault
- 找到/etc/rc3.d/S*
5.建立终端
6.用户登录系统
CentOS6忘记root密码,进入单用户模式
1.进入grub菜单,按'e'进入编辑内核
2.选择内核
3.进入单用户模式
4.按b开机
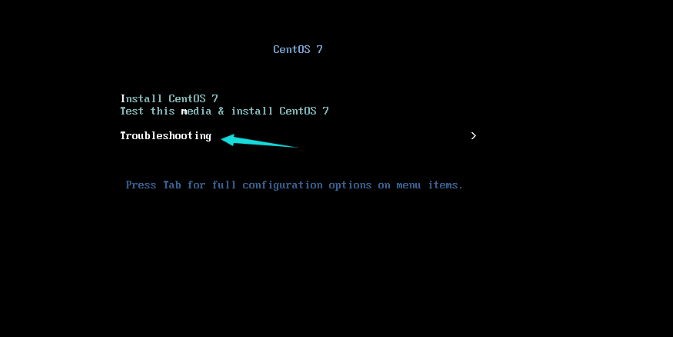
CentOS7开机启动流程
1.加电自检(BIOS检测硬件)
2.MBR引导
3.GRUB2菜单(选择系统)
4.进入系统(运行systemd)
- 找/etc/systemd/system/default.target
- /usr/lib/systemd/system/multi-user.target
- 找到/etc/systemd/system/multi-user.target.wants
# 查看默认运行级别
systemctl get-default

# 设置默认运行级别
systemctl set-default multi-user.target
rm -f /etc/systemd/system/default.target
ln -s /usr/lib/systemd/system/multi-user.target /etc/systemd/system/default.target

# 设置开机自启动
systemctl enable nginx
ln -s /usr/lib/systemd/system/nginx.service /etc/systemd/system/multi-user.target.wants/nginx.service
5.建立终端
6.用户登录系统
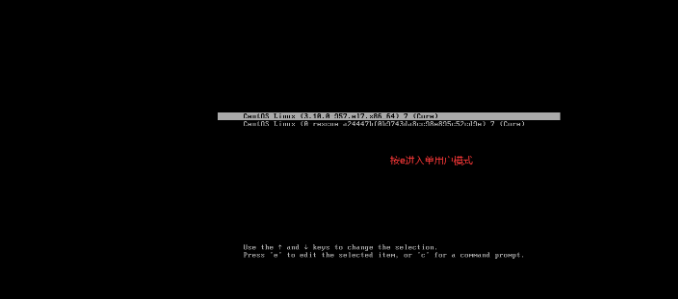
CentOS7忘记root密码,进入单用户模式
1.重启系统
2.在grub菜单界面,按'e'进入单用户模式
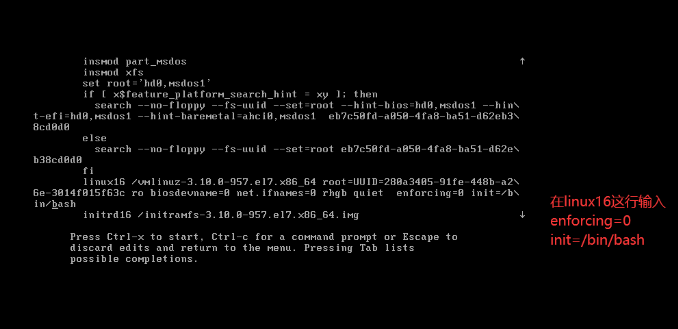
3.方法一:**
在linux16内容的行末写enforcing=0 init=/bin/bash按Ctrl + x开机
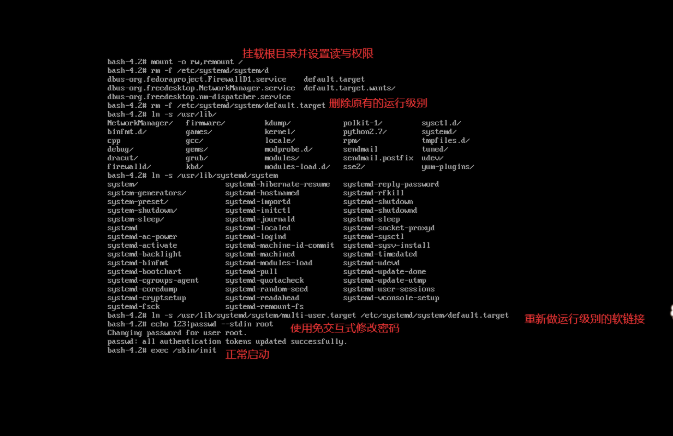
4.重新挂载 /目录,权限设置为可读可写(rw)
mount -o rw,remount /
5.修改root密码
echo 1|passwd --stdin root
6.重新加载init
exec /sbin/init
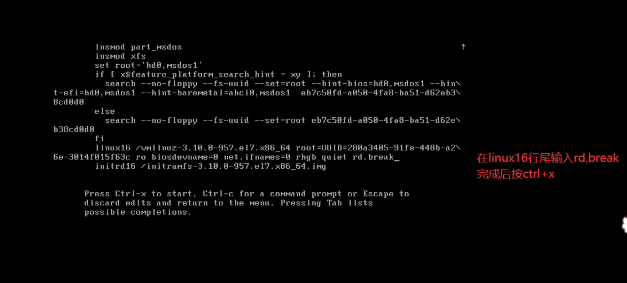
3.方法二:
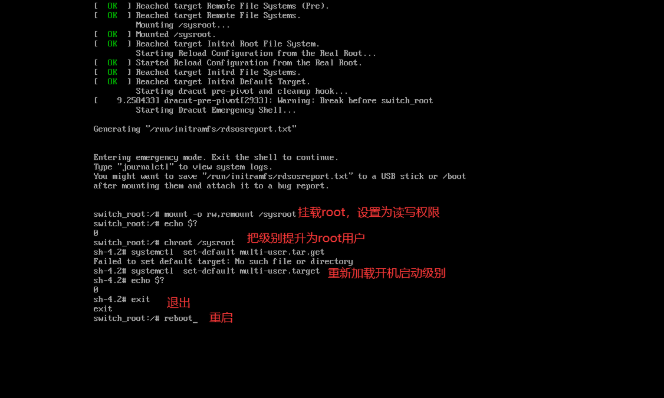
在linux16内容的行末写rd.break按Ctrl + x开机
4.重新挂载sysroot目录设置可读可写权限(rw)
mount -o rw,remount /sysroot
5.获取root权限
chroot /sysroot
6.设置root密码
echo 123|passwd --stdin root
7.退出sh-4.2
exit
8.重启服务器
reboot
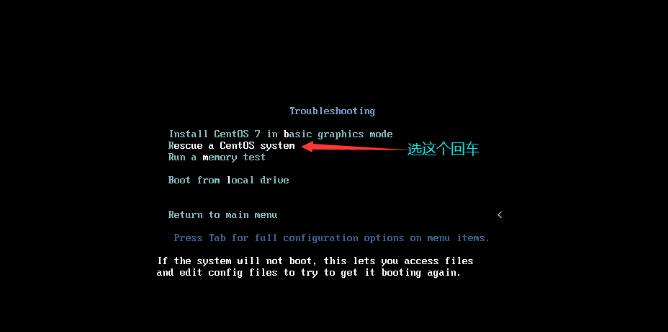
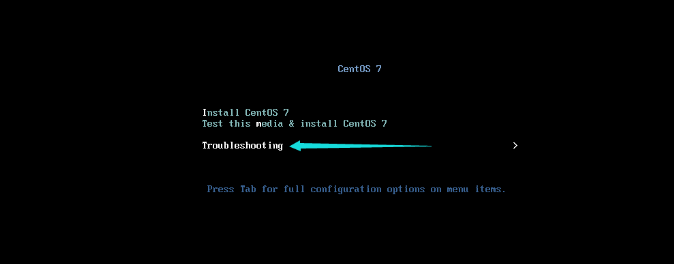
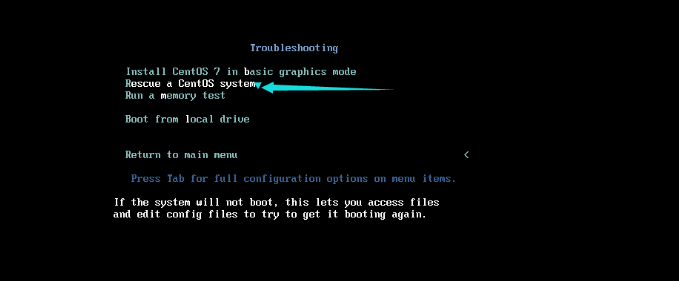
救援模式
0.将光驱中放入镜像,然后连接
1.打开电源进入BIOS
2选择boot界面,将CD-ROM放在第一行
3.按F10保存退出
4.选择yes
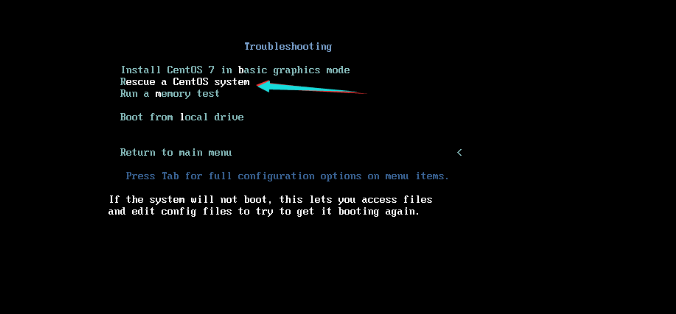
5.进入救援模式
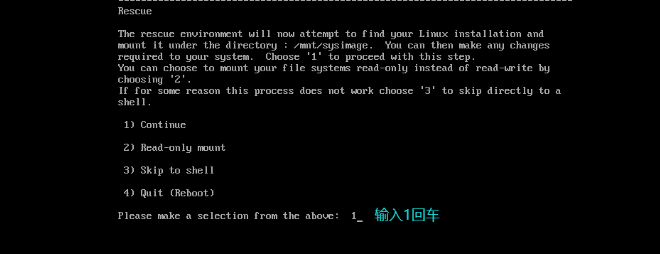
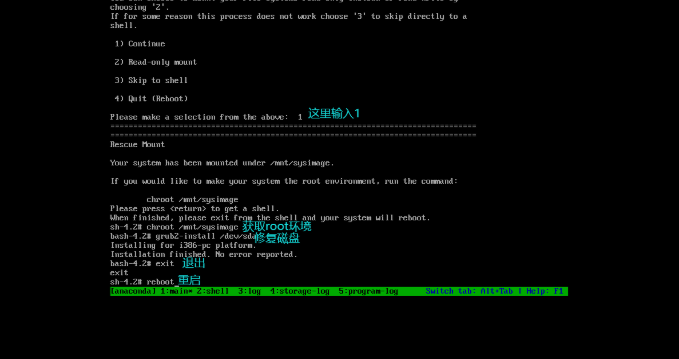
6.进入救援模式之后,选择继续
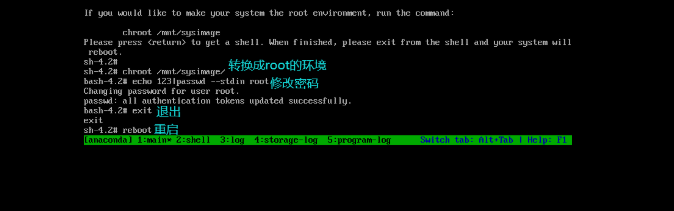
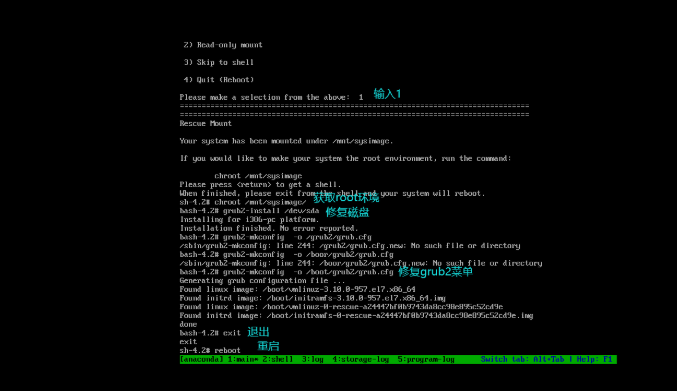
7.获取root的环境变量
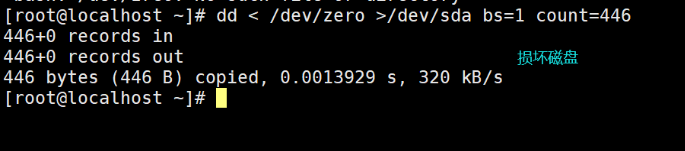
场景二:损坏MBR,进入救援模式解决
# 损坏MBR
[root@qls ~]# dd < /dev/zero >/dev/sda bs=1 count=446

sh-4.2# chroot /mnt/sysimage
bash-4.2# grub2-install /dev/sda
bash-4.2# exit
sh-4.2# reboot
**场景3:**误删除GRUB菜单,进入救援模式
[root@qls ~]# rm -fr /boot/grub2/
[root@qls ~]# reboot
`
sh-4.2# chroot /mnt/sysimage
bash-4.2# grub2-install /dev/sda
bash-4.2# grub2-mkconfig -o /boot/grub2/grub.cfg
bash-4.2# exit
sh-4.2# reboot
systemd进程管理
systemd优势
1.最新系统都采用systemd管理(RedHat7,CentOS7,Ubuntu15...)
2.CentOS7 支持开机并行启动服务,显著提高开机启动效率
3.CentOS7关机只关闭正在运行的服务,而CentOS6,全部都关闭一次。
4.CentOS7服务的启动与停止不在使用脚本进行管理,也就是/etc/init.d下不在有脚本。
5.CentOS7使用systemd解决原有模式缺陷,比如原有service不会关闭程序产生的子进程。
systemd 相关文件
| 相关文件 | CentOS6 | CentOS7 |
|---|---|---|
| 服务启动脚本存放路径 | /etc/init.d | /usr/lib/systemd/system |
| 开机自启服务存放路径 | /etc/rcN.d | /etc/systemd/system/N.target.wants |
| 默认运行级别 | /etc/inittab | /etc/systemd/system/default.target |
systemd启动相关命令
| system V init CentOS6 | systemd CentOS7 | 作用 |
|---|---|---|
| /etc/init.d/nginx start | systemctl start nginx | 启动nginx服务 |
| /etc/init.d/nginx stop | systemctl stop nginx | 停止nginx服务 |
| /etc/init.d/nginx status | systemctl status nginx | 查看服务的启动状态 |
| /etc/init.d/nginx restart | systemctl restart nginx | 重启服务 |
| /etc/init.d/nginx reload | systemctl reload nginx | 不停止服务,重新加载nginx配置文件 |
| systemctl is-active nginx | 判断nginx服务是否存活 | |
| systemctl mask nginx | 禁止服务运行 | |
| systemctl unmask nginx | 取消禁止 |
systemd开机自启动相关命令
| C6 | C7 | 作用 |
|---|---|---|
| chkconfig --list | systemctl list-unit-files | 查看开机自启的服务 |
| chkconfig nginx on | systemctl enable nginx | 加入开机自启动 |
| chkconfig nginx off | systemctl disable nginx | 关闭开机自启动 |
| chkconfig --list nginx | systemctl is-enabled nginx | 查看指定服务是否被开机自启 |
| chkconfig --add nginx | systemctl daemon-reload | 当我们手写脚本时让系统认识 |
systemd服务状态
| 服务状态 | 状态说明 |
|---|---|
| loaded | 服务单元的配置文件已经被处理 |
| active(running) | 服务的一个或多个进程在运行中 |
| active(exited) | 一次性运行的服务成功被执行并退出(服务运行后完成任务,相关进程会自动退出) |
| active(waiting) | 服务已经运行但在等待某个事件 |
| inactive | 服务没有在运行 |
| enable | 服务设定为开机运行 |
| disabled | 服务设定为开机不运行 |
| static | 服务不能被设定开机启动,但可以由其他服务启动该服务 |
Linux9期基础-day32
开机启动流程
C6
# 1.加电自检(BIOS)
# 2.MBR引导 (512k)  dd </dev/zero >/dev/sda bs=1k count=400
# 3.GRUB菜单(选择系统)
# 4.运行init
	- 检查/etc/inittab (id:3:initdefault)
	- 找到/etc/rc3.d/目录下,所有以S开头的服务,并启动
# 5.建立终端
# 6.用户登录


## 运行级别:
	- 0:关机
	- 1:单用户模式
	- 2:多用户模式(没有文件系统,没有网络)
	- 3:多用户模式(命令行)
	- 4:没有被使用
	- 5:图形化界面
	- 6:重启
C7
# 1.加电自检(BIOS)
# 2.MBR引导 (512k)  dd </dev/zero >/dev/sda bs=1k count=400
# 3.GRUB2菜单(选择系统)
# 4.运行systemd
	- 检查/etc/systemd/system/default.target -> /usr/lib/systemd/system/multi-user.target
	- 找到/etc/systemd/system/multi-user.target.wants/所有服务,并启动
# 5.建立终端
# 6.用户登录

## 运行级别:
	- 0:关机								poweroff.target
	- 1:单用户模式						  rescue.target
	- 2:多用户模式(没有文件系统,没有网络)	  multi-user.target
	- 3:多用户模式(命令行)                   multi-user.target
	- 4:没有被使用                            multi-user.target
	- 5:图形化界面                            graphical.target
	- 6:重启								 reboot.target
企业案例一:忘记root密码
# 使用init /bin/bash
# 使用 rd.break
# 救援模式
然后按下Ctrl+x
第二种方法

企业案例二:修改了默认的运行级别为poweroff或者reboot
# 使用init /bin/bash(只能使用ln -s)
# 使用 rd.break(systemd)
# 救援模式


企业案例三:误损坏MBR
# 救援模式
企业案例四:误删除GRUB菜单
# 救援模式

定时任务
## 定时任务,服务启动和停止
# C6:
/etc/init.d/crond start
/etc/init.d/crond stop

# C7
systemctl start crond
systemctl stop crond
定时任务配置文件
FBI WARNING:PATH 出现的目录,下面可执行文件,都可以不加路径直接执行。
[root@qls ~]# vi /etc/crontab

# 定时任务的shell
SHELL=/bin/bash
# 环境变量
PATH=/sbin:/bin:/usr/sbin:/usr/bin

# 如果定时任务执行报错,会给root用户发邮件
MAILTO=root
写定时任务的潜规则:
- 1.所有命令是用绝对路径
- 2.复杂命令或者多个命令,尽量写到脚本中执行
- 3.定时任务中,所有的输出内容全部放到/dev/null
- 4.给定时任务注释
定时任务语法
# For details see man 4 crontabs

# Example of job definition:
# .---------------- minute (0 - 59)
# |  .------------- hour (0 - 23)
# |  |  .---------- day of month (1 - 31)
# |  |  |  .------- month (1 - 12) OR jan,feb,mar,apr ...
# |  |  |  |  .---- day of week (0 - 6) (Sunday=0 or 7) OR sun,mon,tue,wed,thu,fri,sat
# |  |  |  |  |
# *  *  *  *  * user-name  command to be executed


分	     时        日         月        周
* 	      * 	    *         *         *            					 ls
0-59     0-23      1-31      1-12       0-6(1-7) 周日:0或7				 command


# 每天凌晨两点执行 ls 命令
00 02 * * * /bin/ls

# 每个月的1号凌晨2点执行ls命令
00 12 1 * * /bin/ls

# 每月1号和15号12点都行一次ls命令
00 12 1,15 * * /bin/ls

# 每月1号到15号12点都行一次ls命令
00 12 1-15 * * /bin/ls

# 每年的2月14号的凌晨2点,执行ls命令
00 02 14 2 * /bin/ls

# 每周日的凌晨两点执行ls命令
00 02 * * 7 /bin/ls

# 每年6月份的所有周五凌晨2点执行ls命令
00 02 * 6 5 /bin/ls

# 每个月的14号刚好是周日,那么就在凌晨2点执行ls命令
00 02 14 * 7 /bin/ls

# 哪一年2月14日刚好是周日,那么在凌晨2点执行ls命令
00 02 14 2 7 /bin/ls

# 每天的凌晨2点钟,每十分钟执行一次ls
*/10  02 * * * /bin/ls

# 每分钟执行一次 ls
* * * * *  /bin/ls

# 每分钟执行一次 ls
*/1 * * * *  /bin/ls

# 每年的2月14日00点执行ls命令
00 00 14 2 *  /bin/ls

# 每5分钟执行一次ls命令
*/5 * * * *  /bin/ls

# 每年的1月和5月和8月的每天晚上凌晨2点执行ls命令
00 02 * 1,5,8 * /bin/ls
1月1日,2
1月2日,2
...
1月31日,2
5月1日,2
...
5月31日,2
8月1日,2
...
8月31,2

# 每年的1月到7月和9月到12月的每天凌晨2点执行ls命令
00 02 * 1-7,9-12 * /bin/ls
1月1 - 31日,2
2月1 - 28,2
3月1 - 31日,2
4月1 - 30日,2
5月1 - 31日,2
6月1 - 31日,2
7月1 - 31日,2
9月1 - 31日,2
10月1 - 30日,2
11月1 - 30日,2
12月1 - 31日,2

# 每个月的1号到8号的凌晨2点执行
00 02 1-8 * *  /bin/ls
1月1 - 8日,2
2月1 - 8日,2
3月1 - 8日,2
4月1 - 8日,2
5月1 - 8日,2
6月1 - 8日,2
7月1 - 8日,2
8月1 - 8日,2
9月1 - 8日,2
10月1 - 8日,2
11月1 - 8日,2
12月1 - 8日,2


# 每天晚上21点整,执行ls命令
0 21 * * * /bin/ls

# 每个月的1号和10号和22号的凌晨4点45分执行ls命令
45 4 1,10,22 * * /bin/ls

# 每个月的1号到10的凌晨4点45分执行ls命令
45 4 1-10 * * /bin/ls

# 每个月的每2天的8点到11点的3分和15分执行ls命令
3,15 8-11 */2 * * /bin/ls
保存时间:2020年4月26日 11点35分

4月28号,8点03分 和 8点15分,9点03分 和9点15分 , 10点03分和10点15分,11点03分和11点15分执行ls命令
4月30号
5月1号
5月3号

# 每天的00点-7点的每个小时和23点-00点的每个小时都执行ls命令
0 23-7/1 * * * /bin/ls

# 每周一到周五的晚上21点15分执行ls命令
15 21 * * 1-5 /bin/ls
crontab命令
| 选项 | 作用 |
|---|---|
| -e | edit 编辑定时任务 |
| -l | list 查看定时任务 |
| -r | remove 删除当前用户的定时任务 |
| -u | 指定用户 |
crontab -e
vim /var/spool/cron/$USER

crontab -l

crontab -l -u zls

crontab -r

# 删除指定用户的定时任务
[root@qls ~]# crontab -r -u zls

# 第一个定时任务
crontab -e
# 每五分钟跟阿里云同步一次系统时间 日期:xxx 谁:xxx
*/5 * * * * /usr/sbin/ntpdate time1.aliyun.com &>/dev/null
定时任务调试
1.crond调试
- 调整任务每分钟执行的频率, 以便做后续的调试。
- 如果使用cron运行脚本,请将脚本执行的结果写入指定日志文件, 观察日志内容是否正常。
- 命令使用绝对路径, 防止无法找到命令导致定时任务执行产生故障。
- 通过查看/var/log/cron日志,以便检查我们执行的结果,方便进行调试*
发情书给小姐姐
# 1.配置服务器发邮件(安装发邮件服务)
[root@qls ~]# yum install -y mailx
# 2.修改mail的配置文件
[root@qls ~]# vim /etc/mail.rc
#发件人
set from=253097001@qq.com
#邮件服务器
set smtp=smtp.qq.com
#发件人用户名
set smtp-auth-user=253097001@qq.com
#发件人密码(QQ邮箱不可以使用密码,只能使用授权码)
set smtp-auth-password=xxxx
#登录方式
set smtp-auth=login
#邮件服务器协议及端口
set smtp=smtps://smtp.qq.com:465
#忽略证书
set ssl-verify=ignore
#指定证书位置
set nss-config-dir=/root/.certs

############################# 手动创建证书目录
mkdir -p /root/.certs

## 进入证书目录
cd /root/.certs

## 获取腾讯证书
echo -n | openssl s_client -connect smtp.qq.com:465 | sed -ne '/-BEGIN CERTIFICATE-/,/-END CERTIFICATE-/p' > ~/.certs/qq.crt
certutil -A -n "GeoTrust SSL CA" -t "C,,"  -d  ~/.certs  -i  ~/.certs/qq.crt
certutil -A -n "GeoTrust Global CA" -t "C,,"  -d  ~/.certs  -i  ~/.certs/qq.crt
certutil -L -d /root/.certs
certutil -A -n "GeoTrust SSL CA - G3" -t "Pu,Pu,Pu" -d ~/.certs -i ~/.certs/qq.crt


情书脚本

#!/bin/bash
lb_dir='/root/qingshu'
lb_name=`ls -1 $lb_dir|head -1`
cat $lb_dir/$lb_name | mail -s '致亲爱的小姐姐' 133411023qq.com
mv $lb_dir/$lb_name /tmp


vim /root/qingshu/aaaa
vim /root/qingshu/aaa
vim /root/qingshu/aa
vim /root/qingshu/a
vim /root/qingshu/bbb
vim /root/qingshu/accc


crontab -e
# 每天5:20发情书给小姐姐
* * * * * /bin/sh /root/send_lovebook.sh &>/dev/null