复习:
事件绑定的三种方式:


事件:
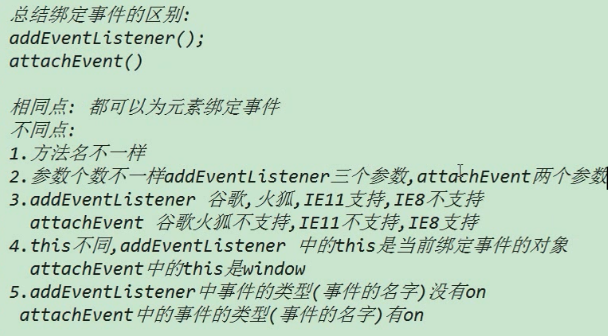
绑定事件的区别:
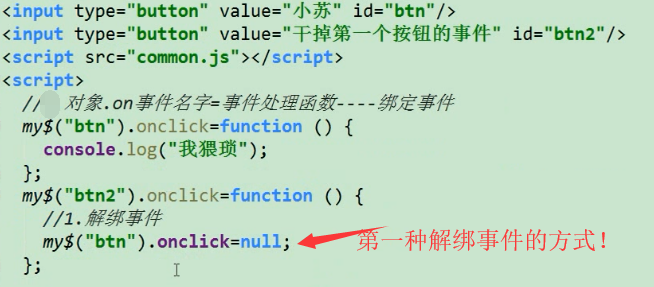
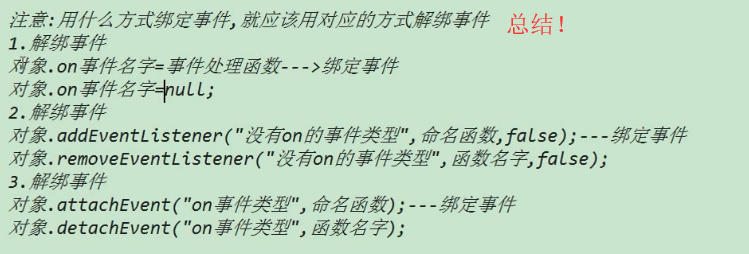
为元素解绑事件:
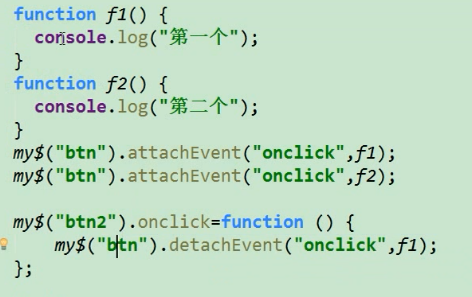
第一种解绑的方式:

第二种解绑的方式:

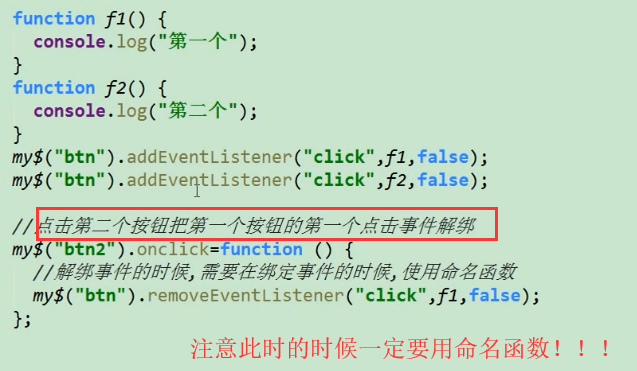
第三种解绑的方式:

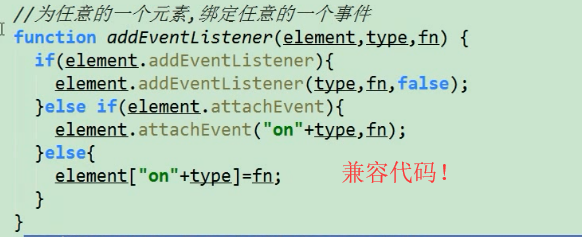
绑定事件和 解绑事件的兼容代码:
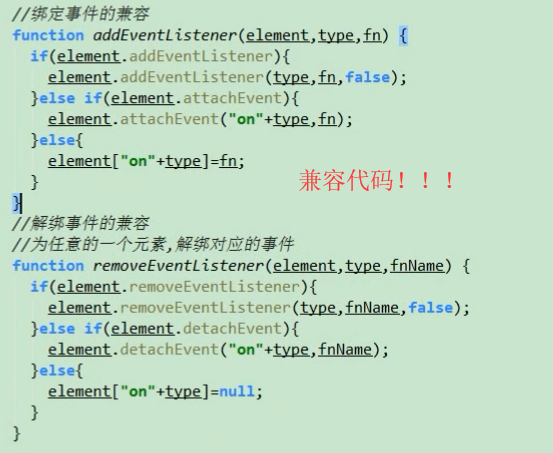


 1 //绑定事件 和 取消绑定的 兼容代码:
 2 function addEventListener(ele, type, fn) {
 3     if(ele.addEventListener){
 4         ele.addEventListener(type,fn,false);
 5     }else if(ele.attachEvent){
 6         ele.attachEvent("on"+type,fn);
 7     }else{
 8         ele["on"+type] = fn;
 9     }
10 }
11
12 function removeEventListener(ele, type, fn) {
13     if(ele.removeEventListener){
14         ele.removeEventListener(type,fn,false);
15     }else if(ele.detachEvent){
16         ele.detachEvent("on"+type,fn);
17     }else{
18         ele["on"+type] =null;
19     }
20 }
到目前为止,common.js 的代码如下:
 1 /**
 2  * 根据id 或者根据tagName 返回相应的元素
 3  * */
 4 function getId$(id){
 5    return document.getElementById(id);
 6 }
 7 function getTags$(tagName) {
 8     return document.getElementsByTagName(tagName)
 9 }
10
11 //绑定事件 和 取消绑定的 兼容代码:
12 function addEventListener(ele, type, fn) {
13     if(ele.addEventListener){
14         ele.addEventListener(type,fn,false);
15     }else if(ele.attachEvent){
16         ele.attachEvent("on"+type,fn);
17     }else{
18         ele["on"+type] = fn;
19     }
20 }
21
22 function removeEventListener(ele, type, fn) {
23     if(ele.removeEventListener){
24         ele.removeEventListener(type,fn,false);
25     }else if(ele.detachEvent){
26         ele.detachEvent("on"+type,fn);
27     }else{
28         ele["on"+type] =null;
29     }
30 }
事件冒泡:

 1 <!DOCTYPE>
 2 <html lang="en">
 3     <head>
 4         <meta charset="UTF-8">
 5         <title>这是网页标题</title>
 6         <style>
 7             #dv1{
 8                 width: 300px;
 9                 height: 300px;
10                 background-color: cyan;
11             }
12             #dv2{
13                 width: 200px;
14                 height: 200px;
15                 background-color: red;
16             }
17             #dv3{
18                 width: 100px;
19                 height: 100px;
20                 background-color: green;
21             }
22         </style>
23     </head>
24     <body>
25         <div id="dv1">
26             <div id="dv2">
27                 <div id="dv3"></div>
28             </div>
29         </div>
30         <script src="js/common.js"></script>
31         <script>
32             getId$("dv1").onclick = function () {
33                 console.log(this.id);
34             };
35             getId$("dv2").onclick = function () {
36                 console.log(this.id);
37             };
38             getId$("dv3").onclick = function () {
39                 console.log(this.id);
40             };
41         </script>
42     </body>
43 </html>
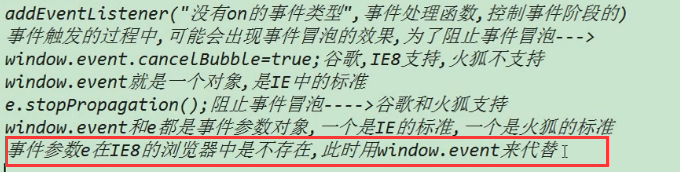
事件冒泡有很大的坏处,一般,我们都是组织事件冒泡的。
阻止事件冒泡:

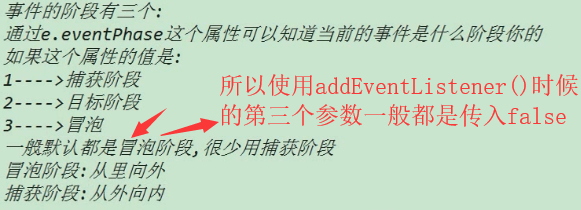
事件的阶段:
1,事件捕获阶段(1代表) :从外到里。
2,事件目标阶段(2代表)
3,事件冒泡阶段 (3代表):从里到外 。
 1 <!DOCTYPE>
 2 <html lang="en">
 3     <head>
 4         <meta charset="UTF-8">
 5         <title>这是网页标题</title>
 6         <style>
 7             #dv1{
 8                 width: 300px;
 9                 height: 300px;
10                 background-color: cyan;
11             }
12             #dv2{
13                 width: 200px;
14                 height: 200px;
15                 background-color: red;
16             }
17             #dv3{
18                 width: 100px;
19                 height: 100px;
20                 background-color: green;
21             }
22         </style>
23     </head>
24     <body>
25         <div id="dv1">
26             <div id="dv2">
27                 <div id="dv3"></div>
28             </div>
29         </div>
30         <script src="js/common.js"></script>
31         <script>
32             var objs = [getId$("dv1"),getId$("dv2"),getId$("dv3")];
33             // objs.forEach(function (ele,idx,arr) {
34             //     console.log("1 "+ele);
35             //     console.log("2 "+idx);
36             //     console.log("3 "+arr);
37             // })
38             objs.forEach(function (ele) {
39                 //为每个元素注册事件
40                 ele.addEventListener("click",function () {
41                     console.log(this.id);
42                 },false); //如果false 改为ture 就是事件的捕获阶段。
43             })
44         </script>
45     </body>
46 </html>
查看具体事件的阶段可以通过属性来查看,它在事件处理函数中的参数中 evt.eventPhase .
 1 <!DOCTYPE>
 2 <html lang="en">
 3     <head>
 4         <meta charset="UTF-8">
 5         <title>这是网页标题</title>
 6         <style>
 7             #dv1{
 8                 width: 300px;
 9                 height: 300px;
10                 background-color: cyan;
11             }
12             #dv2{
13                 width: 200px;
14                 height: 200px;
15                 background-color: red;
16             }
17             #dv3{
18                 width: 100px;
19                 height: 100px;
20                 background-color: green;
21             }
22         </style>
23     </head>
24     <body>
25         <div id="dv1">
26             <div id="dv2">
27                 <div id="dv3"></div>
28             </div>
29         </div>
30         <script src="js/common.js"></script>
31         <script>
32             var objs = [getId$("dv1"),getId$("dv2"),getId$("dv3")];
33             // objs.forEach(function (ele,idx,arr) {
34             //     console.log("1 "+ele);
35             //     console.log("2 "+idx);
36             //     console.log("3 "+arr);
37             // })
38             objs.forEach(function (ele) {
39                 //为每个元素注册事件
40                 ele.addEventListener("click",function (evt) {
41                     console.log(this.id);
42                     console.log("当前的事件阶段是 "+evt.eventPhase);
43                 },false); //如果false 改为ture 就是事件的捕获阶段。
44             })
45         </script>
46     </body>
47 </html>
注意: 事件的捕获阶段是不可能和冒泡阶段同时出现的。
要么是目标 -> 冒泡
要么是捕获 -> 目标

第三个参数如果是false 则是冒泡,如果是true 则是捕获阶段。
事件的总结:
为同一个元素注册多个不同的事件 并用同一个事件处理函数:
 1 <!DOCTYPE>
 2 <html lang="en">
 3     <head>
 4         <meta charset="UTF-8">
 5         <title>这是网页标题</title>
 6
 7     </head>
 8     <body>
 9         <input type="button" value="按钮" id="btn">
10
11         <script src="js/common.js"></script>
12         <script>
13             //为同一个元素绑定 多个不同的事件  ,并用同一个事件处理函数处理
14             getId$("btn").onclick = f1;
15             getId$("btn").onmouseenter = f1;
16             getId$("btn").onmouseleave = f1;
17             function f1(evt) {
18                 switch (evt.type) {
19                     case "click": alert("鼠标点击了"); break;
20                     case "mouseenter": this.style.backgroundColor="cyan"; break;
21                     case "mouseleave": this.style.backgroundColor =""; break;
22                 }
23             }
24         </script>
25     </body>
26 </html>
案例搜索引擎项目(提示功能实现):
 1 <!DOCTYPE>
 2 <html lang="en">
 3     <head>
 4         <meta charset="UTF-8">
 5         <title>这是网页标题</title>
 6     </head>
 7     <body>
 8         <div id="box">
 9             <input type="text" id="txt" value="">
10             <input type="button"  value="搜索" id="btn">
11         </div>
12         <script src="js/common.js"></script>
13         <script>
14             var keyWords = [
15                 "小杨是最纯洁的","小杨才是最帅的","小段是最猥琐的","小炒是最龌龊的","我是一个帅哥","我是一个大帅哥",
16                 "苹果好吃","苹果手机是个球","我爱中国","我是一个男生","我是个女生"
17             ];
18             //获取文本框 并 注册键盘抬起事件
19             getId$("txt").onkeyup = function () {
20                 //获取文本框输入的内容
21                 var text = this.value ;
22                 var tempArr = [];  //存放匹配上的内容 。
23                 for (var i =0 ;i<keyWords.length;i++){
24                     if(keyWords[i].indexOf(text) == 0){
25                         tempArr.push(keyWords[i]); //追加
26                     }
27                 }
28                 //如果文本框是空的或者临时数组是空的 ,此时如果还有dv这时要删除 它
29                 if(this.value.length == 0 || tempArr.length ==0){
30                     //如果此时有div 就要将它删除
31                     if(getId$("dv")){
32                         getId$("box").removeChild(getId$("dv"));
33                         //下面就不应该再往下执行了
34                         return ;
35                     }
36                 }
37                 //遍历临时数组,创建div 对象 ,并加入到box 中
38                 var dvObj = document.createElement("div");
39                 getId$("box").appendChild(dvObj);
40                 dvObj.id = "dv";
41                 dvObj.style.width= "300px";
42                 // dvObj.style.height = "100px"; //完全不需要
43                 dvObj.style.border = "1px solid cyan";
44
45                 //循环临时数组,创建对应的p标签
46                 for (var i = 0;i<tempArr.length;i++ ){
47                     var pObj = document.createElement("p");
48                     dvObj.appendChild(pObj);
49                     pObj.innerText = tempArr[i];
50                     pObj.style.margin = 0;
51                     pObj.style.padding = 0;
52                     pObj.style.cursor = "pointer";
53                     pObj.style.marginTop = "5px";
54                     pObj.style.marginLeft = "5px";
55                     //鼠标进入事件
56                     pObj.onmouseenter = function () {
57                         this.style.backgroundColor = "yellow";
58                     };
59                     //鼠标离开事件
60                     pObj.onmouseleave = function () {
61                         this.style.backgroundColor = "";
62                     };
63                 }
64
65                 console.log(tempArr);
66             };
67         </script>
68     </body>
69 </html>
注:里面存在很多bug 没有修改!!!
BOM:
BOM的介绍:

BOM中的顶级对象 window :

 1 <!DOCTYPE>
 2 <html lang="en">
 3     <head>
 4         <meta charset="UTF-8">
 5         <title>这是网页标题</title>
 6     </head>
 7     <body>
 8
 9         <script src="js/common.js"></script>
10         <script>
11             var num = 100;
12             // console.log(num);
13             //其实num 是属于window 的,即
14             console.log(window.num);  //这才是完整的调用。
15
16             //函数也是如此
17             function f() {
18                 console.log("hello world ");
19             }
20             // f();  //我们平时使用的调用
21             //真实的调用
22             window.f();
23
24         </script>
25     </body>
26 </html>
正是因为页面中的所有东西都是window 的,所以一般情况下,window 是可以省略的。

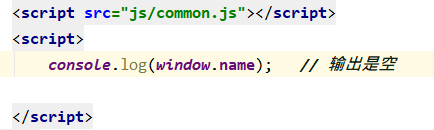

因此,我们在使用变量的时候尽量要避开name 这个命名,
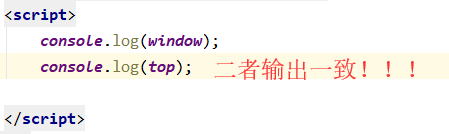
而且,window 还有个别名 是top 如下:
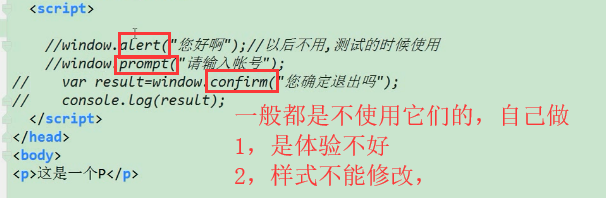
系统的对话框:
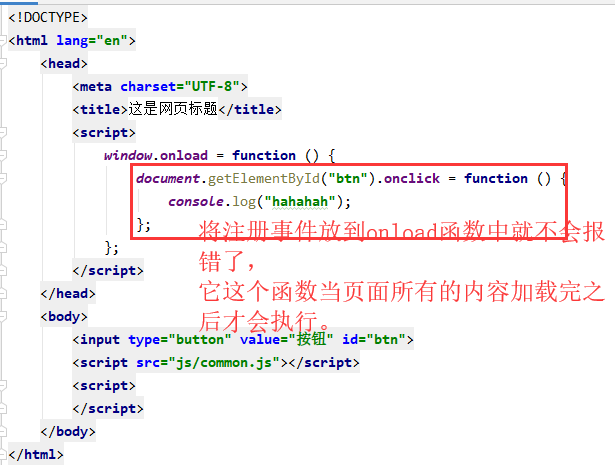
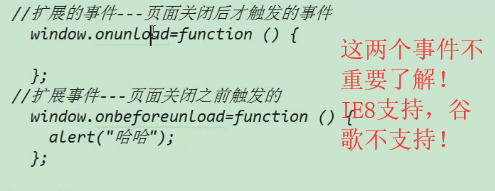
页面加载的事件:
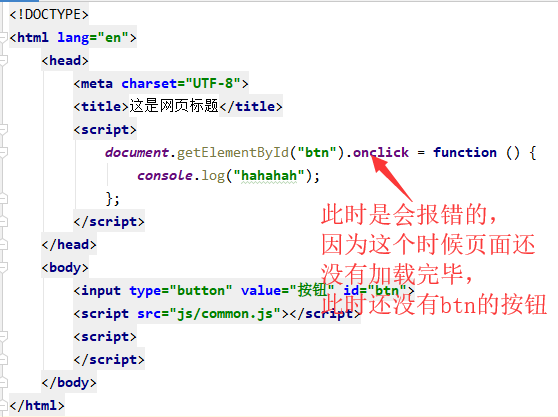
下面看onload() 函数 。
它是在当页面加载完毕之后才会执行的函数!!!
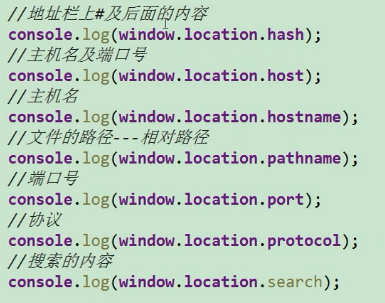
location 对象
location 对象就是地址栏对象。

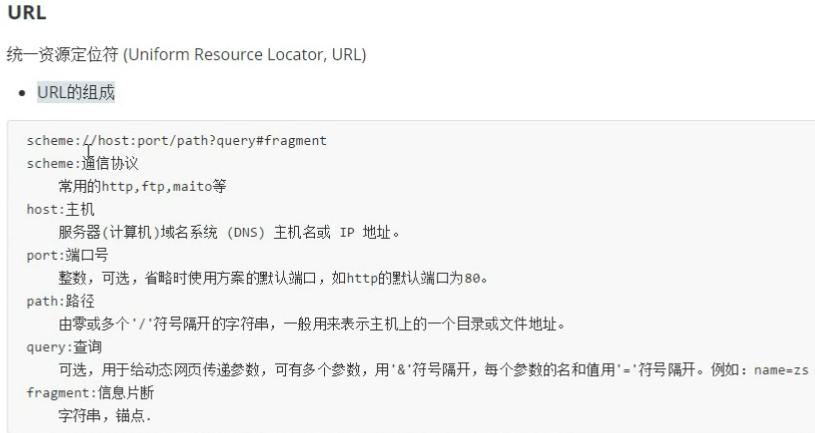
location 对象中的属性:
 1 <!DOCTYPE>
 2 <html lang="en">
 3     <head>
 4         <meta charset="UTF-8">
 5         <title>这是网页标题</title>
 6
 7     </head>
 8     <body>
 9         <input type="button" value="按钮" id="btn" />
10         <script src="js/common.js"></script>
11         <script>
12             onload  =function () {
13                 getId$("btn").onclick = function(){
14                     //设置跳转的页面的地址
15                     // 两种方式 (它们二者的功能一模一样!!!)
16                     //1,通过href 属性
17                     // location.href = "https://www.baidu.com";  //注:window 可以省略
18                     //2,通过 assign()方法
19                     location.assign("https://www.baidu.com");
20                 };
21             };
22         </script>
23     </body>
24 </html>
注:(跳转还可以再跳回来的。)
 1 <!DOCTYPE>
 2 <html lang="en">
 3     <head>
 4         <meta charset="UTF-8">
 5         <title>这是网页标题</title>
 6
 7     </head>
 8     <body>
 9         <input type="button" value="按钮" id="btn" />
10         <script src="js/common.js"></script>
11         <script>
12             onload  =function () {
13                 getId$("btn").onclick = function(){
14                     //重新加载
15                     location.reload();
16                 };
17             };
18         </script>
19     </body>
20 </html>
 1 <!DOCTYPE>
 2 <html lang="en">
 3     <head>
 4         <meta charset="UTF-8">
 5         <title>这是网页标题</title>
 6
 7     </head>
 8     <body>
 9         <input type="button" value="按钮" id="btn" />
10         <script src="js/common.js"></script>
11         <script>
12             onload  =function () {
13                 getId$("btn").onclick = function(){
14                     //页面替换 它和 href 和 assign() 的区别是它不能回退!
15                     location.replace("https://www.baidu.com");
16                 };
17             };
18         </script>
19     </body>
20 </html>
注:它和 href 和 assign() 的区别是它不能回退!
总结:这里面最重要 的就是 href ,它用来设置页面跳转!!!
history对象
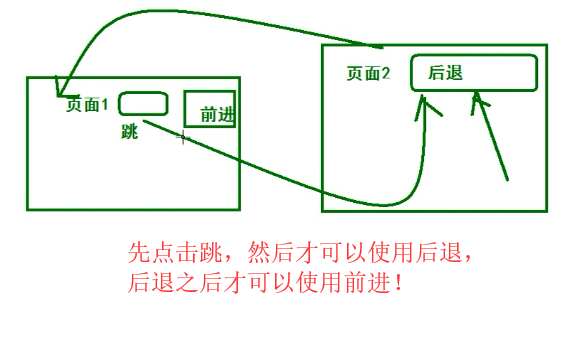
 1 <!DOCTYPE>
 2 <html lang="en">
 3     <head>
 4         <meta charset="UTF-8">
 5         <title>这是网页标题</title>
 6
 7     </head>
 8     <body>
 9         <input type="button" value="跳过去" id="btn1" />
10         <input type="button" value="前进" id="btn2" />
11         <script src="js/common.js"></script>
12         <script>
13             //跳
14             getId$("btn1").onclick = function () {
15                 window.location.href = "test02.html";
16             };
17             //前进
18             getId$("btn2").onclick = function () {
19                 window.history.forward();
20             };
21         </script>
22     </body>
23 </html>
 1 <!DOCTYPE html>
 2 <html lang="en">
 3 <head>
 4     <meta charset="UTF-8">
 5     <title>Title</title>
 6 </head>
 7 <body>
 8     <input type="button" value="后退" id="btn">
 9
10     <script src="js/common.js"></script>
11     <script>
12         getId$("btn").onclick = function () {
13             window.history.back();
14         };
15     </script>
16
17 </body>
18 </html>
而且除了 back() 和 forward() 之外 ,
还有go() 方法,正数表示前进,负数表示后退!
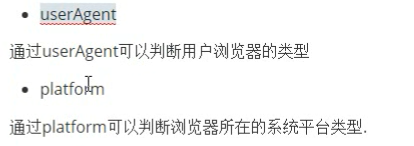
navigator 对象 :
定时器(计时器):

第一个:window.setInterval(fn,interval);
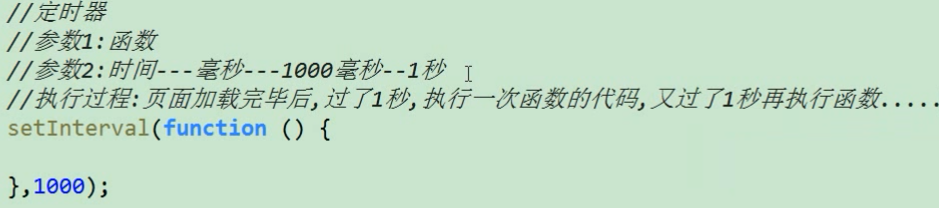
 1 <!DOCTYPE>
 2 <html lang="en">
 3     <head>
 4         <meta charset="UTF-8">
 5         <title>这是网页标题</title>
 6
 7     </head>
 8     <body>
 9
10         <script src="js/common.js"></script>
11         <script>
12             window.setInterval(function () {
13                 console.log("hello world");
14             },1000);  // 每过1s  就输出一次
15
16         </script>
17     </body>
18 </html>
 1 <!DOCTYPE>
 2 <html lang="en">
 3     <head>
 4         <meta charset="UTF-8">
 5         <title>这是网页标题</title>
 6
 7     </head>
 8     <body>
 9         <input type="button" value="停止" id="btn">
10         <script src="js/common.js"></script>
11         <script>
12             var timeId = window.setInterval(function () {
13                 console.log("hello world");
14             },1000);
15             //设置定时器的时候 会返回一个 id  ,我们可以通过它来 停止定时器
16             getId$("btn").onclick = function () {
17                 window.clearInterval(timeId);
18             };
19         </script>
20     </body>
21 </html>
 1 <!DOCTYPE>
 2 <html lang="en">
 3     <head>
 4         <meta charset="UTF-8">
 5         <title>这是网页标题</title>
 6         <style>
 7             img{
 8                 width: 200px;
 9                 height: 200px;
10             }
11             div{
12                 position: absolute;
13             }
14         </style>
15     </head>
16     <body>
17         <input type="button" value="摇起来" id="btn1">
18         <input type="button" value="停止" id="btn2">
19         <div id="dv">
20             <img src="images/1.png" alt="">
21             <img src="images/2.png" alt="">
22         </div>
23
24         <script src="js/common.js"></script>
25         <script>
26             var timeId;
27             getId$("btn1").onclick = function () {
28                 timeId = setInterval(function () {
29                     var x = parseInt(Math.random()*100+1); //0-100随机数
30                     var y = parseInt(Math.random()*100+1);
31                     getId$("dv").style.left= x+"px";
32                     getId$("dv").style.top= y+"px";
33                 },100); //100毫秒动一次
34                 //随机数
35             };
36             //点击停止抖动
37             getId$("btn2").onclick = function () {
38                 window.clearInterval(timeId);
39             };
40         </script>
41     </body>
42 </html>
案例-一闪一闪亮晶晶:
 1 <!DOCTYPE>
 2 <html lang="en">
 3     <head>
 4         <meta charset="UTF-8">
 5         <title>这是网页标题</title>
 6         <style>
 7             div{
 8                 width: 600px;
 9                 height: 600px;
10                 border: 1px solid cyan;
11                 background-color: black;
12                 position: relative;
13             }
14             span{
15                 font-size: 30px;
16                 color: yellow;
17                 position: absolute;
18             }
19         </style>
20     </head>
21     <body>
22         <input type="button" value="闪起来" id="btn">
23         <div id="dv"></div>
24
25         <script src="js/common.js"></script>
26         <script>
27             getId$("btn").onclick= function () {
28                 getId$("dv").innerHTML = "<span>☆</span>";
29
30                 setInterval(function () {
31                     var x= parseInt(Math.random()*600 +1);
32                     var y= parseInt(Math.random()*600 +1);
33                     getId$("dv").firstElementChild.style.left = x+"px";
34                     getId$("dv").firstElementChild.style.top = y+"px";
35                 },100); //0.1s  改变一次位置
36             };
37         </script>
38     </body>
39 </html>
案例 图片时钟:
每隔1s换一张图片,
前提是图片的名字要事先 设置好 :
 1 <!DOCTYPE>
 2 <html lang="en">
 3     <head>
 4         <meta charset="UTF-8">
 5         <title>这是网页标题</title>
 6
 7     </head>
 8     <body>
 9         <img src="" alt="" id="im">
10
11         <script src="js/common.js"></script>
12         <script>
13             function f() {
14                 //获取当前的时间
15                 var dt = new Date();
16                 //获取小时
17                 var hour = dt.getHours();
18                 //获取秒
19                 var second = dt.getSeconds();
20                 //解决 显示05时 05 之类的问题
21                 hour = hour <10? "0"+hour:hour;
22                 second = second<10 ? "0"+second:second;
23
24                 //设置图片
25                 // console.log(hour+"==="+second);
26                 getId$("im").src = "images02/"+hour+"_"+second+".png"
27             }
28
29             setInterval(f,1000); //每隔1s 获取下时间  (不过此时是页面加载完毕之后过了1s才开始执行函数)
30
31
32
33         </script>
34     </body>
35 </html>
(不过此时是页面加载完毕之后过了1s才开始执行函数)
可以事先先执行一次函数。
 1 <!DOCTYPE>
 2 <html lang="en">
 3     <head>
 4         <meta charset="UTF-8">
 5         <title>这是网页标题</title>
 6
 7     </head>
 8     <body>
 9         <img src="" alt="" id="im">
10
11         <script src="js/common.js"></script>
12         <script>
13             function f() {
14                 //获取当前的时间
15                 var dt = new Date();
16                 //获取小时
17                 var hour = dt.getHours();
18                 //获取秒
19                 var second = dt.getSeconds();
20                 //解决 显示05时 05 之类的问题
21                 hour = hour <10? "0"+hour:hour;
22                 second = second<10 ? "0"+second:second;
23
24                 //设置图片
25                 // console.log(hour+"==="+second);
26                 getId$("im").src = "images02/"+hour+"_"+second+".png"
27             }
28             f();
29             setInterval(f,1000); //每隔1s 获取下时间
30
31         </script>
32     </body>
33 </html>