使用socket 模拟服务器 给 浏览器 发 数据:


 1 import socket
 2
 3 sk = socket.socket()
 4 sk.bind(('127.0.0.1',8080))
 5 sk.listen()
 6
 7 while 1:
 8     conn, addr = sk.accept()
 9     d = conn.recv(1024)
10     # print(d.decode())
11     conn.send(b'HTTP/1.1 200 OK

') # 和 浏览器通信 要遵守 http 协议
12     conn.send(b'<h1>Welcome come to my site! </h1>')
13     print('haha')
14
15     conn.close()
16 sk.close()
17
18
19 # http 协议
20 '''
21 GET / HTTP/1.1
22
23 '''
24 '''
25 HTTP/1.1 200 OK
26
27 hello world
28 '''
此时 浏览器 输入 127.0.0.1:8080 就可以访问收到 我们回复的内容了,
Django 框架:
目录:https://www.cnblogs.com/clschao/articles/10526431.html
简单 web框架:
Django基础一之web框架的本质: https://www.cnblogs.com/clschao/articles/10391859.html
 1 from wsgiref.simple_server import make_server
 2 from op_db import getUserData
 3 from jinja2 import Template
 4
 5 def index():
 6     # {'id': 1, 'name': 'tom', 'age': 18}
 7     userinfo = getUserData()
 8     print(userinfo)
 9     with open("index.html","rb") as f:
10         d = f.read()
11
12     tpl_str = Template(d.decode())
13     ret = tpl_str.render({'data':userinfo})
14     return ret.encode()
15
16
17 def ico():
18     with open("favicon.ico","rb") as f:
19         d = f.read()
20     return d
21
22 def application(environ, start_response):
23     start_response('200 OK', [('k1','v1'),])
24     path = environ['PATH_INFO']
25
26     urlpatterns = [
27         ('/',index),
28         ('/favicon.ico', ico),
29     ]
30     for i in urlpatterns:
31         if i[0] == path:
32             data = i[1]()
33     return [data]
34
35 if __name__ == '__main__':
36     httpd = make_server('127.0.0.1', 8080, application)
37     print('Serving HTTP on port 8080...')
38     httpd.serve_forever()
 1 <!DOCTYPE html>
 2 <html lang="zh-CN">
 3 <head>
 4     <meta charset="utf-8">
 5     <meta http-equiv="X-UA-Compatible" content="IE=edge">
 6     <meta name="viewport" content="width=device-width, initial-scale=1">
 7     <title>hello world</title>
 8     <style>
 9         h1{
10             background-color: deeppink;
11         }
12     </style>
13 </head>
14 <body>
15     <h1>你好,{{data['name']}}</h1>
16     <h1>我今年:{{data['age']}}岁 </h1>
17     <ul>
18         <li>哈哈哈哈好</li>
19         <li>哈哈哈哈好</li>
20         <li>哈哈哈哈好</li>
21         <li>哈哈哈哈好</li>
22         <li>哈哈哈哈好</li>
23         <li>哈哈哈哈好</li>
24         <li>哈哈哈哈好</li>
25     </ul>
26     <h1>{{data}}</h1>
27
28     <ul>
29         {%  for k,v in data.items() %}
30             <li>{{k}}:{{v}}</li>
31         {%  endfor    %}
32     </ul>
33
34
35 </body>
36 </html>
 1 import pymysql
 2
 3 def getUserData():
 4     conn = pymysql.connect(
 5         host='127.0.0.1',
 6         port=3306,
 7         user='root',
 8         password='123456',
 9         database='test',
10         charset='utf8'
11     )
12     try:
13         cursor = conn.cursor(pymysql.cursors.DictCursor)
14         cursor.execute('select * from userinfo limit 2;')
15         ret = cursor.fetchone()
16         conn.commit()
17     except:
18         conn.rollback()
19
20     cursor.close()
21     conn.close()
22
23     return ret
url 分发:
正则分组,
url 分发 (include )
视图函数 :
总体上是: FBV (function base view) 和 CBV (class base view)
对FBV 使用 装饰器 判断阻拦请求,
对CBV 可以直接在 dispatch() 函数中 判断阻拦请求 ,也可以在CBV下写 装饰器,不过要借助 django 的
from django.utils.decorators import method_decorator
用时: @method_decorator(dec)
 1 from django.shortcuts import render,redirect
 2 from django.shortcuts import HttpResponse
 3
 4 # Create your views here.
 5 from django.views import View
 6
 7 def home(request):
 8     '''
 9     项目首页
10     :return:
11     '''
12     if request.method == 'GET':
13
14         pass
15     elif request.method == 'POST':
16         pass
17
18
19     return render(request,'home.html')
20
21 def app03_home(request):
22     return HttpResponse('这是 app03的首页')
23
24 def dec(f):
25     def inner(*args,**kwargs):
26         # 搞事情
27         request = args[0]
28         print(request.META)
29         ua = request.META['HTTP_USER_AGENT']
30         #此时就可以 根据ua 来判断了
31         if 'Chrome' in ua:
32             # 合法
33             ret = f(request)
34             return ret
35         else:
36             return HttpResponse("请求不合法")
37
38     return inner
39
40 # 加装饰器 来判断请求是否合法
41 @dec
42 def login(request):
43     if request.method == 'GET':
44          return render(request, 'login.html')
45     elif request.method == 'POST':
46         username = request.POST.get('username')
47         password = request.POST.get('password')
48         if username == 'zcb' and password == '123':
49             # return HttpResponse('登陆成功') # 跳转到 登陆成功页面
50             # print('suc')
51             # return render(request,'login_success.html') # 这种方式  不太好
52             return redirect('/app03/login_success/')
53
54         else:
55             return HttpResponse('登陆失败')
56 def login_success(request):
57
58     return render(request,'login_success.html')
59
60
61 from django.utils.decorators import method_decorator
62 # CBV 类的方式 login2
63 class Login2(View):
64     def dispatch(self, request, *args, **kwargs):
65         print('请求来了')
66         # 这里可以先 判断  request 的合法性,如果不合法,就不调用 下面的 方法,
67
68         ret = super().dispatch(request,*args,**kwargs)
69         print('请求结束了')
70         return ret
71
72     # @method_decorator(dec)  #CBV 下使用装饰器
73     def get(self,request):
74         return render(request,'login2.html')
75
76     def post(self,request):
77         username = request.POST.get('username')
78         password = request.POST.get('password')
79         if username == 'zcb' and password == '123':
80             return redirect('/app03/login_success/')
81         else:
82             return HttpResponse('登陆失败')
request 相关:
request.META : ua 等信息都在这,
request.path_info
request.path
request.method
request.GET ---> .get() .getlist()
request.POST ---> .get() .getlist()
response 相关:
HttpResponse 对象 是回复 字符串,
render() 回复一个页面
redirect() 重定向到一个新的页面,
模板系统 :
https://files.cnblogs.com/files/zach0812/django%E6%A8%A1%E6%9D%BF%E7%B3%BB%E7%BB%9F.zip
关于模板渲染你只需要记两种特殊符号(语法):
{{ }}和 {% %}
变量相关的用{{}},逻辑相关的用{%%}。
万能的 点 .
过滤器( 操作 数据 )| :
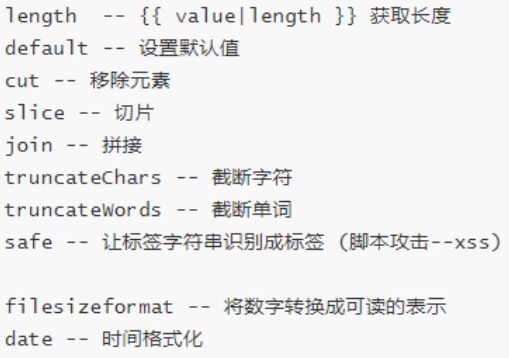
标签 (逻辑操作 数据 在 {% %} 里操作 ):
![]()
模板继承
当有重复代码的时候,使用模板继承 可以省很多 代码,例如 管理的后台页面,
在模板中 加上 {% block % } 槽,
其他 文件中 通过 {% extends 'filename' % } 来引入模板,
组件 化
自定义标签和过滤器
如果 内置的 标签(逻辑相关) 和 过滤器(对数据再操作 ) 不能满足我们的需求,可以自定义,
在app中创建templatetags模块(模块名只能是templatetags)
创建任意 .py 文件,如:my_tags.py
 1 from django import template  # 导入 文件
 2
 3 register = template.Library() #创建一个注册器
 4 # register 固定的名字
 5
 6
 7 @register.filter
 8 def zz(val,val2=''):  # 自定义 过滤器
 9     # 它的作用是 后面加上  ~    过滤器的参数最多有两个!!!
10
11     return val + '~'+val2
12
13 @register.simple_tag   # 自定义标签
14 def tt(val,val2,val3):  # 可以传多个参数
15     # 它的作用是 后面加上 ~
16     return val + val2+ val3 +'~'
17
18
19 # 自定义 组件 标签  (作用 是 先将 test.html 渲染好之后,直接作为组件使用)
20 @register.inclusion_tag('test.html')
21 def func(val):
22
23     data = [11,22,33]
24     data.append(val)
25
26     return {'data':data}
1 <div style="background-color: purple;color: #fff;"> 我去 </div>
2 <ul>
3     {% for d in data %}
4         <li>{{ d }}</li>
5     {% endfor %}
6 </ul>
 1 <!DOCTYPE html>
 2 <html lang="zh-CN">
 3 <head>
 4     <meta charset="utf-8">
 5     <meta http-equiv="X-UA-Compatible" content="IE=edge">
 6     <meta name="viewport" content="width=device-width, initial-scale=1">
 7     <title>hello world</title>
 8 </head>
 9 <body>
10     {% load my_filter_tags %}   <!-- 自定义 过滤器(操作数据的 方法 )  -->
11 {#    <h1>欢迎{{ name | zz }} 来到登陆页面</h1>#}
12     <h1>欢迎{{ name | zz:'~' }} 来到登陆页面</h1>
13
14     {% tt name name name %}   <!-- 自定义 标签 空格 加参数  -->
15     {% func 44 %} <!-- 自定义 组件 标签   -->
16
17     <form action="/app03/login/" method="post">
18         {% csrf_token %}
19         用户名:<input type="text" name="username">
20         密  码:<input type="text" name="password">
21         <input type="submit">
22     </form>
23
24 </body>
25 </html>
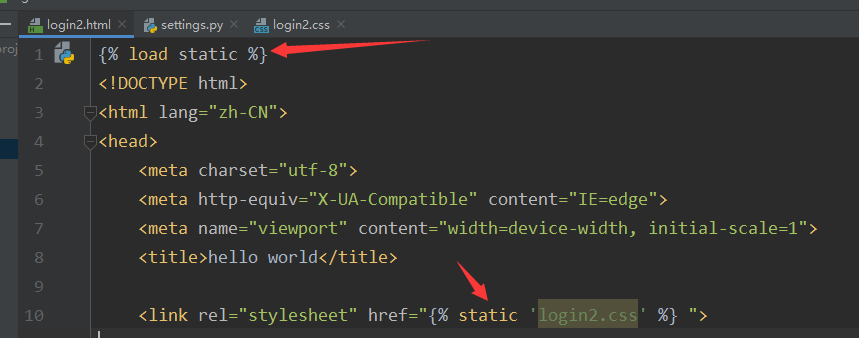
静态文件:
把一些 css,js ,jpg .mp4 等文件 加进来, 当服务器请求 这些 .css 等文件的时候,django 就会自动的读取 发送给浏览器,
引入时:
ORM --- 单表查询 :
 1 from django.db import models
 2
 3 # Create your models here.
 4
 5 class Student(models.Model):
 6     # id = models.AutoField(primary_key=True)  # 默认的
 7     name = models.CharField(max_length=16)
 8     age = models.IntegerField()
 9     date = models.DateField(null=True) # 该字段允许 为空
10
11
12
13     def __str__(self):
14         # 当print (self) 的时候 就会 调用 self.__str__()
15         return self.name
  1 from django.shortcuts import render,redirect,HttpResponse
  2
  3 # Create your views here.
  4 from app01 import models # 利用orm 操作数据库
  5
  6 def index(request):
  7     # 增
  8     '''
  9     # 创建 记录方式1
 10     stu = models.Student(name='tom',age=18)
 11     stu.save()
 12
 13     # 创建 记录方式2
 14     # models.Student.objects # 可理解  可通过objects来增删 改查,
 15     new_obj = models.Student.objects.create(name='e',age=10)
 16     print(new_obj)  # Student object
 17     print(new_obj.name)
 18     print(new_obj.age)
 19     '''
 20
 21     # 增 ---  批量 插入
 22     '''
 23     objs = []
 24     for i in range(30): # 30个记录
 25         obj = models.Student(
 26             name = 'tom%s'%i,
 27             age = 10 + i,
 28         )
 29         objs.append(obj)
 30     models.Student.objects.bulk_create(objs) # 速度快
 31     '''
 32
 33     # 增 --- update_or_create  有就 更新 无则创建
 34     '''
 35     models.Student.objects.update_or_create(
 36         name='jack', # 如果有 name 的话,就 改 为下面 的默认值  ,如果没 的话 ,就创建.
 37         defaults={
 38             'age':40
 39         }
 40     )
 41
 42     '''
 43
 44
 45     # 简单 查询
 46     '''
 47     # 简单 查询之 ---查询 所有的 数据
 48     all_objs = models.Student.objects.all()
 49     print(all_objs)   # QuerySet 类型 类似列表
 50     for obj in all_objs:
 51         print(obj.name)
 52     # 简单 查询之 --- filter 返回的 QuerySet  QuerySet 对象也可以调用 filter()
 53     # 条件 查询 数据 filter() # 查询失败 不报错,返回为  空。
 54     objs = models.Student.objects.filter(id=8); # id 为8 的记录
 55     print(objs)
 56
 57     # 简单 查询之 --- get返回的 model 对象 (Student 对象 )
 58     # 条件 查询 数据 get() 而且 get() 方法有且只有 一个结果,多了少了  都报错 。
 59     objs = models.Student.objects.get(id=8);
 60     print(objs)
 61
 62     '''
 63
 64     # 删除 delete
 65     '''
 66     # 通过 stu 对象 来调用删除
 67     # models.Student.objects.get(id=7).delete() # 需要先把它查出来,然后再删除
 68
 69     # 通过 QuerySet 对象  来调用删除
 70     # models.Student.objects.filter(id=8).delete()
 71
 72     # models.Student.objects.all().delete()   # 删除 表中  所有的数据
 73     '''
 74
 75     # 更新
 76     '''
 77     # stu 对象 不能 update
 78     # models.Student.objects.get(name='jane').update(age = 38)  # stu对象 不能 更新
 79     models.Student.objects.filter(name='jane').update(age = 38) # QuerySet 对象 可以
 80     '''
 81
 82     # 更多查询  都是重点
 83     #01 多条件 查询,
 84     '''
 85     sets = models.Student.objects.filter(age=38,name='jane')    #条件之间是 and 的关系
 86
 87     # 关键字参数 也可以传个 字典~   打散传参 要注意 ,key value 都要是 字符串,
 88     # sets = models.Student.objects.filter(**{'age':38,'name':'jane'}) # 也可以如下格式
 89     print(sets)
 90
 91
 92     # 除了 filter()  get 也支持  多条件, 它返回的是  stu 对象 返回结果  有且只能有一个,
 93     '''
 94
 95     # 02 排除 exclude , 排除 仅仅是 筛选出来 ,并没有删除原有的数据   # objects  和 queryset对象都可以调用
 96     '''
 97     set = models.Student.objects.exclude(id=9)
 98     print(set) # 返回的是个 QuerySet 对象
 99
100     set = models.Student.objects.filter(age=38).exclude(id=9) # 先筛选 再 exclude  两次过滤。
101     print(set)
102     '''
103
104     #03  排序 orderby  原有数据 没变
105     '''
106     set = models.Student.objects.all().order_by('age','-id') # 意思是 先按 age 升序 ,然后 按id 降序
107     print(set)   # 默认是升序 ,降序 用 -
108     '''
109     #04 反转 reverse  # 反转 必须在 order_by 的基础上 来 做  。
110     '''
111     set = models.Student.objects.all().order_by('id').reverse()
112     print(set)
113     '''
114
115     #05 计数 count
116     '''
117     num = models.Student.objects.all().count() # 查询 之后 结果的 set 的 数量
118     print(num)
119     '''
120
121     #06 first
122     '''
123     obj = models.Student.objects.all().first() # 返回 结果是 stu 对象
124     print(obj)
125     '''
126
127     #07 last
128     '''
129     obj = models.Student.objects.all().last()   # 返回 结果是 stu 对象
130     print(obj)
131     '''
132
133
134     #08 exist
135     '''
136     # 它 比 直接 if res: 效率高, exist 只要有一个 符合就返回了,
137     flag = models.Student.objects.filter(name='jane').exists() # 返回 bool
138     print(flag)
139     '''
140
141     #09 values_list 和 values
142     '''
143     set = models.Student.objects.filter(age=38)
144     print(set)
145
146     set =  models.Student.objects.filter(age=38).values_list() # 把所有 values 变为元素返回
147     print(set)  # 它照样是 set 对象, 但是里面的数据 变为了 元组,
148
149     set =  models.Student.objects.filter(age=38).values_list('name','age')
150     print(set)
151
152     set =  models.Student.objects.filter(age=38).values()
153     print(set) # 里面变为 了字典  values_list  和 values 相当于 pymysql 中的 游标中的 元组 和 字典 ~
154     set =  models.Student.objects.filter(age=38).values('name','age')
155     print(set)
156     '''
157
158     #10 去重 主要用在 values_list  和 values  后 ;  因为如果是all(),filter() 都包含 id ,而id 是肯定不会重复的
159     '''
160     set = models.Student.objects.values_list('age').distinct().count()
161     print(set)
162     '''
163
164     #11 基于双下划线 的模糊查询  相当于 数据库 like
165     # set = models.Student.objects.filter(id>20) # 这种写法是错误的, 不支持 大于
166     # 大于
167     set = models.Student.objects.filter( id__gt = 20 ) # 此时id > 20
168     print(set)
169
170     # 大于等于  gte
171     # 小于 lt
172     # 小于等于 lte
173
174     # 在... 里面 in
175     set = models.Student.objects.filter( id__in = [20,22,30] )  # 在 后面三个中的 都要
176     print(set)
177
178     #range    []  左右 都闭区间
179     set = models.Student.objects.filter(age__range=[18,30])
180     print(set)
181
182     #包含 contains  该字段 必须要是 字符串
183     set = models.Student.objects.filter(name__contains='tom') #默认区分大小写
184     print(set)
185
186     set = models.Student.objects.filter(name__icontains='tom') #i  不区分大小写
187     print(set)
188
189     #以 ... 开头 startswith
190     set = models.Student.objects.filter(name__startswith='ja')
191     print(set)
192
193     #以 ... 结尾 endswith
194     set = models.Student.objects.filter(name__endswith='e')
195     print(set)
196
197     # 查询  与日期相关 比较重要~
198     set = models.Student.objects.filter(date='2000-11-11')
199     print(set)
200     set = models.Student.objects.filter(date__year='2000')
201     print(set)
202     set = models.Student.objects.filter(date__year='2000',date__month='12')
203     print(set)
204     set = models.Student.objects.filter(date__year='2000',date__month='12',date__day='8')
205     print(set)
206     # 查看  大于 2000-12-8
207     set = models.Student.objects.filter(date__year='2000',date__month='12',date__day__gt='8')
208     print(set)
209
210
211
212     return render(request,'index.html')
  1 """
  2 Django settings for orm_pro project.
  3
  4 Generated by 'django-admin startproject' using Django 1.11.9.
  5
  6 For more information on this file, see
  7 https://docs.djangoproject.com/en/1.11/topics/settings/
  8
  9 For the full list of settings and their values, see
 10 https://docs.djangoproject.com/en/1.11/ref/settings/
 11 """
 12
 13 import os
 14
 15 # Build paths inside the project like this: os.path.join(BASE_DIR, ...)
 16 BASE_DIR = os.path.dirname(os.path.dirname(os.path.abspath(__file__)))
 17
 18
 19 # Quick-start development settings - unsuitable for production
 20 # See https://docs.djangoproject.com/en/1.11/howto/deployment/checklist/
 21
 22 # SECURITY WARNING: keep the secret key used in production secret!
 23 SECRET_KEY = '9l6_6036bj+*ov$q)yg#p1ny6b8rk(j4z##8+6c)02l2cy@%i3'
 24
 25 # SECURITY WARNING: don't run with debug turned on in production!
 26 DEBUG = True
 27
 28 ALLOWED_HOSTS = []
 29
 30
 31 # Application definition
 32
 33 INSTALLED_APPS = [
 34     'django.contrib.admin',
 35     'django.contrib.auth',
 36     'django.contrib.contenttypes',
 37     'django.contrib.sessions',
 38     'django.contrib.messages',
 39     'django.contrib.staticfiles',
 40     'app01.apps.App01Config',
 41 ]
 42
 43 MIDDLEWARE = [
 44     'django.middleware.security.SecurityMiddleware',
 45     'django.contrib.sessions.middleware.SessionMiddleware',
 46     'django.middleware.common.CommonMiddleware',
 47     'django.middleware.csrf.CsrfViewMiddleware',
 48     'django.contrib.auth.middleware.AuthenticationMiddleware',
 49     'django.contrib.messages.middleware.MessageMiddleware',
 50     'django.middleware.clickjacking.XFrameOptionsMiddleware',
 51 ]
 52
 53 ROOT_URLCONF = 'orm_pro.urls'
 54
 55 TEMPLATES = [
 56     {
 57         'BACKEND': 'django.template.backends.django.DjangoTemplates',
 58         'DIRS': [os.path.join(BASE_DIR, 'templates')]
 59         ,
 60         'APP_DIRS': True,
 61         'OPTIONS': {
 62             'context_processors': [
 63                 'django.template.context_processors.debug',
 64                 'django.template.context_processors.request',
 65                 'django.contrib.auth.context_processors.auth',
 66                 'django.contrib.messages.context_processors.messages',
 67             ],
 68         },
 69     },
 70 ]
 71
 72 WSGI_APPLICATION = 'orm_pro.wsgi.application'
 73
 74
 75 # Database
 76 # https://docs.djangoproject.com/en/1.11/ref/settings/#databases
 77
 78 DATABASES = {
 79     'default': {
 80         'ENGINE': 'django.db.backends.mysql',
 81         'HOST':'127.0.0.1',
 82         'PROT':3306,
 83         'NAME':'orm01',
 84         'USER':'root',
 85         'PASSWORD':'123456',
 86     }
 87 }
 88
 89
 90 # Password validation
 91 # https://docs.djangoproject.com/en/1.11/ref/settings/#auth-password-validators
 92
 93 AUTH_PASSWORD_VALIDATORS = [
 94     {
 95         'NAME': 'django.contrib.auth.password_validation.UserAttributeSimilarityValidator',
 96     },
 97     {
 98         'NAME': 'django.contrib.auth.password_validation.MinimumLengthValidator',
 99     },
100     {
101         'NAME': 'django.contrib.auth.password_validation.CommonPasswordValidator',
102     },
103     {
104         'NAME': 'django.contrib.auth.password_validation.NumericPasswordValidator',
105     },
106 ]
107
108
109 # Internationalization
110 # https://docs.djangoproject.com/en/1.11/topics/i18n/
111
112 LANGUAGE_CODE = 'en-us'
113
114 TIME_ZONE = 'UTC'
115
116 USE_I18N = True
117
118 USE_L10N = True
119
120 USE_TZ = True
121
122
123 # Static files (CSS, JavaScript, Images)
124 # https://docs.djangoproject.com/en/1.11/howto/static-files/
125
126 STATIC_URL = '/static/'
127
128
129
130
131
132
133
134
135
136
137
138 # 如果想打印orm转换过程中的sql,需要在settings中进行如下配置
139 # LOGGING = {
140 #     'version': 1,
141 #     'disable_existing_loggers': False,
142 #     'handlers': {
143 #         'console':{
144 #             'level':'DEBUG',
145 #             'class':'logging.StreamHandler',
146 #         },
147 #     },
148 #     'loggers': {
149 #         'django.db.backends': {
150 #             'handlers': ['console'],
151 #             'propagate': True,
152 #             'level':'DEBUG',
153 #         },
154 #     }
155 # }
修改后端数据 切换页面 时,可以通过绑定事件,然后 location.href ,
但是,麻烦,可以通过 a标签,它可以帮我们自动 发请求,
django批量操作 models中的表到 admin 中:
1 from django.contrib import admin
2
3 # Register your models here.
4 from app01 import models
5
6 for table in models.__all__: # table 就是个字符串
7     if hasattr(models,table):
8         admin.site.register(getattr(models,table))
django 中 使用外面的脚本 批量导入到数据库 中数据:(外部文件 操作django 的models )

 1 # 外部 文件使用 djjango 的models, 需要配置 django 环境  (模仿 manage.py )
 2 import os
 3 if __name__ == '__main__':
 4     #===============配置=================
 5     os.environ.setdefault("DJANGO_SETTINGS_MODULE", "orm_pro.settings")
 6     import django
 7     django.setup()
 8     #================================
 9
10     from app01 import models
11     obj_lists = []
12     for i in range(50):
13         obj = models.Books(
14             name='葵花宝典第%s式'%i,
15             price = 20+i,
16             date ='1980-12-11',
17             press_name= '人民日报出版社'
18         )
19         obj_lists.append(obj)
20
21     models.Books.objects.bulk_create(obj_lists)
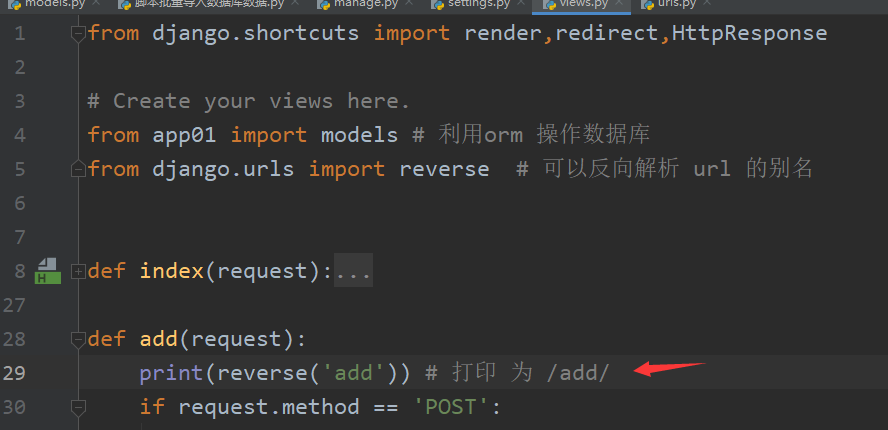
url 别名 和 反向解析:
views.py 中要导入 reverse
url 路由 的时候 要用name 关键字 起个别名, 以后可以一直用这个别名,
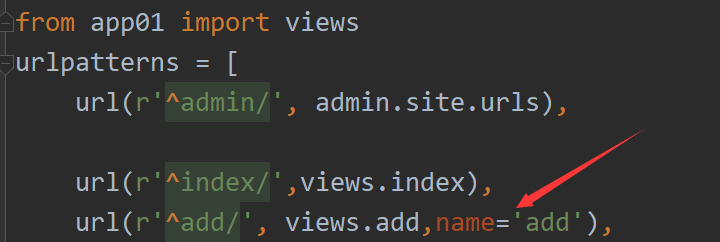
起了别名之后,以后,修改 前面的请求路径 也 不用修改面的,因为用了别名,
html 中 也可以使用 url 的别名, 语法: { % url ' 别名' %} ,常用在 a标签 中的 href 属性中,
使用别名 的好处是 以防后面升级 路径时,不用到处更改 路径,
其中 redirect()中,可以直接写 别名,不用 reverse() 也可以,但,只限于 redirect() ,

善用别名,
善用路径,将后端数据放在路径中,删除数据 ,编辑数据的时候 ,可以通过 a 标签 达到 自动访问数据库的目的,例如 /edit/17 意思是编辑 id 为17 的图书 ,
后端 数据 不要随便从 前端中获取,有可能是错的,
ORM --- 多表 操作 :
创建 django 的admin 用户,
python manager.py createsuperuser
多表操作之 增 删 改:
 1 from django.db import models
 2
 3 # Create your models here.
 4 # 作者表
 5 class Author(models.Model):
 6     name = models.CharField(max_length=16)
 7     age = models.IntegerField()
 8     # authorDetail = models.OneToOneField(to='AuthorDetail',to_field='id',on_delete=models.CASCADE) # 不级联 model.SET_NULL  这时,如果删了的话,外键 就变为NULL了
 9     authorDetail_id = models.OneToOneField(to='AuthorDetail') # 默认 to_field 是id ,  django1.x 版本默认是 级联
10     def __str__(self):
11         return self.name
12
13
14
15 # 作者详情表  # 作者表 和 作者详情表 是一对一的 关系
16 class AuthorDetail(models.Model):
17     birthday = models.DateField()
18     tele = models.CharField(max_length=32)
19     addr = models.CharField(max_length=64)
20
21     def __str__(self):
22         return self.addr
23
24
25
26 # 出版社 表
27 class Press(models.Model):
28     name = models.CharField(max_length=32)
29     city = models.CharField(max_length=32)
30     email = models.EmailField() #实际也是 CharField,不过它可以帮我们 校验  是否是邮箱
31
32     def __str__(self):
33         return self.name
34
35
36
37 #书籍表  和 作者是多对多的关系
38 #书籍表 和 出版社 这里认为是一对多关系 (一个出版社 出版多本书 )
39 class Book(models.Model):
40     title = models.CharField(max_length=32)
41     publishDate = models.DateField()
42     price = models.FloatField()
43     # price = models.DecimalField(max_digits=5,decimal_places=2) # 5位整数,2位小数
44
45     press_id = models.ForeignKey(to='Press',on_delete=models.CASCADE) # 关联到 出版社 表 ,
46
47     author = models.ManyToManyField(to='Author') #不是真实的字段,可以通过它操作第三张表 ,它 只是自动帮我们创建第三张表(  下面的  )
48
49     def __str__(self):
50         return self.title
51
52 # class BookToAuthor(models.Model):   # 多对多的关系 用第三张  表
53 #     book_id = models.ForeignKey(to='Book')
54 #     author_id = models.ForeignKey(to='Author')
 1 """orm_pro URL Configuration
 2
 3 The `urlpatterns` list routes URLs to views. For more information please see:
 4     https://docs.djangoproject.com/en/1.11/topics/http/urls/
 5 Examples:
 6 Function views
 7     1. Add an import:  from my_app import views
 8     2. Add a URL to urlpatterns:  url(r'^$', views.home, name='home')
 9 Class-based views
10     1. Add an import:  from other_app.views import Home
11     2. Add a URL to urlpatterns:  url(r'^$', Home.as_view(), name='home')
12 Including another URLconf
13     1. Import the include() function: from django.conf.urls import url, include
14     2. Add a URL to urlpatterns:  url(r'^blog/', include('blog.urls'))
15 """
16 from django.conf.urls import url
17 from django.contrib import admin
18
19 from app01 import views
20 urlpatterns = [
21     url(r'^admin/', admin.site.urls),
22
23
24     url(r'^query/',views.query)
25
26 ]
  1 from django.shortcuts import render,redirect,HttpResponse
  2
  3 # Create your views here.
  4 from app01 import models # 利用orm 操作数据库
  5 from django.urls import reverse  # 可以反向解析 url 的别名
  6
  7 def query(request):
  8 #一对一 操作多表 操作 author 表 和 authordetail表
  9     # 增  (一种是 对象 一种是属性 )
 10     '''
 11     author_detail_obj =  models.AuthorDetail.objects.create(
 12         birthday='1998-10-10',
 13         tele='188888888889',
 14         addr='黑龙江哈尔滨'
 15     )
 16     # 添加方式1  用属性 =  类对象的方式
 17     models.Author.objects.create(
 18         name='m万涛',
 19         age = 40,
 20         authorDetail_id=author_detail_obj # 这是类的属性
 21     )
 22     '''
 23     '''
 24     # 常用
 25     # 添加方式2  用 表字段 =  查询结果 方式
 26     obj = models.AuthorDetail.objects.filter(addr='山西临汾').first()
 27     # print(obj.id)
 28
 29     models.Author.objects.create(
 30         name='m狗蛋',
 31         age=24,
 32         authorDetail_id_id = obj.id  # 这是 数据库表中的 字段
 33     )
 34     '''
 35     # 删
 36     '''
 37     models.AuthorDetail.objects.get(id=1).delete()  #删它 会删 author ,然后会删 author_book 表 -->  牵一发而动全身
 38     '''
 39     # 改
 40     # models.Author.objects.get() # 不能用get 它得到的对象是 author 没有update()
 41     '''
 42     models.Author.objects.filter(id=2).update(
 43         name='德刚2',
 44         age=38,
 45         authorDetail_id_id = 6,
 46         # authorDetail_id = models.AuthorDetail.objects.get(id=6)
 47     )
 48     '''
 49
 50     # 查
 51
 52 # 一对多 操作多表  press 和 book  是一对多的关系  一本书 只能 由一个出版社
 53     # 增
 54     '''
 55     models.Book.objects.create(
 56         title = '李刚的辛福生活',
 57         publishDate='2009-10-10',
 58         price= 121,
 59         # press_id= models.Press.objects.create(name='幸福出版社',city='北京',email='1001@xx.com'),
 60         # press_id= models.Press.objects.get(id=1),
 61
 62         # 常用
 63         # press_id_id= models.Press.objects.get(id=1).id,
 64         press_id_id = 1  # 外键的时候, 这四种方式都可以
 65     )
 66     '''
 67
 68
 69     # 删  和一对一的删除一样,
 70     # models.Press.objects.get(id=1).delete()
 71
 72     # 改
 73     '''
 74     models.Book.objects.filter(id=8).update(
 75         title='钢铁之翼2',
 76         # press_id_id =2,
 77         press_id = models.Press.objects.get(id=2)
 78     )
 79     '''
 80
 81     # 查
 82
 83 # 多对多 操作多表  author  和 book 表
 84     # 增
 85     '''
 86     # 常用
 87     book_obj = models.Book.objects.get(id=1)
 88     # book_obj.author  # 使用 Book 中的author 属性来添加多对于的记录
 89     book_obj.author.add(*[1,2]) # book_id 1  的author 有两个 1 和 2
 90     # book_obj.author.add(*[1, 2,3])  # book_id 1  的author 有三个 1,2,3
 91     '''
 92
 93     '''
 94     # 先找到 两个作者
 95     author1 = models.Author.objects.get(id=1)
 96     author2 = models.Author.objects.get(id=2)
 97     # 找到 书
 98     book_obj = models.Book.objects.get(id=3)
 99     book_obj.author.add(*[author1,author2])
100     '''
101
102     # 删 就是删除第三张 表
103     '''
104     # 首先要找到 这个表 ,通过 Book 中的 author 属性
105     book_obj = models.Book.objects.get(id=9)
106     # book_obj.author.remove(3) # remove 写的是对应的 author id
107     book_obj.author.remove(*[3,5]) #删的是 9 对应的 3,5
108
109     # book_obj.author.clear()  # 删的是 book 9 对应的所有 author
110     # book_obj.author.set('4') # 将id book 9 对应的author id修改为 4 设置为1个
111     # book_obj.author.set(['2','3']) # 将id book 9 对应的author id修改为 4和 6  设置为多个
112     '''
113     # 改
114     '''
115     多对多的 更改 就是 上面 删除中的 set
116     '''
117
118     # 查
119
120     return  HttpResponse('ok ')
121     pass
级联的时候,orm 没有 级联更新,有级联删除,
多表操作之 查:
多表查询,无论是 基于 对象 还是基于双下划线,它们都有 正向查询 和 反向查询 ,
就看外键那个属性写在哪,从 有 外键的表 查 叫:正向 , 反之,反向查询,

1,基于对象 的跨表 查询 (类似于 子查询 )
2,基于双下划线的 跨表查询 (类似于连表 join 连接 )
related_name关键字:
related_name = ‘xx’ :当创建外键 的时候 。它的作用是 当反向查询的时候 不用表名了,用 xx就行了。
聚合 函数使用 :
from django.db.models import Avg,Max,Min,Sum,Count
补充:‘12’.isdigit( ) 不好,它全识别,使用 '12'.isdecimal()
分组 查询 :
group by 分组 就是为了 统计信息,
以及 分组后的 having
F查询 和 Q查询 :
orm (mysql)的坑(orm 不能解决):
分组导致的, 分组之后取 其他字段 会导致数据有问题,

如果分组,select 只能 select groupby 后的字段 和 统计的结果,其他字段都是无意义的,
只有如下可以:
如果是实在想要其他字段,orm 解决不了 了,
原生sql 可以解决:
先不分组, 先连接,连接之后,首先按照 price 降序排列,使得价格最大的在第一行,(这样就避免了后面 分组时候的错误),
连接之后:

先按price 降序排序:如下:

然后,如果 max() 取数据,其他数据也都是在第一行的,就不会有错了,
最终如下:
1 select title,price from
2     (
3     select app01_author.id,app01_book.title,app01_book.price from app01_author
4     INNER JOIN app01_book_author on app01_author.id=app01_book_author.author_id
5     INNER JOIN app01_book on app01_book.id=app01_book_author.book_id
6     ORDER BY app01_book.price desc
7     ) as b
8     GROUP BY id
注:sql_mode 非常重要,
 1 """orm_pro URL Configuration
 2
 3 The `urlpatterns` list routes URLs to views. For more information please see:
 4     https://docs.djangoproject.com/en/1.11/topics/http/urls/
 5 Examples:
 6 Function views
 7     1. Add an import:  from my_app import views
 8     2. Add a URL to urlpatterns:  url(r'^$', views.home, name='home')
 9 Class-based views
10     1. Add an import:  from other_app.views import Home
11     2. Add a URL to urlpatterns:  url(r'^$', Home.as_view(), name='home')
12 Including another URLconf
13     1. Import the include() function: from django.conf.urls import url, include
14     2. Add a URL to urlpatterns:  url(r'^blog/', include('blog.urls'))
15 """
16 from django.conf.urls import url
17 from django.contrib import admin
18
19 from app01 import views
20 urlpatterns = [
21     url(r'^admin/', admin.site.urls),
22
23     url(r'^query/',views.query)
24
25 ]
 1 from django.db import models
 2
 3 # Create your models here.
 4 # 作者表
 5 class Author(models.Model):
 6     name = models.CharField(max_length=16)
 7     age = models.IntegerField()
 8     # authorDetail = models.OneToOneField(to='AuthorDetail',to_field='id',on_delete=models.CASCADE) # 不级联 model.SET_NULL  这时,如果删了的话,外键 就变为NULL了
 9     authorDetail_id = models.OneToOneField(to='AuthorDetail') # 默认 to_field 是id ,  django1.x 版本默认是 级联
10     def __str__(self):
11         return self.name
12
13
14
15 # 作者详情表  # 作者表 和 作者详情表 是一对一的 关系
16 class AuthorDetail(models.Model):
17     birthday = models.DateField()
18     tele = models.CharField(max_length=32)
19     addr = models.CharField(max_length=64)
20
21     def __str__(self):
22         return self.addr
23
24
25
26 # 出版社 表
27 class Press(models.Model):
28     name = models.CharField(max_length=32)
29     city = models.CharField(max_length=32)
30     email = models.EmailField() #实际也是 CharField,不过它可以帮我们 校验  是否是邮箱
31
32     def __str__(self):
33         return self.name
34
35
36
37 #书籍表  和 作者是多对多的关系
38 #书籍表 和 出版社 这里认为是一对多关系 (一个出版社 出版多本书 )
39 class Book(models.Model):
40     title = models.CharField(max_length=32)
41     publishDate = models.DateField()
42     dianzan_num = models.IntegerField(default=0) # 点赞
43     comment_num = models.IntegerField(default=0) # 评论  后面又加上的(要么 default= ,要么set_null = True),
44
45     price = models.FloatField()
46     # price = models.DecimalField(max_digits=5,decimal_places=2) # 5位整数,2位小数
47
48                                                                 # related_name = 'xx' 的意思是 反向查询的时候,不用表名了,用xx即可,
49     # press_id = models.ForeignKey(to='Press',on_delete=models.CASCADE,related_name='xx') # 关联到 出版社 表 ,
50     press_id = models.ForeignKey(to='Press',on_delete=models.CASCADE) # 关联到 出版社 表 ,
51
52     author = models.ManyToManyField(to='Author') #不是真实的字段,可以通过它操作第三张表 ,它 只是自动帮我们创建第三张表(  下面的  )
53
54     def __str__(self):
55         return self.title
56
57 # class BookToAuthor(models.Model):   # 多对多的关系 用第三张  表
58 #     book_id = models.ForeignKey(to='Book')
59 #     author_id = models.ForeignKey(to='Author')
  1 from django.shortcuts import render,redirect,HttpResponse
  2
  3 # Create your views here.
  4 from app01 import models # 利用orm 操作数据库
  5 from django.urls import reverse  # 可以反向解析 url 的别名
  6
  7 def query(request):
  8 #1 基于对象的 多表查询  (类似于 子查询)
  9 #一对一 操作多表 操作 author 表 和 authordetail表
 10     # 查
 11     # 正向 查询
 12     '''
 13     author_obj = models.Author.objects.filter(name='超哥').first()
 14     print(author_obj.authorDetail_id.birthday)
 15     print(author_obj.authorDetail_id.tele)
 16     print(author_obj.authorDetail_id.addr)
 17     '''
 18     # 反向 查询  通过authorDetail 中 数据 查询 author 的信息
 19     '''
 20     detail_obj = models.AuthorDetail.objects.get(addr='江西南昌')
 21     # 具体是 通过小写的 表名
 22     print(detail_obj.author.name)
 23     print(detail_obj.author.age)
 24     print(detail_obj.author.authorDetail_id)
 25     '''
 26
 27 # 一对多 操作多表  press 和 book  是一对多的关系  一本书 只能 由一个出版社
 28     # 查
 29     # 正向查询
 30     '''
 31     book_obj = models.Book.objects.get(id=7)
 32     print(book_obj.press_id.name)
 33     print(book_obj.press_id.city)
 34     print(book_obj.press_id.email)
 35     '''
 36     # 反向查询
 37     '''
 38     press_obj = models.Press.objects.get(name='幸福出版社')
 39     # 具体是用  表名_set
 40     # print(press_obj.book_set.first().title)
 41     # print(press_obj.book_set.first().publishDate)
 42     # print(press_obj.book_set.first().price)
 43     # print(press_obj.book_set.first().press_id)
 44     for book in press_obj.book_set.all():
 45         print(book.title)
 46         print(book.publishDate)
 47         print(book.price)
 48         print(book.press_id )
 49     '''
 50
 51 # 多对多 操作多表  author  和 book 表
 52     # 查
 53     # 正向查询 一本书 是 哪几个作者写的
 54     '''
 55     book_obj = models.Book.objects.get(id=9)
 56     # 通过 book 中的 author 属性
 57     print(book_obj.author.all()) #<QuerySet [<Author: 德刚2>, <Author: 超哥>]>
 58     '''
 59
 60     # 反向查询 一个作者 写了  哪几本书
 61     '''
 62     author_obj = models.Author.objects.get(name='德刚2')
 63     print(author_obj.book_set.all())
 64     '''
 65
 66 #2 基于 双下划綫 的 多表查询  (类似于 join 连接)
 67 #一对一 操作多表 操作 author 表 和 authordetail表
 68     # 查 m狗蛋的地址
 69     '''
 70     # 正向查询
 71     # authorDetail_id   __   addr 它是先将 author 和 authorDeatail 连接在一起,然后再查 addr
 72     set = models.Author.objects.filter(name='m狗蛋').values('authorDetail_id__addr','age')
 73     print(set)  # 查找 addr 时 连表
 74     # 通过使用小写的 表名
 75     # 反向查询
 76     set = models.AuthorDetail.objects.filter(author__name='m狗蛋').values('addr','author__age')
 77     print(set) # 查找 addr 前 连表
 78     '''
 79
 80     # 查 地址为 江西南昌 作者的名字
 81     '''
 82     # 正向查询
 83     set = models.Author.objects.filter(authorDetail_id__addr='江西南昌').values('name','authorDetail_id__birthday')
 84     print(set)
 85     # 反向查询
 86     set = models.AuthorDetail.objects.filter(addr='江西南昌').values('author__name','tele')
 87     print(set)
 88     '''
 89     # 查 电话 为 222222222 的作者的 名字
 90     '''
 91     # 正向查询
 92     set = models.Author.objects.filter(authorDetail_id__tele='222222222').values('name')
 93     print(set)
 94     # 反向查询
 95     set = models.AuthorDetail.objects.filter(tele='222222222').values('author__name')
 96     print(set)
 97     '''
 98
 99 # 一对多 操作多表  press 和 book  是一对多的关系  一本书 只能 由一个出版社
100     # 查 李刚的辛福生活 书  的出版社 是哪个?
101     '''
102     # 正向查询 有外键的 用外键 连接, 无外键的 用 表名小写连接,
103     set = models.Book.objects.filter(title='李刚的辛福生活').values('press_id__name')
104     print(set)
105     # 反向查询
106     set = models.Press.objects.filter(book__title='李刚的辛福生活').values('name')
107     print(set)
108     '''
109     # 查 b哥出版社 都出版了 哪些书
110     '''
111     # 正向查询
112     set = models.Book.objects.filter(press_id__name='b哥出版社').values('title')
113     print(set)
114     # 反向查询
115     set = models.Press.objects.filter(name='b哥出版社').values('book__title')
116     print(set)
117     '''
118
119
120 # 多对多 操作多表  author  和 book 表
121     # 查 李刚的辛福生活  是谁写的
122     '''
123     # 正向查询
124     set = models.Book.objects.filter(title='李刚的辛福生活').values('author__name')
125     print(set)
126     # 反向查询
127     set = models.Author.objects.filter(book__title='李刚的辛福生活').values('name')
128     print(set)
129     '''
130
131     # 查 m狗蛋 写了 哪些书
132     '''
133     # 正向查询
134     set = models.Book.objects.filter(author__name='m狗蛋').values('title')
135     print(set)
136     # 反向查询
137     set = models.Author.objects.filter(name='m狗蛋').values('book__title')
138     print(set)
139     '''
140 #3 基于 双下划綫 的 进阶查询
141     # 查 b哥出版社 , 出版的书 的名称 以及作者的名称 # press author -->  press --book --author
142     # 三张表
143     # 推荐第一种
144     '''
145     set = models.Press.objects.filter(name='b哥出版社').values('book__title','book__author__name')
146     print(set)
147
148     set = models.Book.objects.filter(press_id__name='b哥出版社').values('title','author__name')
149     print(set)
150
151     set = models.Author.objects.filter(book__press_id__name='b哥出版社').values('book__title','name')
152     print(set)
153     '''
154
155
156     # 聚合 函数
157     '''
158     from django.db.models import Avg,Max,Min,Sum,Count
159     # 算所有书  的平均价格
160     # price = models.Book.objects.all().aggregate(Avg('price'))  # aggregate() 返回的是个字典
161     res = models.Book.objects.all().aggregate(a = Avg('price'))  # a 会覆盖默认的键
162     print(res)
163
164     res = models.Book.objects.all().aggregate(Max('price'),Sum('price'),Count('price'))
165     print(res)
166     '''
167
168     # 分组查询
169     from django.db.models import Avg,Min,Max,Count,Sum
170     # 一种写法
171     '''
172     # 查 每个出版社 出版书籍 的平均价格  如果用 sql的话: select avg(price) from app01_book group by press_id_id;
173     #models.Book.objects.values('press_id_id') #所有出版社的id, 它作为 后面 annotate 时候的  分组条件,
174     # models.Book.objects.values('press_id_id').annotate() # 分组
175     ret = models.Book.objects.values('press_id_id').annotate(a = Avg('price'),b = Min('price'),c=Max('price'),d=Avg('press_id_id') )
176     print(ret)
177
178     # 多个 条件分组
179     # 以 press_id_id 和 id 为分组条件
180     # models.Book.objects.values('press_id_id','id')
181
182     ret = models.Book.objects.values('press_id_id','id').annotate(a = Avg('price'))
183     print(ret)
184     print(ret.filter(a__gt=25)) # 在查出 的结果中再次筛选, 它相当于 having ,group by 之后的 having
185     '''
186
187
188     #另一种写法 以press 表为 分组依据,
189     '''
190     # 上面是把  values() 放在了 annotate ()前面 不好理解,
191     # models.Press.objects  # Press 就是分组条件
192                                           # a 一定要写
193     # ret = models.Press.objects.annotate(a = Avg('xx__price')) # xx  是book 的别名, 做了一次连接,
194     # print(ret) #<QuerySet [<Press: b哥出版社>, <Press: yy出版社>]>
195     ret = models.Press.objects.annotate(a = Avg('xx__price')).values('a') # 同时会将 a 塞到 press 这个表中做为一个字段,
196     print(ret)
197     '''
198
199
200     # F 函数   和 Q函数
201
202     # F 查询:主要用于 单表中的 字段 的 比较,
203     from django.db.models import F , Q
204     # 例如查询 book 表中 评论数 大于   点赞赞 书
205     '''
206     ret = models.Book.objects.filter(comment_num__gt=F('dianzan_num'))
207     print(ret)
208     '''
209
210     # F函数 还支持 四则运算
211     '''
212     ret = models.Book.objects.filter(comment_num__gt=F('dianzan_num') + 10)
213     print(ret)
214     '''
215     # F 函数的 其他用途
216     '''
217     # 让 book 所有书 的价格 都加 20
218     models.Book.objects.all().update(price =F('price') + 20)
219     '''
220
221
222     # Q函数  一个表中 的 字段 之间的或者关系,
223     '''
224     # 查 评论数  大于20 并且 点赞数 大于 20
225     ret = models.Book.objects.filter(comment_num__gt=20,dianzan_num__gt=20)
226     print(ret)
227
228     # 查 评论数  大于20  或者  点赞数 大于 20
229     ret = models.Book.objects.filter(Q(comment_num__gt=20)|Q(dianzan_num__gt=20))
230     print(ret)
231     # Q 也支持  & ~
232     ret = models.Book.objects.filter(~(Q(comment_num__gt=20)&Q(dianzan_num__gt=20)))
233     print(ret)
234
235     # Q 也支持嵌套   把 多个条件 括起来,
236     ret = models.Book.objects.filter(Q(~(Q(comment_num__gt=20) & Q(dianzan_num__gt=20)))&Q(price__gt=141))
237     print(ret)
238     '''
239
240
241     # 习题 (orm mysql 的坑):
242     # 查询 每个作者出版 书的最高价格
243     ret = models.Author.objects.annotate(m = Max('book__price')).values('m')
244     print(ret)
245     # 它对应的原生 sql 是:
246     '''
247     # 连接
248     # select * from app01_author
249     inner join app01_book_author on app01_author.id = app01_book_author.author_id
250     inner join app01_book on app01_book.id = app01_book_author.book_id;
251
252     # select  app01_author.id, max(app01_book.price) from app01_author
253     inner join app01_book_author on app01_author.id = app01_book_author.author_id
254     inner join app01_book on app01_book.id = app01_book_author.book_id
255     group by app01_author.id;
256
257
258     '''
259     # 上面还没有 坑,
260     # 下面就是 orm 的坑: 分组导致的坑~
261
262     #查 每个作者出版的所有书的最高价格  以及  最高价格的那本书的名称
263     ret =  models.Author.objects.annotate( m = Max('book__price')).values('m','book__title')
264     print(ret)
265     # 如果写 肯定是上面这样写, 它是有坑的,
266
267     '''
268     | id | name    | age | authorDetail_id_id | id | book_id | author_id | id | title                 | publishDate | price | press_id_id | comment_num | dianzan_num |
269     +----+---------+-----+--------------------+----+---------+-----------+----+-----------------------+-------------+-------+-------------+-------------+-------------+
270     |  2 | 德刚2   |  38 |                  6 |  8 |       3 |         2 |  3 | 钢铁之翼              | 2020-03-06  |    40 |           2 |          10 |         100 |
271     |  2 | 德刚2   |  38 |                  6 | 27 |       9 |         2 |  9 | 得当的内心独白        | 2008-10-01  |   220 |           5 |          10 |          40 |
272     如果数据如上面, max(price),  price字段得到 的是 220 ,但是,其他字段 就没办法取了,只能按照第一行的数据。这 orm 是无法解决的。
273
274     mysql  中 可以设置 sql_mode = only_full_group_by ,此时就不能 select * 了,只能 select group by 后的字段 以及统计数据,其他字段无法拿到,
275
276
277     总结:  分组之后 拿统计数据才是 有意义的,其他字段 没有任何意义 ~
278     '''
279
280     '''
281     # 上述问题,orm 不能解决, 原生sql 可以解决:
282     #select title,price from
283     (
284     select app01_author.id,app01_book.title,app01_book.price from app01_author
285     INNER JOIN app01_book_author on app01_author.id=app01_book_author.author_id
286     INNER JOIN app01_book on app01_book.id=app01_book_author.book_id
287     ORDER BY app01_book.price desc
288     ) as b
289     GROUP BY id
290     '''
291
292
293
294
295     return  HttpResponse('ok ')
django 中时间相关:
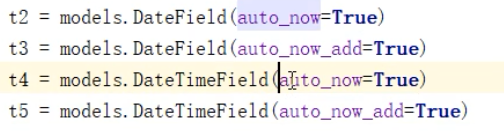
auto_now 是更新的时候,自动更新时间, auto_now_add 是创建的时候 加时间,更新时不更新时间,
而且差8小时, 配置: USE_TZ = False
问题:
auto_now_add 没多大问题,auto_now 更新数据的时会有问题,
我们如果用update() 去更新数据,auto_now 是不会帮我们更新时间的,【我们可以自己传入时间 datetime.datetime.now() 手动增加 】(常用)
如果用 obj.name = 'tom3' obj.save() 更新数据时,auto_now 会帮更新时间
时间转化:
https://www.cnblogs.com/clschao/articles/10757374.html
ORM --- 锁 和 事务:
https://www.cnblogs.com/clschao/articles/10463267.html
行级锁:
select_for_update,
共享锁, 排他锁,
表锁:
事务四大特性:
原子性 , 一致性,持久性,隔离性= 。
Django --- Ajax :
https://www.cnblogs.com/clschao/articles/10468335.html
ajax 是js的技术,
这里不再使用 form 和 a 标签来 发送请求了,它是使用 ajax 发送请求,请求结果也是会返回给 ajax 的请求,
前后端 分离的时候用的就是 ajax , js 中的 ajax 就是类似于 python 中的 request ,
登陆认证 只是 ajax 的一个应用,

补:content-type :
它是前后端 交互的时候的消息格式,
django 默认解析的 content-type 是 urlencoded 
如果你发送请求 使用 content-type :application /json 那么,django 就不会帮你解析参数了,需要你自己手动从 请求头中自己 解析,
在做接口的时候,可能会遇到此类问题,
django 还认: multipart/form-data 上传文件(见下面) 用的,django 只认这两种 content-type ,
上传文件:
两种: 1,form 表单 上传文件, 2,ajax 上传文件,
如何将Python 中的 时间日期类型 进行 序列化:
python中的datetime等时间日期类型是不能进行json序列化的,因为json没有对应的格式,此时需要我们自己手动处理:
 1 import json
 2 from datetime import datetime
 3 from datetime import date
 4
 5 #对含有日期格式数据的json数据进行转换
 6 class JsonCustomEncoder(json.JSONEncoder):
 7     def default(self, field):
 8         if isinstance(field,datetime):
 9             return field.strftime('%Y-%m-%d %H:%M:%S')
10         elif isinstance(field,date):
11             return field.strftime('%Y-%m-%d')
12         else:
13             return json.JSONEncoder.default(self,field)
14
15
16 d1 = datetime.now()
17
18 dd = json.dumps(d1,cls=JsonCustomEncoder) # 使用的时候,要用cls 关键字 来指定自定义的类,
19 print(dd)
 1 {% load static %}
 2 <!DOCTYPE html>
 3 <html lang="zh-CN">
 4 <head>
 5     <meta charset="utf-8">
 6     <meta http-equiv="X-UA-Compatible" content="IE=edge">
 7     <meta name="viewport" content="width=device-width, initial-scale=1">
 8     <title>hello world</title>
 9
10 </head>
11 <body>
12     <h1>上传文件 </h1>
13
14     <form action="" method="post" enctype="multipart/form-data">
15         {% csrf_token %}
16         头像:<input type="file" name="head_pic">
17         用户名:<input type="text" name="username">
18         <input type="submit">
19     </form>
20 </body>
21 </html>
 1 {% load static %}
 2 <!DOCTYPE html>
 3 <html lang="zh-CN">
 4 <head>
 5     <meta charset="utf-8">
 6     <meta http-equiv="X-UA-Compatible" content="IE=edge">
 7     <meta name="viewport" content="width=device-width, initial-scale=1">
 8     <title>hello world</title>
 9 </head>
10 <body>
11     <h1>上传文件2</h1>
12     文件:<input type="file" id="file">  {#    ajax  上传 不需要 name 属性也可 ajax 需要我们自己写 key value  #}
13
14     用户名:<input type="text" id="uname">
15     <button id="btn">上传</button>
16     <script src="{% static 'jquery.js' %}"></script>
17     <script>
18         $('#btn').click(function () {
19             // console.log($('#file')[0].files[0]);
20             var form_data = new FormData();
21             form_data.append('uname',$('#uname').val());
22             form_data.append('file_obj',$('#file')[0].files[0]);
23             form_data.append('csrfmiddlewaretoken','{{ csrf_token }}');
24
25             $.ajax({
26                 url:'{% url 'upload2' %}',
27                 type:'post',
28                 {#data:{#}
29                 {#    csrfmiddlewaretoken:'{{ csrf_token }}',#}
30                 {#    uname:$('#uname').val(),#}
31                 {#    //file_obj: $('#file')[0].files[0]  // 直接上传 不可以,ajax 上传数据 需借助formdata#}
32 {##}
33 {#                }#}
34                 data:form_data,
35                 processData:false, // 不处理数据
36                 contentType:false, // 不设置内容类型   在ajax 上传文件时候 必须写
37
38
39                 success:function (res) {
40                     console.log(res);
41                 }
42
43             })
44
45         });
46
47
48
49     </script>
50 </body>
51 </html>
  1 from django.shortcuts import render,redirect,HttpResponse
  2
  3
  4 # Create your views here.
  5 from app01 import models # 利用orm 操作数据库
  6 from django.urls import reverse  # 可以反向解析 url 的别名
  7 from django.http import JsonResponse  # 做的工作是 添加 content-type: application/json
  8
  9 def query(request):
 10     return  HttpResponse('ok ')
 11
 12 from django.views import View
 13
 14 def index(request):
 15     return render(request,'index.html')
 16
 17 def home(request):
 18     if request.method == 'GET':
 19         all_books = models.Book.objects.all()
 20         print(all_books)
 21
 22         all_press = models.Press.objects.all()
 23
 24         return render(request,'home.html',{'all_books':all_books,'all_press':all_press})
 25     else:
 26         print(request.POST)
 27
 28         return HttpResponse('ok')
 29
 30
 31 def data(request):
 32     ll = [11,1,1,33,44]
 33         # 在回复 非字典的时候,要加上 safe = False
 34     return JsonResponse(ll,safe = False)
 35
 36 # 通过form 表单上传文件
 37 def upload(request):
 38     if request.method == 'GET':
 39         return render(request,'upload.html')
 40     else:
 41         print(request.POST) #<QueryDict: {'csrfmiddlewaretoken': ['Tu0Eo0hBDKlvmAS8ynxo8iEY2IY0smCiR9QQbDeFe9HGsRPmQNtMyNE4ZS2EKb9u'], 'head_pic': ['10.jpg'], 'username': ['zcb']}>
 42         print(request.FILES) # POST 中放的只是 文件名字,真实的数据 在 request.FILES  中,但是 form 表单中要加: enctype = 'multipart/form-data'
 43             # 配置好  enctype 中 之后: <MultiValueDict: {'head_pic': [<InMemoryUploadedFile: 9.jpg (image/jpeg)>]}>
 44         # 保存到 服务器
 45         file_obj = request.FILES.get('head_pic') # file_obj 可以当做是 文件句柄
 46         f_name = file_obj.name
 47
 48         from orm_pro import settings
 49         import os
 50         path = os.path.join(settings.BASE_DIR,'static_files','user_img',f_name)
 51         with open(path,"wb") as f:
 52             # 方式1: 数据是多行的,
 53             for i in file_obj:
 54                 f.write(i)
 55
 56             # 方式2 :如果数据就只有一行
 57             # for i in file_obj.chunks(): # 还是读数据,默认一次 读 64KB ( 只是django 中 )
 58             #     f.write(i)
 59
 60
 61         return HttpResponse('ok')
 62
 63 # 通过 ajax 上传文件
 64 def upload2(request):
 65     if request.method == 'GET':
 66         print('hhhhhh')
 67         return render(request,'upload2.html')
 68         # return render(request,'upload2.html')
 69     else:
 70         print('#================================')
 71         print(request.POST)
 72         print(request.FILES)
 73         file_obj = request.FILES.get('file_obj')
 74
 75         with open(file_obj.name, "wb") as f:
 76             # 方式1: 数据是多行的,
 77             for i in file_obj:
 78                 f.write(i)
 79             # 方式2 chunks()
 80
 81
 82         print('#================================')
 83
 84         return HttpResponse('ok')
 85
 86
 87
 88 import json
 89 class LoginView(View):
 90     def get(self,request):
 91         return render(request,'login.html')
 92
 93     def post(self,request):
 94         # 此时是 ajax 请求过来的 不再是 form 了
 95         uname = request.POST.get('uname')
 96         pwd = request.POST.get('pwd')
 97         if uname == 'zcb' and pwd == '123':
 98             print("成功")
 99             # return render(request,'index.html') # ajango  成功之后 返回个首页
100             ret = {'code':0,'msg':'ok','url':'/index/'}
101             return HttpResponse(json.dumps(ret))
102             # return HttpResponse(json.dumps(ret),content_type='application/json') # content_type这样之后,ajax收到数据就不用反序列化了
103             # 上面一行 还要手动自己写 content_type ,有没有不用自己写的,有,   JsonResponse() # from django.http import JsonResponse
104                 #直接 return JsonResponse(ret)
105         else:
106             # return  redirect('/login/') 此时 ajax 不认识 django 的 redirect 的,要想重定向要通过js 的location.href 。
107
108             # 应该返回的是 redirect 的url
109             ret = {'code':3,'msg':'用户名或密码错误','url':'/login/'}
110             # 要返回的应该是 str
111             return HttpResponse(json.dumps(ret))
 1 """orm_pro URL Configuration
 2
 3 The `urlpatterns` list routes URLs to views. For more information please see:
 4     https://docs.djangoproject.com/en/1.11/topics/http/urls/
 5 Examples:
 6 Function views
 7     1. Add an import:  from my_app import views
 8     2. Add a URL to urlpatterns:  url(r'^$', views.home, name='home')
 9 Class-based views
10     1. Add an import:  from other_app.views import Home
11     2. Add a URL to urlpatterns:  url(r'^$', Home.as_view(), name='home')
12 Including another URLconf
13     1. Import the include() function: from django.conf.urls import url, include
14     2. Add a URL to urlpatterns:  url(r'^blog/', include('blog.urls'))
15 """
16 from django.conf.urls import url
17 from django.contrib import admin
18
19 from app01 import views
20 urlpatterns = [
21     url(r'^admin/', admin.site.urls),
22     url(r'^query/',views.query),
23     url(r'^index/',views.index),
24     url(r'^home/', views.home,name='home'),
25     url(r'^data/', views.data,name='data'),
26     url(r'^upload/$',views.upload,name='upload'),
27     url(r'^upload2/$',views.upload2,name='upload2'),
28     url(r'^login/', views.LoginView.as_view(),name='login'),
29
30
31 ]
 1 {% load static %}
 2 <!DOCTYPE html>
 3 <html lang="zh-CN">
 4 <head>
 5     <meta charset="utf-8">
 6     <meta http-equiv="X-UA-Compatible" content="IE=edge">
 7     <meta name="viewport" content="width=device-width, initial-scale=1">
 8     <title>hello world</title>
 9
10 </head>
11 <body>
12     <h1>你好,世界!</h1>
13     <ul>
14     </ul>
15     <script src="{% static 'jquery.js' %}"></script>
16     <script>
17         $.ajax({
18             url:'{% url 'data' %}',
19             type:'get',
20             success:function (res) {
21                 console.log(res);
22                 $.each(res,function (k,v) {
23                     console.log(k,v);
24                     /*
25                     //1
26                     var li = document.createElement('li');
27                     $(li).text(v);
28                     $('ul').append(li);
29                     */
30                     //2
31                     var s = '<li>'+v.toString()+'</li>';
32                     $('ul').append(s);
33                 })
34
35             }
36         })
37
38
39     </script>
40
41 </body>
42 </html>
上传文件: https://files.cnblogs.com/files/zach0812/django_%E4%B8%8A%E4%BC%A0%E6%96%87%E4%BB%B6.zip
django--- cookie 和 session(会话):
http 是不支持持续会话的,
http的两个特性:
1,无连接 (发一次 收一次 , 完事儿~)
2,无状态 (本次连接 结束,下次连接时 不认识对方,), cookie (给http 请求头中加了 cookie )来解决 这个问题,

cookie 是服务端 发来存储在浏览器上的 一组键值对,

为什么会有 session :

把之前 想发给客户端的 放在 服务端,只给 客户端 发个key ,
现在就是不能直接看到 真实cookie 的真实键值对了,而且存储在服务端, 用户下次访问 要拿着 key 过来访问服务端,
django 中设置session 不再通过 响应对象 来设置了,直接通过request 来设置,
而且django 设置 session 时,会保存到 数据库 django 的内置表 django_session 。

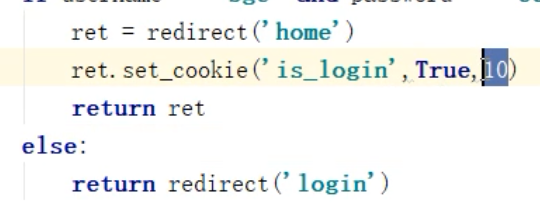
取 加密的cookie 时,
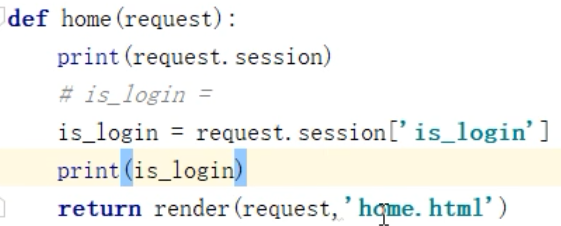
注: 经过网络传输 ,只有 str 一种类型,所以,直接 使用 cookie 时,True 是 str 类型, 如果使用了 session 的话,True 还是 bool 类型,
这个服务端的加密数据,是根据 用户 和浏览器 来生成的 记录,
django 做的事情是:一个浏览器 和一个用户 只给保留一条记录(覆盖), (但是,如果没有session_id(用户主动清除cookie) ,还是会产生新的记录的,没法判断是否是 原来的 浏览器 和 用户了 )
cookie 和 session 里的参数 :
set_cookie() 的参数:

request.session 的一些方法:

views.py 中的 视图函数:

补: django 项目的 配置文件
from django.conf import global_settings ,可以在 global_settings 配置 key ,不叫 session_id ,
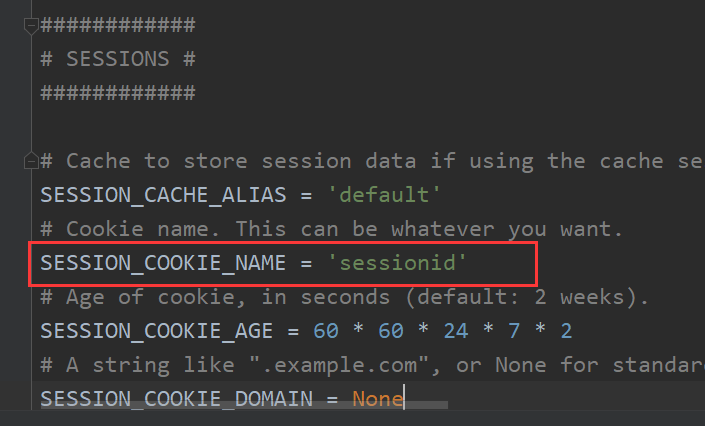
但是,直接在用户配置文件中 配置即可,
django--- 中间件 (midware):
之前给视图函数加装饰器来判断是用户是否登录,把没有登录的用户请求跳转到登录页面。
我们通过给几个特定视图函数加装饰器实现了这个需求。但是以后添加的视图函数可能也需要加上装饰器,这样是不是稍微有点繁琐。
我们就可以用更适宜的方式来实现类似给所有请求都做相同操作的功能了,就是中间件(就是一个类),
我们在一个固定位置 写个py 文件即可,

把这个配置到 settings.py 即可, 这样所有的请求都会经过我们的这个 process_request() ,响应走的时候(必须 return response )都会经过 process_response() ,
中间件的一个用途:限制IP 频率, (客户端的 ip 在 request.META 中 ),规则: 例如,10s 之内 只能访问三次,
Django 请求的生命周期:

Django -- form 验证 组件 :
https://www.cnblogs.com/clschao/articles/10486468.html
前后端 的认证 都是需要的,
form组件 主要做 数据校验,
views.py :
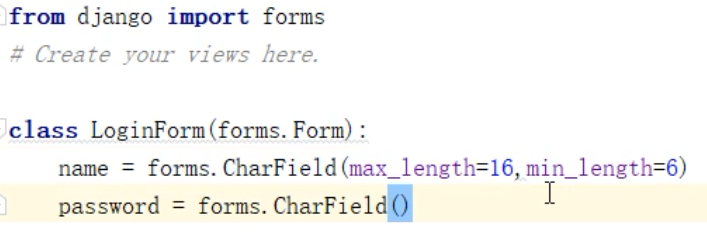
name 只能 6 到 16 位,
在使用的时候,可以将loginForm 对象 渲染到 HTML 中,
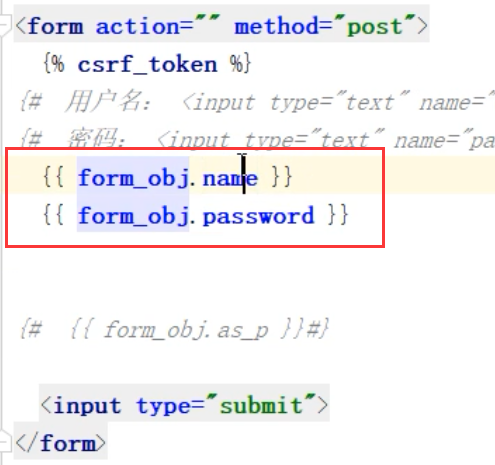
如果使用 form_obj.as_p 会自动 加 label ,label 可以指定 input 的名字, 但是扩展性不好,一般不用 .as_p

django form 表单上传文件:
参考: https://www.cnblogs.com/clschao/articles/10468335.html#part_2
models.py 中 ImageField(upload)
def test(request):
    if request.method == 'GET':
        test_form = TestForm(request)
        return render(request,'zcb.html',{'test_form':test_form})
    else:
        img_obj = request.FILES.get('img')
        file_name = img_obj.name

        with open('static/xxnaicha/img/'+file_name,'wb') as f:
            for chunks in img_obj.chunks():
                f.write(chunks)

        return HttpResponse('ok')
Django Rest_Framework 组件 :
具体详细项目见 百度网盘,
drf 序列化:
当前端 向服务器请求数据,我们手工 序列化数据很麻烦,尤其当涉及外键关系,需要我们自己自行构建数据结构,
Django自带的序列化组件,不好(外键关系无法处理),from django.core.serializers import serialize
建议使用: drf( Django Rest_Framework )

APIView csrf 豁免,发送post 请求 比View方便,
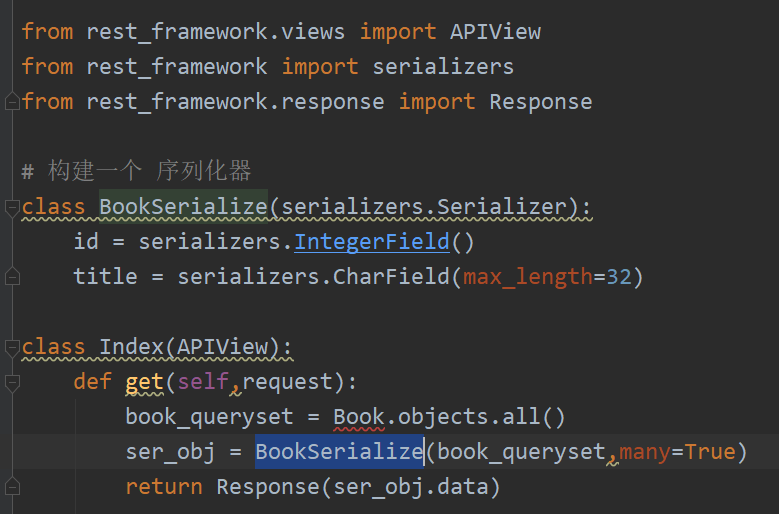
1 # 构建一个 序列化器
2 class BookSerialize(serializers.Serializer):
3     id = serializers.IntegerField()
4     title = serializers.CharField(max_length=32)
5     CHOICES = ((1,'python'),(2,'linux'))
6     # course = serializers.ChoiceField(choices=CHOICES) # 直接这样写  拿到的数据是 前面的 1,2
7     course = serializers.CharField(source='get_course_display') # source 可以执行 一些orm 操作,这时拿到的是 后面的Python 和 linux
 1 from rest_framework.views import APIView
 2 from rest_framework import serializers
 3 from rest_framework.response import Response
 4
 5 class AuthorSerialize(serializers.Serializer):
 6     id = serializers.IntegerField()
 7     name = serializers.CharField(max_length=32)  # 想要什么字段写什么,写什么就序列化什么
 8
 9 class PublishSerialize(serializers.Serializer):
10     id = serializers.IntegerField()
11     name = serializers.CharField(max_length=32)
12
13 class BookSerialize(serializers.Serializer):
14     id = serializers.IntegerField()
15     title = serializers.CharField(max_length=32)
16
17     publish = PublishSerialize()  # 因为一本书只有一个出版社,
18     author = AuthorSerialize(many=True) #因为一本书可能有多个作者 所以 many = True
19
20 class Index(APIView):
21     def get(self,request):
22         book_queryset = Book.objects.all()
23         ser_obj = BookSerialize(book_queryset,many=True)
24         return Response(ser_obj.data)
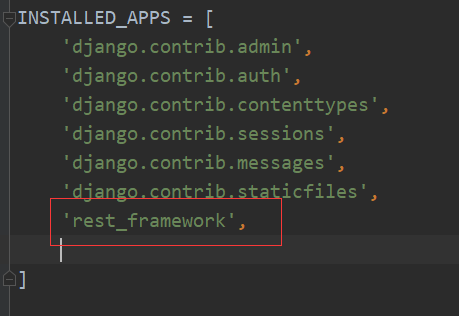
注: 还要把 rest_framework 注册进 settings 里, 如下:
drf 反序列化:
当前端 提交过来一个数据的时候,我们就需要 反序列化了,
假设前端传过来的数据如下:

 1 from rest_framework.views import APIView
 2 from rest_framework import serializers
 3 from rest_framework.response import Response
 4
 5 class AuthorSerialize(serializers.Serializer):
 6     id = serializers.IntegerField()
 7     name = serializers.CharField(max_length=32)  # 想要什么字段写什么,写什么就序列化什么
 8
 9 class PublishSerialize(serializers.Serializer):
10     id = serializers.IntegerField()
11     name = serializers.CharField(max_length=32)
12
13 class BookSerialize(serializers.Serializer):
14     id = serializers.IntegerField(required=False) #required=False 表示  id不用校验
15     title = serializers.CharField(max_length=32)
16     CHOICES = ((1,'PYTHON'),(2,'LINUX'))
17     course = serializers.CharField(source='get_course_display',write_only=True) # 序列化时候 用 ,这是返回字符
18     post_course = serializers.ChoiceField(choices=CHOICES,read_only=True) # 反序列化时候 用 ,前端提交过来 数字
19
20     publish = PublishSerialize(write_only=True)
21     author = AuthorSerialize(many=True,write_only=True)
22
23     post_publish_id = serializers.IntegerField (read_only=True)
24     post_author_id = serializers.ListField(read_only=True)
25
26     def create(self, validated_data):
27         #  post 提交数据时,orm 操作保存数据
28         book_obj = models.Book.create(
29             title=validated_data['title'],
30             publish_id = validated_data['post_publish_id'],
31             course = validated_data['post_course']
32         )
33         # 处理多对多的关系
34         book_obj.authors.add(*validated_data['post_author_id'])
35         return book_obj  # 一定要 return
36
37
38
39 class Index(APIView):
40     def get(self,request):
41         book_queryset = models.Book.objects.all()
42         ser_obj = BookSerialize(book_queryset,many=True)
43         return Response(ser_obj.data)
44
45     def post(self,request):
46         book_obj = request.data # 相当于 原来 request.POST  data中放着除了 GET外的信息  (APIView 封装了下原先的request 并得到了新的request)
47
48         # 对前端传来的数据 做校验
49         ser_obj = BookSerialize(data=book_obj)
50         if ser_obj.is_valid():
51             ser_obj.save()
52             return Response(ser_obj.data)
53         else:
54             return Response(ser_obj.errors)
所有的视图类,

drf 版本控制组件 认证组件 权限控制 频率控制 分页器 解析器 渲染器 :
项目见 百度网盘
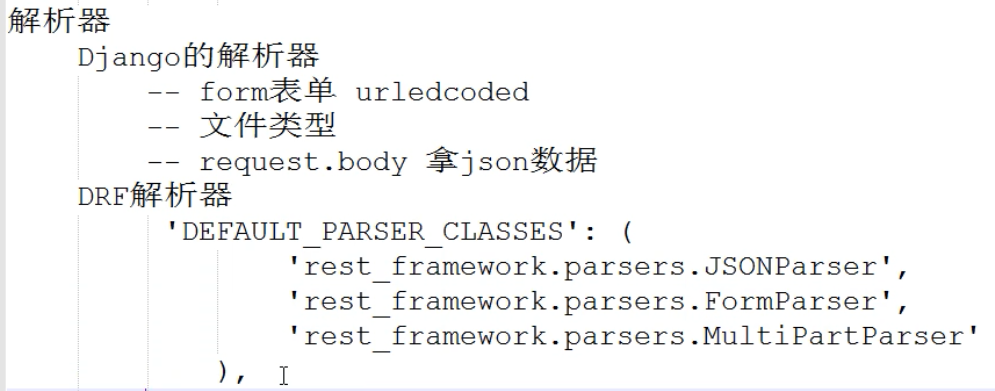
解析器:
django 中默认content-type 只支持两种 类型,一个是form-data 一个是url-encode

渲染器:

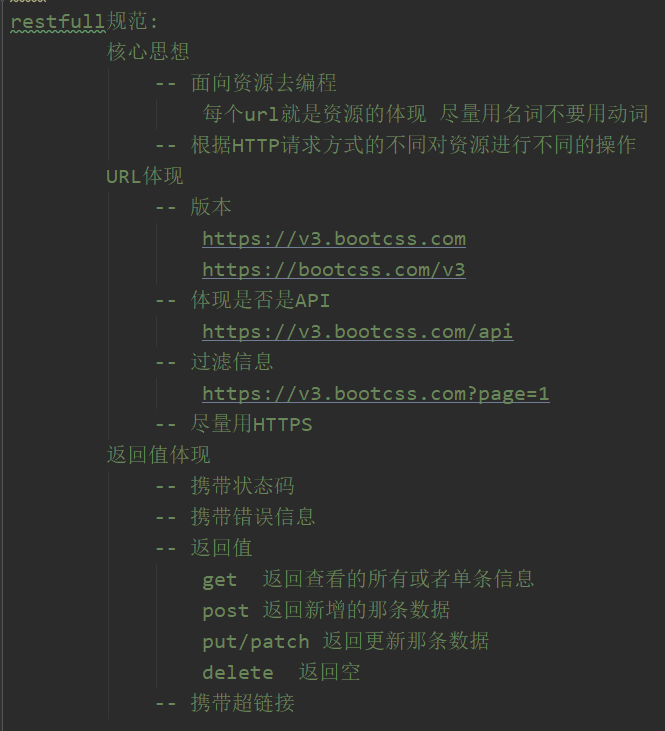
RESTful 规范:
REST 风格: 表述性状态转移,【这个风格只是个建议,】
URI:统一资源标识符,
URL:统一资源定位符, (url 是通过定位实现的URI )
统一资源接口:
根据HTTP请求方式的不同对资源进行不同的操作(get 获取,post新增),
例如:在前后端交互时,不能再addbook,editbook,delbook ,应该直接一个book ,然后根据不同的请求方式 来做不同的逻辑(get获取,post新增,delete删除)
遵循HTTP请求方式的语义(get 就是获取,post就是新增(不能不增),)
遵循 REST风格的就叫 RESTful 规范,
django ContentType组件:
使用ContentType 的好处:
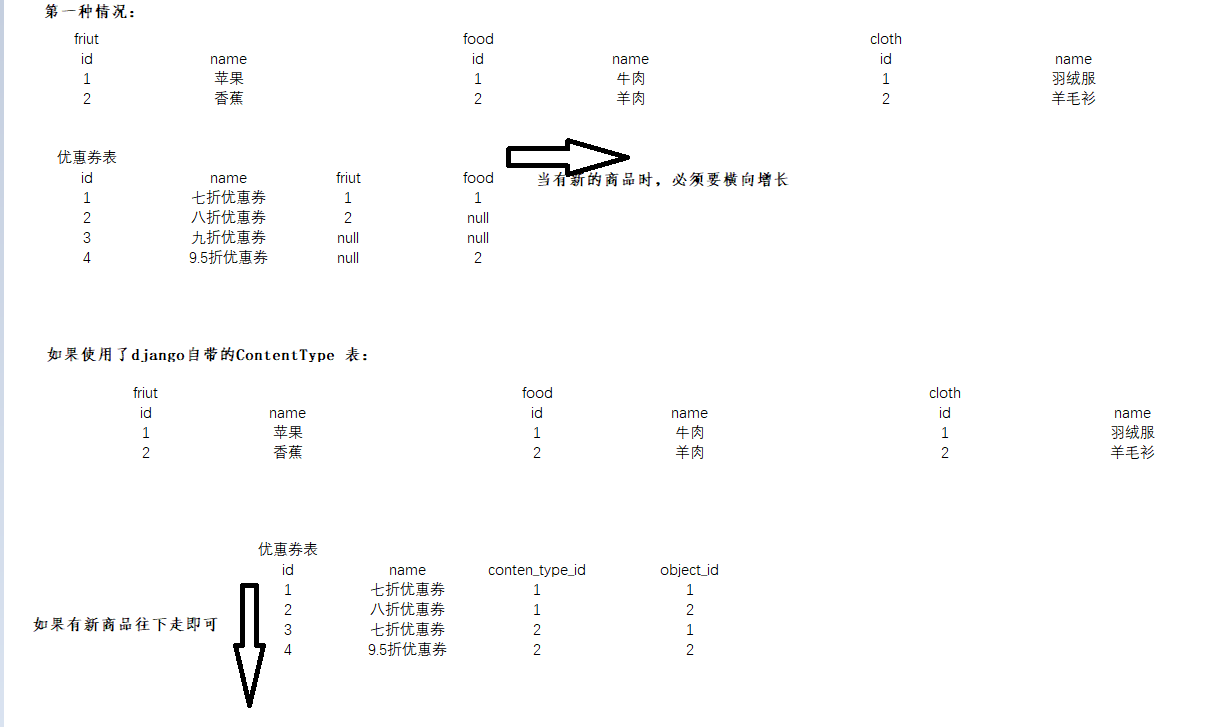
使用ContentType 的步骤:
1,优惠券表中 需要foreignkey 到 ContentType
2,object_id 是所关联到的表的 id
3,GenericForeignKey 两者, 使用对象.就可以直接 找到所要的记录
https://www.cnblogs.com/GGGG-XXXX/articles/9697458.html
接口测试 Postman:
开发流程:
功能结构图
原型图
根据功能需求设计表结构( 没有表结构 ER图 ,是 不可以写代码的 )
前后端分离项目 文档十分重要,
数据库设计软件PowerDesigner :
xxx
权限:
通过url 来控制 用户的访问,
权限表结构设计 (rbac):
rbac 模式 :role based access control :基于角色 的 权限控制,
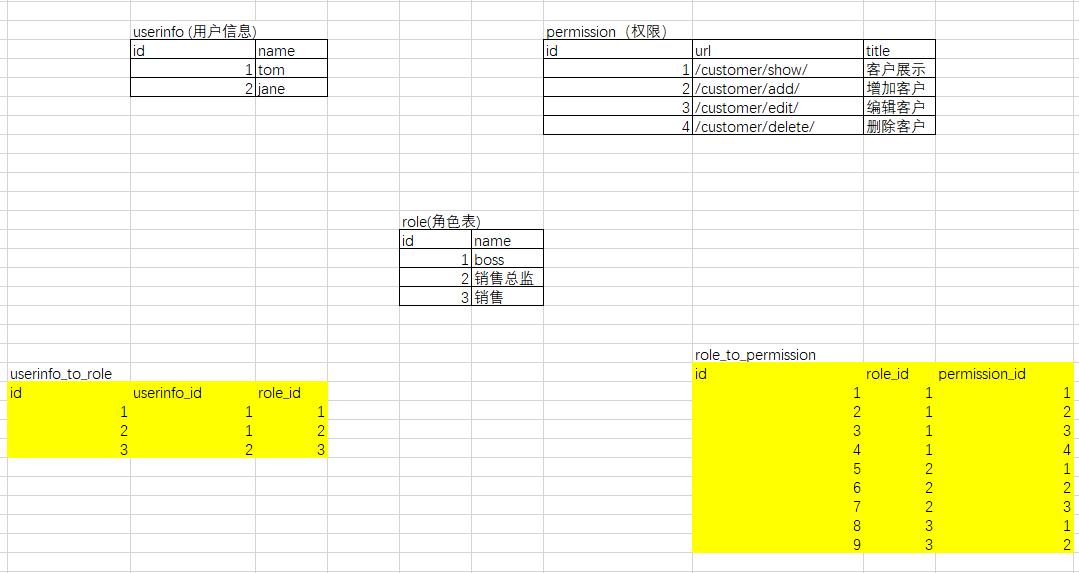
动态菜单 展示 :
不同的用户 展示 不同的菜单栏,
ES6 常用语法 :
笔记参看:https://github.com/able8/hello-es6#12promise
变量的定义:
var 会有 变量的提升,
let 不会有 变量的提升,而且不能重复定义
 1         // var 变量提升,可以重复定义
 2         var a = 'tom';
 3         var a = 'jane';
 4         console.log(a);
 5
 6         // let 不会变量提升,也不能重复定义,更严格
 7         let b = 'tom' ;
 8         let b = 'ajen'; // 报错 duplicate declaration # 重复定义
 9         console.log(b);
10
11         // const 固定值,不能修改,是常量
模板字符串:
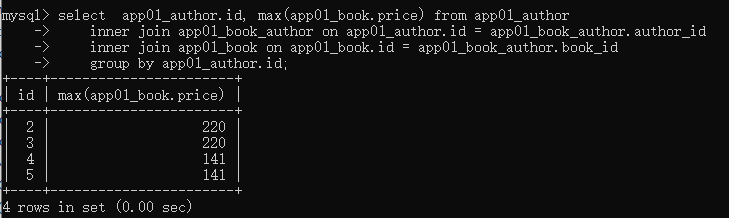
用`(反引号)标识,用${}将变量括起来
1 let n = 'tom';
2 let age = 18;
3 let motto = `hello world,my name is ${n},my age is ${age}`;
4 console.log(motto);
箭头函数 (匿名函数):
python 中的匿名函数为 : lambda
1 // res => res + 1
2 let f = res => res + 1  ;
3 let ret = f(1);
4 console.log(ret);
this:
普通函数 的this 指的是 当前函数 最近的调用者,
箭头函数的this 与它所处的上下文中的this一致(常用于回调),
 1 function f() {
 2     console.log(this);
 3 }
 4 f(); //this 为 Window对象
 5 let obj = {
 6     func:f
 7 };
 8 obj.func(); //this 为 obj 这个对象
 9
10 let obj2 = {
11     test:obj
12 };
13 obj2.test.func();// this仍然是 obj 这个对象
 1 function f() {
 2     setTimeout(function () {
 3         console.log('普通函数');
 4         console.log(this);// 为它的最近调用者 即 window
 5         console.log('普通函数');
 6     });
 7     setTimeout(res=>{
 8         console.log('匿名函数');
 9         console.log(this); // 和 它所处的上下文 环境中this一致 ,即 f函数中的 this 一致
10         console.log('匿名函数');
11     });
12 }
13 let obj = {
14     func:f
15 };
16 obj.func();
箭头函数的好处:
如果回调函数是普通函数,想使用 外层函数的this, 必须要在外层先 let that = this; ,然后使用that ,
而如果是箭头函数,则可以直接使用this ,
数据的打散 和 聚合 :
Python 函数实参位置 中用* 打散列表,** 打散字典,
Python 函数形参位置 中用* 聚合列表 ,** 聚合字典,
es 6 中也有类似操作: ...
三个点在实参位置时,起到聚合成数组 的作用,
1 function f(a,b,...args) {
2     console.log(a);
3     console.log(b);
4     console.log(args);
5 }
6 f(1,2,3,4,5); // 3,4,5,被聚合成一个数组
三个点在实参位置时,起到打散数组 的作用,
1 function f(a,b,c) {
2     console.log(a);
3     console.log(b);
4     console.log(c);
5 }
6 f(...[1,2,3]); // 把[1,2,3] 打散成 1,2,3
解构 赋值:
es 6 中也有类似操作:
它是用{} 解析对象, 用 [ ] 解析数组,
View CodeES6的 面向对象 :
在es5中,定义一个类是 用原型链 来定义,es6 中,我们可以通过class 来定义类了~
 1 /*类的基本用法*/
 2 class Demo{
 3     constructor(userName,age){
 4         this.nick = userName;
 5         this.age = age;
 6     }
 7     run(){
 8         console.log('run with ',this.nick);
 9         return 1;
10     }
11 }
12 let d = new Demo('tom',18);
13 console.log(d.nick,d.age);
14 let ret = d.run();
15 console.log('我是 方法run 的返回值: ',ret);
16
17 /*继承*/
18 class MyDemo extends Demo{
19     constructor(userName,age) {
20         super(userName,age);  // 子类中没有this ,需要先super下,
21         this.nick = userName;
22         this.age = age;
23     }
24 }
25 let demo2 = new MyDemo('a',18);
26 demo2.run();
ES6 中的 import 和 export :
与python 不同的是,js中要想import 导入,必须要先 export 出 变量,
要想导入,必须先抛出 变量,
但是,浏览器还不支持它们,还不能识别,
ES6的 Promise :
使用js进行异步操作,会陷入回调地狱(callback hell ) ,代码可读性降低,
 1 /*
 2 * Promise 实例化: 要传它一个函数
 3 * 为了后续使用,这个函数要有两个参数(不需要我们手动传入,js引擎传),第一个代表是成功要执行的函数,第二个是失败要执行的函数
 4 *
 5 * */
 6
 7 let p = new Promise(function (a,b) {
 8     //这里写 异步代码
 9     $.ajax({
10         url:'test.py',
11         success:function (res) {
12             console.log(res);
13             a();
14             // b();
15         },
16         error:function(res){
17             console.log('fail');
18         }
19     })
20 });
21 // 此时默认上面的异步代码一定执行成功
22 p.then(function f1() {
23     console.log('上面Promise 形参中的第一个函数 a执行了');
24 },function f2() {
25     console.log('上面Promise 形参中的第二个函数 b执行了');
26 });
27
28 p.then(function f1() {
29     console.log('上面Promise 形参中的第一个函数 a执行了');
30 }).catch(function f2() {
31     console.log('上面Promise 形参中的第二个函数 b执行了');
32 })
上面代码如果不用Promise对象的话,代码如下:
 1 function test() {
 2     $.ajax({
 3         url:'test.py',
 4         success:function (res) {
 5             console.log(res);
 6             function f1() {
 7                 console.log('上面Promise 形参中的第一个函数 a执行了');
 8             }
 9             f1();
10         },
11         error:function(res){
12             console.log('fail');
13             function f2() {
14                 console.log('上面Promise 形参中的第二个函数 b执行了');
15             }
16             f2();
17         }
18     })
19 }
20 test();
再如:
如果是有两次异步请求:
 1 let p = new Promise(function (a,b) {
 2     //这里写 异步代码
 3     $.ajax({
 4         url:'test.py',
 5         success:function (res) {
 6             console.log(res);
 7             a();
 8         },
 9         error:function(res){
10             console.log('fail');
11             b();
12         }
13     })
14 });
15
16 let p2 = new Promise(function (a,b) {
17     $.ajax({
18         url:'test2.py',
19         success:function (res) {
20             a();
21         },
22         error:function (res) {
23             b();
24         }
25     })
26 });
27
28 p.then(function f1() {
29     p2.then(function f3() {
30         console.log('2次都成功了');
31     }).catch(function f4() {
32         console.log('第一次成功,第二次失败');
33     })
34 },function f2() {
35     p2.then(function f3() {
36         console.log('第一次失败,第二次成功');
37     }).catch(function f4() {
38         console.log('2次都失败了');
39     })
40 });
如果不用Promise实现上述代码:
 1 function test() {
 2     $.ajax({
 3         url:'test.py',
 4         success:function (res) {
 5             function f1() {
 6                 $.ajax({
 7                     url:'test.py',
 8                     success:function () {
 9                         console.log('2次都成功了');
10                     },
11                     error:function () {
12                         console.log('第一次成功,第二次失败');
13                     }
14                 })
15             }
16             f1();
17         },
18         error:function(res){
19             console.log('fail');
20             function f2() {
21                 $.ajax({
22                     url:'test.py',
23                     success:function () {
24                         console.log('第一次失败,第二次成功');
25                     },
26                     error:function () {
27                         console.log('2次都失败了');
28                     }
29                 })
30             }
31             f2();
32         }
33     })
34 }
35 test();
批量操作Promise对象:
除了上面一个一个Promise 对象的用,还有多个Promise对象一起使用的,
Promise.all() 和 Promise.race()
 1 let p = new Promise(function (a,b) {
 2     //这里写 异步代码
 3     $.ajax({
 4         url:'test1.py',
 5         success:function (res) {
 6             a();
 7         },
 8         error:function(res){
 9             b();
10         }
11     })
12 });
13
14 let p2 = new Promise(function (a,b) {
15     $.ajax({
16         url:'test1.py',
17         success:function (res) {
18             a();
19         },
20         error:function (res) {
21             b();
22         }
23     })
24 });
25
26 // 一个一个的使用 还是麻烦 垃圾
27 // p.then(function f1() {
28 //     p2.then(function f3() {
29 //         console.log('2次都成功了');
30 //     }).catch(function f4() {
31 //         console.log('第一次成功,第二次失败');
32 //     })
33 // },function f2() {
34 //     p2.then(function f3() {
35 //         console.log('第一次失败,第二次成功');
36 //     }).catch(function f4() {
37 //         console.log('2次都失败了');
38 //     })
39 // });
40
41 // 批量的用 all 是全部执行成功
42 // race 是看谁执行的快
43 Promise.all([p,p2]).then(function f() {
44     console.log('两次都成功了');
45 }).catch(function () {
46     console.log('不是两个都成功,一个失败,或两个都失败了');
47 });
48
49 Promise.race([p,p2]).then(function f() {
50     console.log('有一个已经执行完了');
51 }).catch(function f() {
52     console.log('全部失败');
53 });
 1 let p = new Promise(function (a,b) {
 2     //这里写 异步代码
 3     $.ajax({
 4         url:'test3.py',
 5         success:function (res) {
 6             a(res);
 7         },
 8         error:function(res){
 9             b(res);
10         }
11     })
12 });
13
14 let p2 = new Promise(function (a,b) {
15     $.ajax({
16         url:'test2.py',
17         success:function (res) {
18             a(res);
19         },
20         error:function (res) {
21             b(res);
22         }
23     })
24 });
25
26 // 批量的用 all 是全部执行成功
27 // race 是看谁执行的快,如果在比赛中发现有一个已经失败,失败
28 Promise.all([p,p2]).then(function f(res) {
29     // console.log(res);//  [data1 ,data2] 重要
30     console.log('两次都成功了');
31 }).catch(function (res) {
32     // console.log(res);// 第一个失败的 数据
33     console.log('不是两个都成功,一个失败,或两个都失败了');
34 });
35
36 Promise.race([p,p2]).then(function f(res) {
37     console.log(res); // 第一个执行完的 数据  重要
38     console.log('有一个已经执行完了');
39 }).catch(function f(res) {
40     console.log(res);// 第一个检测到的那个,失败的那个的数据
41     console.log('检测有一个失败,或全部失败');
42 });
封装函数 用于生成Promise对象:
我们发现 Promise对象之后url 不同,因此可以封装一个函数 专门用来生成Promise对象:
 1 function get_promise(url){
 2     return new Promise(function (a,b) {
 3         $.ajax({
 4             url:url,
 5             success:function (res) {
 6                 a(res);
 7             },
 8             error:function (res) {
 9                 b(res);
10             }
11         })
12     })
13 }
14 let p = get_promise('test.py');
15 let p2 = get_promise('test2.py');
16
17 Promise.all([p,p2]).then(function (res) {
18     console.log('两次都成功了');
19     console.log('第一个数据');
20     console.log(res[0]);
21     console.log('第二个数据');
22     console.log(res[1]);
23 })
 1 // function get_promise(url){
 2 //     return new Promise(function (a,b) {
 3 //         $.ajax({
 4 //             url:url,
 5 //             success:function (res) {
 6 //                 a(res);
 7 //             },
 8 //             error:function (res) {
 9 //                 b(res);
10 //             }
11 //         })
12 //     })
13 // }
14 function get_promise(url){
15     return new Promise((a,b)=>{
16         $.ajax({
17             url:url,
18             success:res=>{
19                 a(res);
20             },
21             error:res=>{
22                 b(res);
23             }
24         })
25     })
26 }
27
28 let p = get_promise('test.py');
29 let p2 = get_promise('test2.py');
30
31 Promise.all([p,p2]).then(function (res) {
32     console.log('两次都成功了');
33     console.log('第一个数据');
34     console.log(res[0]);
35     console.log('第二个数据');
36     console.log(res[1]);
37 })
 1 function get_promise(url){
 2     return new Promise((a,b)=>{
 3         /*
 4         $.ajax({
 5             url:url,
 6             success:res=>{
 7                 a(res);
 8             },
 9             error:res=>{
10                 b(res);
11             }
12         })*/
13         // 这里写异步代码
14     })
15 }
注:上面的a, b形参名字,一般我们用 resolve 和 reject 来表示
ES8 :
ES8 的 async 和 await :
 1     function block(sec) {
 2         while(1){
 3             if(new Date().getSeconds() === sec){
 4                 break;
 5             }
 6         }
 7     }
 8     function getData(url){
 9         // block(15); //模拟 正在 从url 获取数据  ...
10         return 'success';
11     }
12
13     async function test() {
14         return (await getData('test.py'));
15     }
16     let p = test();
17     p.then(function (res) {
18         console.log(res);
19     });
20     console.log('hello world1');
21 /*
22 * function前面加上async关键字,表示该function需要执行异步代码。
23 * async function函数体内可以使用await关键字,且await关键字只能出现在async function函数体内。
24 * await关键字可以跟在任意变量或者表达式之前,await后面 的将会是个异步过程
25 *
26 * 1,如果没有 async 内没有使用 await ,那么,将会是同步过程
27 * 2,如果 async 中使用了 await
28 *      第一个await 时,此时阻塞两个地方一个是主程序,一个是第一个await 后的代码
29 *      然后 第一个await 后代码执行完毕后,然后执行 主程序,最后再执行 第一个await后的代码
30 * */
vue 框架:
前端回顾:

vue 的思想: 数据来驱动视图, 它改变 了原先 获取dom 渲染dom 的思想
后端有MVC(django 中的MTV 模式 ),M - M , V - T ,C - V
前端呢,又基于MVC 改进成了 MVVM ,Model , View, VIewModel ,
MVVM中的 VM 和 C 和 django 中的 v(视图层函数)功能一致:都是给view提供处理好的数据的,
vue 的 常用指令 :
 1 <!DOCTYPE html>
 2 <html lang="zh-CN">
 3 <head>
 4     <meta charset="utf-8">
 5     <meta http-equiv="X-UA-Compatible" content="IE=edge">
 6     <meta name="viewport" content="width=device-width, initial-scale=1">
 7     <title>hello world</title>
 8 </head>
 9 <body>
10     <div class="box">
11         {{name}}
12         {{motto}}
13     </div>
14     <script src="vue.js"></script>
15     <script>
16         const app = new Vue({
17             el:'.box', // 1,指定 vue 的作用域
18             data:{     // 2,放入数据
19                 name:'tom',
20                 motto:'Life is short , I learn Python!'
21             }
22         })
23     </script>
24 </body>
25 </html>
v-text 和 v-html :
 1 <!DOCTYPE html>
 2 <html lang="zh-CN">
 3 <head>
 4     <meta charset="utf-8">
 5     <meta http-equiv="X-UA-Compatible" content="IE=edge">
 6     <meta name="viewport" content="width=device-width, initial-scale=1">
 7     <title>hello world</title>
 8 </head>
 9 <body>
10     <div class="box">
11         {{name}}
12         <div v-text="motto"></div>
13         <div v-html="hobby"></div>
14     </div>
15     <script src="vue.js"></script>
16     <script>
17         const app = new Vue({
18             el:'.box', // 1,指定 vue 的作用域
19             data:{     // 2,放入数据
20                 name:'tom',
21                 motto:'Life is short , I learn Python!',
22                 hobby:`<ul>
23                             <li>学习</li>
24                             <li>游戏</li>
25                             <li>电影</li>
26                         </ul>`
27             }
28         })
29     </script>
30 </body>
31 </html>
v-if:
 1 <!DOCTYPE html>
 2 <html lang="zh-CN">
 3 <head>
 4     <meta charset="utf-8">
 5     <meta http-equiv="X-UA-Compatible" content="IE=edge">
 6     <meta name="viewport" content="width=device-width, initial-scale=1">
 7     <title>hello world</title>
 8 </head>
 9 <body>
10     <div class="box" >
11         <div v-if="age > 18 ">你已经成年了</div>
12         <div v-else-if="age < 18 ">你还未成年</div>
13         <div v-else>你刚好18</div>
14     </div>
15     <script src="vue.js"></script>
16     <script>
17         const app = new Vue({
18             el:'.box', // 1,指定 vue 的作用域
19             data:{     // 2,放入数据
20                 age:22
21             },
22             methods:{
23
24             }
25         })
26     </script>
27 </body>
28 </html>
它底层是 通过控制 appendChild 来实现的,不会一次性将所有标签都放到页面,哪个条件成立,显示谁。
v-show :
v-show 是通过style 中的display 来控制的,
 1 <!DOCTYPE html>
 2 <html lang="zh-CN">
 3 <head>
 4     <meta charset="utf-8">
 5     <meta http-equiv="X-UA-Compatible" content="IE=edge">
 6     <meta name="viewport" content="width=device-width, initial-scale=1">
 7     <title>hello world</title>
 8 </head>
 9 <body>
10     <div class="box" >
11         <div v-show="isShow">Hello world</div>
12     </div>
13     <script src="vue.js"></script>
14     <script>
15         const app = new Vue({
16             el:'.box', // 1,指定 vue 的作用域
17             data:{     // 2,放入数据
18                 isShow:true
19             },
20             methods:{
21
22             }
23         })
24     </script>
25 </body>
26 </html>
v-for:
 1 <!DOCTYPE html>
 2 <html lang="zh-CN">
 3 <head>
 4     <meta charset="utf-8">
 5     <meta http-equiv="X-UA-Compatible" content="IE=edge">
 6     <meta name="viewport" content="width=device-width, initial-scale=1">
 7     <title>hello world</title>
 8 </head>
 9 <body>
10     <div class="box">
11         <ul>
12             <li v-for="(course,index) in course_lists" :key="index">{{course}}{{index}}</li>
13         </ul>
14     </div>
15     <script src="vue.js"></script>
16     <script>
17         const app = new Vue({
18             el:'.box', // 1,指定 vue 的作用域
19             data:{     // 2,放入数据
20                 course_lists:['python','django','flask']
21             }
22         })
23     </script>
24 </body>
25 </html>
v-bind:
动态绑定属性
 1 <!DOCTYPE html>
 2 <html lang="zh-CN">
 3 <head>
 4     <meta charset="utf-8">
 5     <meta http-equiv="X-UA-Compatible" content="IE=edge">
 6     <meta name="viewport" content="width=device-width, initial-scale=1">
 7     <title>hello world</title>
 8 </head>
 9 <body>
10     <div class="box">
11         <img v-bind:src="url" alt="">
12     </div>
13     <script src="vue.js"></script>
14     <script>
15         const app = new Vue({
16             el:'.box', // 1,指定 vue 的作用域
17             data:{     // 2,放入数据
18                 url:'https://www.baidu.com/img/baidu_jgylogo3.gif'
19             }
20         })
21     </script>
22 </body>
23 </html>
简写: 冒号 :
v-on:
v-on:click
简写:@click
绑定事件,
 1 <!DOCTYPE html>
 2 <html lang="zh-CN">
 3 <head>
 4     <meta charset="utf-8">
 5     <meta http-equiv="X-UA-Compatible" content="IE=edge">
 6     <meta name="viewport" content="width=device-width, initial-scale=1">
 7     <title>hello world</title>
 8 </head>
 9 <body>
10     <div class="box" >
11         <button v-on:click="myClick('tom')">Come on</button>
12     </div>
13     <script src="vue.js"></script>
14     <script>
15         const app = new Vue({
16             el:'.box', // 1,指定 vue 的作用域
17             data:{     // 2,放入数据
18             },
19             methods:{
20                 myClick:function(arg){
21                     console.log('我是 ',arg);
22                 }
23             }
24         })
25     </script>
26 </body>
27 </html>
@mouseenter
@mouseleave 等等...
当绑定多个事件的时候,如下:
 1 <!DOCTYPE html>
 2 <html lang="zh-CN">
 3 <head>
 4     <meta charset="utf-8">
 5     <meta http-equiv="X-UA-Compatible" content="IE=edge">
 6     <meta name="viewport" content="width=device-width, initial-scale=1">
 7     <title>hello world</title>
 8 </head>
 9 <body>
10     <div class="box" >
11         <button v-on="{mouseenter:enter,mouseleave:leave}">Come on</button>
12     </div>
13     <script src="vue.js"></script>
14     <script>
15         const app = new Vue({
16             el:'.box', // 1,指定 vue 的作用域
17             data:{     // 2,放入数据
18             },
19             methods:{
20                 enter:function () {
21                     console.log('进入');
22                 },
23                 leave:function () {
24                     console.log('离开');
25                 }
26
27             }
28         })
29     </script>
30 </body>
31 </html>
v-model:
 1 <!DOCTYPE html>
 2 <html lang="zh-CN">
 3 <head>
 4     <meta charset="utf-8">
 5     <meta http-equiv="X-UA-Compatible" content="IE=edge">
 6     <meta name="viewport" content="width=device-width, initial-scale=1">
 7     <title>hello world</title>
 8 </head>
 9 <body>
10     <div class="box" >
11         <input type="text" v-model="username">
12         {{username}}
13
14         <textarea name="" id="" cols="30" rows="10" v-model="article"></textarea>
15         {{article}}
16
17         <select name="" id="" v-model="choices">
18             <option value="0">aaa</option>
19             <option value="1">bbb</option>
20             <option value="2">ccc</option>
21         </select>
22         {{choices}}
23         <select name="" id="" v-model="choices2" multiple>
24             <option value="0">aaa</option>
25             <option value="1">bbb</option>
26             <option value="2">ccc</option>
27         </select>
28         {{choices2}}
29     </div>
30     <script src="vue.js"></script>
31     <script>
32         const app = new Vue({
33             el:'.box', // 1,指定 vue 的作用域
34             data:{     // 2,放入数据
35                 username:'',
36                 article:'',
37                 choices:'',
38                 choices2:[],
39             },
40             methods:{
41
42             }
43         })
44     </script>
45 </body>
46 </html>
指令修饰符:
如果想失去光标的时候,再渲染,可以用 点 给指令加上小的功能,
这里使用
.lazy
 1 <!DOCTYPE html>
 2 <html lang="zh-CN">
 3 <head>
 4     <meta charset="utf-8">
 5     <meta http-equiv="X-UA-Compatible" content="IE=edge">
 6     <meta name="viewport" content="width=device-width, initial-scale=1">
 7     <title>hello world</title>
 8 </head>
 9 <body>
10     <div class="box" >
11         <input type="text" v-model.lazy="username">
12         {{username}}
13     </div>
14     <script src="vue.js"></script>
15     <script>
16         const app = new Vue({
17             el:'.box', // 1,指定 vue 的作用域
18             data:{     // 2,放入数据
19                 username:'',
20             },
21             methods:{
22
23             }
24         })
25     </script>
26 </body>
27 </html>
.number :转为number 类型,
 1 <!DOCTYPE html>
 2 <html lang="zh-CN">
 3 <head>
 4     <meta charset="utf-8">
 5     <meta http-equiv="X-UA-Compatible" content="IE=edge">
 6     <meta name="viewport" content="width=device-width, initial-scale=1">
 7     <title>hello world</title>
 8 </head>
 9 <body>
10     <div class="box" >
11 <!--        <input type="text" v-model="price">-->
12 <!--        {{ typeof price}}-->
13
14 <!--        但是数据库中希望是  number 类型-->
15         <input type="text" v-model.lazy.number="price">
16         {{ typeof price}}
17         <pre>    i love you</pre>
18     </div>
19     <script src="vue.js"></script>
20     <script>
21         const app = new Vue({
22             el:'.box', // 1,指定 vue 的作用域
23             data:{     // 2,放入数据
24                 price:''
25             },
26             methods:{
27
28             }
29         })
30     </script>
31 </body>
32 </html>
补充:HTML中的 pre 标签 可以打印数据的原始状态, 多个空格也能展示出来,
.trim:
 1 <!DOCTYPE html>
 2 <html lang="zh-CN">
 3 <head>
 4     <meta charset="utf-8">
 5     <meta http-equiv="X-UA-Compatible" content="IE=edge">
 6     <meta name="viewport" content="width=device-width, initial-scale=1">
 7     <title>hello world</title>
 8 </head>
 9 <body>
10     <div class="box" >
11         <input type="text" v-model.trim="motto">
12     </div>
13     <script src="vue.js"></script>
14     <script>
15         const app = new Vue({
16             el:'.box', // 1,指定 vue 的作用域
17             data:{     // 2,放入数据
18                 motto:''
19             },
20             methods:{
21             }
22         })
23     </script>
24 </body>
25 </html>
自定义指令: :
 1 <!DOCTYPE html>
 2 <html lang="zh-CN">
 3 <head>
 4     <meta charset="utf-8">
 5     <meta http-equiv="X-UA-Compatible" content="IE=edge">
 6     <meta name="viewport" content="width=device-width, initial-scale=1">
 7     <title>hello world</title>
 8 </head>
 9 <body>
10     <div class="box" >
11         <div v-my="d">
12             我是div 标签
13         </div>
14     </div>
15     <script src="vue.js"></script>
16     <script>
17         Vue.directive('my',function (arg1,arg2) {
18             console.log(arg1); // 指令操作的对象
19             console.log(arg2); // 相关的数据对象
20             if(arg2.value){
21                 arg1.style.border = '1px solid red';
22             }
23         });
24         const app = new Vue({
25             el:'.box', // 1,指定 vue 的作用域
26             data:{     // 2,放入数据
27                 d:true
28             },
29             methods:{
30             }
31         })
32     </script>
33 </body>
34 </html>
再加上 指令修饰符:
 1 <!DOCTYPE html>
 2 <html lang="zh-CN">
 3 <head>
 4     <meta charset="utf-8">
 5     <meta http-equiv="X-UA-Compatible" content="IE=edge">
 6     <meta name="viewport" content="width=device-width, initial-scale=1">
 7     <title>hello world</title>
 8 </head>
 9 <body>
10     <div class="box" >
11         <div v-my.flag1.flag2="d">
12             我是div 标签
13         </div>
14     </div>
15     <script src="vue.js"></script>
16     <script>
17         Vue.directive('my',function (arg1,arg2) {
18             console.log(arg1); // 指令操作的对象
19             console.log(arg2); // 相关的数据对象
20             if(arg2.value){
21                 arg1.style.border = '1px solid red';
22                 if(arg2.modifiers.flag1 && arg2.modifiers.flag1){
23                     arg1.style.backgroundColor = 'purple';
24                 }
25             }
26         });
27         const app = new Vue({
28             el:'.box', // 1,指定 vue 的作用域
29             data:{     // 2,放入数据
30                 d:true
31             },
32             methods:{
33             }
34         })
35     </script>
36 </body>
37 </html>
vue DOM 相关 :
获取dom:
 1 <!DOCTYPE html>
 2 <html lang="zh-CN">
 3 <head>
 4     <meta charset="utf-8">
 5     <meta http-equiv="X-UA-Compatible" content="IE=edge">
 6     <meta name="viewport" content="width=device-width, initial-scale=1">
 7     <title>hello world</title>
 8 </head>
 9 <body>
10     <div class="box" >
11         <div ref="div1">div1</div>  <!-- 一定要是 ref  -->
12         <div ref="div2">div2</div>
13         <button @click="clickEvt">点我啊</button>
14     </div>
15     <script src="vue.js"></script>
16     <script>
17         const app = new Vue({
18             el:'.box', // 1,指定 vue 的作用域
19             data:{     // 2,放入数据
20             },
21             methods:{
22                 clickEvt:function () {
23                     // 这里的this 是 app
24                     // this.$refs.div1.style.backgroundColor='red';
25                     this.$refs.div2.style.backgroundColor='red';
26                 }
27             }
28         })
29     </script>
30 </body>
31 </html>
计算属性:
它和 data 的区别是:它通常放一些动态的数据,
 1 <!DOCTYPE html>
 2 <html lang="zh-CN">
 3 <head>
 4     <meta charset="utf-8">
 5     <meta http-equiv="X-UA-Compatible" content="IE=edge">
 6     <meta name="viewport" content="width=device-width, initial-scale=1">
 7     <title>hello world</title>
 8 </head>
 9 <body>
10     <div class="box" >
11         <table>
12             <thead>
13                 <tr>
14                     <th>科目</th>
15                     <th>成绩</th>
16                 </tr>
17             </thead>
18             <tbody>
19                 <tr>
20                     <td>语文</td>
21                     <td><input type="text" v-model.number="c"></td>
22                 </tr>
23                 <tr>
24                     <td>数学</td>
25                     <td><input type="text" v-model.number="m"></td>
26                 </tr>
27                 <tr>
28                     <td>英语</td>
29                     <td><input type="text" v-model.number="e"></td>
30                 </tr>
31                 <tr>
32                     <td>总分</td>
33                     <td>{{c+m+e}}</td>
34                 </tr>
35                 <tr>
36                     <td>平均分</td>
37                     <td>{{(c+m+e)/3}}</td>
38                 </tr>
39             </tbody>
40         </table>
41     </div>
42
43     <script src="vue.js"></script>
44     <script>
45         const app = new Vue({
46             el:'.box', // 1,指定 vue 的作用域
47             data:{     // 2,放入数据
48                 c:'',
49                 m:'',
50                 e:''
51             },
52             methods:{
53             }
54         })
55     </script>
56 </body>
57 </html>
但是,有的时候,我们不希望在 模板中使用大量的逻辑,这时,就可以使用 计算属性,
数据的监听:
 1 <!DOCTYPE html>
 2 <html lang="zh-CN">
 3 <head>
 4     <meta charset="utf-8">
 5     <meta http-equiv="X-UA-Compatible" content="IE=edge">
 6     <meta name="viewport" content="width=device-width, initial-scale=1">
 7     <title>hello world</title>
 8 </head>
 9 <body>
10     <div class="box" >
11         {{name}}
12         <br>
13         {{arr}}
14         <br>
15         {{obj}}
16     </div>
17
18     <script src="vue.js"></script>
19     <script>
20         const app = new Vue({
21             el:'.box', // 1,指定 vue 的作用域
22             data:{     // 2,放入数据
23                 name:'tom',
24                 arr:[1,2,3],
25                 obj:{'name':'tom','age':18}
26             },
27             methods:{
28             },
29             computed:{
30             },
31             watch:{
32                 name:{
33                     handler:function (newVal,oldVal) {
34                         console.log(newVal,oldVal);
35                     }
36                 },
37                 arr:{
38                     // 只能监听到 数组长度的变化,如果里面元素发生变化,是监听不到的
39                     // 此时如果想要 修改里面元素 还想被监听到,就不能使用简单的 = 号了,
40                     // 使用 app.$set(this.arr,0,'4'); 这是就可以被监听到了
41                     handler:function (newVal,oldVal) {
42                         console.log(newVal,oldVal);
43
44                     },
45                     // deep:true  没用,深度监听 也不可以
46                 },
47                 obj:{
48                     // 只能监听到 整个对象的变化
49                     handler:function (newVal,oldVal) {
50                         console.log(newVal,oldVal);
51                     },
52                     deep:true // 但是,deep 只能监听 对象已有属性变化,如果新增还是监听不到,用  app.$set()
53                 }
54             }
55         })
56     </script>
57 </body>
58 </html>
vue 的 组件:
 1 <!DOCTYPE html>
 2 <html lang="zh-CN">
 3 <head>
 4     <meta charset="utf-8">
 5     <meta http-equiv="X-UA-Compatible" content="IE=edge">
 6     <meta name="viewport" content="width=device-width, initial-scale=1">
 7     <title>hello world</title>
 8 </head>
 9 <body>
10     <div class="box" >
11         <my_star></my_star>
12     </div>
13     <hr>
14     <div class="box2" >
15         <my_star></my_star>
16     </div>
17
18     <script src="vue.js"></script>
19     <script>
20         Vue.component('my_star',{
21            template:`<div style="1px solid red;">我是div标签 by--{{title}}</div>`,
22             data:function () {
23                 return {
24                     title:'tom'
25                 }
26             },
27             methods:function () {
28             }
29         });
30         const app1 = new Vue({
31             el:'.box', // 1,指定 vue 的作用域
32             data:{     // 2,放入数据
33             },
34             methods:{
35             },
36             computed:{
37             },
38             watch:{
39             }
40         });
41         const app2 = new Vue({
42             el:'.box2', // 1,指定 vue 的作用域
43             data:{     // 2,放入数据
44             },
45             methods:{
46             },
47             computed:{
48             },
49             watch:{
50             }
51         })
52     </script>
53 </body>
54 </html>
 1 <!DOCTYPE html>
 2 <html lang="zh-CN">
 3 <head>
 4     <meta charset="utf-8">
 5     <meta http-equiv="X-UA-Compatible" content="IE=edge">
 6     <meta name="viewport" content="width=device-width, initial-scale=1">
 7     <title>hello world</title>
 8 </head>
 9 <body>
10     <div class="box" >
11         <my_star></my_star>
12     </div>
13     <script src="vue.js"></script>
14     <script>
15         let my_star = {
16             template:`<div style="1px solid red;">我是div标签 by--{{title}}</div>`,
17             data:function () {
18                 return {
19                     title:'tom'
20                 }
21             },
22             methods:function () {
23             }
24         };
25         const app1 = new Vue({
26             el:'.box', // 1,指定 vue 的作用域
27             data:{     // 2,放入数据
28             },
29             methods:{
30             },
31             computed:{
32             },
33             watch:{
34             },
35             components:{
36                 my_star:my_star
37             }
38         });
39
40     </script>
41 </body>
42 </html>
<!DOCTYPE html>
<html lang="zh-CN">
<head>
    <meta charset="utf-8">
    <meta http-equiv="X-UA-Compatible" content="IE=edge">
    <meta name="viewport" content="width=device-width, initial-scale=1">
    <title>hello world</title>
</head>
<body>
    <div class="box" >
        <my_star></my_star>
    </div>
    <script src="vue.js"></script>
    <script>
        let star = {
            template:`<div style="1px solid blue;">我是子组件 --{{title}}</div>`,
            data:function () {
                return {
                    title:'jane'
                }
            },
            methods:function () {
            },
        };
        let my_star = {
            template:`<div style="1px solid red;">组件--{{title}}<star></star>     </div> `,
            data:function () {
                return {
                    title:'tom'
                }
            },
            methods:function () {
            },
            components: {
                star:star
            }
        };
        const app1 = new Vue({
            el:'.box', // 1,指定 vue 的作用域
            data:{     // 2,放入数据
            },
            methods:{
            },
            computed:{
            },
            watch:{
            },
            components:{
                my_star:my_star
            }
        });

    </script>
</body>
</html>
父子组件 通信 :
父 ----> 子
 1 <!DOCTYPE html>
 2 <html lang="zh-CN">
 3 <head>
 4     <meta charset="utf-8">
 5     <meta http-equiv="X-UA-Compatible" content="IE=edge">
 6     <meta name="viewport" content="width=device-width, initial-scale=1">
 7     <title>hello world</title>
 8 </head>
 9 <body>
10     <div class="box" >
11         <father></father>
12     </div>
13     <script src="vue.js"></script>
14     <script>
15         let son = {
16             template:`<div>我是子组件 :[{{fa_say}}]</div>`,
17             props:['fa_say']
18         };
19         let father = {
20             template:`
21                 <div>我是父组件  <son v-bind:fa_say="fa_say"></son> </div>
22             `,
23             components: {
24                 son:son
25             },
26             data:function () {
27                 return {
28                     fa_say:'你好 son'
29                 }
30             }
31
32         };
33         const app1 = new Vue({
34             el:'.box', // 1,指定 vue 的作用域
35             data:{     // 2,放入数据
36             },
37             methods:{
38             },
39             computed:{
40             },
41             watch:{
42             },
43             components:{
44                 father:father
45             }
46         });
47
48     </script>
49 </body>
50 </html>
子父组件 通信 :
子 ---> 父
需要 儿子 先发射 emit 一个事件,
 1 <!DOCTYPE html>
 2 <html lang="zh-CN">
 3 <head>
 4     <meta charset="utf-8">
 5     <meta http-equiv="X-UA-Compatible" content="IE=edge">
 6     <meta name="viewport" content="width=device-width, initial-scale=1">
 7     <title>hello world</title>
 8 </head>
 9 <body>
10     <div class="box" >
11         <father></father>
12     </div>
13     <script src="vue.js"></script>
14     <script>
15         let son = {
16             template:`<div>我是子组件
17                 <button @click="myEvt">点我</button>
18             </div>`,
19             methods: {
20                 myEvt:function () {
21                     this.$emit('sonEmit','我是你的儿子');
22                 }
23             }
24         };
25         let father = {
26             template:`
27                 <div>我是父组件  <son @sonEmit="myEvt"></son> </div>
28             `,
29             components: {
30                 son:son
31             },
32             methods:{
33                 myEvt:function (data) {
34                     console.log(data);
35                 }
36             }
37
38         };
39         const app1 = new Vue({
40             el:'.box', // 1,指定 vue 的作用域
41             data:{     // 2,放入数据
42             },
43             methods:{
44             },
45             computed:{
46             },
47             watch:{
48             },
49             components:{
50                 father:father
51             }
52         });
53
54     </script>
55 </body>
56 </html>
非父子组件 通信 :
这时需要一个第三方 来作为调度,
 1 <!DOCTYPE html>
 2 <html lang="zh-CN">
 3 <head>
 4     <meta charset="utf-8">
 5     <meta http-equiv="X-UA-Compatible" content="IE=edge">
 6     <meta name="viewport" content="width=device-width, initial-scale=1">
 7     <title>hello world</title>
 8 </head>
 9 <body>
10     <div class="box" >
11         <c1></c1>
12         <c2></c2>
13
14     </div>
15     <script src="vue.js"></script>
16     <script>
17         let middle = new Vue();
18
19         let c1 = {
20             template:` <div>
21             组件1
22             <button @click="myEvt">发送消息</button>
23             </div> `,
24             methods:{
25                 myEvt:function () {
26                     middle.$emit('myEmit','我是组件1,你呢?')
27                 }
28             }
29         };
30         let c2 = {
31             template:` <div>组件2</div> `,
32             mounted:function (res) {
33                 // mounted 是当 组件加载之后  就执行的函数
34                 middle.$on('myEmit',res=>{
35                     // console.log(this); // 要注意this 的问题,
36                     console.log('组件二中:  ',res);
37                 })
38             }
39
40         };
41
42         const app1 = new Vue({
43             el:'.box', // 1,指定 vue 的作用域
44             data:{     // 2,放入数据
45             },
46             methods:{
47             },
48             computed:{
49             },
50             watch:{
51             },
52             components:{
53                 c1:c1,
54                 c2:c2
55             }
56         });
57
58     </script>
59 </body>
60 </html>
混合 :
共用一个代码块,
 1 <!DOCTYPE html>
 2 <html lang="zh-CN">
 3 <head>
 4     <meta charset="utf-8">
 5     <meta http-equiv="X-UA-Compatible" content="IE=edge">
 6     <meta name="viewport" content="width=device-width, initial-scale=1">
 7     <title>hello world</title>
 8 </head>
 9 <body>
10     <div class="box" >
11         <c1></c1>
12         <hr>
13         <c2></c2>
14
15     </div>
16     <script src="vue.js"></script>
17     <script>
18         let base = {
19             data() {
20                 return {
21                     title:'hello world'
22                 }
23             },
24             methods:{
25                 // 也可以注册事件
26             }
27         };
28         let c1 = {
29             template:` <div>{{title}}</div> `,
30             methods:{
31             },
32             mixins:[base]
33         };
34         let c2 = {
35             template:` <div>{{title}}</div> `,
36             methods:{
37             },
38             mixins:[base]
39         };
40
41         const app1 = new Vue({
42             el:'.box', // 1,指定 vue 的作用域
43             data:{     // 2,放入数据
44             },
45             methods:{
46             },
47             computed:{
48             },
49             watch:{
50             },
51             components:{
52                 c1:c1,
53                 c2:c2
54             }
55         });
56
57     </script>
58 </body>
59 </html>
组件中 开槽 slot:
 1 <!DOCTYPE html>
 2 <html lang="zh-CN">
 3 <head>
 4     <meta charset="utf-8">
 5     <meta http-equiv="X-UA-Compatible" content="IE=edge">
 6     <meta name="viewport" content="width=device-width, initial-scale=1">
 7     <title>hello world</title>
 8 </head>
 9 <body>
10     <div class="box" >
11         <c1>
12             <a href="http://www.baidu.com">百度一下</a>
13         </c1>
14     </div>
15     <script src="vue.js"></script>
16     <script>
17         let c1 = {
18             template:` <div>  <slot></slot>  </div> `,
19             methods:{
20             },
21         };
22         const app1 = new Vue({
23             el:'.box', // 1,指定 vue 的作用域
24             data:{     // 2,放入数据
25             },
26             methods:{
27             },
28             computed:{
29             },
30             watch:{
31             },
32             components:{
33                 c1:c1,
34             }
35         });
36
37     </script>
38 </body>
39 </html>
 1 <!DOCTYPE html>
 2 <html lang="zh-CN">
 3 <head>
 4     <meta charset="utf-8">
 5     <meta http-equiv="X-UA-Compatible" content="IE=edge">
 6     <meta name="viewport" content="width=device-width, initial-scale=1">
 7     <title>hello world</title>
 8 </head>
 9 <body>
10     <div class="box" >
11         <c1>
12             <a slot="s1" href="http://www.baidu.com">百度一下</a>
13             <a slot="s2" href="http://www.google.com">谷歌一下</a>
14         </c1>
15     </div>
16     <script src="vue.js"></script>
17     <script>
18         let c1 = {
19             template:` <div>
20                              <slot name="s1"></slot>
21                              <slot name="s2"></slot>
22                         </div> `,
23             methods:{
24             },
25         };
26         const app1 = new Vue({
27             el:'.box', // 1,指定 vue 的作用域
28             data:{     // 2,放入数据
29             },
30             methods:{
31             },
32             computed:{
33             },
34             watch:{
35             },
36             components:{
37                 c1:c1,
38             }
39         });
40
41     </script>
42 </body>
43 </html>
vue 路由:
vue通过 路由 和 组件 可以构建一个 单页面的应用,
 1 <!DOCTYPE html>
 2 <html lang="zh-CN">
 3 <head>
 4     <meta charset="utf-8">
 5     <meta http-equiv="X-UA-Compatible" content="IE=edge">
 6     <meta name="viewport" content="width=device-width, initial-scale=1">
 7     <title>hello world</title>
 8 </head>
 9 <body>
10     <div class="box" >
11         <router-link to="/">首页</router-link> <!--router-link 底层是 a 标签  -->
12         <router-link to="/course">课程</router-link>
13
14         <router-view></router-view>  <!-- 用于放 url 中path对应的组件 -->
15     </div>
16     <script src="vue.js"></script>
17     <script src="vue-router.js"></script>
18     <script>
19         //1, 定义路由 和 组件的匹配规则
20         let url = [
21             {
22                 path:'/',
23                 component:{
24                     template: `<div>这是组件1,根目录</div> `
25                 }
26             },
27             {
28                 path:'/course',
29                 component:{
30                     template: `<div>这是组件2,课程目录</div> `
31                 }
32             }
33         ];
34         // 2 实例化  VueRouter 对象
35         let router = new VueRouter({
36             routes:url
37         });
38         // 3把 实例化的 router 放到 app1中
39         const app1 = new Vue({
40             el:'.box',
41             router:router,
42
43         });
44
45     </script>
46 </body>
47 </html>
给url 起别名:
 1 <!DOCTYPE html>
 2 <html lang="zh-CN">
 3 <head>
 4     <meta charset="utf-8">
 5     <meta http-equiv="X-UA-Compatible" content="IE=edge">
 6     <meta name="viewport" content="width=device-width, initial-scale=1">
 7     <title>hello world</title>
 8 </head>
 9 <body>
10     <div class="box" >
11         <router-link :to="{name:'home'}">首页</router-link> <!--router-link 底层是 a 标签  -->
12         <router-link :to="{name:'course'}">课程</router-link>
13
14         <router-view></router-view>  <!-- 用于放 url 中path对应的组件 -->
15     </div>
16     <script src="vue.js"></script>
17     <script src="vue-router.js"></script>
18     <script>
19         //1, 定义路由 和 组件的匹配规则
20         let url = [
21             {
22                 path:'/',
23                 name:'home',// 起别名
24                 component:{
25                     template: `<div>这是组件1,根目录</div> `
26                 }
27             },
28             {
29                 path:'/course',
30                 name:'course', // 起别名
31                 component:{
32                     template: `<div>这是组件2,课程目录</div> `
33                 }
34             }
35         ];
36         // 2 实例化  VueRouter 对象
37         let router = new VueRouter({
38             routes:url
39         });
40         // 3把 实例化的 router 放到 app1中
41         const app1 = new Vue({
42             el:'.box',
43             router:router,
44
45         });
46
47     </script>
48 </body>
49 </html>
路由的参数 :
 1 <!DOCTYPE html>
 2 <html lang="zh-CN">
 3 <head>
 4     <meta charset="utf-8">
 5     <meta http-equiv="X-UA-Compatible" content="IE=edge">
 6     <meta name="viewport" content="width=device-width, initial-scale=1">
 7     <title>hello world</title>
 8 </head>
 9 <body>
10     <div class="box" >
11         <router-link :to="{name:'home'}">首页</router-link> <!--router-link 底层是 a 标签  -->
12         <router-link :to="{name:'course'}">课程</router-link>
13         <router-link :to="{name:'user',params:{username:'xxx'},query:{age:18}}">用户</router-link>
14
15         <router-view></router-view>  <!-- 用于放 url 中path对应的组件 -->
16     </div>
17     <script src="vue.js"></script>
18     <script src="vue-router.js"></script>
19     <script>
20         //1, 定义路由 和 组件的匹配规则
21         let url = [
22             {
23                 path:'/',
24                 name:'home',// 起别名
25                 component:{
26                     template: `<div>这是组件1,根目录</div> `
27                 }
28             },
29             {
30                 path:'/course',
31                 name:'course', // 起别名
32                 component:{
33                     template: `<div>这是组件2,课程目录</div> `
34                 }
35             },
36             {
37                 path:'/user/:name',
38                 name:'user', // 起别名
39                 component:{
40                     template: `<div>我是【{{this.$route.params.username}}】,我今年【{{this.$route.query.age}}】 岁</div> `
41                 },
42                 mounted:function () {
43                     console.log(this.$route);
44                 }
45             }
46         ];
47         // 2 实例化  VueRouter 对象
48         let router = new VueRouter({
49             routes:url
50         });
51         // 3把 实例化的 router 放到 app1中
52         const app1 = new Vue({
53             el:'.box',
54             router:router,
55
56         });
57
58     </script>
59 </body>
60 </html>
手动路由:
需要用 this.$router ,
注: router 是 VueRouter 的实例化对象, 而 route 只是当前url 的信息,
this.$router.push() 就可以改变路由,
 1 <!DOCTYPE html>
 2 <html lang="zh-CN">
 3 <head>
 4     <meta charset="utf-8">
 5     <meta http-equiv="X-UA-Compatible" content="IE=edge">
 6     <meta name="viewport" content="width=device-width, initial-scale=1">
 7     <title>hello world</title>
 8 </head>
 9 <body>
10     <div class="box" >
11         <router-link :to="{name:'home'}">首页</router-link> <!--router-link 底层是 a 标签  -->
12
13         <router-view></router-view>  <!-- 用于放 url 中path对应的组件 -->
14     </div>
15     <script src="vue.js"></script>
16     <script src="vue-router.js"></script>
17     <script>
18         //1, 定义路由 和 组件的匹配规则
19         let url = [
20             {
21                 path:'/',
22                 name:'home',// 起别名
23                 component:{
24                     template: `<div>这是组件1,根目录
25                                 <button @click="clickEvt">点击登录</button>
26                               </div> `,
27                     methods:{
28                     clickEvt:function () {
29                         console.log(this.$route);
30                         console.log(this.$router);
31                         // console.log(this.$el);
32                         // console.log(this.$data);
33
34                         this.$router.push('/login');  // $router.push 方法 手动路由,
35                         }
36                     }
37                 },
38
39             },
40             {
41                 path:'/login',
42                 name:'login', // 起别名
43                 component:{
44                     template: `<div>这是登录页面</div> `
45                 }
46             },
47
48         ];
49         // 2 实例化  VueRouter 对象
50         let router = new VueRouter({
51             routes:url
52         });
53         // 3把 实例化的 router 放到 app1中
54         const app1 = new Vue({
55             el:'.box',
56             router:router,
57
58         });
59
60     </script>
61 </body>
62 </html>
路由下配置子路由:
 1 <!DOCTYPE html>
 2 <html lang="zh-CN">
 3 <head>
 4     <meta charset="utf-8">
 5     <meta http-equiv="X-UA-Compatible" content="IE=edge">
 6     <meta name="viewport" content="width=device-width, initial-scale=1">
 7     <title>hello world</title>
 8 </head>
 9 <body>
10     <div class="box" >
11         <router-link :to="{name:'home'}">首页</router-link> <!--router-link 底层是 a 标签  -->
12         <router-link :to="{name:'user'}">查看用户</router-link> <!--router-link 底层是 a 标签  -->
13
14         <router-view></router-view>  <!-- 用于放 url 中path对应的组件 -->
15     </div>
16     <script src="vue.js"></script>
17     <script src="vue-router.js"></script>
18     <script>
19         //1, 定义路由 和 组件的匹配规则
20         let url = [
21             {
22                 path:'/',
23                 name:'home',// 起别名
24                 component:{
25                     template: `<div>这是组件1,根目录
26                                 <button @click="clickEvt">点击登录</button>
27                               </div> `,
28                     methods:{
29                     clickEvt:function () {
30                         this.$router.push('/login');
31                         }
32                     }
33                 },
34             },
35             {
36                 path:'/user',
37                 name:'user', // 起别名
38                 component:{
39                     template: `<div>这是用户页面
40                             <hr>
41                             <router-link :to="{name:'userDetail1'}">用户详情1</router-link>
42                             <router-link :to="{name:'userDetail2'}">用户详情2</router-link>
43                             <router-view></router-view>
44                         </div> `
45                 },
46                 children:[
47                     {
48                         path:'userDetail1',
49                         name:'userDetail1',
50                         component:{
51                             template: `<div>详情页面1</div> `
52                         },
53                     },
54                     {
55                         path:'userDetail2',
56                         name:'userDetail2',
57                         component:{
58                             template: `<div>详情页面2</div> `
59                         },
60                     }
61
62
63
64                 ]
65             },
66
67         ];
68         // 2 实例化  VueRouter 对象
69         let router = new VueRouter({
70             routes:url
71         });
72         // 3把 实例化的 router 放到 app1中
73         const app1 = new Vue({
74             el:'.box',
75             router:router,
76
77         });
78
79     </script>
80 </body>
81 </html>
 1 <!DOCTYPE html>
 2 <html lang="zh-CN">
 3 <head>
 4     <meta charset="utf-8">
 5     <meta http-equiv="X-UA-Compatible" content="IE=edge">
 6     <meta name="viewport" content="width=device-width, initial-scale=1">
 7     <title>hello world</title>
 8 </head>
 9 <body>
10     <div class="box" >
11         <router-link :to="{name:'home'}">首页</router-link> <!--router-link 底层是 a 标签  -->
12         <router-link :to="{name:'user'}">查看用户</router-link> <!--router-link 底层是 a 标签  -->
13
14         <router-view></router-view>  <!-- 用于放 url 中path对应的组件 -->
15     </div>
16     <script src="vue.js"></script>
17     <script src="vue-router.js"></script>
18     <script>
19         //1, 定义路由 和 组件的匹配规则
20         let url = [
21             {
22                 path:'/',
23                 name:'home',// 起别名
24                 component:{
25                     template: `<div>这是组件1,根目录
26                                 <button @click="clickEvt">点击登录</button>
27                               </div> `,
28                     methods:{
29                     clickEvt:function () {
30                         this.$router.push('/login');
31                         }
32                     }
33                 },
34             },
35             {
36                 path:'/user',
37                 name:'user', // 起别名
38                 redirect:{
39                     name:'userDetail1'
40                 },
41                 component:{
42                     template: `<div>这是用户页面
43                             <hr>
44                             <router-link :to="{name:'userDetail1'}">用户详情1</router-link>
45                             <router-link :to="{name:'userDetail2'}">用户详情2</router-link>
46                             <router-view></router-view>
47                         </div> `
48                 },
49                 children:[
50                     {
51                         path:'userDetail1',
52                         name:'userDetail1',
53                         component:{
54                             template: `<div>详情页面1</div> `
55                         },
56                     },
57                     {
58                         path:'userDetail2',
59                         name:'userDetail2',
60                         component:{
61                             template: `<div>详情页面2</div> `
62                         },
63                     }
64
65
66
67                 ]
68             },
69
70         ];
71         // 2 实例化  VueRouter 对象
72         let router = new VueRouter({
73             routes:url
74         });
75         // 3把 实例化的 router 放到 app1中
76         const app1 = new Vue({
77             el:'.box',
78             router:router,
79
80         });
81
82     </script>
83 </body>
84 </html>
路由钩子函数:
 1 <!DOCTYPE html>
 2 <html lang="zh-CN">
 3 <head>
 4     <meta charset="utf-8">
 5     <meta http-equiv="X-UA-Compatible" content="IE=edge">
 6     <meta name="viewport" content="width=device-width, initial-scale=1">
 7     <title>hello world</title>
 8 </head>
 9 <body>
10     <div class="box" >
11         <router-link :to="{name:'home'}">首页</router-link> <!--router-link 底层是 a 标签  -->
12         <router-link :to="{name:'user'}">查看用户</router-link> <!--router-link 底层是 a 标签  -->
13
14         <router-view></router-view>  <!-- 用于放 url 中path对应的组件 -->
15     </div>
16     <script src="vue.js"></script>
17     <script src="vue-router.js"></script>
18     <script>
19         //1, 定义路由 和 组件的匹配规则
20         let url = [
21             {
22                 path:'/',
23                 name:'home',// 起别名
24                 component:{
25                     template: `<div>这是组件1,根目录
26                                 <button @click="clickEvt">点击登录</button>
27                               </div> `,
28                     methods:{
29                     clickEvt:function () {
30                         this.$router.push('/login');
31                         }
32                     }
33                 },
34
35             },
36             {
37                 path:'/login',
38                 name:'login', // 起别名
39                 component:{
40                     template: `<div>这是登录页面</div> `
41                 }
42             },
43             {
44                 path:'/user',
45                 name:'user', // 起别名
46                 component:{
47                     template: `<div>这是用户页面</div> `
48                 }
49             },
50
51         ];
52         // 2 实例化  VueRouter 对象
53         let router = new VueRouter({
54             routes:url
55         });
56         // 路由钩子函数
57         router.beforeEach(function (to,from,next) {
58             console.log(to);   // 去哪个 route
59             console.log(from); // 从哪个 route 来
60             console.log(next); // 下一步 干什么
61             if (to.path === '/user' ){
62                 next('/login'); // 如果用户没登录 就查看 user ,要跳到 login
63             }else{
64                 next(); // 正常情况 直接next();  如果没有 next() 或者 next(false);这样就不跳转了,
65             }
66
67
68         });
69
70         // 3把 实例化的 router 放到 app1中
71         const app1 = new Vue({
72             el:'.box',
73             router:router,
74
75         });
76
77     </script>
78 </body>
79 </html>
 1 <!DOCTYPE html>
 2 <html lang="zh-CN">
 3 <head>
 4     <meta charset="utf-8">
 5     <meta http-equiv="X-UA-Compatible" content="IE=edge">
 6     <meta name="viewport" content="width=device-width, initial-scale=1">
 7     <title>hello world</title>
 8 </head>
 9 <body>
10     <div class="box" >
11         <router-link :to="{name:'home'}">首页</router-link> <!--router-link 底层是 a 标签  -->
12         <router-link :to="{name:'user'}">查看用户</router-link> <!--router-link 底层是 a 标签  -->
13
14         <router-view></router-view>  <!-- 用于放 url 中path对应的组件 -->
15     </div>
16     <script src="vue.js"></script>
17     <script src="vue-router.js"></script>
18     <script>
19         //1, 定义路由 和 组件的匹配规则
20         let url = [
21             {
22                 path:'/',
23                 name:'home',// 起别名
24                 component:{
25                     template: `<div>这是组件1,根目录
26                                 <button @click="clickEvt">点击登录</button>
27                               </div> `,
28                     methods:{
29                     clickEvt:function () {
30                         this.$router.push('/login');
31                         }
32                     }
33                 },
34             },
35             {
36                 path:'/login',
37                 name:'login', // 起别名
38                 component:{
39                     template: `<div>这是登录页面</div> `
40                 }
41             },
42             {
43                 path:'/user',
44                 name:'user', // 起别名
45                 meta:{   // 元信息配置
46                     must_login:true,
47                 },
48                 component:{
49                     template: `<div>这是用户页面</div> `
50                 }
51             },
52
53         ];
54         // 2 实例化  VueRouter 对象
55         let router = new VueRouter({
56             routes:url
57         });
58         // 路由钩子函数
59         router.beforeEach(function (to,from,next) {
60             console.log(to);   // 去哪个 route
61             console.log(from); // 从哪个 route 来
62             console.log(next); // 下一步 干什么
63             if (to.meta.must_login){
64                 next('/login'); // 如果用户没登录 就查看 user ,要跳到 login
65             }else{
66                 next(); // 正常情况 直接next();  如果没有 next() 或者 next(false);这样就不跳转了,
67             }
68
69
70         });
71
72         // 3把 实例化的 router 放到 app1中
73         const app1 = new Vue({
74             el:'.box',
75             router:router,
76
77         });
78
79     </script>
80 </body>
81 </html>
还有 router.afterEach(): 不过它没有 next 操作,

命名的 router-view
 1 <!DOCTYPE html>
 2 <html lang="zh-CN">
 3 <head>
 4     <meta charset="utf-8">
 5     <meta http-equiv="X-UA-Compatible" content="IE=edge">
 6     <meta name="viewport" content="width=device-width, initial-scale=1">
 7     <title>hello world</title>
 8 </head>
 9 <body>
10     <div class="box" >
11         <router-link :to="{name:'home'}">首页</router-link> <!--router-link 底层是 a 标签  -->
12         <router-link :to="{name:'user'}">查看用户</router-link> <!--router-link 底层是 a 标签  -->
13         <router-view name="head"></router-view>  <!--专门展示 头部 head -->
14         <router-view></router-view>
15         <router-view name="foot"></router-view> <!--专门展示 尾部 foot  -->
16     </div>
17     <script src="vue.js"></script>
18     <script src="vue-router.js"></script>
19     <script>
20         let url = [
21             {
22                 path:'/',
23                 name:'home',// 起别名
24                 component:{
25                     template: `<div>这是组件1,根目录
26                                 <button @click="clickEvt">点击登录</button>
27                               </div> `,
28                     methods:{
29                     clickEvt:function () {
30                         this.$router.push('/login');
31                         }
32                     }
33                 },
34             },
35             {
36                 path:'/user',
37                 name:'user', // 起别名
38                 components: {
39                     head:{
40                         template: `<div>头部页面 </div> `
41                     },
42                     foot:{
43                         template: `<div>尾部页面 </div> `
44                     }
45
46                 },
47
48             },
49
50         ];
51         let router = new VueRouter({
52             routes:url,
53             mode:'history' // 可以整洁 地址栏中的 url
54         });
55         const app1 = new Vue({
56             el:'.box',
57             router:router,
58
59         });
60
61     </script>
62 </body>
63 </html>
其他:
mode = 'history' 小参数vue 生命周期:
https://www.cnblogs.com/GGGG-XXXX/articles/9467297.html

 1 <!DOCTYPE html>
 2 <html lang="zh-CN">
 3 <head>
 4     <meta charset="utf-8">
 5     <meta http-equiv="X-UA-Compatible" content="IE=edge">
 6     <meta name="viewport" content="width=device-width, initial-scale=1">
 7     <title>hello world</title>
 8 </head>
 9 <body>
10     <div class="box" >
11        {{username}}
12     </div>
13     <script src="vue.js"></script>
14     <script src="vue-router.js"></script>
15     <script>
16         const app1 = new Vue({
17             el:'.box',
18             data:{
19                 username:'tom'
20             },
21             methods:{
22                 func:function () {
23                     console.log('hello');
24                 }
25             },
26             beforeCreate(){ // 1, 钩子函数 1
27                 console.group('beforeCreate');
28                 console.log(this.$el);   //undefined
29                 console.log(this.username); //undefined
30                 console.log(this.func); //undefined
31             },
32             created(){ // 2, 钩子函数 2
33                 console.group('created');
34                 console.log(this.$el); //undefined
35                 console.log(this.username); // tom
36                 console.log(this.func); // ƒ () { ... }
37
38             },
39             beforeMount(){ // 3, 钩子函数 3
40                 console.group('beforeMount 页面真实加载完成之前 , 下面就要编译 dom, 就是做编译 一些例如 router-link router-view 等的工作');
41                 console.log(this.$el); //  <div>...</div>
42                 console.log(this.username); // tom
43                 console.log(this.func); // ƒ () { ... }
44             },
45             mounted(){ // 4, 钩子函数 4  *******常用******
46                 console.group('mounted 页面真实加载完成之后');
47                 console.log(this.$el); //  <div>...</div>
48                 console.log(this.username); // tom
49                 console.log(this.func); // ƒ () { ... }
50             },
51             beforeUpdate(){ // 5, 钩子函数 5   *******常用******
52                 console.group('beforeUpdate  更改数据 之前 ');
53                 console.log(this.$el); //  <div>...</div>
54                 console.log(this.username); // tom
55                 console.log(this.func); // ƒ () { ... }
56             },
57             updated(){ // 6, 钩子函数 6    *******常用******
58                 console.group('updated  更改数据 之后');
59                 console.log(this.$el); //  <div>...</div>
60                 console.log(this.username); // tom
61                 console.log(this.func); // ƒ () { ... }
62             },
63
64
65             beforeDestroy(){ // 7, 钩子函数 7  app.$destroy(); 会触发它们,
66                 console.group('beforeDestroy');
67                 console.log(this.$el);
68                 console.log(this.username);
69                 console.log(this.func);
70             },
71             destroyed(){ // 8, 钩子函数 8
72                 console.group('destroyed 一旦销毁之后 vue 的实例对象就不能再用了');
73                 console.log(this.$el);
74                 console.log(this.username);
75                 console.log(this.func);
76             },
77
78         });
79
80     </script>
81 </body>
82 </html>

element :
https://element.eleme.cn/#/zh-CN
现在很多网站都是 vue + element 来搭,不会用 jquery 和 bootstrap ,
但是,前后端不分离还是会用 jquery 和 bootstrap 来搭
导航条:
 1 <!DOCTYPE html>
 2 <html lang="zh-CN">
 3 <head>
 4     <meta charset="utf-8">
 5     <meta http-equiv="X-UA-Compatible" content="IE=edge">
 6     <meta name="viewport" content="width=device-width, initial-scale=1">
 7     <title>hello world</title>
 8
 9
10     <script src="vue.js"></script>
11     <script src="vue-router.js"></script>
12     <!-- element -->
13     <link rel="stylesheet" href="element/index.css">
14     <script src="element/index.js"></script>
15     <!-- 引入样式 -->
16 <!--    <link rel="stylesheet" href="https://unpkg.com/element-ui/lib/theme-chalk/index.css">-->
17     <!-- 引入组件库 -->
18 <!--    <script src="https://unpkg.com/element-ui/lib/index.js"></script>-->
19     <style>
20         .el-menu{
21             display: flex;
22             justify-content: center;
23         }
24     </style>
25 </head>
26 <body>
27     <template id="header">
28         <div class="page_head">
29 <!--            <el-menu :default-active="activeIndex" class="el-menu-demo" mode="horizontal" @select="handleSelect">-->
30             <el-menu :default-active="activeIndex" class="el-menu-demo" mode="horizontal" >
31                   <el-menu-item index="0">首页</el-menu-item>
32                   <el-menu-item index="1">免费课程</el-menu-item>
33                   <el-menu-item index="2">轻课</el-menu-item>
34                   <el-menu-item index="3">学位课程</el-menu-item>
35                   <el-menu-item index="4">智能题库</el-menu-item>
36             </el-menu>
37
38         </div>
39     </template>
40     <div class="box">
41         <my_header></my_header>
42     </div>
43     <script>
44         let my_header = {
45             template:'#header',// 这里是使用 选择器
46             data(){
47                 return {
48                     activeIndex:'0',
49                 }
50             }
51         };
52         const app = new Vue({
53             el:'.box',
54             components: {
55                 my_header:my_header,
56             }
57         });
58     </script>
59 </body>
60 </html>
 1 <!DOCTYPE html>
 2 <html lang="zh-CN">
 3 <head>
 4     <meta charset="utf-8">
 5     <meta http-equiv="X-UA-Compatible" content="IE=edge">
 6     <meta name="viewport" content="width=device-width, initial-scale=1">
 7     <title>hello world</title>
 8
 9
10     <script src="vue.js"></script>
11     <script src="vue-router.js"></script>
12     <!-- element -->
13     <link rel="stylesheet" href="element/index.css">
14     <script src="element/index.js"></script>
15     <!-- 引入样式 -->
16 <!--    <link rel="stylesheet" href="https://unpkg.com/element-ui/lib/theme-chalk/index.css">-->
17     <!-- 引入组件库 -->
18 <!--    <script src="https://unpkg.com/element-ui/lib/index.js"></script>-->
19     <style>
20         .el-menu{
21             display: flex;
22             justify-content: center;
23         }
24     </style>
25 </head>
26 <body>
27     <template id="header">
28         <div class="page_head">
29 <!--            <el-menu :default-active="activeIndex" class="el-menu-demo" mode="horizontal" @select="handleSelect">-->
30             <el-menu :default-active="activeIndex" class="el-menu-demo" mode="horizontal" :router="true">
31                   <el-menu-item index="/">首页</el-menu-item>
32                   <el-menu-item index="/course">免费课程</el-menu-item>
33                   <el-menu-item index="2">轻课</el-menu-item>
34                   <el-menu-item index="3">学位课程</el-menu-item>
35                   <el-menu-item index="4">智能题库</el-menu-item>
36             </el-menu>
37
38         </div>
39     </template>
40     <div class="box">
41         <my_header></my_header>
42         <router-view></router-view>
43     </div>
44     <script>
45         let my_header = {
46             template:'#header',// 这里是使用 选择器
47             data(){
48                 return {
49                     activeIndex:'/',
50                 }
51             }
52         };
53         let url = [
54             {
55                 path:'/',
56                 component:{
57                     template:`<div>这是首页</div>`
58                 },
59             },
60             {
61                 path:'/course',
62                 component:{
63                     template:`<div>这是免费课程页面</div>`
64                 },
65             },
66         ];
67         let router = new VueRouter({
68             routes:url,
69             mode:'history',
70         });
71         const app = new Vue({
72             el:'.box',
73             router:router,
74             components: {
75                 my_header:my_header,
76             }
77         });
78     </script>
79
80
81
82 </body>
83 </html>
npm 管理项目 :
https://www.cnblogs.com/GGGG-XXXX/articles/9503423.html

npm run 可以运行 package.json 中的脚本,
webpack 打包工具 :
默认入口文件 index.js ,出口文件 main.js , webpack 中的文件支持 es6 的 export 和 import
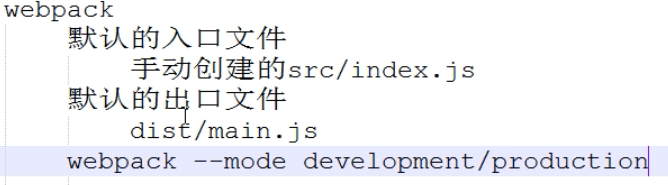
vue-cli :
https://files.cnblogs.com/files/zach0812/vue-cli%E6%90%AD%E5%BB%BA%E9%A1%B9%E7%9B%AE.zip
下到全局: npm install vue-cli -g
然后切换到工作目录: vue init webpack 项目名字
vuex :
https://www.cnblogs.com/GGGG-XXXX/articles/9467325.html
npm install vuex --save
为了解决组件间通信麻烦的问题,出现了 vue-x ,它是用来管理共用数据的


mpvue 中使用:
https://files.cnblogs.com/files/zach0812/vuex%E7%9A%84%E7%94%A8%E6%B3%95state.zip
axios :
npm install axios --save
它是向后端发送ajax 的工具,当然,你也可以使用原生 js ,或者使用jquery ,
axios 不能注册到 vue 的根实例中,但是,我们还想通过this.$ 来使用axios
可以通过加到原型中来干:

如果安装失败可以:
npm cache clean --forcevue-cookie :
将数据保存到 本地浏览器,