1. 什么是Debezium
Debezium是一个开源的分布式平台,用于捕捉变化数据(change data capture)的场景。它可以捕捉数据库中的事件变化(例如表的增、删、改等),并将其转为事件流,使得下游应用可以看到这些变化,并作出指定响应。
2. Debezium常规使用架构
根据Debezium官网[1]提供的常规使用的架构图:

可以看到,在对RMSDB数据源做数据摄入时,使用的是Kafka Connect。Source Connector从数据库中获取记录并发送到Kafka;Sink Connectors将记录从Kafka Topic 传播到其他系统中。
上图中分别对MySQL 与 PostgreSQL部署了connector:
- MySQL connector使用的是一个客户端库访问binlog
- PostgreSQL connector读取的是的一个replication stream
另一种方式是仅部署Debezium Server(不带Kakfa),架构如下图所示:
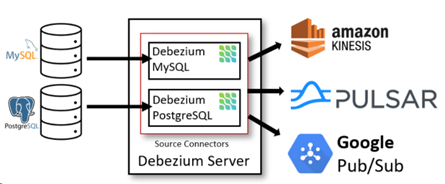
此方式使用的是Debezium自带的Source Connector。数据库端的事件会被序列化为JSON或Apache Avro格式,然后发送到其他消息系统如Kinesis、Apache Pulsar等。
3. 部署Debezium
在此次部署中,我们使用的均为AWS 资源:
- 使用AWS RDS MySQL作为源端数据库
- 使用AWS EKS 部署Kafka Connector
- 使用AWS MSK 部署Kafka
- Kafka下游为AWS EMR,运行Flink,实现增量载入Hudi表
此处会省去创建AWS RDS、EKS、MSK 以及 EMR的过程,主要介绍搭建过程中的具体使用到的方法。
3.1. AWS EKS部署Kafka Connector
3.1.1. 安装Operator Framework 与 Strimzi Apache Kafka Operator
先安装Operator Framework[2],它是一个用来管理k8s原生应用(Operator)的开源工具。然后安装Kafka可以使用Strimzi Apache Kafka Operator[3]。
安装最新版 operator-framework[4],当前版本为 0.18.1
kubectl apply -f https://github.com/operator-framework/operator-lifecycle-manager/releases/download/v0.18.1/crds.yaml

kubectl apply -f https://github.com/operator-framework/operator-lifecycle-manager/releases/download/v0.18.1/olm.yaml
安装Strimzi Apache Kafka Operator:
kubectl apply -f https://operatorhub.io/install/strimzi-kafka-operator.yaml

$ kubectl get csv -n operators
NAME                               DISPLAY   VERSION   REPLACES                           PHASE
strimzi-cluster-operator.v0.23.0   Strimzi   0.23.0    strimzi-cluster-operator.v0.22.1   Succeeded
3.1.2. 打包Debezium的MySQL Kafka Connector
下面部署Debezium 的 MySQL Kafka Connector。
源端数据库为MySQL,所以下载 debezium-connector-mysql,版本为1.5.0.Final:
wget https://repo1.maven.org/maven2/io/debezium/debezium-connector-mysql/1.5.0.Final
/debezium-connector-mysql-1.5.0.Final-plugin.tar.gz

tar -zxvf debezium-connector-mysql-1.5.0.Final-plugin.tar.gz
然后我们build一个自定义的debezium-connector-mysql Docker镜像:
创建Dockerfile:
FROM strimzi/kafka:0.20.1-kafka-2.6.0
USER root:root
RUN mkdir -p /opt/kafka/plugins/debezium
COPY ./debezium-connector-mysql/ /opt/kafka/plugins/debezium/
USER 1001
Bulid镜像并推送:
# 登录aws ecr
> aws ecr get-login --no-include-email

# Build 镜像
> sudo docker build . -t {ECR_Repository}/connect-debezium

# 推送到ECR
> sudo docker push {ECR_Repository}/connect-debezium
3.1.3. 部署 Debezium MySQL Connector
$ cat debezium-mysql-connector.yaml
apiVersion: kafka.strimzi.io/v1beta2
kind: KafkaConnect
metadata:
  name: debezium-connector
  namespace: kafka
#  annotations:
#  # use-connector-resources configures this KafkaConnect
#  # to use KafkaConnector resources to avoid
#  # needing to call the Connect REST API directly
#    strimzi.io/use-connector-resources: "true"
spec:
  version: 2.8.0
  replicas: 1
  bootstrapServers: xxxx
  image: xxxxxx.dkr.ecr.cn-north-1.amazonaws.com.cn/connect-debezium:latest
  config:
    group.id: connect-cluster
    offset.storage.topic: connect-cluster-offsets
    config.storage.topic: connect-cluster-configs
    status.storage.topic: connect-cluster-status
    # -1 means it will use the default replication factor configured in the broker
    config.storage.replication.factor: -1
    offset.storage.replication.factor: -1
status.storage.replication.factor: -1

$ kubectl apply -f debezium-mysql-connector.yaml

$ kubectl get pods -n kafka
NAME                                          READY   STATUS    RESTARTS   AGE
debezium-connector-connect-69c98cc784-kqvww   1/1     Running   0          5m44s
替换其中的bootstrapServers为AWS MSK bootstrapServers;image为3.1.2 步骤中打包的镜像地址。
使用本地代理访问Kafka Connect 服务,并验证可用 Connectors:
$ kubectl port-forward service/debezium-connector-connect-api 8083:8083 -n kafka

$ curl localhost:8083/connector-plugins
[{
    "class": "io.debezium.connector.mysql.MySqlConnector",
    "type": "source",
    "version": "1.5.0.Final"
}, {
    "class": "org.apache.kafka.connect.file.FileStreamSinkConnector",
    "type": "sink",
    "version": "2.6.0"
}
…
]
编写 MySQL Connector 配置文件:
$ cat mysql-connector-tang.json
{
  "name": "mysql-connector",
  "config": {
    "connector.class": "io.debezium.connector.mysql.MySqlConnector",
    "tasks.max": "1",
    "database.hostname": "xxxxx",
    "database.port": "3306",
    "database.user": "xxxx",
    "database.password": "xxxx",
    "database.server.id": "184055",
    "database.server.name": "mysql-tang",
    "database.include.list": "tang ",
    "database.history.kafka.bootstrap.servers": "xxxxx",
    "database.history.kafka.topic": " changes.tang"
  }
}
将配置推送到 Kafka Connector:
$ cat mysql-connector.json | curl -i -X POST -H "Accept:application/json" -H "Content-Type:application/json" localhost:8083/connectors/ -d @-
HTTP/1.1 201 Created
Date: Fri, 21 May 2021 11:00:25 GMT
Location: http://localhost:8083/connectors/mysql-connector-tang
Content-Type: application/json
Content-Length: 733
Server: Jetty(9.4.24.v20191120)

# 验证已经创建connector
$ curl localhost:8083/connectors/
["mysql-connector-tang"]
3.1.4. 验证
部署完成后,在AWS RDS MySQL 中创建库与测试表,并写入测试数据。此时在AWS MSK中未发现对应 events生成。
查看connector 的pod 日志:
$ kubectl logs debezium-connector-connect-69c98cc784-kqvww -n kafka
….
io.debezium.DebeziumException: The MySQL server is not configured to use a ROW binlog_format, which is required for this connector to work properly. Change the MySQL configuration to use a binlog_format=ROW and restart the connector.
        at io.debezium.connector.mysql.MySqlConnectorTask.validateBinlogConfiguration(MySqlConnectorTask.java:203)
        at io.debezium.connector.mysql.MySqlConnectorTask.start(MySqlConnectorTask.java:85)
        at io.debezium.connector.common.BaseSourceTask.start(BaseSourceTask.java:130)
可以看到MySQLConnector需要MySQL server 配置 binlog_format 为 ROW。
修改此配置后,再次通过进行kafka-console-consumer.sh 进行验证,即可看到测试数据库中的所有事件:
$ ./kafka-console-consumer.sh --bootstrap-server xxxx --topic schema-changes.inventory --from-beginning
…
{
  "source" : {
    "server" : "mysql-tang"
  },
  "position" : {
    "ts_sec" : 1621585297,
    "file" : "mysql-bin-changelog.000015",
    "pos" : 511,
    "snapshot" : true
  },
  "databaseName" : "inventory",
  "ddl" : "CREATE DATABASE `inventory` CHARSET latin1 COLLATE latin1_swedish_ci",
  "tableChanges" : [ ]
}
…
{
  "source" : {
    "server" : "mysql-tang"
  },
  "position" : {
    "ts_sec" : 1621585297,
    "file" : "mysql-bin-changelog.000015",
    "pos" : 511,
    "snapshot" : true
  },
  "databaseName" : "inventory",
  "ddl" : "CREATE TABLE `test` (
  `id` int(11) DEFAULT NULL,
  `name` varchar(10) DEFAULT NULL
) ENGINE=InnoDB DEFAULT CHARSET=latin1",
  "tableChanges" : [ {
    "type" : "CREATE",
    "id" : ""inventory"."test"",
    "table" : {
      "defaultCharsetName" : "latin1",
      "primaryKeyColumnNames" : [ ],
      "columns" : [ {
        "name" : "id",
        "jdbcType" : 4,
        "typeName" : "INT",
        "typeExpression" : "INT",
        "charsetName" : null,
        "length" : 11,
        "position" : 1,
        "optional" : true,
        "autoIncremented" : false,
        "generated" : false
      }, {
        "name" : "name",
        "jdbcType" : 12,
        "typeName" : "VARCHAR",
        "typeExpression" : "VARCHAR",
        "charsetName" : "latin1",
        "length" : 10,
        "position" : 2,
        "optional" : true,
        "autoIncremented" : false,
        "generated" : false
      } ]
    }
  } ]
}
4. Flink 消费Debezium 类型消息
RMDB数据经Debezium Connector写入Kafka后,先由Flink进行消费。可以参考Flink官网中对Debezium格式的处理代码[5]:
CREATE TABLE topic_products (
  -- schema is totally the same to the MySQL "products" table
  id BIGINT,
  name STRING,
  description STRING,
  weight DECIMAL(10, 2)
) WITH (
 'connector' = 'kafka',
 'topic' = 'products_binlog',
 'properties.bootstrap.servers' = 'localhost:9092',
 'properties.group.id' = 'testGroup',
 -- using 'debezium-json' as the format to interpret Debezium JSON messages
 -- please use 'debezium-avro-confluent' if Debezium encodes messages in Avro format
 'format' = 'debezium-json'
)
5. 写入Hudi表
RMDB数据经Debezium Connector写入Kafka后,接下来通过 Flink 将流式数据写入到一张Hudi表,实现实时数据到Hudi。此部分可以参考Hudi官网对Flink支持的代码[6]:
CREATE TABLE t1(
  uuid VARCHAR(20), -- you can use 'PRIMARY KEY NOT ENFORCED' syntax to mark the field as record key
  name VARCHAR(10),
  age INT,
  ts TIMESTAMP(3),
  `partition` VARCHAR(20)
)
PARTITIONED BY (`partition`)
WITH (
  'connector' = 'hudi',
  'path' = 'table_base_path',
  'write.tasks' = '1', -- default is 4 ,required more resource
  'compaction.tasks' = '1', -- default is 10 ,required more resource
  'table.type' = 'MERGE_ON_READ' -- this creates a MERGE_ON_READ table, by default is COPY_ON_WRITE
);
5.1. 依赖包问题
在这个过程中,有一点需要注意的是,在使用Hudi官网提到的 hudi-flink-bundle_2.11-0.7.0.jar (或hudi-flink-bundle_2.11-0.8.0.jar) 时,会遇到以下问题:
Caused by: org.apache.flink.table.api.ValidationException: Could not find any factory for identifier 'hudi' that implements 'org.apache.flink.table.factories.DynamicTableFactory' in the classpath.
从报错来看,hudi-flink-bundle_2.11-0.7.0.jar版本并未提供flink 与 hudi 通过 “connector=hudi” 集成的功能。但是在最新版的Hudi tutorial中有提到(当前为hudi 0.9 版本)需要hudi-flink-bundle_2.1?-*.*.*.jar。
于是笔者尝试了手动编译hudi 0.9 版本,build出hudi-flink-bundle_2.11-0.9.0-SNAPSHOT.jar。但是在编译过程中遇到以下问题:
[ERROR] Failed to execute goal on project hudi-hadoop-mr: Could not resolve dependencies for project org.apache.hudi:hudi-hadoop-mr:jar:0.9.0-SNAPSHOT: Failed to collect dependencies at org.apache.hive:hive-exec:jar:core:2.3.2 -> org.apache.calcite:calcite-core:jar:1.10.0 -> org.pentaho:pentaho-aggdesigner-algorithm:jar:5.1.5-jhyde: Failed to read artifact descriptor for org.pentaho:pentaho-aggdesigner-algorithm:jar:5.1.5-jhyde: Could not transfer artifact org.pentaho:pentaho-aggdesigner-algorithm:pom:5.1.5-jhyde from/to maven-default-http-blocker (http://0.0.0.0/): Blocked mirror for repositories: [nexus-aliyun (http://maven.aliyun.com/nexus/content/groups/public/, default, releases), datanucleus (http://www.datanucleus.org/downloads/maven2, default, releases), glassfish-repository (http://maven.glassfish.org/content/groups/glassfish, default, disabled), glassfish-repo-archive (http://maven.glassfish.org/content/groups/glassfish, default, disabled), apache.snapshots (http://repository.apache.org/snapshots, default, snapshots), central (http://repo.maven.apache.org/maven2, default, releases), conjars (http://conjars.org/repo, default, releases+snapshots)] -> [Help 1]
此问题说明的是无法从提供的任一maven 源中拉取org.pentaho:pentaho-aggdesigner-algorithm:jar:5.1.5-jhyde 包。
解决此问题的方法是:手动下载此jar包(位置为https://public.nexus.pentaho.org/repository/proxy-public-3rd-party-release/org/pentaho/pentaho-aggdesigner-algorithm/5.1.5-jhyde/pentaho-aggdesigner-algorithm-5.1.5-jhyde.jar
),并install 到本地 maven仓库中,再修改对应编译模块的pom文件,加上此依赖说明即可。
Maven install package的命令如:
../apache-maven-3.8.1/bin/mvn install:install-file -DgroupId=org.pentaho -DartifactId=pentaho-aggdesigner-algorithm -Dversion=5.1.5-jhyde -Dpackaging=jar -Dfile=/home/hadoop/.m2/repository/org/pentaho/pentaho-aggdesigner-algorithm/5.15-jhyde/pentaho-aggdesigner-algorithm-5.15-jhyde.jar
此过程完成后,可以成功解决flink sql 映射 hudi 表的问题。
5.2. Flink 版本问题
在AWS EMR 最新版 emr-5.33.0 下,Flink版本为1.12.1,而hudi 0.9 版本编译所需的Flink版本为1.12.2。
笔者在编译0.9 版本 hudi 的 hudi-flink-bundle_2.11-0.9.0-SNAPSHOT.jar后,在EMR-5.33.0 下使用,遇到版本不一致报出的 NoSuchMethod问题。尝试各种jar包替换后仍未解决。
所以最终使用的是自建Flink 1.12.2 版本集群。
6. Flink消费Debezium与写入Hudi测试
使用简单的测试表进行测试。
MySQL中建表:
create table customer(id varchar(20), name varchar(10), age int, user_level varchar(10));
启动Flink程序,主体代码为:
package cdc

import org.apache.flink.streaming.api.scala.StreamExecutionEnvironment
import org.apache.flink.table.api.{EnvironmentSettings, SqlDialect, TableResult}
import org.apache.flink.table.api.bridge.scala.StreamTableEnvironment

object DebeziumHudi {

  def main(args: Array[String]): Unit = {
    // Env settings
    val senv = StreamExecutionEnvironment.getExecutionEnvironment
    val blinkStreamSetting = EnvironmentSettings.newInstance().inStreamingMode().useBlinkPlanner().build()
    val tableEnv = StreamTableEnvironment.create(senv, blinkStreamSetting)
    tableEnv.getConfig().setSqlDialect(SqlDialect.DEFAULT)

    val table_base_path = args(0)
    val table_type = args(1)

    // kafka config
    val topicName = "my-con.tangdb.customer"
    val bootstrapServers = "xxxx:9092"
    val groupID = "group_mysql_tangdb"

    // create kafka table
    val create_kafka_table_sql = "CREATE TABLE customer(
" +
      "id VARCHAR(20),
" +
      "name VARCHAR(10),
" +
      "age int,
" +
      "user_level VARCHAR(20)
" +
      ") WITH (
" +
      "  'connector' = 'kafka',
" +
      "  'topic' = '" + topicName + "',
" +
      "  'properties.bootstrap.servers' = '" + bootstrapServers + "',
" +
      "  'properties.group.id' = '" + groupID + "',
" +
      "  'debezium-json.schema-include' = 'true',
" +
      "  'format' = 'debezium-json'
" +
      ")"


    // hudi table config
    //val table_base_path = "s3://xxx-hudi/customer/"
    //val table_type = "COPY_ON_WRITE"

    // create hudi table
    val create_hudi_table_sql = "CREATE TABLE customers_hudi(
" +
      "id VARCHAR(20) PRIMARY KEY NOT ENFORCED,
" +
      "name VARCHAR(10),
" +
      "age INT,
" +
      "ts TIMESTAMP(3),
" +
      "`user_level` VARCHAR(20) )
" +
      "PARTITIONED BY (user_level)
" +
      "WITH (
" +
      "  'connector' = 'hudi',
" +
      "  'path' = '" + table_base_path +"',
" +
      "  'table.type' = '" + table_type + "',
" +
      "  'read.tasks' = '1',
" +
      "  'write.tasks' = '1',
" +
      "  'compaction.tasks' = '1',
" +
      "  'write.batch.size' = '8',
" +
      "  'compaction.delta_commits' = '2',
" +
      "  'compaction.delta_seconds' = '10' " +
      ")"

    // do sql query
    tableEnv.executeSql(create_kafka_table_sql)
    tableEnv.executeSql(create_hudi_table_sql)
    tableEnv.executeSql("insert into customers_hudi (id, name, age, ts, user_level) select id, name, age, current_timestamp, user_level from customer")

  }

}
提交Flink程序后正常运行:
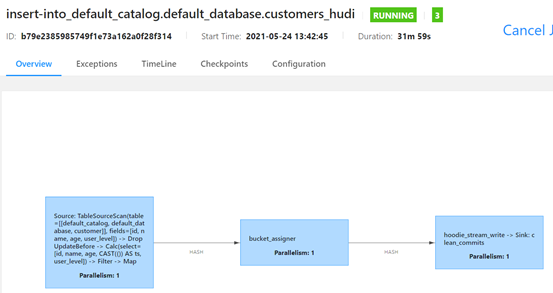
使用MySQL procedure 不断向customer 表中写入数据。可以观察到hudi路径下出现对应分区路径,并出现结果文件:
$ hdfs dfs -ls s3://xxx-hudi/customer/
Found 3 items
drwxrwxrwx   - hadoop hadoop          0 1970-01-01 00:00 s3://tang-hudi/customer/.hoodie
drwxrwxrwx   - hadoop hadoop          0 1970-01-01 00:00 s3://tang-hudi/customer/lv2
drwxrwxrwx   - hadoop hadoop          0 1970-01-01 00:00 s3://tang-hudi/customer/lv3

$ hdfs dfs -ls s3://xxx-hudi/customer/lv2/
Found 2 items
-rw-rw-rw-   1 hadoop hadoop         93 2021-05-24 13:52 s3://tang-hudi/customer/lv2/.hoodie_partition_metadata
-rw-rw-rw-   1 hadoop hadoop    2092019 2021-05-24 14:00 s3://tang-hudi/customer/lv2/e8195cc8-aae4-4462-8605-7f4eceac90ce_0-1-0_20210524134250.parquet
7. 验证hudi表
首先使用 AWS S3 Select 查询目标parquet文件,可以拿到正确结果:

但是,而后分别使用了 SparkSQL与 Hive对Hudi表地址进行映射并执行读取操作,结果均失败。暂未得出失败原因。
初步判断可能与包环境依赖有关。由于最新版AWS EMR emr-5.33.0 下,Flink版本为1.12.1,而hudi 0.9 版本编译所需的Flink版本为1.12.2。所以笔者使用了自建的Flink集群,当时仅考虑了Flink与Hudi版本保持一致,但未将Spark与Hive版本纳入考虑范围内,所以可能导致了此原因。
8. 总结
总体来看,Debezium是一个非常方便部署使用的CDC工具,可以有效地将RMSDB数据抽取到消息系统中,供不同的下游应用消费。而Flink直接对接Debezium与Hudi的功能,极大方便了数据湖场景下的实时数据ingestion。
References
[1] https://debezium.io/documentation/reference/1.5/architecture.html
[3] https://operatorhub.io/operator/strimzi-kafka-operator
[4] https://github.com/operator-framework/operator-lifecycle-manager/releases/
[5] https://ci.apache.org/projects/flink/flink-docs-release-1.13/docs/connectors/table/formats/debezium/
[6] https://hudi.apache.org/docs/flink-quick-start-guide.html