UITableView是最常用的控件,这里整理下常用方法,outline如下(本文参考http://www.cnblogs.com/kenshincui/p/3931948.html,代码下载地址为https://github.com/zanglitao/tableviewdemo)
1:基本介绍
2:数据源
3:代理
4:修改,删除,添加和排序
5:背景view
6:自定义cell
7:UITableViewController
8:UISearchdisplayController
9:下拉刷新
10:静态tableviewcell
基本介绍
UITableView有两种风格:UITableViewStylePlain和UITableViewStyleGrouped。这两者操作起来其实并没有本质区别,只是后者按分组样式显示前者按照普通样式显示而已。大家先看一下两者的应用:
1>分组样式


2>不分组样式


大家可以看到在UITableView中数据只有行的概念,并没有列的概念,因为在手机操作系统中显示多列是不利于操作的。UITableView中每行数据都是一个UITableViewCell,在这个控件中为了显示更多的信息,iOS已经在其内部设置好了多个子控件以供开发者使用。如果我们查看UITableViewCell的声明文件可以发现在内部有一个UIView控件(contentView,作为其他元素的父控件)、两个UILable控件(textLabel、detailTextLabel)、一个UIImage控件(imageView),分别用于容器、显示内容、详情和图片。使用效果类似于微信、QQ信息列表:


当然,这些子控件并不一定要全部使用,具体操作时可以通过UITableViewCellStyle进行设置,具体每个枚举表示的意思已经在代码中进行了注释:
typedef NS_ENUM(NSInteger, UITableViewCellStyle) {
    UITableViewCellStyleDefault,    // 左侧显示textLabel(不显示detailTextLabel),imageView可选(显示在最左边)
    UITableViewCellStyleValue1,        // 左侧显示textLabel、右侧显示detailTextLabel(默认蓝色),imageView可选(显示在最左边)
    UITableViewCellStyleValue2,        // 左侧依次显示textLabel(默认蓝色)和detailTextLabel,imageView可选(显示在最左边)
    UITableViewCellStyleSubtitle    // 左上方显示textLabel,左下方显示detailTextLabel(默认灰色),imageView可选(显示在最左边)
};
数据源
由于iOS是遵循MVC模式设计的,很多操作都是通过代理和外界沟通的,但对于数据源控件除了代理还有一个数据源属性,通过它和外界进行数据交互。 对于UITableView设置完dataSource后需要实现UITableViewDataSource协议,在这个协议中定义了多种 数据操作方法,下面通过创建一个简单的联系人管理进行演示:
UserEntity包括姓名和电话两个属性
@interface UserEntity : NSObject

@property(nonatomic,strong)NSString *name;
@property(nonatomic,strong)NSString *phone;

-(id)initWithName:(NSString *)name Phone:(NSString *)phone;

@end

@implementation UserEntity

-(id)initWithName:(NSString *)name Phone:(NSString *)phone {
    self = [super init];
    if (self) {
        self.name = name;
        self.phone = phone;
    }

    return self;
}

@end
UserGroup代表一个分表,包括联系人数组,分组代号以及分组描述
@interface UserGroup : NSObject

@property(nonatomic,strong)NSMutableArray *userEntities;
@property(nonatomic,strong)NSString *groupIdentifier;
@property(nonatomic,strong)NSString *groupIntro;

-(id)initWithEntities:(NSArray *)entities GroupIdentifier:(NSString *)groupIdentifier GroupIntro:(NSString *)groupIntro;

@end

@implementation UserGroup

-(id)initWithEntities:(NSMutableArray *)entities GroupIdentifier:(NSString *)groupIdentifier GroupIntro:(NSString *)groupIntro {
    self = [super init];
    if (self) {
        self.userEntities = entities;
        self.groupIdentifier = groupIdentifier;
        self.groupIntro = groupIntro;
    }
    return self;
}

@end
viewcontroller需要实现UITableViewDataSource协议,协议中包含了数据源相关方法,用来控制列表数据
@interface ZLTViewController ()<UITableViewDataSource> {
    UITableView *_tableView;
    NSMutableArray *_dataSource;
}

@end

@implementation ZLTViewController

- (void)viewDidLoad
{
    [super viewDidLoad];

    //配置列表需要展示的数据,真实项目中这部分数据往往来自文件或者网络
    [self initdata];

    _tableView = [[UITableView alloc] initWithFrame:[UIScreen mainScreen].bounds style:UITableViewStyleGrouped];
    //设置列表数据源
    _tableView.dataSource = self;

    [self.view addSubview:_tableView];
}

- (void)initdata {
    UserEntity *entity1 = [[UserEntity alloc] initWithName:@"user1" Phone:@"11111111111"];
    UserEntity *entity2 = [[UserEntity alloc] initWithName:@"user2" Phone:@"11111111112"];
    UserGroup *group1 = [[UserGroup alloc] initWithEntities:[NSMutableArray arrayWithObjects:entity1,entity2, nil] GroupIdentifier:@"1" GroupIntro:@"this is group1"];


    UserEntity *entity3 = [[UserEntity alloc] initWithName:@"user3" Phone:@"11111111113"];
    UserEntity *entity4 = [[UserEntity alloc] initWithName:@"user4" Phone:@"11111111114"];
    UserEntity *entity5 = [[UserEntity alloc] initWithName:@"user5" Phone:@"11111111115"];
    UserGroup *group2 = [[UserGroup alloc] initWithEntities:[NSMutableArray arrayWithObjects:entity3,entity4,entity5, nil] GroupIdentifier:@"2" GroupIntro:@"this is group2"];

    UserEntity *entity6 = [[UserEntity alloc] initWithName:@"user6" Phone:@"11111111116"];
    UserEntity *entity7 = [[UserEntity alloc] initWithName:@"user7" Phone:@"11111111117"];
    UserGroup *group3 = [[UserGroup alloc] initWithEntities:[NSMutableArray arrayWithObjects:entity6,entity7, nil] GroupIdentifier:@"3" GroupIntro:@"this is group3"];

    UserEntity *entity8 = [[UserEntity alloc] initWithName:@"user8" Phone:@"11111111118"];
    UserGroup *group4 = [[UserGroup alloc] initWithEntities:[NSMutableArray arrayWithObjects:entity8,nil] GroupIdentifier:@"4" GroupIntro:@"this is group4"];

    UserEntity *entity9 = [[UserEntity alloc] initWithName:@"user9" Phone:@"11111111119"];
    UserEntity *entity10 = [[UserEntity alloc] initWithName:@"user10" Phone:@"111111111110"];
    UserEntity *entity11 = [[UserEntity alloc] initWithName:@"user11" Phone:@"111111111111"];
    UserGroup *group5 = [[UserGroup alloc] initWithEntities:[NSMutableArray arrayWithObjects:entity9,entity10,entity11, nil] GroupIdentifier:@"5" GroupIntro:@"this is group5"];

    _dataSource = [NSMutableArray arrayWithObjects:group1,group2,group3,group4,group5, nil];
}

//返回列表分组数,默认为1
- (NSInteger)numberOfSectionsInTableView:(UITableView *)tableView {
    return [_dataSource count];
}

//返回列表每个分组section拥有cell行数
- (NSInteger)tableView:(UITableView *)tableView numberOfRowsInSection:(NSInteger)section {
    return [((UserGroup *)_dataSource[section]).userEntities count];
}

//配置每个cell,随着用户拖拽列表,cell将要出现在屏幕上时此方法会不断调用返回cell
- (UITableViewCell *)tableView:(UITableView *)tableView cellForRowAtIndexPath:(NSIndexPath *)indexPath {
    static NSString *identifier = @"mycell";
    UITableViewCell *cell = [tableView dequeueReusableCellWithIdentifier:identifier];

    if (!cell) {
        cell = [[UITableViewCell alloc] initWithStyle:UITableViewCellStyleSubtitle reuseIdentifier:identifier];
    }

    UserGroup *group = _dataSource[indexPath.section];
    UserEntity *entity = group.userEntities[indexPath.row];
    cell.detailTextLabel.text = entity.phone;
    cell.textLabel.text = entity.name;

    //给cell设置accessoryType或者accessoryView
    //也可以不设置,这里纯粹为了展示cell的常用可设置选项
    if (indexPath.section == 0 && indexPath.row == 0) {
        cell.accessoryType = UITableViewCellAccessoryDetailButton;
    }else if (indexPath.section == 0 && indexPath.row == 1) {
        cell.accessoryView = [[UISwitch alloc] initWithFrame:CGRectZero];
    } else {
        cell.accessoryType = UITableViewCellAccessoryNone;
    }

    //设置cell没有选中效果
    cell.selectionStyle = UITableViewCellSelectionStyleNone;

    return cell;
}

//返回列表每个分组头部说明
- (NSString *)tableView:(UITableView *)tableView titleForHeaderInSection:(NSInteger)section{
    return [_dataSource[section] groupIdentifier];
}

//返回列表每个分组尾部说明
- (NSString *)tableView:(UITableView *)tableView titleForFooterInSection:(NSInteger)section {
    return [_dataSource[section] groupIntro];
}

@end

大家在使用iPhone通讯录时会发现右侧可以按字母检索,使用起来很方便,其实这个功能使用UITableView实现很简单,只要实现数据源协议的一个方法,构建一个分组标题的数组即可实现。数组元素的内容和组标题内容未必完全一致,UITableView是按照数组元素的索引和每组数据索引顺序来定位的而不是按内容查找。
- (NSArray *)sectionIndexTitlesForTableView:(UITableView *)tableView {
    NSMutableArray *array = [NSMutableArray array];
    [_dataSource enumerateObjectsUsingBlock:^(id obj, NSUInteger idx, BOOL *stop) {
        [array addObject:[obj groupIdentifier]];
    }];

    return array;
}

需要注意的是上面几个重点方法的执行顺序,请看下图:

代理
数据源足以用来显示列表数据,但是如果我们需要改变sectionheader或者sectionfooter的高度,样式 ,以及处理cell点击事件还需要设置列表的代理UITableViewDelegate
@interface ZLTViewController ()<UITableViewDataSource,UITableViewDelegate> {
    UITableView *_tableView;
    NSMutableArray *_dataSource;
}

@end

@implementation ZLTViewController

- (void)viewDidLoad
{
    [super viewDidLoad];

    //配置列表需要展示的数据,真实项目中这部分数据往往来自文件或者网络
    [self initdata];

    _tableView = [[UITableView alloc] initWithFrame:[UIScreen mainScreen].bounds style:UITableViewStyleGrouped];
    //设置列表数据源
    _tableView.dataSource = self;
    //设置列表代理
    _tableView.delegate = self;

    [self.view addSubview:_tableView];
}

- (void)initdata {
    UserEntity *entity1 = [[UserEntity alloc] initWithName:@"user1" Phone:@"11111111111"];
    UserEntity *entity2 = [[UserEntity alloc] initWithName:@"user2" Phone:@"11111111112"];
    UserGroup *group1 = [[UserGroup alloc] initWithEntities:[NSMutableArray arrayWithObjects:entity1,entity2, nil] GroupIdentifier:@"1" GroupIntro:@"this is group1"];


    UserEntity *entity3 = [[UserEntity alloc] initWithName:@"user3" Phone:@"11111111113"];
    UserEntity *entity4 = [[UserEntity alloc] initWithName:@"user4" Phone:@"11111111114"];
    UserEntity *entity5 = [[UserEntity alloc] initWithName:@"user5" Phone:@"11111111115"];
    UserGroup *group2 = [[UserGroup alloc] initWithEntities:[NSMutableArray arrayWithObjects:entity3,entity4,entity5, nil] GroupIdentifier:@"2" GroupIntro:@"this is group2"];

    UserEntity *entity6 = [[UserEntity alloc] initWithName:@"user6" Phone:@"11111111116"];
    UserEntity *entity7 = [[UserEntity alloc] initWithName:@"user7" Phone:@"11111111117"];
    UserGroup *group3 = [[UserGroup alloc] initWithEntities:[NSMutableArray arrayWithObjects:entity6,entity7, nil] GroupIdentifier:@"3" GroupIntro:@"this is group3"];

    UserEntity *entity8 = [[UserEntity alloc] initWithName:@"user8" Phone:@"11111111118"];
    UserGroup *group4 = [[UserGroup alloc] initWithEntities:[NSMutableArray arrayWithObjects:entity8,nil] GroupIdentifier:@"4" GroupIntro:@"this is group4"];

    UserEntity *entity9 = [[UserEntity alloc] initWithName:@"user9" Phone:@"11111111119"];
    UserEntity *entity10 = [[UserEntity alloc] initWithName:@"user10" Phone:@"111111111110"];
    UserEntity *entity11 = [[UserEntity alloc] initWithName:@"user11" Phone:@"111111111111"];
    UserGroup *group5 = [[UserGroup alloc] initWithEntities:[NSMutableArray arrayWithObjects:entity9,entity10,entity11, nil] GroupIdentifier:@"5" GroupIntro:@"this is group5"];

    _dataSource = [NSMutableArray arrayWithObjects:group1,group2,group3,group4,group5, nil];
}

//返回列表分组数,默认为1
- (NSInteger)numberOfSectionsInTableView:(UITableView *)tableView {
    return [_dataSource count];
}

//返回列表每个分组section拥有cell行数
- (NSInteger)tableView:(UITableView *)tableView numberOfRowsInSection:(NSInteger)section {
    return [((UserGroup *)_dataSource[section]).userEntities count];
}

//配置每个cell,随着用户拖拽列表,cell将要出现在屏幕上时此方法会不断调用返回cell
- (UITableViewCell *)tableView:(UITableView *)tableView cellForRowAtIndexPath:(NSIndexPath *)indexPath {
    static NSString *identifier = @"mycell";
    UITableViewCell *cell = [tableView dequeueReusableCellWithIdentifier:identifier];

    if (!cell) {
        cell = [[UITableViewCell alloc] initWithStyle:UITableViewCellStyleSubtitle reuseIdentifier:identifier];
    }

    UserGroup *group = _dataSource[indexPath.section];
    UserEntity *entity = group.userEntities[indexPath.row];
    cell.detailTextLabel.text = entity.phone;
    cell.textLabel.text = entity.name;

    //给cell设置accessoryType或者accessoryView
    //也可以不设置,这里纯粹为了展示cell的常用可设置选项
//    if (indexPath.section == 0 && indexPath.row == 0) {
//        cell.accessoryType = UITableViewCellAccessoryDetailButton;
//    }else if (indexPath.section == 0 && indexPath.row == 1) {
//        cell.accessoryView = [[UISwitch alloc] initWithFrame:CGRectZero];
//    } else {
//        cell.accessoryType = UITableViewCellAccessoryNone;
//    }

    //设置cell没有选中效果
    cell.selectionStyle = UITableViewCellSelectionStyleNone;

    return cell;
}

//返回列表每个分组头部说明
- (NSString *)tableView:(UITableView *)tableView titleForHeaderInSection:(NSInteger)section{
    return [_dataSource[section] groupIdentifier];
}

//返回列表每个分组尾部说明
- (NSString *)tableView:(UITableView *)tableView titleForFooterInSection:(NSInteger)section {
    return [_dataSource[section] groupIntro];
}

- (NSArray *)sectionIndexTitlesForTableView:(UITableView *)tableView {
    NSMutableArray *array = [NSMutableArray array];
    [_dataSource enumerateObjectsUsingBlock:^(id obj, NSUInteger idx, BOOL *stop) {
        [array addObject:[obj groupIdentifier]];
    }];

    return array;
}

//设置cell的高度
- (CGFloat)tableView:(UITableView *)tableView heightForRowAtIndexPath:(NSIndexPath *)indexPath {
    return 60;
}

//设置sectionheader的高度
- (CGFloat)tableView:(UITableView *)tableView heightForHeaderInSection:(NSInteger)section {
    if (section == 0) {
        return 60;
    }
    return 40;
}

//设置sectionfooter的高度
- (CGFloat)tableView:(UITableView *)tableView heightForFooterInSection:(NSInteger)section {
    return 40;
}

//设置cell的点击事件
- (void)tableView:(UITableView *)tableView didSelectRowAtIndexPath:(NSIndexPath *)indexPath {

    UIAlertView *alertView = [[UIAlertView alloc] initWithTitle:@"title" message:@"message" delegate:nil cancelButtonTitle:@"确定" otherButtonTitles:nil];
    alertView.alertViewStyle = UIAlertViewStylePlainTextInput;
    UITextField *text = [alertView textFieldAtIndex:0];

    UserGroup *group = _dataSource[indexPath.section];
    NSString *phone = [group.userEntities[indexPath.row] phone];
    [text setText:phone];

    [alertView show];
}

//自定义sectionheader显示的view
//- (UIView *)tableView:(UITableView *)tableView viewForHeaderInSection:(NSInteger)section {
//    UIView *view = [[UIView alloc] initWithFrame:CGRectZero];
//    [view setBackgroundColor:[UIColor greenColor]];
//    return view;
//}

//自定义sectionfooter显示的view
//- (UIView *)tableView:(UITableView *)tableView viewForFooterInSection:(NSInteger)section {
//    UIView *view = [[UIView alloc] initWithFrame:CGRectZero];
//    [view setBackgroundColor:[UIColor yellowColor]];
//    return view;
//}
@end

由于实现了tableView:didSelectRowAtIndexPath: ,所以点击某个cell后会alert出联系人的属性"phone"
修改,删除,添加和排序
UITableView除了显示数据外,往往还提供了更多的交互。
修改数据:当我们点击cell后弹出alertview,在alertView中可以设置号码属性,修改完后调用reloadRowsAtIndexPaths对界面进行局部更新
//设置cell的点击事件
- (void)tableView:(UITableView *)tableView didSelectRowAtIndexPath:(NSIndexPath *)indexPath {
    _indexPath = indexPath;
    UIAlertView *alertView = [[UIAlertView alloc] initWithTitle:@"title" message:@"message" delegate:self cancelButtonTitle:@"取消" otherButtonTitles:@"确定",nil];
    alertView.alertViewStyle = UIAlertViewStylePlainTextInput;
    UITextField *text = [alertView textFieldAtIndex:0];

    UserGroup *group = _dataSource[indexPath.section];
    NSString *phone = [group.userEntities[indexPath.row] phone];
    [text setText:phone];

    [alertView show];
}

- (void)alertView:(UIAlertView *)alertView clickedButtonAtIndex:(NSInteger)buttonIndex {
    if (buttonIndex == 1) {
        UITextField *field = [alertView textFieldAtIndex:0];
        NSString *phone = [field text];

        UserGroup *group = _dataSource[_indexPath.section];
        UserEntity *entity = group.userEntities[_indexPath.row];
        [entity setPhone:phone];

        //[_tableView reloadData];
        [_tableView reloadRowsAtIndexPaths:@[_indexPath] withRowAnimation:UITableViewRowAnimationFade];
    }
}
除了局部indexpath的更新外,UITableview还提供了reloadData来进行整个列表的更新,但是这种更新肯定比局部更新更耗资源
删除,添加数据:通过setEditing:YES可以让列表处于编辑状态,我们可以设置方法
- (UITableViewCellEditingStyle)tableView:(UITableView *)tableView editingStyleForRowAtIndexPath:(NSIndexPath *)indexPath
的返回值确定编辑风格是删除还是添加,默认状态下该方法返回的编辑风格是删除风格UITableViewCellEditingStyleDelete
我们在根视图上添加一个toolbar,toolbar上放置删除和添加两个按钮,当点击按钮后设置相应的编辑风格,然后让列表进入编辑状态
@interface ZLTViewController ()<UITableViewDataSource,UITableViewDelegate> {
    UITableView *_tableView;
    NSMutableArray *_dataSource;
    NSIndexPath *_indexPath;
    UIToolbar *_toolbar;

    //判断当前处于的状态
    BOOL *_isAdd;
}

@end

@implementation ZLTViewController

- (void)viewDidLoad
{
    [super viewDidLoad];

    //配置列表需要展示的数据,真实项目中这部分数据往往来自文件或者网络
    [self initdata];

    _tableView = [[UITableView alloc] initWithFrame:[UIScreen mainScreen].bounds style:UITableViewStyleGrouped];
    //设置列表数据源
    _tableView.dataSource = self;
    //设置列表代理
    _tableView.delegate = self;
    //为了不遮挡toolbar,tableview的内容显示区域向下移动44个像素
    _tableView.contentInset = UIEdgeInsetsMake(44, 0, 0, 0);


    [self.view addSubview:_tableView];
    [self setToolbar];
}

- (void)setToolbar {
    _toolbar = [[UIToolbar alloc] initWithFrame:CGRectMake(0, 0, 320, 44)];
    [self.view addSubview:_toolbar];

    UIBarButtonItem *deleteItem = [[UIBarButtonItem alloc] initWithBarButtonSystemItem:UIBarButtonSystemItemTrash target:self action:@selector(delete)];

    UIBarButtonItem *flexibleItem = [[UIBarButtonItem alloc] initWithBarButtonSystemItem:UIBarButtonSystemItemFlexibleSpace target:nil action:nil];

    UIBarButtonItem *addItem = [[UIBarButtonItem alloc] initWithBarButtonSystemItem:UIBarButtonSystemItemAdd target:self action:@selector(add)];
    _toolbar.items = @[deleteItem,flexibleItem,addItem];
}


- (void)initdata {
    UserEntity *entity1 = [[UserEntity alloc] initWithName:@"user1" Phone:@"11111111111"];
    UserEntity *entity2 = [[UserEntity alloc] initWithName:@"user2" Phone:@"11111111112"];
    UserGroup *group1 = [[UserGroup alloc] initWithEntities:[NSMutableArray arrayWithObjects:entity1,entity2, nil] GroupIdentifier:@"1" GroupIntro:@"this is group1"];


    UserEntity *entity3 = [[UserEntity alloc] initWithName:@"user3" Phone:@"11111111113"];
    UserEntity *entity4 = [[UserEntity alloc] initWithName:@"user4" Phone:@"11111111114"];
    UserEntity *entity5 = [[UserEntity alloc] initWithName:@"user5" Phone:@"11111111115"];
    UserGroup *group2 = [[UserGroup alloc] initWithEntities:[NSMutableArray arrayWithObjects:entity3,entity4,entity5, nil] GroupIdentifier:@"2" GroupIntro:@"this is group2"];

    UserEntity *entity6 = [[UserEntity alloc] initWithName:@"user6" Phone:@"11111111116"];
    UserEntity *entity7 = [[UserEntity alloc] initWithName:@"user7" Phone:@"11111111117"];
    UserGroup *group3 = [[UserGroup alloc] initWithEntities:[NSMutableArray arrayWithObjects:entity6,entity7, nil] GroupIdentifier:@"3" GroupIntro:@"this is group3"];

    UserEntity *entity8 = [[UserEntity alloc] initWithName:@"user8" Phone:@"11111111118"];
    UserGroup *group4 = [[UserGroup alloc] initWithEntities:[NSMutableArray arrayWithObjects:entity8,nil] GroupIdentifier:@"4" GroupIntro:@"this is group4"];

    UserEntity *entity9 = [[UserEntity alloc] initWithName:@"user9" Phone:@"11111111119"];
    UserEntity *entity10 = [[UserEntity alloc] initWithName:@"user10" Phone:@"111111111110"];
    UserEntity *entity11 = [[UserEntity alloc] initWithName:@"user11" Phone:@"111111111111"];
    UserGroup *group5 = [[UserGroup alloc] initWithEntities:[NSMutableArray arrayWithObjects:entity9,entity10,entity11, nil] GroupIdentifier:@"5" GroupIntro:@"this is group5"];

    _dataSource = [NSMutableArray arrayWithObjects:group1,group2,group3,group4,group5, nil];
}

//返回列表分组数,默认为1
- (NSInteger)numberOfSectionsInTableView:(UITableView *)tableView {
    return [_dataSource count];
}

//返回列表每个分组section拥有cell行数
- (NSInteger)tableView:(UITableView *)tableView numberOfRowsInSection:(NSInteger)section {
    return [((UserGroup *)_dataSource[section]).userEntities count];
}

//配置每个cell,随着用户拖拽列表,cell将要出现在屏幕上时此方法会不断调用返回cell
- (UITableViewCell *)tableView:(UITableView *)tableView cellForRowAtIndexPath:(NSIndexPath *)indexPath {
    static NSString *identifier = @"mycell";
    UITableViewCell *cell = [tableView dequeueReusableCellWithIdentifier:identifier];

    if (!cell) {
        cell = [[UITableViewCell alloc] initWithStyle:UITableViewCellStyleSubtitle reuseIdentifier:identifier];
    }

    UserGroup *group = _dataSource[indexPath.section];
    UserEntity *entity = group.userEntities[indexPath.row];
    cell.detailTextLabel.text = entity.phone;
    cell.textLabel.text = entity.name;

    //给cell设置accessoryType或者accessoryView
    //也可以不设置,这里纯粹为了展示cell的常用可设置选项
//    if (indexPath.section == 0 && indexPath.row == 0) {
//        cell.accessoryType = UITableViewCellAccessoryDetailButton;
//    }else if (indexPath.section == 0 && indexPath.row == 1) {
//        cell.accessoryView = [[UISwitch alloc] initWithFrame:CGRectZero];
//    } else {
//        cell.accessoryType = UITableViewCellAccessoryNone;
//    }

    //设置cell没有选中效果
    cell.selectionStyle = UITableViewCellSelectionStyleNone;

    return cell;
}

//返回列表每个分组头部说明
- (NSString *)tableView:(UITableView *)tableView titleForHeaderInSection:(NSInteger)section{
    return [_dataSource[section] groupIdentifier];
}

//返回列表每个分组尾部说明
- (NSString *)tableView:(UITableView *)tableView titleForFooterInSection:(NSInteger)section {
    return [_dataSource[section] groupIntro];
}

- (NSArray *)sectionIndexTitlesForTableView:(UITableView *)tableView {
    NSMutableArray *array = [NSMutableArray array];
    [_dataSource enumerateObjectsUsingBlock:^(id obj, NSUInteger idx, BOOL *stop) {
        [array addObject:[obj groupIdentifier]];
    }];

    return array;
}

//设置cell的高度
- (CGFloat)tableView:(UITableView *)tableView heightForRowAtIndexPath:(NSIndexPath *)indexPath {
    return 60;
}

//设置sectionheader的高度
- (CGFloat)tableView:(UITableView *)tableView heightForHeaderInSection:(NSInteger)section {
    if (section == 0) {
        return 60;
    }
    return 40;
}

//设置sectionfooter的高度
- (CGFloat)tableView:(UITableView *)tableView heightForFooterInSection:(NSInteger)section {
    return 40;
}

//设置cell的点击事件
- (void)tableView:(UITableView *)tableView didSelectRowAtIndexPath:(NSIndexPath *)indexPath {
    _indexPath = indexPath;
    UIAlertView *alertView = [[UIAlertView alloc] initWithTitle:@"title" message:@"message" delegate:self cancelButtonTitle:@"取消" otherButtonTitles:@"确定",nil];
    alertView.alertViewStyle = UIAlertViewStylePlainTextInput;
    UITextField *text = [alertView textFieldAtIndex:0];

    UserGroup *group = _dataSource[indexPath.section];
    NSString *phone = [group.userEntities[indexPath.row] phone];
    [text setText:phone];

    [alertView show];
}

//自定义sectionheader显示的view
//- (UIView *)tableView:(UITableView *)tableView viewForHeaderInSection:(NSInteger)section {
//    UIView *view = [[UIView alloc] initWithFrame:CGRectZero];
//    [view setBackgroundColor:[UIColor greenColor]];
//    return view;
//}

//自定义sectionfooter显示的view
//- (UIView *)tableView:(UITableView *)tableView viewForFooterInSection:(NSInteger)section {
//    UIView *view = [[UIView alloc] initWithFrame:CGRectZero];
//    [view setBackgroundColor:[UIColor yellowColor]];
//    return view;
//}

//设置编辑风格
- (UITableViewCellEditingStyle)tableView:(UITableView *)tableView editingStyleForRowAtIndexPath:(NSIndexPath *)indexPath {
    if (_isAdd) {
        return UITableViewCellEditingStyleInsert;
    } else {
        return UITableViewCellEditingStyleDelete;
    }
}

//处理添加和删除的代码
-(void)tableView:(UITableView *)tableView commitEditingStyle:(UITableViewCellEditingStyle)editingStyle forRowAtIndexPath:(NSIndexPath *)indexPath {
    if (editingStyle == UITableViewCellEditingStyleDelete) {
        UserGroup *group = _dataSource[indexPath.section];
        [group.userEntities removeObjectAtIndex:indexPath.row];


        [_tableView deleteRowsAtIndexPaths:@[indexPath] withRowAnimation:UITableViewRowAnimationBottom];

        if ([group.userEntities count] == 0) {
            [_dataSource removeObjectAtIndex:indexPath.section];
            [_tableView deleteSections:[NSIndexSet indexSetWithIndex:indexPath.section] withRowAnimation:UITableViewRowAnimationBottom];
        }
    } else if(editingStyle == UITableViewCellEditingStyleInsert) {
        UserGroup *group = _dataSource[indexPath.section];
        [group.userEntities insertObject:[[UserEntity alloc] initWithName:@"new user" Phone:@"137xxxxxxxx"] atIndex:indexPath.row];

        [_tableView insertRowsAtIndexPaths:@[indexPath] withRowAnimation:UITableViewRowAnimationLeft];
    }
}


//删除
- (void)delete {
    _isAdd = NO;
    [_tableView setEditing:!_tableView.isEditing animated:YES];
}


//添加
- (void)add {
    _isAdd = YES;
    [_tableView setEditing:!_tableView.isEditing animated:YES];
}


//修改
- (void)alertView:(UIAlertView *)alertView clickedButtonAtIndex:(NSInteger)buttonIndex {
    if (buttonIndex == 1) {
        UITextField *field = [alertView textFieldAtIndex:0];
        NSString *phone = [field text];

        UserGroup *group = _dataSource[_indexPath.section];
        UserEntity *entity = group.userEntities[_indexPath.row];
        [entity setPhone:phone];

        //[_tableView reloadData];
        [_tableView reloadRowsAtIndexPaths:@[_indexPath] withRowAnimation:UITableViewRowAnimationFade];
    }
}


@end

排序:当实现- (void)tableView:(UITableView *)tableView moveRowAtIndexPath:(NSIndexPath *)sourceIndexPath toIndexPath:(NSIndexPath *)destinationIndexPath
方法后,列表处于编辑状态时就可以移动cell

背景view
当我们删除完列表中所有的数据,或者列表中本来就没有数据时可以设置一个背景,比如显示一个logo
UITableView有个属性为backgroundView,我们可以通过这个属性设置列表的背景视图,当加载完数据或者对数据进行了删除添加操作后判断数据源中有没有数据,如果没有则在tableview中心处显示"暂时没有数据",如果有则不显示
- (void)viewDidLoad
{
    [super viewDidLoad];

    //配置列表需要展示的数据,真实项目中这部分数据往往来自文件或者网络
    [self initdata];

    _tableView = [[UITableView alloc] initWithFrame:[UIScreen mainScreen].bounds style:UITableViewStyleGrouped];
    //设置列表数据源
    _tableView.dataSource = self;
    //设置列表代理
    _tableView.delegate = self;
    //为了不遮挡toolbar,tableview的内容显示区域向下移动44个像素
    _tableView.contentInset = UIEdgeInsetsMake(44, 0, 0, 0);

    UIView *view = [[UIView alloc] initWithFrame:CGRectZero];
    UILabel *label = [[UILabel alloc] initWithFrame:CGRectMake(0, 0, 320, 44)];
    label.tag = 1;
    label.text = @"暂时没有数据";
    label.textAlignment = NSTextAlignmentCenter;
    [label setTextColor:[UIColor lightGrayColor]];
    [view addSubview:label];
    _tableView.backgroundView = view;
    label.center = view.center;

    if ([_dataSource count] != 0) {
        [[_tableView.backgroundView viewWithTag:1] setHidden:YES];
    }

    [self.view addSubview:_tableView];
    [self setToolbar];
}

-(void)tableView:(UITableView *)tableView commitEditingStyle:(UITableViewCellEditingStyle)editingStyle forRowAtIndexPath:(NSIndexPath *)indexPath {
    if (editingStyle == UITableViewCellEditingStyleDelete) {
        UserGroup *group = _dataSource[indexPath.section];
        [group.userEntities removeObjectAtIndex:indexPath.row];


        [_tableView deleteRowsAtIndexPaths:@[indexPath] withRowAnimation:UITableViewRowAnimationBottom];

        if ([group.userEntities count] == 0) {
            [_dataSource removeObjectAtIndex:indexPath.section];
            [_tableView deleteSections:[NSIndexSet indexSetWithIndex:indexPath.section] withRowAnimation:UITableViewRowAnimationBottom];
        }
    } else if(editingStyle == UITableViewCellEditingStyleInsert) {
        UserGroup *group = _dataSource[indexPath.section];
        [group.userEntities insertObject:[[UserEntity alloc] initWithName:@"new user" Phone:@"137xxxxxxxx"] atIndex:indexPath.row];

        [_tableView insertRowsAtIndexPaths:@[indexPath] withRowAnimation:UITableViewRowAnimationLeft];
    }

    if ([_dataSource count] == 0) {
        [[_tableView.backgroundView viewWithTag:1] setHidden:NO];
    } else {
        [[_tableView.backgroundView viewWithTag:1] setHidden:YES];
    }
}

自定义cell
UITableViewCell是构建一个UITableView的基础,在UITableViewCell内部有一个UIView控件作为其他内容的容器,它上面有一个UIImageView和两个UILabel,通过UITableViewCellStyle属性可以对其样式进行控制。其结构如下:

有时候我们会发现很多UITableViewCell右侧可以显示不同的图标,在iOS中称之为访问器,点击可以触发不同的事件,例如设置功能:

要设置这些图标只需要设置UITableViewCell的accesoryType属性,这是一个枚举类型具体含义如下:
typedef NS_ENUM(NSInteger, UITableViewCellAccessoryType) {
    UITableViewCellAccessoryNone,                   // 不显示任何图标
    UITableViewCellAccessoryDisclosureIndicator,    // 跳转指示图标
    UITableViewCellAccessoryDetailDisclosureButton, // 内容详情图标和跳转指示图标
    UITableViewCellAccessoryCheckmark,              // 勾选图标
    UITableViewCellAccessoryDetailButton NS_ENUM_AVAILABLE_IOS(7_0) // 内容详情图标
};
显然系统提供的几种样式是无法满足各种功能繁多的应用的,我们需要自定义自己的cell
自定义cell的方式有很多,有纯代码的实现,也有通过xib实现或者通过storyboard实现,这里介绍使用storyboard,这也是最方便的方式
1:新建两个文件:CustomTableCellController(继承UIViewController) CustomTableCell(继承UITableViewCell)
2:在storyboard中新加入一个ViewController,file owner为CustomTableCellView
3:拖入一个tableView,设置一个prototype cell

4:在cell中拖入两个label,并且设置cell的class为CustomTableCell,并设置一个identifier

5:CustomTableCell
@interface CustomTableCell : UITableViewCell
@property (weak, nonatomic) IBOutlet UILabel *label1;
@property (weak, nonatomic) IBOutlet UILabel *label2;

-(void)setContent:(NSDictionary *)dic;
@end

@implementation CustomTableCell

- (id)initWithStyle:(UITableViewCellStyle)style reuseIdentifier:(NSString *)reuseIdentifier
{
    self = [super initWithStyle:style reuseIdentifier:reuseIdentifier];
    if (self) {
        // Initialization code
    }
    return self;
}

-(void)setContent:(NSDictionary *)dic {
    NSString *label1 = dic[@"label1"];
    NSString *lable2 = dic[@"label2"];
    [_label1 setText:label1];

    CGSize textSize=[lable2 boundingRectWithSize:CGSizeMake(226, MAXFLOAT) options:NSStringDrawingUsesLineFragmentOrigin attributes:@{NSFontAttributeName: [UIFont systemFontOfSize:17]} context:nil].size;

    _label2.frame = CGRectMake(_label2.frame.origin.x, _label2.frame.origin.y, _label2.frame.size.width, textSize.height);
    _label2.text = lable2;
}

@end
6: CustomTableCellController
@interface CustomTableCellController ()<UITableViewDelegate,UITableViewDataSource> {
    NSArray *_array;
}
@property (weak, nonatomic) IBOutlet UITableView *tableView;

@end

@implementation CustomTableCellController

- (void)viewDidLoad
{
    [super viewDidLoad];

    _array = @[@{@"label1": @"静夜思",@"label2":@"床前明月光,疑是地上霜。举头望明月,低头思故乡。"},@{@"label1": @"早秋",@"label2":@"遥夜泛清瑟,西风生翠萝。残萤栖玉露,早雁拂金河。高树晓还密,远山晴更多。                             淮南一叶下,自觉洞庭波。"}];

    _tableView.delegate = self;
    _tableView.dataSource = self;
}

- (void)didReceiveMemoryWarning
{
    [super didReceiveMemoryWarning];
    // Dispose of any resources that can be recreated.
}

#pragma mark - Table view data source

- (NSInteger)tableView:(UITableView *)tableView numberOfRowsInSection:(NSInteger)section
{
    return 2;
}


- (UITableViewCell *)tableView:(UITableView *)tableView cellForRowAtIndexPath:(NSIndexPath *)indexPath
{
    CustomTableCell *cell = [tableView dequeueReusableCellWithIdentifier:@"customcell" forIndexPath:indexPath];

    [cell setContent:_array[indexPath.row]];

    return cell;
}

- (CGFloat)tableView:(UITableView *)tableView heightForRowAtIndexPath:(NSIndexPath *)indexPath {
    CGSize textSize=[_array[indexPath.row][@"label2"] boundingRectWithSize:CGSizeMake(226, MAXFLOAT) options:NSStringDrawingUsesLineFragmentOrigin attributes:@{NSFontAttributeName: [UIFont systemFontOfSize:17]} context:nil].size;

    return textSize.height + 10;
}
@end

UITableViewController
很多时候一个UIViewController中只有一个UITableView,因此苹果官方为了方便大家开发直接提供了一个UITableViewController,这个控制器 UITableViewController实现了UITableView数据源和代理协议,内部定义了一个tableView属性供外部访问,同时自动铺满整个屏幕、自动伸缩以方便我们的开发。当然UITableViewController也并不是简单的帮我们定义完UITableView并且设置了数据源、代理而已,它还有其他强大的功能,例如刷新控件、滚动过程中固定分组标题等。
有时候一个表格中的数据特别多,检索起来就显得麻烦,这个时候可以实现一个搜索功能帮助用户查找数据,其实搜索的原理很简单:修改模型、刷新表格。下面使用UITableViewController简单演示一下这个功能:
@interface CustomTableViewController : UITableViewController
@end


@interface CustomTableViewController ()<UISearchBarDelegate> {
    UISearchBar *_searchBar;
    //数据源
    NSArray *_datasource;

    //存放符合筛选条件的数据源
    NSMutableArray *_filterdatasource;

    //searcbar是否处于搜索状态,这个布尔值决定使用_datasource还是_filterdatasource
    BOOL _isSearching;
}

@end

@implementation CustomTableViewController

- (void)viewDidLoad
{
    [super viewDidLoad];
    _datasource = @[@[@"zanglitao",@"zang",@"li",@"tao"],@[@"male"]];
    _filterdatasource = [NSMutableArray array];


    _searchBar = [[UISearchBar alloc] initWithFrame:CGRectMake(0, 0, 320, 44)];
    _searchBar.delegate = self;
    _searchBar.showsCancelButton = YES;
    _searchBar.placeholder = @"输入关键字";
    //_searchBar.keyboardType = UIKeyboardTypeAlphabet;//键盘类型
    //_searchBar.autocorrectionType = UITextAutocorrectionTypeNo;//自动纠错类型
    //_searchBar.autocapitalizationType = UITextAutocapitalizationTypeNone;//哪一次shitf被自动按下
    self.tableView.tableHeaderView = _searchBar;
}

- (void)didReceiveMemoryWarning
{
    [super didReceiveMemoryWarning];
    // Dispose of any resources that can be recreated.
}

#pragma mark - Table view data source
- (NSInteger)numberOfSectionsInTableView:(UITableView *)tableView {
    if (_isSearching) {
        return 1;
    }
    return [_datasource count];
}

- (NSInteger)tableView:(UITableView *)tableView numberOfRowsInSection:(NSInteger)section
{
    if (_isSearching) {
        return [_filterdatasource count];
    }
    return [_datasource[section] count];
}


- (UITableViewCell *)tableView:(UITableView *)tableView cellForRowAtIndexPath:(NSIndexPath *)indexPath
{
    static NSString *identifier = @"cell";
    UITableViewCell *cell = [tableView dequeueReusableCellWithIdentifier:identifier];
    if (!cell) {
        cell = [[UITableViewCell alloc] initWithStyle:UITableViewCellStyleDefault reuseIdentifier:identifier];
    }
    if (_isSearching) {
        cell.textLabel.text = _filterdatasource[indexPath.row];
    } else {
        cell.textLabel.text = _datasource[indexPath.section][indexPath.row];
    }


    return cell;
}

- (NSString *)tableView:(UITableView *)tableView titleForHeaderInSection:(NSInteger)section {
    if (_isSearching) {
        return @"搜索结果";
    }
    return [NSString stringWithFormat:@"%d",section];
}

#pragma mark - Search bar delegate
//searchbar开始处于编辑状态时调用
- (void)searchBarTextDidBeginEditing:(UISearchBar *)searchBar {
    [_filterdatasource removeAllObjects];
    _isSearching = YES;
    [self.tableView reloadData];
}

//searchbar内容改变时调用
- (void)searchBar:(UISearchBar *)searchBar textDidChange:(NSString *)searchText {
    [_filterdatasource removeAllObjects];
    [_datasource enumerateObjectsUsingBlock:^(id obj, NSUInteger idx, BOOL *stop) {
        [obj enumerateObjectsUsingBlock:^(id obj, NSUInteger idx, BOOL *stop) {
            NSString *str = [(NSString *)obj uppercaseString];
            if ([str rangeOfString:[searchText uppercaseString]].location != NSNotFound) {
                [_filterdatasource addObject:obj];
            }
        }];
    }];

    [self.tableView reloadData];
}

//点击searchbar的cancel按钮时调用
- (void)searchBarCancelButtonClicked:(UISearchBar *) searchBar{
    [searchBar resignFirstResponder];
    [searchBar setText:@""];
    _isSearching = NO;
    [self.tableView reloadData];
}

//点击搜索
- (void)searchBarSearchButtonClicked:(UISearchBar *)searchBar {
    [searchBar resignFirstResponder];
}
@end

UISearchDisplayController
在上面的搜索中每次搜索完后都需要手动刷新表格来显示搜索结果,我们要用一个tableView显示两种状态的不同数据,提高了程序逻辑复杂度。为了简化这个过程,我们可以使用UISearchDisplayController,UISearchDisplayController内部也有一个UITableView类型的对象searchResultsTableView,如果我们设置它的数据源代理为当前控制器,那么它完全可以像UITableView一样加载数据。同时它本身也有搜索监听的方法,我们不必在监听UISearchBar输入内容,直接使用它的方法即可自动刷新其内部表格。
@interface CustomSearchBarTableViewController : UITableViewController
@end

@interface CustomSearchBarTableViewController ()<UISearchDisplayDelegate,UISearchBarDelegate> {
    //数据源
    NSArray *_datasource;

    //存放符合筛选条件的数据源
    NSMutableArray *_filterdatasource;

    UISearchDisplayController *_searchController;
    UISearchBar *_searchBar;
}

@end

@implementation CustomSearchBarTableViewController
- (void)viewDidLoad
{
    [super viewDidLoad];

    _datasource = @[@[@"zanglitao",@"zang",@"li",@"tao"],@[@"male"]];
    _filterdatasource = [NSMutableArray array];

    _searchBar = [[UISearchBar alloc] initWithFrame:CGRectMake(0, 0, 320, 44)];
    _searchBar.delegate = self;
    _searchBar.showsCancelButton = YES;
    _searchBar.placeholder = @"输入关键字";
    self.tableView.tableHeaderView = _searchBar;

    _searchController = [[UISearchDisplayController alloc] initWithSearchBar:_searchBar contentsController:self];
    _searchController.delegate = self;
    //设置内部tableView的delegate
    _searchController.searchResultsDelegate = self;
    //设置内部tableview的datasource
    _searchController.searchResultsDataSource = self;
}

- (void)didReceiveMemoryWarning
{
    [super didReceiveMemoryWarning];
    // Dispose of any resources that can be recreated.
}

#pragma mark - Table view data source

- (NSInteger)numberOfSectionsInTableView:(UITableView *)tableView {
    if (tableView == _searchController.searchResultsTableView) {
        return 1;
    }
    return [_datasource count];
}

- (NSInteger)tableView:(UITableView *)tableView numberOfRowsInSection:(NSInteger)section
{
    if (tableView == _searchController.searchResultsTableView) {
        return [_filterdatasource count];
    }
    return [_datasource[section] count];
}


- (UITableViewCell *)tableView:(UITableView *)tableView cellForRowAtIndexPath:(NSIndexPath *)indexPath
{
    static NSString *identifier = @"cell";
    UITableViewCell *cell = [tableView dequeueReusableCellWithIdentifier:identifier];
    if (!cell) {
        cell = [[UITableViewCell alloc] initWithStyle:UITableViewCellStyleDefault reuseIdentifier:identifier];
    }

    if (tableView == _searchController.searchResultsTableView) {
        cell.textLabel.text = _filterdatasource[indexPath.row];
    } else {
        cell.textLabel.text = _datasource[indexPath.section][indexPath.row];
    }


    return cell;
}

- (NSString *)tableView:(UITableView *)tableView titleForHeaderInSection:(NSInteger)section {
    if (tableView == _searchController.searchResultsTableView) {
        return @"搜索结果";
    }
    return [NSString stringWithFormat:@"%d",section];
}

#pragma mark - Search bar controller delegate
-(BOOL)searchDisplayController:(UISearchDisplayController *)controller shouldReloadTableForSearchString:(NSString *)searchString{


    [_filterdatasource removeAllObjects];
    [_datasource enumerateObjectsUsingBlock:^(id obj, NSUInteger idx, BOOL *stop) {
        [obj enumerateObjectsUsingBlock:^(id obj, NSUInteger idx, BOOL *stop) {
            NSString *str = [(NSString *)obj uppercaseString];
            if ([str rangeOfString:[searchString uppercaseString]].location != NSNotFound) {
                [_filterdatasource addObject:obj];
            }
        }];
    }];

    return YES;
}

@end
下拉刷新
下拉刷新是列表最常见的一种交互,IOS平台上第三方下拉刷新控件相当多,比较常用的有egorefresh,ios6之后新添加了UIRfreshControl控件,但是只能用在UITableViewController中
- (void)setRefrshController {
    self.refreshControl = [[UIRefreshControl alloc] init];
    [self.refreshControl setAttributedTitle:[[NSAttributedString alloc] initWithString:@"下拉刷新"]];

    [self.refreshControl addTarget:self action:@selector(refreshViewControlEventValueChanged) forControlEvents:UIControlEventValueChanged];
}

- (void)refreshViewControlEventValueChanged {
    //模拟重新加载数据
    [NSThread sleepForTimeInterval:3];

    //修改refreshControl状态
    [self.refreshControl endRefreshing];
    //更新列表
    [self.tableView reloadData];
}

静态tableviewcell
有时候我们只想简单显示几行数据,这时候可以借助storyboard使用静态单元格
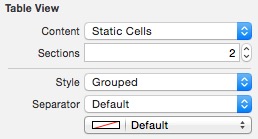
1:在storyboard拖出一个UITableViewController(只有UITableViewController支持静态单元格),并设置UITableView中tableView的相关属性
2:点击tableviewcell后可以随意的设置属性,并且把控件添加上去

3:运行后直接显示我们设置的静态列表

说明:使用静态列表不需要实现代理方法和数据源方法,但是一旦实现了代理方法和数据源方法,那么列表会与我们代理和数据源方法中设置的一致