先去Spring官网下载Spring4.x.x开发包(本人使用的版本是Spring4.2.5),这个网上有一大堆博客有介绍,故省略。下载下来之后,我就来详细说明如何在Eclipse中搭建Spring4.2.5开发环境。
首先在Eclipse中新建一个普通Java Project,名为spring_first。
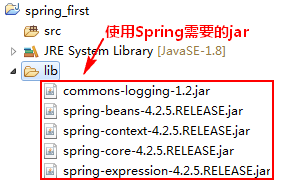
接着我们就要导入Spring需要的jar包,进入到下载并解压的spring-framework-4.2.5.RELEASE的目录中,进入libs文件夹,找到如下jar包:
spring-core-4.2.5.RELEASE.jar
spring-beans-4.2.5.RELEASE.jar
spring-context-4.2.5.RELEASE.jar
spring-expression-4.2.5.RELEASE.jar
将之拷贝到spring_first项目新建的lib目录下,同时我们还要将commons-logging-1.2.jar包拷贝到lib目录中,如图:
将lib目录下的五个jar包Add to Build Path。
编写Spring的配置文件,该配置文件模板可以从Spring的参考手册或Spring的例子中得到。配置文件的取名可以任意,文件可以存放在任何目录下,但考虑到通用性,一般放在类路径下。
在spring-framework-4.2.5.RELEASEdocsspring-framework-referencehtmlsingle目录中打开index.html,以关键字<bean搜索,可查找到如下配置信息:
<?xml version="1.0" encoding="UTF-8"?>
<beans xmlns="http://www.springframework.org/schema/beans"
    xmlns:xsi="http://www.w3.org/2001/XMLSchema-instance"
    xsi:schemaLocation="http://www.springframework.org/schema/beans
        http://www.springframework.org/schema/beans/spring-beans.xsd">

    <bean id="..." class="...">
        <!-- collaborators and configuration for this bean go here -->
    </bean>

    <bean id="..." class="...">
        <!-- collaborators and configuration for this bean go here -->
    </bean>

    <!-- more bean definitions go here -->

</beans>
在spring_first的src目录下新建一个beans.xml的文件,添加如下配置信息:
        <?xml version="1.0" encoding="UTF-8"?>
        <beans xmlns="http://www.springframework.org/schema/beans"
            xmlns:xsi="http://www.w3.org/2001/XMLSchema-instance"
            xsi:schemaLocation="http://www.springframework.org/schema/beans
                http://www.springframework.org/schema/beans/spring-beans.xsd">

        </beans>
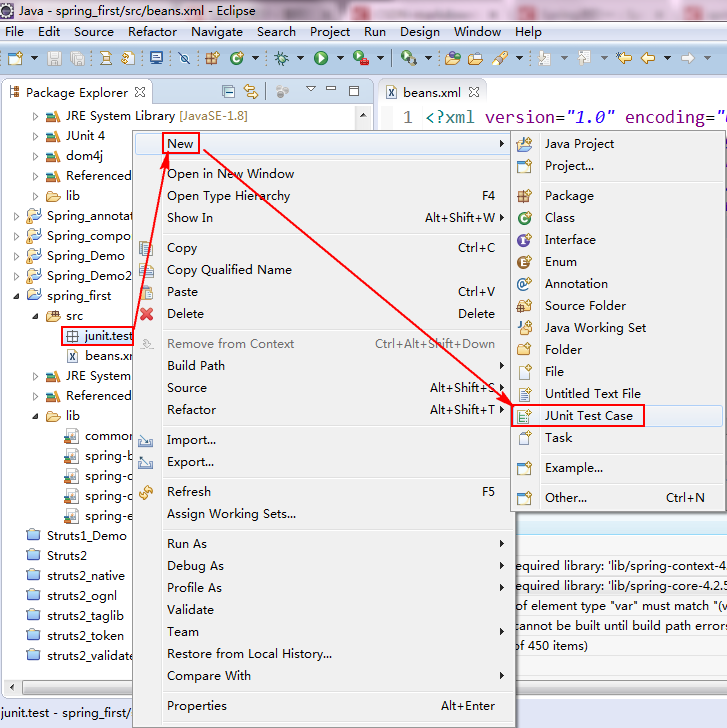
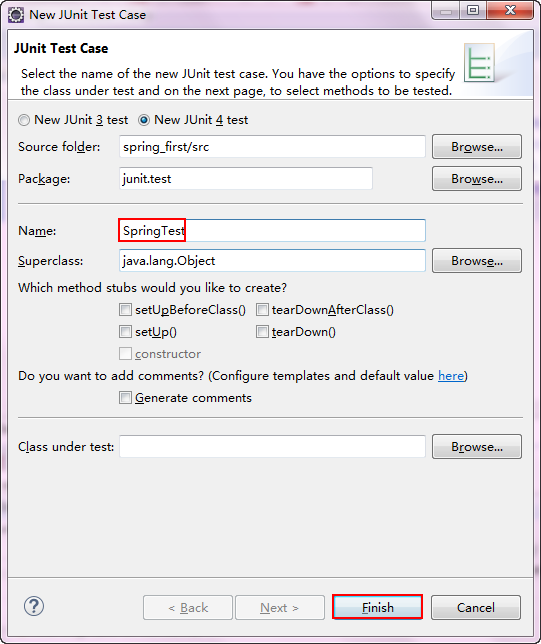
编写测试代码,在src目录下新建一个junit.test包,并在该包下新建一个JUnit Test Case。
在SpringTest.java的文件中加入测试代码,如下:
     public class SpringTest {
         @Test
             public void test() {
             // ApplicationContext是接口
             // 实例化Spring容器
             ApplicationContext ctx = new ClassPathXmlApplicationContext("beans.xml");
            }
        }
以上代码为实例化Spring容器。实例化Spring容器常用的两种方式:
方法一:在类路径下寻找配置文件来实例化容器。
ApplicationContext ctx = new ClassPathXmlApplicationContext(new String[]{"beans.xml"});
方法二:在文件系统路径下寻找配置文件来实例化容器。
ApplicationContext ctx = new FileSystemXmlApplicationContext(new String[]{"d:\beans.xml"});
注意:Spring的配置文件可以指定多个,可以通过String数组传入
运行test方法,Eclipse控制台打印如下:
