1.HandlerMapping的类结构
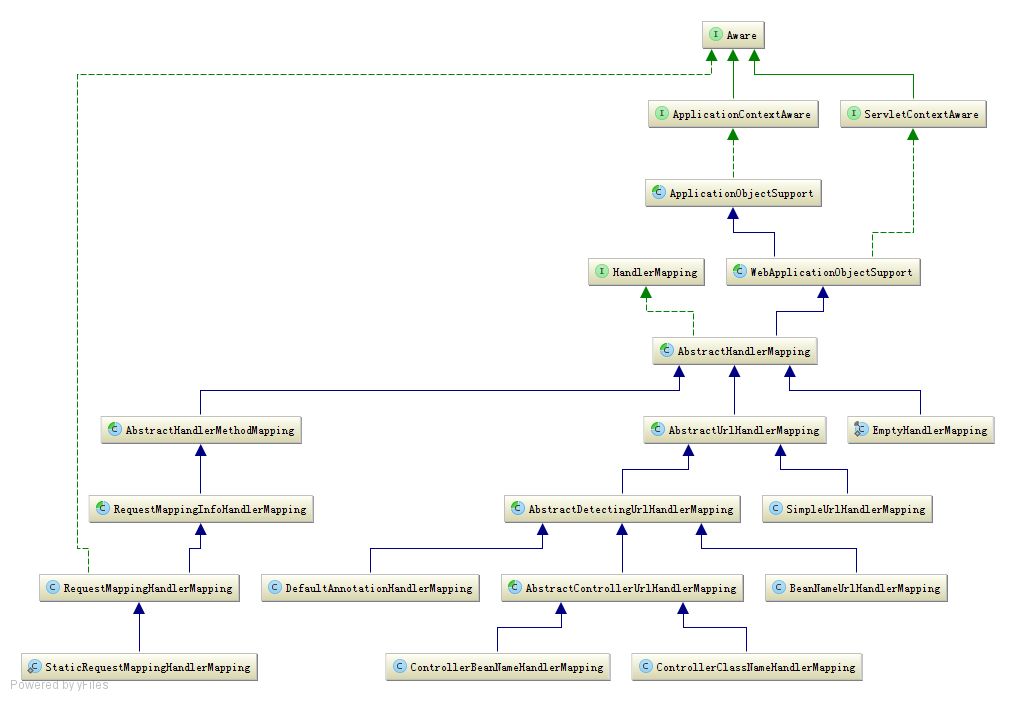
如上图所示,HandlerMapping接口有一个叫做;getHandler()的方法,这个方法是用来回去HandlerMapping对应的处理器的,由此也就可以看出HandlerMapping主要是用来映射请求和处理器的。
AbstractHandlerMapping实现了HandlerMapping接口,还继承了WebApplicationObjectSupport,而WebApplicationObjectSupport最终实现了ApplicationContextAware接口,这个接口使用来扩展
Spring的,ApplicationContextAware可以对应用上下文进行加工,加入自己的逻辑,SpringMVC就是通过它来实现的url和处理器的映射。
接下来我们看到AbstractHandlerMethodMapping和AbstractUrlHandlerMapping都继承了AbstractHandlerMapping,这两个类分别从不同的角度来映射请求和处理器。
2.AbstractHandlerMapping具体的实现
2.1 AbstractUrlHandlerMapping
我们分开来看,首先分析AbstractUrlHandlerMapping,这个类是用来映射url和handler的,它维护了一个handlerMap用来存储url相应的处理器,它的实现类AbstractDetectingUrlHandlerMapping重写了
initApplictionContext()方法:
@Override
    public void initApplicationContext() throws ApplicationContextException {
        super.initApplicationContext();
        detectHandlers();
    }
可以看到他调用了父类的initApplicationContext方法,然后又调用了detectHandlers()方法来处理请求映射,看detectHandler()源码:
protected void detectHandlers() throws BeansException {

        String[] beanNames = (this.detectHandlersInAncestorContexts ?
                BeanFactoryUtils.beanNamesForTypeIncludingAncestors(getApplicationContext(), Object.class) :
                getApplicationContext().getBeanNamesForType(Object.class));

        // Take any bean name that we can determine URLs for.
        for (String beanName : beanNames) {
            String[] urls = determineUrlsForHandler(beanName);
            if (!ObjectUtils.isEmpty(urls)) {
                // URL paths found: Let's consider it a handler.
                registerHandler(urls, beanName);
            }
            else {
                if (logger.isDebugEnabled()) {
                    logger.debug("Rejected bean name '" + beanName + "': no URL paths identified");
                }
            }
        }
    }
第一步,获取所有的beanname,第二步,根据这个beanName查询它是不是一个处理器,并取出他的url,
determineUrlsForHandler有多种实现,我们拿AbstractControllerUrlHandlerMapping举例说明:
@Override
    protected String[] determineUrlsForHandler(String beanName) {
        Class<?> beanClass = getApplicationContext().getType(beanName);
        if (isEligibleForMapping(beanName, beanClass)) {
            return buildUrlsForHandler(beanName, beanClass);
        }
        else {
            return null;
        }
    }
首先从应用上下文中根据beanname获取到bean的class对象,然后判断有没有成为处理器的资格,即判断是否实现了Controller接口。
然后调用buildUrlsForHandler()方法获取处理器的url,然后返回。
接下来执行 registerHandler(urls, beanName) :
protected void registerHandler(String[] urlPaths, String beanName) throws BeansException, IllegalStateException {
        Assert.notNull(urlPaths, "URL path array must not be null");
        for (String urlPath : urlPaths) {
            registerHandler(urlPath, beanName);
        }
    }
registerHandler(url,beanname)
protected void registerHandler(String urlPath, Object handler) throws BeansException, IllegalStateException {

        Object resolvedHandler = handler;

        // Eagerly resolve handler if referencing singleton via name.
        if (!this.lazyInitHandlers && handler instanceof String) {
            String handlerName = (String) handler;
            if (getApplicationContext().isSingleton(handlerName)) {
                resolvedHandler = getApplicationContext().getBean(handlerName);
            }
        }

        Object mappedHandler = this.handlerMap.get(urlPath);
        if (mappedHandler != null) {
            if (mappedHandler != resolvedHandler) {
                throw new IllegalStateException(
                        "Cannot map " + getHandlerDescription(handler) + " to URL path [" + urlPath +
                        "]: There is already " + getHandlerDescription(mappedHandler) + " mapped.");
            }
        }
        else {
            if (urlPath.equals("/")) {
                if (logger.isInfoEnabled()) {
                    logger.info("Root mapping to " + getHandlerDescription(handler));
                }
                setRootHandler(resolvedHandler);
            }
            else if (urlPath.equals("/*")) {
                if (logger.isInfoEnabled()) {
                    logger.info("Default mapping to " + getHandlerDescription(handler));
                }
                setDefaultHandler(resolvedHandler);
            }
            else {
                this.handlerMap.put(urlPath, resolvedHandler);
                if (logger.isInfoEnabled()) {
                    logger.info("Mapped URL path [" + urlPath + "] onto " + getHandlerDescription(handler));
                }
            }
        }
    }
首先从上下文拿到一个处理器实例,然后根据url的不同,将它设置到不同的处理器存储位置,例如,如果url是"/"就将处理器设置为根处理器,
如果url是"/*"就将处理器设置为默认处理器。如果都不是就放进handleMap中。
通过以上步骤,我们就将上下文中所有的bean循环了一遍,只要是符合HandlerMapping的规则的处理器,就会将他的映射关系存储起来。
2.2 AbstractHandlerMethodMapping
AbstractHandlerMethodMapping和AbstractUrlMethodMapping有所不同,他实现了InitializingBean接口,通过实现afterPropertiesSet()方法来扩展相应的业务
public void afterPropertiesSet() {
        initHandlerMethods();
    }
调用了initHandlerMethods()
protected void initHandlerMethods() {
        String[] beanNames = (this.detectHandlerMethodsInAncestorContexts ?
                BeanFactoryUtils.beanNamesForTypeIncludingAncestors(getApplicationContext(), Object.class) :
                getApplicationContext().getBeanNamesForType(Object.class));

        for (String beanName : beanNames) {
            if (!beanName.startsWith(SCOPED_TARGET_NAME_PREFIX) &&
                    isHandler(getApplicationContext().getType(beanName))){
                detectHandlerMethods(beanName);
            }
        }
        handlerMethodsInitialized(getHandlerMethods());
    }
首先获取所有的beanname,然后遍历这些bean,判断他是不是处理器,不同的实现有不同的判断方法,那我们最常用的@Controller为例说明
protected boolean isHandler(Class<?> beanType) {
        return ((AnnotationUtils.findAnnotation(beanType, Controller.class) != null) ||
                (AnnotationUtils.findAnnotation(beanType, RequestMapping.class) != null));
    }
判断这个类有没有@Controller或者@ReuqestMapping注解就可以了.
接下来执行detectHandlerMethods(beanName)
protected void detectHandlerMethods(final Object handler) {
        Class<?> handlerType =
                (handler instanceof String ? getApplicationContext().getType((String) handler) : handler.getClass());

        // Avoid repeated calls to getMappingForMethod which would rebuild RequestMappingInfo instances
        final Map<Method, T> mappings = new IdentityHashMap<Method, T>();
        final Class<?> userType = ClassUtils.getUserClass(handlerType);

        Set<Method> methods = HandlerMethodSelector.selectMethods(userType, new MethodFilter() {
            @Override
            public boolean matches(Method method) {
                T mapping = getMappingForMethod(method, userType);
                if (mapping != null) {
                    mappings.put(method, mapping);
                    return true;
                }
                else {
                    return false;
                }
            }
        });

        for (Method method : methods) {
            registerHandlerMethod(handler, method, mappings.get(method));
        }
    }
可以看到它首先会得到所有的方法,然后对方法进行过滤,调用matches方法,还是拿@Controller举例:
protected RequestMappingInfo getMappingForMethod(Method method, Class<?> handlerType) {
        RequestMappingInfo info = null;
        RequestMapping methodAnnotation = AnnotationUtils.findAnnotation(method, RequestMapping.class);
        if (methodAnnotation != null) {
            RequestCondition<?> methodCondition = getCustomMethodCondition(method);
            info = createRequestMappingInfo(methodAnnotation, methodCondition);
            RequestMapping typeAnnotation = AnnotationUtils.findAnnotation(handlerType, RequestMapping.class);
            if (typeAnnotation != null) {
                RequestCondition<?> typeCondition = getCustomTypeCondition(handlerType);
                info = createRequestMappingInfo(typeAnnotation, typeCondition).combine(info);
            }
        }
        return info;
    }
可以看到他是判断方法有没有RequestMapping注解来过滤方法的,所有过滤出来的方法都会生成一个 RequestMappingInfo,(它包含该方法的所有的注解信息),放进maps里面,
接下来就是将所有的方法进行注册:
protected void registerHandlerMethod(Object handler, Method method, T mapping) {
        HandlerMethod newHandlerMethod = createHandlerMethod(handler, method);
        HandlerMethod oldHandlerMethod = this.handlerMethods.get(mapping);
        if (oldHandlerMethod != null && !oldHandlerMethod.equals(newHandlerMethod)) {
            throw new IllegalStateException("Ambiguous mapping found. Cannot map '" + newHandlerMethod.getBean() +
                    "' bean method
" + newHandlerMethod + "
to " + mapping + ": There is already '" +
                    oldHandlerMethod.getBean() + "' bean method
" + oldHandlerMethod + " mapped.");
        }

        this.handlerMethods.put(mapping, newHandlerMethod);
        if (logger.isInfoEnabled()) {
            logger.info("Mapped "" + mapping + "" onto " + newHandlerMethod);
        }

        Set<String> patterns = getMappingPathPatterns(mapping);
        for (String pattern : patterns) {
            if (!getPathMatcher().isPattern(pattern)) {
                this.urlMap.add(pattern, mapping);
            }
        }

        if (this.namingStrategy != null) {
            String name = this.namingStrategy.getName(newHandlerMethod, mapping);
            updateNameMap(name, newHandlerMethod);
        }
    }
首先创建一个HandlerMethod对象,用来包装处理器和对应的方法。然后判断是否有重复的handlermethod,然后将映射类和处理类放进handlerMethods中,
可以看到,他还会将url和映射信息放进一个urlMap来记录,这说明多个请求可能对应同一个映射。
以上就是HandlerMapping的大体作用和流程信息,用来呈放web应用的映射信息,关于如何根据request寻找到对应的映射器,将在下一章介绍。