集群规划
| 主机名 | IP | VIP | Nginx:port | KeepAlived主备 |
| KA_NG_01 | 192.168.30.130 | 192.168.30.120 | 8088 | MASTER |
| KA_NG_02 | 192.168.30.131 | 192.168.30.120 | 8088 | BACKUP |
实验环境:
[root@KA_NG_01 ~]# cat /etc/redhat-release
CentOS release 6.9 (Final)
[root@KA_NG_01 ~]# keepalived -v
Keepalived v1.2.13 (03/19,2015)
[root@KA_NG_01 ~]# nginx -v
nginx version: nginx/1.14.0
如果是编译安装的的话,在本机首先配置好YUM源,保证机器可以访问公网,然后安装以下依赖:
[root@KA_NG_01 ~]# yum install -y gcc gcc-c++ make automake autoconf libtool pcre pcre-devel zlib zlib-devel openssl openssl-devel
去官网下载对应的的软件包进行编译安装
Nginx的官网下载地址:
http://nginx.org/en/download.html
keepalived的官方下载地址:
http://www.keepalived.org/software/keepalived-1.4.3.tar.gz
编译安装以后有时间再搞,这里为了快速见效,采用YUM一键安装部署。
使用YUM安装Nginx:http://nginx.org/en/linux_packages.html#stable
参考:http://nginx.org/en/linux_packages.html#stable
在/etc/yum.repo.d/新建nginx.repo文件,文件内容如下所示:
[root@KA_NG_01 ~]# vim /etc/yum.repos.d/nginx.repo
[nginx]
name=nginx repo
baseurl=http://nginx.org/packages/centos/6/$basearch/
gpgcheck=0
enabled=1
依次执行yum clean all,yum list.
安装nginx
[root@KA_NG_01 ~]# yum install -y nginx
安装完成之后,nginx的相关文件位置如下:
[root@KA_NG_01 ~]# find / -name nginx
/etc/rc.d/init.d/nginx
/etc/sysconfig/nginx
/etc/logrotate.d/nginx
/etc/nginx #主配置文件
/usr/lib64/nginx
/usr/sbin/nginx #启动文件
/usr/share/nginx #默认的网页存放位置
/var/lib/yum/repos/x86_64/6/nginx
/var/lock/subsys/nginx
/var/log/nginx #日志位置
/var/cache/nginx
/var/cache/yum/x86_64/6/nginx
安装完成之后,可以先启动下,看看能否访问:
[root@KA_NG_01 ~]# service nginx restart
Stopping nginx: [ OK ]
Starting nginx: [ OK ]
[root@KA_NG_01 ~]# elinks 192.168.30.130:80 --dump #注意这里是两个横线
Welcome to nginx !
If you see this page, the nginx web server is successfully installed and
working. Further configuration is required.
For online documentation and support please refer to [1]nginx.org.
Commercial support is available at [2]nginx.com.
Thank you for using nginx.
References
Visible links
1. http://nginx.org/
2. http://nginx.com/
出现这个,证明安装没问题。
配置Nginx:
[root@KA_NG_01 ~]# cp /etc/nginx/nginx.conf{,.bak} #修改配置文件之前,先备份,养成好习惯
[root@KA_NG_01 ~]# vim /etc/nginx/nginx.conf
31 include /etc/nginx/conf.d/*.conf; #大概在31行左右,这行说明了nginx的默认网页存放路径等的相关配置文件的位置
[root@KA_NG_01 ~]# ls /etc/nginx/conf.d/default.conf #这个文件指定了nginx的默认网页根目录,及端口等等
/etc/nginx/conf.d/default.conf
[root@KA_NG_01 ~]# cat !$
cat /etc/nginx/conf.d/default.conf
server {
listen 80;
server_name localhost;
#charset koi8-r;
#access_log /var/log/nginx/host.access.log main;
location / {
root /usr/share/nginx/html;
index index.html index.htm;
}
#error_page 404 /404.html;
# redirect server error pages to the static page /50x.html
#
error_page 500 502 503 504 /50x.html;
location = /50x.html {
root /usr/share/nginx/html;
}
# proxy the PHP scripts to Apache listening on 127.0.0.1:80
#
#location ~ .php$ {
# proxy_pass http://127.0.0.1;
#}
# pass the PHP scripts to FastCGI server listening on 127.0.0.1:9000
#
#location ~ .php$ {
# root html;
# fastcgi_pass 127.0.0.1:9000;
# fastcgi_index index.php;
# fastcgi_param SCRIPT_FILENAME /scripts$fastcgi_script_name;
# include fastcgi_params;
#}
# deny access to .htaccess files, if Apache's document root
# concurs with nginx's one
#
#location ~ /.ht {
# deny all;
#}
}
两种修改方式,第一种可以把/etc/nginx/nginx.conf中的31行左右 “include /etc/nginx/conf.d/*.conf;”注释掉;第二种可以在default.conf中直接修改,(改之前备份下),这里我采用的是第一种方式注释掉31行。修改完后的配置文件如下:
[root@KA_NG_01 ~]# vim /etc/nginx/nginx.conf #注意缩进,因为直接Ctrl+v过来的,缩进不规范
1
2 #user nginx;
3 user root;
4 worker_processes 1;
5
6 #error_log /var/log/nginx/error.log warn;
7 #pid /var/run/nginx.pid;
8
9
10 events {
11 worker_connections 1024;
12 }
13
14
15 http {
16 include /etc/nginx/mime.types;
17 default_type application/octet-stream;
18
19 # log_format main '$remote_addr - $remote_user [$time_local] "$request" '
20 # '$status $body_bytes_sent "$http_referer" '
21 # '"$http_user_agent" "$http_x_forwarded_for"';
22 #
23 # access_log /var/log/nginx/access.log main;
24 #
25 sendfile on;
26 #tcp_nopush on;
27
28 keepalive_timeout 65;
29
30 #gzip on;
31
32 #include /etc/nginx/conf.d/*.conf;
33 server {
34 listen 8088; #指定端口号
35 server_name localhost;
36 location / { #指定网页根目录
37 root /usr/share/nginx/html;
38 index index.html index.htm;
39 }
编写测试页面:
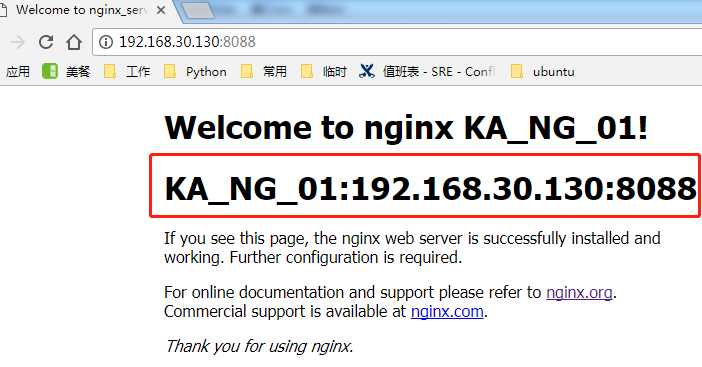
[root@KA_NG_01 ~]# vim /usr/share/nginx/html/index.html
1 <!DOCTYPE html>
2 <html>
3 <head>
4 <title>Welcome to nginx_server_01!</title>
5 <style>
6 body {
7 35em;
8 margin: 0 auto;
9 font-family: Tahoma, Verdana, Arial, sans-serif;
10 }
11 </style>
12 </head>
13 <body>
14 <h1>Welcome to nginx KA_NG_01!</h1>
15 <h1><b>KA_NG_01:192.168.30.130:8088</b></h1>
16 <p>If you see this page, the nginx web server is successfully installed and
17 working. Further configuration is required.</p>
18
19 <p>For online documentation and support please refer to
20 <a href="http://nginx.org/">nginx.org</a>.<br/>
21 Commercial support is available at
22 <a href="http://nginx.com/">nginx.com</a>.</p>
23
24 <p><em>Thank you for using nginx.</em></p>
25 </body>
26 </html>
检查配置nginx配置文件的合法性
[root@KA_NG_01 ~]# nginx -t
nginx: the configuration file /etc/nginx/nginx.conf syntax is ok
nginx: configuration file /etc/nginx/nginx.conf test is successful
重启Nginx,浏览器访问测试:
开始安装Keepalived:
[root@KA_NG_01 ~]# yum install -y keepalived #一条命令搞定
配置keepalived:
[root@KA_NG_01 ~]# cp /etc/keepalived/keepalived.conf{,.bak} #修改之前先备份
[root@KA_NG_01 ~]# vim /etc/keepalived/keepalived.conf
1 ! Configuration File for keepalived
2
3 global_defs { #全局定义
4 notification_email { #邮件通知在实验中没有涉及,所以没有配置,如果需要,需要开启sendmail服务,或者其他邮件服务
5 sendmail@example.com
6 receive@example.com
7 }
8 notification_email_from receive@example.com
9 smtp_server mail.example.com
10 smtp_connect_timeout 30
11 router_id KA_NG_01 # 节点标识,设为主机名即可
12 }
13
14 vrrp_script chk_nginx { #检测nginx的运行状态
15 script "/etc/keepalived/nginx_check.sh" #脚本路径
16 interval 2 #探测间隔时间
17 weight -20 #如果条件满足,权重-20
18 }
19 vrrp_instance VI_1 { #定义虚拟路由 VI_1为标识符,也可自定义
20 state MASTER #主节点标识,备节点为BACKUP
21 interface eth0 #绑定VIP接口,与本机IP地址接口相同
22 virtual_router_id 30 #虚拟路由ID标识号,可自定义,但是主备必须一致,也使用IP最后一段,以相同的VRID为一个组,其决定多播的MAC地址
23 mcast_scr_ip 192.168.30.130 #本机IP地址
24 priority 100 #节点优先级,范围0~254,MASTER要比BACKUP高
25 nopreempt #优先级的高级设置,nopreempt解决异常恢复后再次抢占的问题
26 advert_int 1 #组播信息发送间隔,主备必须一致,默认1s
27 authentication { #验证信息,主备需一致
28 auth_type PASS
29 auth_pass 1111 #生产环境下,按实际情况来定
30 }
31 track_script { #将track_script块加入instance配置块
32 chk_nginx #执行Nginx检测
33 }
34 virtual_ipaddress { #虚拟IP主备需一致
35 192.168.30.120 #虚拟IP可定义多个
36 }
37 }
38
编写 nginx_check.sh脚本文件
[root@KA_NG_01 ~]# vim /etc/keepalived/nginx_check.sh
1 #!/bin/bash
2 A=`ps -C nginx –no-header |wc -l`
3 if [ $A -eq 0 ];then
4 /etc/init.d/nginx start
5 sleep 2
6 if [ `ps -C nginx --no-header |wc -l` -eq 0 ];then
7 killall keepalived
8 fi
9 fi
[root@KA_NG_01 ~]# chmod +x !$
chmod +x /etc/keepalived/nginx_check.sh
关机,然后使用VMware的克隆功能,直接克隆出第二台机器(KA_NG_02),开启克隆出来的机器,将主机名修改为KA_NG_02,IP设置为192.168.30.131,对keepalived.conf做以下变动
[root@KA_NG_02 ~]# vim /etc/keepalived/keepalived.conf
1 ! Configuration File for keepalived
2
3 global_defs {
4 notification_email {
5 sendmail@example.com
6 receive@example.com
7 }
8 notification_email_from receive@example.com
9 smtp_server mail.example.com
10 smtp_connect_timeout 30
11 router_id KA_NG_02
12 }
13
14 vrrp_script chk_nginx {
15 script "/etc/keepalived/nginx_check.sh"
16 interval 2
17 weight -20
18 }
19 vrrp_instance VI_1 {
20 state BACKUP
21 interface eth0
22 virtual_router_id 30
23 mcast_src_ip 192.168.30.131
24 priority 90
25 nopreempt
26 advert_int 1
27 authentication {
28 auth_type PASS
29 auth_pass 1111
30 }
31 track_script {
32 chk_nginx
33 }
34 virtual_ipaddress {
35 192.168.30.120
36 }
37 }
nginx的测试页内容更改为:
[root@KA_NG_02 ~]# cat /usr/share/nginx/html/index.html
<!DOCTYPE html>
<html>
<head>
<title>Welcome to nginx_server_02!</title>
<style>
body {
35em;
margin: 0 auto;
font-family: Tahoma, Verdana, Arial, sans-serif;
}
</style>
</head>
<body>
<h1>Welcome to nginx KA_NG_02!</h1>
<h1><b>KA_NG_02:192.168.30.131:8088</b></h1>
<p>If you see this page, the nginx web server is successfully installed and
working. Further configuration is required.</p>
<p>For online documentation and support please refer to
<a href="http://nginx.org/">nginx.org</a>.<br/>
Commercial support is available at
<a href="http://nginx.com/">nginx.com</a>.</p>
<p><em>Thank you for using nginx.</em></p>
</body>
</html>
关机。重启机器,开启nginx,keepalived服务进行测试
通过VIP进行访问
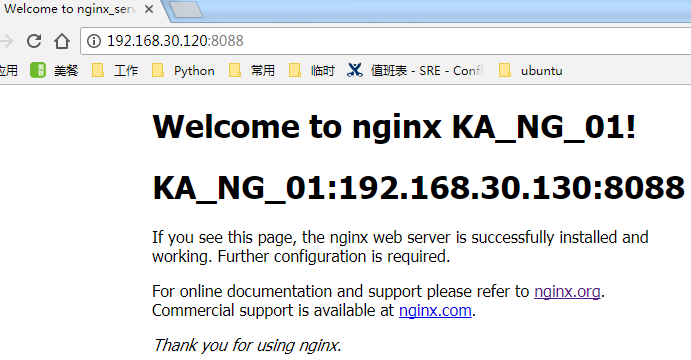
手动关闭KA_NG_01上的nginx和keepalived,再次访问测试

大功告成。
文中内容有写是参考这里: