https://www.cnblogs.com/sunnydou/p/49b92d511047f4f9da6cd727cfd415d5.html(文章出处)
一、基本模块及高可用架构
FastDFS 是余庆老师开发的一个开源的高性能分布式文件系统(DFS)。 它的主要功能包括:文件存储,文件同步和文件访问,以及高容量和负载平衡。
FastDFS 系统有三个角色:跟踪服务器(Tracker Server)、存储服务器(Storage Server)和客户端(Client)。
- Tracker Server: 跟踪服务器,主要做调度工作,起到均衡的作用;负责管理所有的storage server和group,每个storage在启动后会连接 Tracker,告知自己所属 group 等信息,并保持周期性心跳。多个Tracker之间是对等关系,不存在单点故障。
- Storage Server: 存储服务器,主要提供容量和备份服务;以 group 为单位,每个 group 内可以有多台 storage server,组内的storage server上的数据互为备份。
- Client:客户端,上传下载数据的服务器
模块之间的主要关系如下: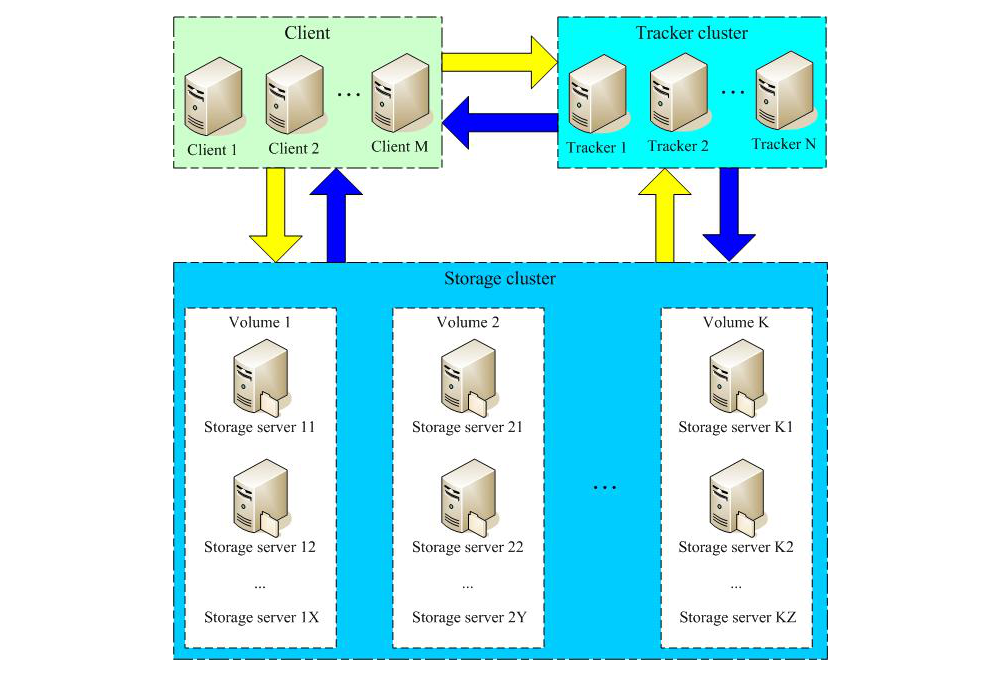
下图是实现统一的对外下载访问入口的高可用架构,其中所有的Nginx只做下载用途,上传通过tracker进行上传。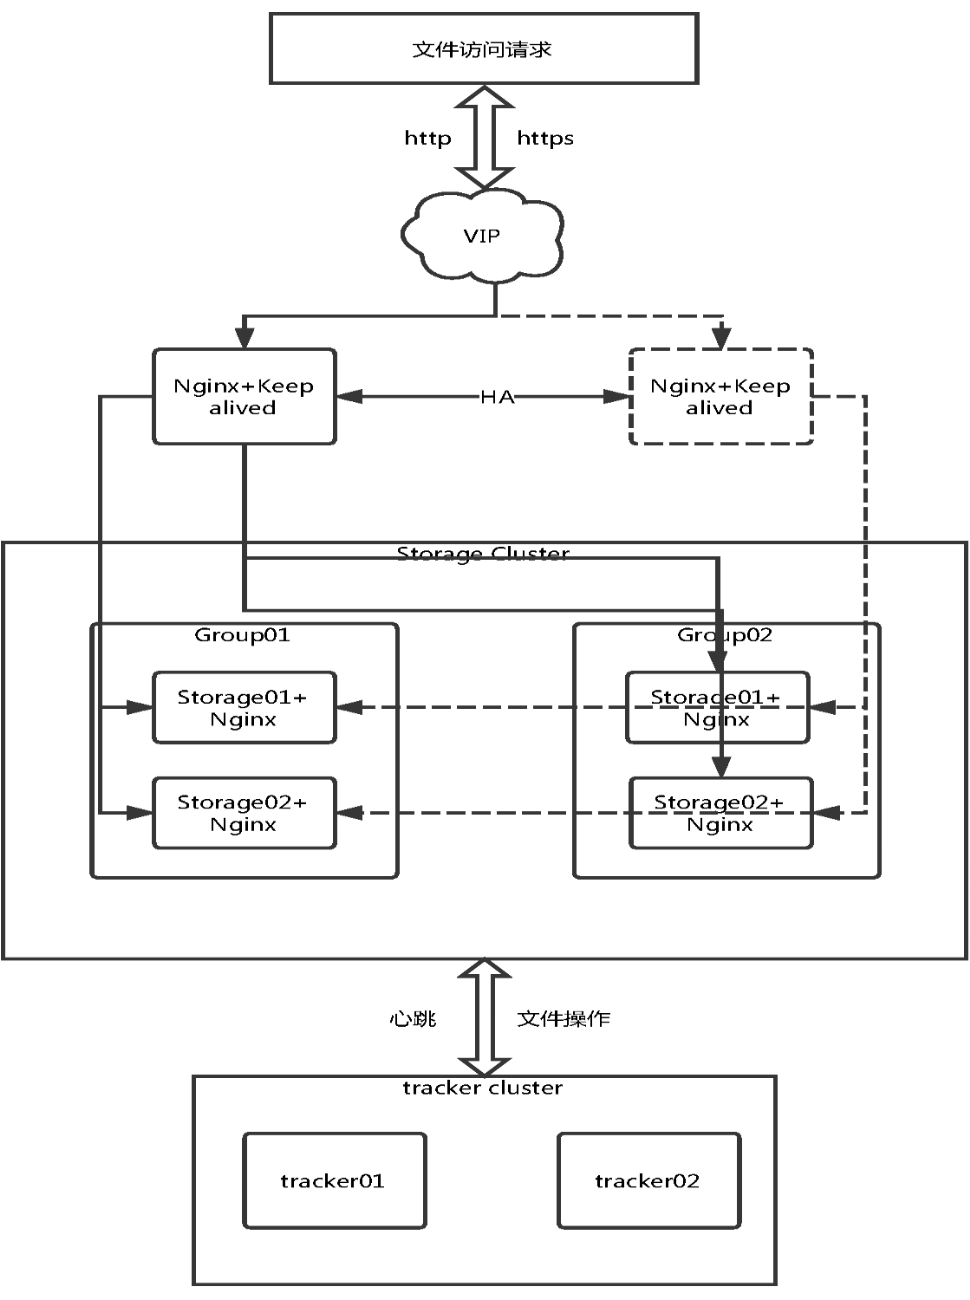
二、环境准备工作
系统软件说明:
| 名称 | 说明 |
| CentOS | 7.x(安装系统) |
| libfastcommon | FastDFS分离出的一些公用函数包 |
| FastDFS | FastDFS本体 |
| fastdfs-nginx-module | FastDFS和nginx的关联模块,解决组内同步延迟问题 |
| nginx | nginx 1.12.2(CentOS 7 下YUM可以安装的最新版本) |
整个搭建所需环境资源及用途如下表:
| 名称 | IP地址 | 应用 |
| tracker01 | 192.168.0.1 | FastDFS,libfastcommon |
| tracker02 | 192.168.0.2 | FastDFS,libfastcommon |
| storage01 | 192.168.0.10 | FastDFS,libfastcommon,nginx,fastdfs-nginx-module |
| storage02 | 192.168.0.11 | FastDFS,libfastcommon,nginx,fastdfs-nginx-module |
| nginx01 | 192.168.0.100 | nginx,keepalived |
| nginx02 | 192.168.0.101 | nginx,keepalived |
| VIP | 192.168.0.200 | - |
三、安装过程
1、编译环境准备
| 说明 | 位置 |
| 所有安装包 | /opt/fastdfs |
| 数据存储位置 | /data/fastdfs |
$ tar -zxvf libfastcommon-1.0.39.tar.gz
#安装编译环境
$ yum groups install Development Tools -y
$ yum install perl -y
$ mkdir -p /opt/fastdfs /data/fastdfs
$ cd /opt/fastdfs  #为下一步下载源码做准备
2、安装libfastcommon
#下载文件
$ wget https://github.com/happyfish100/libfastcommon/archive/V1.0.39.tar.gz
$ tar -zxvf libfastcommon-1.0.39.tar.gz
$ cd libfastcommon-1.0.39/
$ ./make.sh
$ ./make.sh install
3、安装FastDFS

$ wget https://github.com/happyfish100/fastdfs/archive/V5.11.tar.gz
$ tar -zxvf fastdfs-5.11.tar.gz
$ cd fastdfs-5.11/
$ ./make.sh
$ ./make.sh install
#配置文件准备
$ cp /etc/fdfs/tracker.conf.sample /etc/fdfs/tracker.conf #tracker节点
$ cp /etc/fdfs/storage.conf.sample /etc/fdfs/storage.conf #storage节点
$ cp /etc/fdfs/client.conf.sample /etc/fdfs/client.conf #客户端文件,测试用
$ cp /opt/fastdfs/fastdfs-5.11/conf/http.conf /etc/fdfs/ #供nginx访问使用
$ cp /opt/fastdfs/fastdfs-5.11/conf/mime.types /etc/fdfs/ #供nginx访问使用
tracker server配置:
$ vim /etc/fdfs/tracker.conf
#需要修改的内容如下
port=22122 # tracker服务器端口(默认22122,一般不修改)
base_path=/data/fastdfs # 存储日志和数据的根目录
#编辑启动文件
$ vim /usr/lib/systemd/system/fastdfs-tracker.service
[Unit]
Description=The FastDFS File server
After=network.target remote-fs.target nss-lookup.target

[Service]
Type=forking
ExecStart=/usr/bin/fdfs_trackerd /etc/fdfs/tracker.conf start
ExecStop=/usr/bin/fdfs_trackerd /etc/fdfs/tracker.conf stop
ExecRestart=/usr/bin/fdfs_trackerd /etc/fdfs/tracker.conf restart

[Install]
WantedBy=multi-user.target

$ systemctl daemon-reload
$ systemctl enable fastdfs-tracker.service
$ systemctl start fastdfs-tracker.service
$ netstat -tulnp #查看服务是否启动,端口是否打开

如果没有打开需要手动打开
(5)手动启动tracker,运行如下命令:
/usr/bin/fdfs_trackerd /etc/fdfs/tracker.conf restart
storage server配置
$ vim /etc/fdfs/storage.conf
#需要修改的内容如下
port=23000 # storage服务端口(默认23000,一般不修改)
base_path=/data/fastdfs # 数据和日志文件存储根目录
store_path0=/data/fastdfs # 第一个存储目录
tracker_server=192.168.0.1:22122 # tracker服务器IP和端口
tracker_server=192.168.0.2:22122 # tracker服务器IP和端口
http.server_port=8888 # http访问文件的端口(默认8888,看情况修改,和nginx中保持一致)
#编辑启动文件
$ vim /usr/lib/systemd/system/fastdfs-storage.service

[Unit]
Description=The FastDFS File server
After=network.target remote-fs.target nss-lookup.target

[Service]
Type=forking
ExecStart=/usr/bin/fdfs_storaged /etc/fdfs/storage.conf start
ExecStop=/usr/bin/fdfs_storaged /etc/fdfs/storage.conf stop
ExecRestart=/usr/bin/fdfs_storaged /etc/fdfs/storage.conf restart

[Install]
WantedBy=multi-user.target

$ systemctl daemon-reload
$ systemctl enable fastdfs-storage.service
$ systemctl start fastdfs-storage.service
$ netstat -tulnp #查看服务是否启动,端口是否打开
#查看集群状态
$ fdfs_monitor /etc/fdfs/storage.conf list
[2018-11-06 00:00:00] DEBUG - base_path=/data/fastdfs/storage, connect_timeout=30, network_timeout=60, tracker_server_count=2, anti_steal_token=0, anti_steal_secret_key length=0, use_connection_pool=0, g_connection_pool_max_idle_time=3600s, use_storage_id=0, storage server id count: 0
server_count=2, server_index=0
tracker server is 192.168.0.1:22122
group count: 1
Group 1:
...
Client配置
$ vim /etc/fdfs/client.conf
#需要修改的内容如下
base_path=/data/fastdfs
tracker_server=192.168.0.1:22122 # tracker服务器IP和端口
tracker_server=192.168.0.2:22122 # tracker服务器IP和端口

#保存后测试,返回ID表示成功 如:group1/M00/00/00/xx.tar.gz
$ fdfs_upload_file /etc/fdfs/client.conf testfile
4、安装nginx和fastdfs-nginx-module
下载nginx module
$ wget https://github.com/happyfish100/fastdfs-nginx-module/archive/V1.20.tar.gz
$ cp /opt/fastdfs/fastdfs-nginx-module-1.20/src/mod_fastdfs.conf /etc/fdfs
安装nginx
$ yum install nginx -y
# 查看版本及编译参数
$ nginx -v
$ nginx -V
添加nginx module
wget http://nginx.org/download/nginx-1.12.2.tar.gz
$ tar -zxvf nginx-1.12.2.tar.gz
$ cd nginx-1.12.2/
$ ./configure --prefix=/usr/share/nginx --sbin-path=/usr/sbin/nginx --modules-path=/usr/lib64/nginx/modules --conf-path=/etc/nginx/nginx.conf --error-log-path=/var/log/nginx/error.log --http-log-path=/var/log/nginx/access.log --http-client-body-temp-path=/var/lib/nginx/tmp/client_body --http-proxy-temp-path=/var/lib/nginx/tmp/proxy --http-fastcgi-temp-path=/var/lib/nginx/tmp/fastcgi --http-uwsgi-temp-path=/var/lib/nginx/tmp/uwsgi --http-scgi-temp-path=/var/lib/nginx/tmp/scgi --pid-path=/run/nginx.pid --lock-path=/run/lock/subsys/nginx --user=nginx --group=nginx --with-file-aio --with-ipv6 --with-http_auth_request_module --with-http_ssl_module --with-http_v2_module --with-http_realip_module --with-http_addition_module --with-http_xslt_module=dynamic --with-http_image_filter_module=dynamic --with-http_geoip_module=dynamic --with-http_sub_module --with-http_dav_module --with-http_flv_module --with-http_mp4_module --with-http_gunzip_module --with-http_gzip_static_module --with-http_random_index_module --with-http_secure_link_module --with-http_degradation_module --with-http_slice_module --with-http_stub_status_module --with-http_perl_module=dynamic --with-mail=dynamic --with-mail_ssl_module --with-pcre --with-pcre-jit --with-stream=dynamic --with-stream_ssl_module --with-google_perftools_module --with-debug --with-cc-opt='-O2 -g -pipe -Wall -Wp,-D_FORTIFY_SOURCE=2 -fexceptions -fstack-protector-strong --param=ssp-buffer-size=4 -grecord-gcc-switches -specs=/usr/lib/rpm/redhat/redhat-hardened-cc1 -m64 -mtune=generic' --with-ld-opt='-Wl,-z,relro -specs=/usr/lib/rpm/redhat/redhat-hardened-ld -Wl,-E' --add-module=/opt/fastdfs/fastdfs-nginx-module-1.20/src/
$ make
$ cp objs/nginx /usr/sbin/nginx
$ systemctl enable nginx
$ systemctl restart nginx
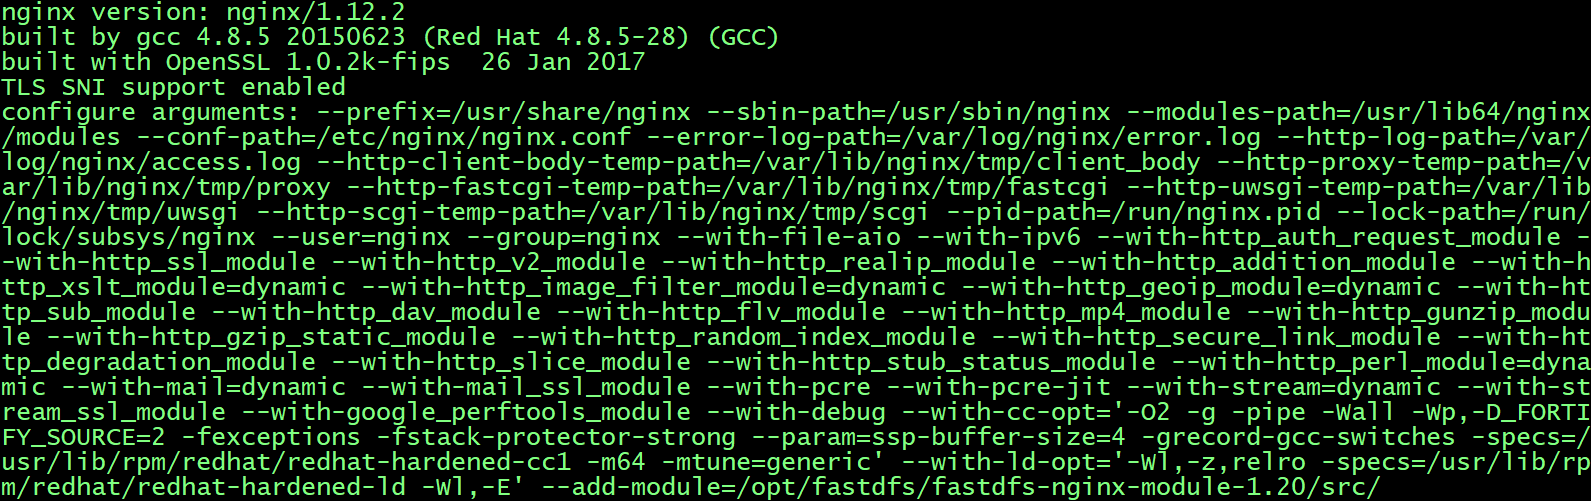
查看插件是否安装成功:
$ nginx -V
配置nginx访问
$ vim /etc/fdfs/mod_fastdfs.conf
#需要修改的内容如下
tracker_server=192.168.0.1:22122 # tracker服务器IP和端口
tracker_server=192.168.0.2:22122 # tracker服务器IP和端口
url_have_group_name=true
base_path=/data/fastdfs
store_path0=/data/fastdfs
#配置nginx.config
$ vim /etc/nginx/nginx.conf
#增加如下内容
server {
        listen 8888; ## 该端口为storage.conf中的http.server_port相同
        server_name localhost;
        location ~/group[0-9]/ {
            root /data/fastdfs;
            ngx_fastdfs_module;
        }
        error_page 500 502 503 504 /50x.html;
        location = /50x.html {
            root html;
        }
    }
#测试下载,用外部浏览器访问刚才已传过的文件,引用返回的ID
http://192.168.0.10:8888/group1/M00/00/00/wKgAQ1pysxmAaqhAAA76tz-dVgg.tar.gz
#弹出下载则目前nginx已经OK
注:
在nginx的构建中会遇到不少的报错,具体如下:
- ./configure: error: the Google perftools module requires the Google perftools library. You can either do not enable the module or install the library.
解决方法如下:
$ yum install gperftools -y
- /configure: error: the HTTP rewrite module requires the PCRE library.
解决方法如下:
$ yum -y install pcre pcre-devel
- ./configure: error: the HTTP cache module requires md5 functions from OpenSSL library. You can either disable the module by using --without-http-cache option, or install the OpenSSL library into the system, or build the OpenSSL library statically from the source with nginx by using --with-http_ssl_module --with-openssl= options.
解决方法如下:
$ yum -y install openssl openssl-devel
- ./configure: error: the HTTP gzip module requires the zlib library. You can either disable the module by using –without-http_gzip_module option, or install the zlib library into the system, or build the zlib library statically from the source with nginx by using –with-zlib= option.
解决方法如下:
$ yum install -y zlib-devel
- ./configure: error: the HTTP XSLT module requires the libxml2/libxslt libraries. You can either do not enable the module or install the libraries.
解决方法如下:
$ yum -y install libxml2 libxml2-dev
$ yum -y install libxslt-devel
- ./configure: error: the HTTP image filter module requires the GD library. You can either do not enable the module or install the libraries.
解决方法如下:
$ yum -y install gd-devel
- ./configure: error: perl module ExtUtils::Embed is required
解决方法如下:
$ yum -y install perl-devel perl-ExtUtils-Embed
- ./configure: error: the GeoIP module requires the GeoIP library. You can either do not enable the module or install the library.
解决方法如下:
$ yum -y install GeoIP GeoIP-devel GeoIP-data
- 在make过程中会出现一个报错:/usr/include/fastdfs/fdfs_define.h:15:27: fatal error: common_define.h: No such file or directory
解决方法如下:
修改fastdfs-nginx-module-1.20/src/config文件,修改如下:
ngx_module_incs="/usr/include/fastdfs /usr/include/fastcommon/"
CORE_INCS="$CORE_INCS /usr/include/fastdfs /usr/include/fastcommon/"
然后重新./configure && make,就可以了
5、配置文件访问的负载均衡和高可用
在192.168.0.100和101上安装nginx、keepalived
yum install -y nginx keepalived
nginx的配置文件如下:
upstream fdfs_group01 {
    server 192.168.0.10:8888 weight=1 max_fails=2 fail_timeout=30s;
    server 192.168.0.11:8888 weight=1 max_fails=2 fail_timeout=30s;
}
server {
    listen 80;
    server_name localhost;
    location /group01{
        proxy_next_upstream http_502 http_504 error timeout invalid_header;
        proxy_pass http://fdfs_group01;
        expires 30d;
    }
}
keepalived配置文件如下:
global_defs {
   router_id LVS_DEVEL
}

vrrp_script chk_ngx {
    script "/etc/keepalived/check_nginx.sh"
    interval 2
    weight -5
    fall 3
    rise 2
}


vrrp_instance VI_1 {
    interface eno16777984
    state MASTER
    priority 100
    virtual_router_id 11
    advert_int 1
    authentication {
        auth_type PASS
        auth_pass 1111
    }

    unicast_src_ip 192.168.0.100

    unicast_peer {
        192.168.0.101
    }

    virtual_ipaddress {
        192.168.0.200
    }

    track_script {
       chk_ngx
    }
    notify_master "/etc/keepalived/notify.sh master"
    notify_backup "/etc/keepalived/notify.sh backup"
    notify_fault "/etc/keepalived/notify.sh fault"
}
check_nginx.sh
#!/bin/bash

counter=$(ps -C nginx --no-heading|wc -l)
if [ "${counter}" = "0" ]; then
    exit 1
else
    exit 0
fi
OK,以上就是所有的安装步骤及相关配置。
文章中有什么疑问或者错误,欢迎大家提出指正。
注:借鉴文章URL如下:
注:本作品采用知识共享署名-非商业性使用-相同方式共享 4.0 国际许可协议进行许可。