一、物体分类:
这里使用的是caffe官网中自带的例子,我这里主要是对代码的解释~
首先导入一些必要的库:
import caffe
import numpy as np
import matplotlib.pyplot as plt
%matplotlib inline
plt.rcParams['figure.figsize'] = (10 , 10) #显示图像的最大范围,使用plt.rcParams['savefig.dpi']得到缺省的dpi值为100,则最大的图片范围为1000*1000
plt.rcParams['image.interpolation'] = 'nearest' #最近邻差值方式
plt.rcParams['image.cmap'] = 'gray' #灰度空间,表明显示图像时是灰度图而不是彩色图 import sys caffe_root = 'E:\caffe\caffe-master\' sys.path.insert(0 , caffe_root + 'python')
import os
caffe.set_mode_cpu() #CPU模式
model_def = caffe_root + 'models/bvlc_reference_caffenet/deploy.prototxt' #加载配置文件
model_weights = caffe_root + 'models/bvlc_reference_caffenet/bvlc_reference_caffenet.caffemodel' #加载模型文件
net = caffe.Net(model_def , model_weights , caffe.TEST) #用caffe的测试模式,即只是提取特征,不训练
#预处理函数
#caffe中用的图像是BGR空间,但是matplotlib用的是RGB空间;再比如caffe的数值空间是[0,255],但是matplotlib的空间是[0,1],这些都需要转换
#载入imagenet的均值,实际图像要减去这个均值,从而减少噪声影响(同时还有特征缩放的作用?)
mu = np.load(caffe_root + 'python/caffe/imagenet/ilsvrc_2012_mean.npy')
mu = mu.mean(1).mean(1)  #计算像素的平均值(mean(1)按每行计算均值)
print 'mean-subtracted values:' , zip('BGR' , mu) #打印B、G、R的平均像素值
transformer = caffe.io.Transformer({'data' : net.blobs['data'].data.shape}) #用转换函数Transformer函数使transformer得到data层的数据格式
transformer.set_transpose('data' , (2 , 0 , 1))  #由于python中读取的图片格式为H*W*K,所以需要转换为caffe的格式即K*H*W
transformer.set_mean('data' , mu) #每个通道都减去平均像素值
transformer.set_raw_scale('data' , 255) #python 中将图片存储为[0,1],而caffe中将图片存储为[0,255],而这里是Python空间,所以将[0,1]转换为[0,255]
transformer.set_channel_swap('data' , (2 , 1 , 0)) #交换RGB空间到BGR空间
net.blobs['data'].reshape(50 , 3 , 227 , 227) #batchsize=50,3通道,图像大小为227*227
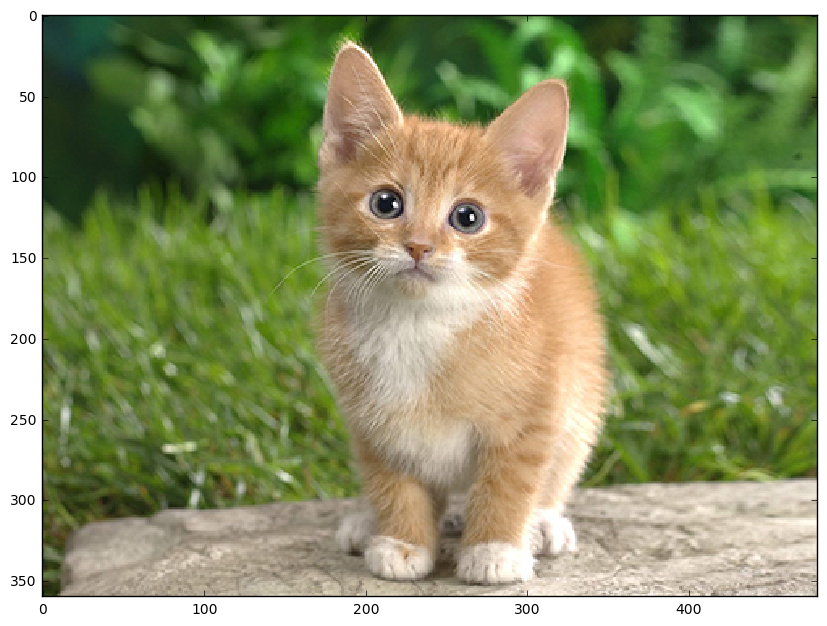
image = caffe.io.load_image(caffe_root + 'examples/images/cat.jpg')
transformed_image = transformer.preprocess('data' , image) #执行上面的图像预处理操作,并将image载入到blob中,和下面语句一起的
plt.imshow(image) #显示图片

net.blobs['data'].data[...] = transformed_image
output = net.forward() #进行一次前向传播
output_prob = output['prob'][0] #output_prob存储属于每类的概率,['prob'][0],它是一个一维数组
'''
layer {
  name: "prob"
  type: "Softmax"
  bottom: "fc8"
  top: "prob"
}
'''
print 'predicted class is:' , output_prob.argmax() #最大概率所在的类别
out:predicted class is: 281
labels_file = caffe_root + 'data/ilsvrc12/synset_words.txt'
labels = np.loadtxt(labels_file , str , delimiter = '	') #一行一行读取到labels中,定界符delimiter是
print 'output label:' , labels[output_prob.argmax()]
out:
output label: n02123045 tabby, tabby cat
#输出概率较大的前5个物体
top_inds = output_prob.argsort()[: : -1][: 5] #得到数组值从小到大的索引值后再从右向左进行提取,并取前5个即概率最大的5个物体
print 'probabilities and labels:'
zip(output_prob[top_inds] , labels[top_inds])
out:
Out[17]:
二、人脸检测
代码来自一个教程中给的视频,贴出代码和附注~
import caffe
%matplotlib inline
import numpy as np
import matplotlib.pyplot as plt
import matplotlib.cbook as cbook
#import Image
import sys
import os
from  math import pow
from PIL import Image, ImageDraw, ImageFont
import cv2
import math
import random
caffe_root = 'E:\caffe\caffe-master\'

sys.path.insert(0, caffe_root + 'python')
os.environ['GLOG_minloglevel'] = '2'

caffe.set_mode_cpu()
#非极大值抑制算法NMS
class Point(object):
    def __init__(self, x, y):
        self.x = x
        self.y = y
def calculateDistance(x1,y1,x2,y2):  #计算人脸框的对角线距离
    dist = math.sqrt((x2 - x1)**2 + (y2 - y1)**2)
    return dist

def range_overlap(a_min, a_max, b_min, b_max):

    return (a_min <= b_max) and (b_min <= a_max)

def rect_overlaps(r1,r2):
    return range_overlap(r1.left, r1.right, r2.left, r2.right) and range_overlap(r1.bottom, r1.top, r2.bottom, r2.top)

def rect_merge(r1,r2, mergeThresh):

    if rect_overlaps(r1,r2):
        # dist = calculateDistance((r1.left + r1.right)/2, (r1.top + r1.bottom)/2, (r2.left + r2.right)/2, (r2.top + r2.bottom)/2)
        SI= abs(min(r1.right, r2.right) - max(r1.left, r2.left)) * abs(max(r1.bottom, r2.bottom) - min(r1.top, r2.top))
        SA = abs(r1.right - r1.left)*abs(r1.bottom - r1.top)
        SB = abs(r2.right - r2.left)*abs(r2.bottom - r2.top)
        S=SA+SB-SI
        ratio = float(SI) / float(S)
        if ratio > mergeThresh :
            return 1
    return 0
class Rect(object):
    def __init__(self, p1, p2): #p1和p2为对角线上的两个点
        '''Store the top, bottom, left and right values for points
               p1 and p2 are the (corners) in either order
        '''
        self.left   = min(p1.x, p2.x) #?????
        self.right  = max(p1.x, p2.x)
        self.bottom = min(p1.y, p2.y)
        self.top    = max(p1.y, p2.y)

    def __str__(self):
        return "Rect[%d, %d, %d, %d]" % ( self.left, self.top, self.right, self.bottom )
def nms_average(boxes, groupThresh=2, overlapThresh=0.2):
    rects = []
    temp_boxes = []
    weightslist = []
    new_rects = []
    for i in range(len(boxes)):
        if boxes[i][4] > 0.2:
            rects.append([boxes[i,0], boxes[i,1], boxes[i,2]-boxes[i,0], boxes[i,3]-boxes[i,1]])


    rects, weights = cv2.groupRectangles(rects, groupThresh, overlapThresh) #函数解释http://blog.csdn.net/nongfu_spring/article/details/38977833

    rectangles = []
    for i in range(len(rects)):

        testRect = Rect( Point(rects[i,0], rects[i,1]), Point(rects[i,0]+rects[i,2], rects[i,1]+rects[i,3]))
        rectangles.append(testRect)
    clusters = []
    for rect in rectangles:
        matched = 0
        for cluster in clusters:
            if (rect_merge( rect, cluster , 0.2) ):
                matched=1
                cluster.left   =  (cluster.left + rect.left   )/2
                cluster.right  = ( cluster.right+  rect.right  )/2
                cluster.top    = ( cluster.top+    rect.top    )/2
                cluster.bottom = ( cluster.bottom+ rect.bottom )/2

        if ( not matched ):
            clusters.append( rect )
    result_boxes = []
    for i in range(len(clusters)):

        result_boxes.append([clusters[i].left, clusters[i].bottom, clusters[i].right, clusters[i].top, 1])

    return result_boxes
def generateBoundingBox(featureMap, scale): #由于做了scale变换,所以在这里还要将坐标反变换回去
    boundingBox = [] #存储候选框,以及属于人脸的概率
    stride = 32 #感受野的大小,filter大小,这个需要自己不断地去调整;
    cellSize = 227 #人脸框的大小,它这里是认为特征图上的一块区域的prob大于95%,就以那个点在原始图像中相应的位置作为人脸框的左上角点,然后框出候选框,但这么做感觉会使候选框变多
    #遍历最终的特征图,寻找属于人脸的概率大于95%的那些区域,加上Box
    for (x,y), prob in np.ndenumerate(featureMap):
        if(prob >= 0.95):
            boundingBox.append([float(stride * y)/ scale,
                                float(x * stride)/scale,
                                float(stride * y + cellSize - 1)/scale,
                                float(stride * x + cellSize - 1)/scale, prob])

    return boundingBox
def face_detection(imgFile):
    net_full_conv = caffe.Net(os.path.join(caffe_root, 'faceDetect', 'deploy_full_conv.prototxt'),
                              os.path.join(caffe_root, 'faceDetect', 'alexnet_iter_50000_full_conv.caffemodel'),
                              caffe.TEST)#全卷积网络(导入训练好的模型和deploy配置文件)
    randNum = random.randint(1,10000) #设置一个在1到10000之间的随机数


    scales = []  #设置几个scale,组成图像金字塔
    factor = 0.793700526  #图像放大或者缩小的一个因子(经验值)


    img = cv2.imread(imgFile) #读入测试图像


    largest = min(2, 4000/max(img.shape[0:2])) #设定做scale变幻时最大的scale
    scale = largest
    minD = largest*min(img.shape[0:2]) #设定最小的scale
    while minD >= 227: #只要最小的边做完最大的scale变换后大于227,之前得到的largest就可以作为最大的scale来用,并依此乘上factor,加入到scale列表中
        scales.append(scale)
        scale *= factor
        minD *= factor

    total_boxes = []  #存储所有的候选框
    #进行多尺度的人脸检测
    for scale in scales:

        scale_img = cv2.resize(img,((int(img.shape[0] * scale), int(img.shape[1] * scale))))  #调整图像的长和高
        cv2.imwrite('E:\caffe\caffe-master\faceDetect\scale\scale_img.jpg',scale_img) #保存图像
        #图像预处理
        im = caffe.io.load_image('E:\caffe\caffe-master\faceDetect\scale\scale_img.jpg') #得到的特征值是0到1之间的小数
        net_full_conv.blobs['data'].reshape(1,3,scale_img.shape[1],scale_img.shape[0]) #blobs['data']指data层,字典用法;同时由于图像大小发生了变化,data层的输入接口也要发生相应的变化
        transformer = caffe.io.Transformer({'data': net_full_conv.blobs['data'].data.shape}) #设定图像的shape格式
        transformer.set_mean('data', np.load(caffe_root +
                                             'python\caffe\imagenet\ilsvrc_2012_mean.npy').mean(1).mean(1)) #减去均值操作
        transformer.set_transpose('data', (2,0,1))  #move image channels to outermost dimension
        transformer.set_channel_swap('data', (2,1,0)) #swap channels from RGB to BGR
        transformer.set_raw_scale('data', 255.0) #rescale from [0,1] to [0,255]

        out = net_full_conv.forward_all(data=np.asarray([transformer.preprocess('data', im)])) #进行一次前向传播,out包括所有经过每一层后的特征图,其中元素为[(x,y),prob](特征图中的每一个小区域都代表一个概率)

        boxes = generateBoundingBox(out['prob'][0,1], scale)  #输出两类的可能性,并经过筛选获得候选框
        if(boxes):
            total_boxes.extend(boxes)  #将每次scale变换后的图片得到的候选框存进total_boxes中

    boxes_nms = np.array(total_boxes)
    true_boxes = nms_average(boxes_nms, 1, 0.2)  #利用非极大值算法过滤出人脸概率最大的框
    if not true_boxes == []:
        (x1, y1, x2, y2) = true_boxes[0][:-1]
        print (x1, y1, x2, y2)
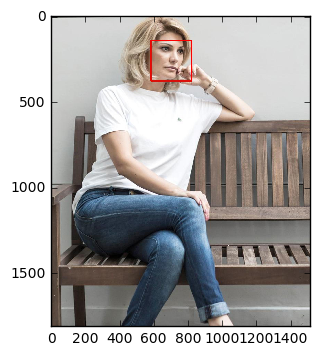
        cv2.rectangle(img, (int(x1),int(y1)), (int(x2),int(y2)), (0,0,255),thickness = 5)
        cv2.imwrite('E:\caffe\caffe-master\faceDetect\scale\result.jpg',img)
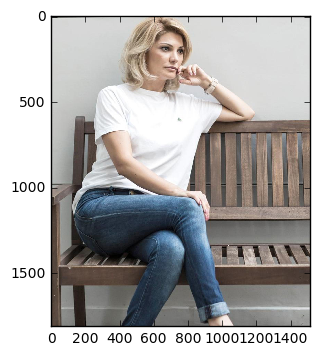
imgFile = 'E:\caffe\caffe-master\data\imageset_2\tangyudi\tmp9055.jpg'
#image_file = cbook.get_sample_data(imgFile)
img = plt.imread(imgFile)
plt.imshow(img)
plt.show()

#face_detection(imgFile)

face_detection(imgFile)
out:
(581, 147, 818, 384)
imgFile = 'E:\caffe\caffe-master\faceDetect\scale\result.jpg'
img = plt.imread(imgFile)
plt.imshow(img)
plt.show()
