本文是《大型分布式网站架构与实践》3.2节 常用安全算法的 学习笔记。
数字摘要
数字摘要也成为消息摘要(message digest),它是一个唯一对应一个消息或者文本的固定长度的值,它由一个单向的Hash函数计算产生。假设Hash函数为f(x),那么理想情况是任意的x1和x2,f(x1) ≠f(x2); 任意的x1,f(x1)的值总是相同的。如果两个不同的值产生了相同的消息摘要,我们称之为Hash碰撞。发生碰撞的概率越小Hash函数越好,尽管完全不发生碰撞是不可能的。消息摘要是不可逆的,我们无法从摘要中复原原有信息。消息摘要的使用场景是 我们得到了一个文本和它的消息摘要,我们可以使用相同的Hash函数计算出自己的摘要,如果两个摘要是相同的,我们就可以判定文本没有被修改过。
常用的消息摘要算法有MD5(Message Digest Algorithm 5) 和 SHA-1(Secure Hash Algorithm 1)。
我们还需要将摘要算法得到的二进制编码为字符串,常用的编码有16进制编码和base64编码
下面代码演示了使用java(JDK1.8)来进行MD5和SHA-1计算摘要,以及使用16进制编码和base64编码为字符串。
package test;

import java.io.UnsupportedEncodingException;
import java.security.MessageDigest;
import java.security.NoSuchAlgorithmException;
import java.util.Base64;

public class MeesageDigest {
    /**
     * 根据不同的算法计算消息摘要
     * @param value  待计算的字符串
     * @param algorithm 特定摘要算法
     * @return
     * @throws NoSuchAlgorithmException
     * @throws UnsupportedEncodingException
     */
    public static byte[] messageDigest(String value, String algorithm) throws NoSuchAlgorithmException, UnsupportedEncodingException{
        MessageDigest md5 = MessageDigest.getInstance(algorithm);
        return md5.digest(value.getBytes("UTF-8"));
    }

    //16进制编码
    public static String bytesToHexString(byte[] src){
        StringBuilder stringBuilder = new StringBuilder("");
        if (src == null || src.length <= 0) {
            return null;
        }
        for (int i = 0; i < src.length; i++) {
            int v = src[i] & 0xFF;
            String hv = Integer.toHexString(v);
            if (hv.length() < 2) {
                stringBuilder.append(0);
            }
            stringBuilder.append(hv);
        }
        return stringBuilder.toString();
    }

    //16进制解码
    public static byte[] hexStringToBytes(String hexString) {
        if (hexString == null || hexString.equals("")) {
            return null;
        }
        hexString = hexString.toUpperCase();
        int length = hexString.length() / 2;
        char[] hexChars = hexString.toCharArray();
        byte[] d = new byte[length];
        for (int i = 0; i < length; i++) {
            int pos = i * 2;
            d[i] = (byte) ((byte) "0123456789ABCDEF".indexOf(hexChars[pos]) << 4 | (byte) "0123456789ABCDEF".indexOf(hexChars[pos + 1]));
        }
        return d;
    }

    public static void main(String[] args) throws Exception {
        byte[] md5_bytes = messageDigest("do what you love and keep going !", "MD5");
        byte[] sha1_bytes = messageDigest("do what you love and keep going !", "SHA-1");

        //16进制编码,我们利用网上的一些md5加密工具(32位小)得到的结果就是下面的这个md5_str。
        String md5_str = bytesToHexString(md5_bytes);
        System.out.println(md5_str);

        //base64编码
        String base64_str = Base64.getEncoder().encodeToString(md5_bytes);
        System.out.println(base64_str);
    }
}
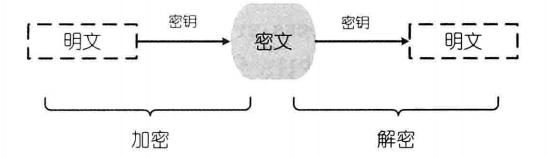
对称加密
对称加密(Symmetric Cryptography ):加密和解密必须使用同一个秘钥,对称加密加密效率高,但是由于通信双方都必须知道这个秘钥,所以对秘钥的保护就变得相当重要(在后面会讲到可以使用非对称加密来传递对称加密的秘钥)。
常用的对称加密算法有:DES 、 3DES、 AES。
下面java代码演示了如何使用AES算法(Advanced Encryption Standard)来加密和解密文本。
package test;

import java.util.Base64;
import javax.crypto.Cipher;
import javax.crypto.KeyGenerator;
import javax.crypto.SecretKey;
import javax.crypto.spec.SecretKeySpec;

public class SymmetricCryptography {
    //AES算法产生秘钥
    public static SecretKey genKeyAES() throws Exception{
        KeyGenerator keyGen = KeyGenerator.getInstance("AES");
        keyGen.init(128);//秘钥长度
        SecretKey key = keyGen.generateKey();
        return key;
    }

    /**
     * 我们这里定义了一个字符串类型的秘钥转换为java类型秘钥的方法
     * 在真实的场景中,我们会将秘钥保存在一个文件中,当需要用它来加密解密时,从文件中读取出来,然后再转换为java的秘钥对象
     */
    public static SecretKey loadKeyAES(String keyStr){
        byte[] bytes = Base64.getDecoder().decode(keyStr);
        SecretKey key = new SecretKeySpec(bytes, "AES");
        return key;
    }

    //下面两个方法分别使用AES算法加密和解密,他们都需要秘钥参与
    public static byte[] encryptAES(byte[] source, String keyStr) throws Exception{
        Cipher cipher = Cipher.getInstance("AES");
        cipher.init(Cipher.ENCRYPT_MODE, loadKeyAES(keyStr));
        byte[] bytes = cipher.doFinal(source);
        return bytes;
    }

    public static byte[] decryptAES(byte[] source, String keyStr) throws Exception{
        Cipher cipher = Cipher.getInstance("AES");
        cipher.init(Cipher.DECRYPT_MODE, loadKeyAES(keyStr));
        byte[] bytes = cipher.doFinal(source);
        return bytes;
    }

    public static void main(String[] args) throws Exception {
        //加密和解密必须使用相同的key
        SecretKey key = genKeyAES();
        //产生字符串秘钥的key,可以保存在文件中以备使用
        String keyStr = Base64.getEncoder().encodeToString(key.getEncoded());
        //待加密的文本
        String source = "do what you love and keep going !";

        //将文本加密并按base64编码后输出
        byte[] encrypt_bytes = encryptAES(source.getBytes("UTF-8"), keyStr);
        System.out.println(Base64.getEncoder().encodeToString(encrypt_bytes));

        //使用同样的key解码后输出
        byte[] decrypt_bytes = decryptAES(encrypt_bytes, keyStr);
        System.out.println(new String(decrypt_bytes, "UTF-8"));

        //使用不同的key解码然后输出
        SecretKey another_key = genKeyAES();
        String another_key_str = Base64.getEncoder().encodeToString(another_key.getEncoded());
        //使用不同的秘钥将抛出javax.crypto.BadPaddingException,无法解密。
        byte[] another_decrypt_bytes = decryptAES(encrypt_bytes, another_key_str);
        System.out.println(new String(another_decrypt_bytes, "UTF-8"));
    }

}
非对称加密
非对称加密(asymmetric encryption)使用一对秘钥进行加密和解密:假设通信双方为Alice和Bob,Alice首先产生一对秘钥,并将其中一把公开出来,任何人都可以获得到,我们称之为 公钥(public key),而另一把则只有Alice自己知道,我们称之为 私钥(private key)。 非对称加密算法的特点是 对于使用私钥加密的密文可以使用公钥解密,而使用公钥加密的密文可以使用私钥解密。 现在Alice拥有了私钥,Bob拥有了公钥,他们之间便可以相互加密传输信息了。非对称加密只需要一对秘钥就够了。
Alice向Bob加密传输信息:
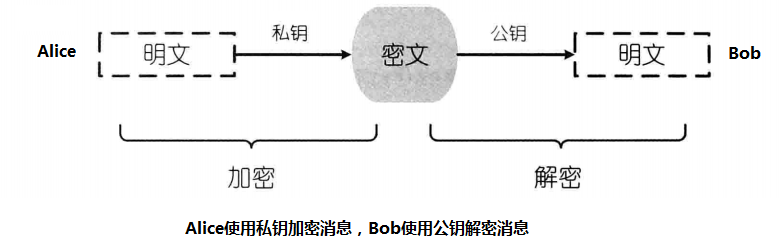
Bob向Alice加密传输信息:

非对称加密可以做到即使得到了公钥和加密算法源码也不能够解密密文,而实际上它们就是公开的。所以它不同于对称加密那样,一旦传输过程中将 加密秘钥 暴露,加密就不再安全了。 另一方面,非对称加密由于更加复杂,所以加密效率更低,不适于加密长文本。 在实际使用中,往往将对称加密和非对称加密混合使用:首先使用非对称加密来传输对称加密的秘钥,然后再使用对称加密传输真正的消息文本。这样就既保证了加密效率又不存在对称加密秘钥分发存在风险的问题了。最常用的非对称加密算法是RSA算法(其名称来自于三位作者的名字)
下面代码演示了RSA算法的java实现。
package test;

import java.security.Key;
import java.security.KeyFactory;
import java.security.KeyPair;
import java.security.KeyPairGenerator;
import java.security.PrivateKey;
import java.security.PublicKey;
import java.security.spec.PKCS8EncodedKeySpec;
import java.security.spec.X509EncodedKeySpec;
import java.util.Base64;

import javax.crypto.Cipher;

public class AsymmetricEncryption {
    //生成非对称加密的一对秘钥
    public static KeyPair getKeyPair() throws Exception{
        KeyPairGenerator keyPairGenerator = KeyPairGenerator.getInstance("RSA");
        //初始化KeyPairGenerator的值决定了最大可以加密的字节数,例如512最大加密53字节,1024最大加密117字节....,而且随着加密字节的增多,速度会越来越慢
        keyPairGenerator.initialize(512);
        KeyPair keyPair = keyPairGenerator.generateKeyPair();
        return keyPair;
    }


    /*
     * 下面两个方法用于将字符串转换为秘钥对象
     * 在真实的场景中,往往是将秘钥转换为字符串保存在文件中以备后面使用。
     * 当使用的时候,从文件中读取字符串然后再转换为java的秘钥对象。
     */
    //将String类型(base64)的公钥转换为PublicKey对象。
    public static PublicKey string2PublicKey(String pubStr) throws Exception{
        byte[] keyBytes = Base64.getDecoder().decode(pubStr);
        //需要先将公钥转换为X509EncodedKeySpec
        X509EncodedKeySpec keySpec = new X509EncodedKeySpec(keyBytes);
        KeyFactory keyFactory = KeyFactory.getInstance("RSA");
        PublicKey publicKey = keyFactory.generatePublic(keySpec);
        return publicKey;
    }

    //将String类型(base64)的公钥转换为PrivateKey对象。
    public static PrivateKey string2PrivateKey(String priStr) throws Exception{
        byte[] keyBytes = Base64.getDecoder().decode(priStr);
        //需要先将私钥转换为PKCS8EncodedKeySpec
        PKCS8EncodedKeySpec keySpec = new PKCS8EncodedKeySpec(keyBytes);
        KeyFactory keyFactory = KeyFactory.getInstance("RSA");
        PrivateKey privateKey = keyFactory.generatePrivate(keySpec);
        return privateKey;
    }

    //下面两个方法分别用于加密和解密,如果使用公钥加密则使用私钥解密,如果使用私钥加密则使用公钥解密
    public static byte[] RSAEncrypt(byte[] content, Key key) throws Exception{
        Cipher cipher = Cipher.getInstance("RSA");
        cipher.init(Cipher.ENCRYPT_MODE, key);
        byte[] bytes = cipher.doFinal(content);
        return bytes;
    }

    public static byte[] RSADecrypt(byte[] content, Key key) throws Exception{
        Cipher cipher = Cipher.getInstance("RSA");
        cipher.init(Cipher.DECRYPT_MODE, key);
        byte[] bytes = cipher.doFinal(content);
        return bytes;
    }

    public static void main(String[] args) throws Exception {
        //生成非对称加密的一对秘钥,按base64编码
        KeyPair keyPair = getKeyPair();
        PublicKey publicKey = keyPair.getPublic();
        PrivateKey privateKey = keyPair.getPrivate();

        String public_str = Base64.getEncoder().encodeToString(publicKey.getEncoded());
        String private_str = Base64.getEncoder().encodeToString(privateKey.getEncoded());

        //在真实的场景中,会将生成的字符串类型的公钥发送给通信的另一方,让其保存在文件中。 而字符串类型的私钥则自己保存在文件中。
        System.out.println("public key: " + private_str);
        System.out.println("private key: " + public_str);

        //真正通信的时候,再将秘钥的字符串表示转换为java秘钥对象
        PublicKey publicKey2 = string2PublicKey(public_str);
        PrivateKey privateKey2 = string2PrivateKey(private_str);

        String content = "do what you love and keep going !";

        //在这里加密的内容不能大约53个字节
        assert content.getBytes("UTF-8").length <= 53 : "Data must not be longer than 53 bytes ";

        //使用公钥加密,私钥解密
        byte[] public_encrypt_bytes = RSAEncrypt(content.getBytes("UTF-8"), publicKey2);
        byte[] private_decrypt_bytes = RSADecrypt(public_encrypt_bytes, privateKey2);

        System.out.println(new String(private_decrypt_bytes, "UTF-8"));

        //使用私钥加密,公钥解密
        byte[] private_encrypt_bytes = RSAEncrypt(content.getBytes("UTF-8"), privateKey2);
        byte[] public_decrypt_bytes = RSADecrypt(private_encrypt_bytes, publicKey2);

        System.out.println(new String(public_decrypt_bytes, "UTF-8"));
    }
}
数字签名
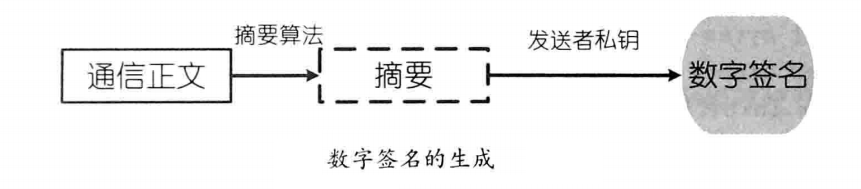
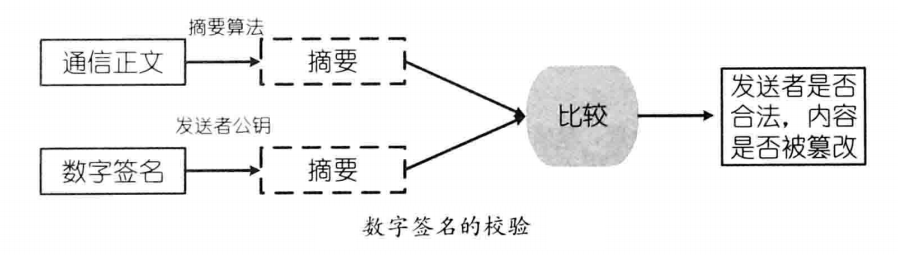
数字签名是非对称加密技术和消息摘要技术的综合运用。 消息发送方将消息正文通过摘要算法产生消息摘要,然后通过私钥加密,便得到了 数字签名。 数字签名需要和消息正文一同发送给接受者,接受者首先对接受到的消息正文采用相同的摘要算法产生消息摘要,然后使用发送者的公钥来将数字签名解密,得到加密前的消息摘要,通过这两个消息摘要进行对比,发送者就可以确定 消息是否被篡改过,以及消息是否来自于期待的发送者。签名的含义就是发送方使用只有自己知道的私钥来对消息摘要进行加密,这样别人就无法冒充发送方。
从上面的讨论中我们不难猜测出常用的数字签名算法其实就是 数字摘要算法和非对称加密算法的组合,比如 MD5withRSA 、 SHA1withRSA。
下面使用Java自身的签名API实现了MD5withRSA算法,其实我们通过组合之前对数字签名和非对称加密的讨论,自己实现起来也很容易。
package test;

import java.security.KeyPair;
import java.security.PrivateKey;
import java.security.PublicKey;
import java.security.Signature;

public class SignatureWithJavaApi {
    /**
     * 发送发对消息文本签名
     * @param content  消息文本
     * @param privateKey 发送发私钥
     * @return
     * @throws Exception
     */
    public static byte[] sign(String content, PrivateKey privateKey) throws Exception{
        Signature signature = Signature.getInstance("MD5withRSA");
        signature.initSign(privateKey);
        signature.update(content.getBytes("UTF-8"));
        return signature.sign();
    }

    /**
     * 接收方认证数字签名
     * @param content 消息文本
     * @param sign 发送发数字签名
     * @param publicKey 发送发公钥
     * @return
     * @throws Exception
     */
    public static boolean verify(String content, byte[] sign, PublicKey publicKey) throws Exception{
        Signature signature = Signature.getInstance("MD5withRSA");
        signature.initVerify(publicKey);
        signature.update(content.getBytes("UTF-8"));
        return signature.verify(sign);
    }

    public static void main(String[] args) throws Exception {
        String content = "do what you love and keep going !";
        KeyPair pair = AsymmetricEncryption.getKeyPair();

        byte[] sign = sign(content, pair.getPrivate());
        boolean isVerify = verify(content, sign, pair.getPublic());
        System.out.println(isVerify);
    }
}
数字证书
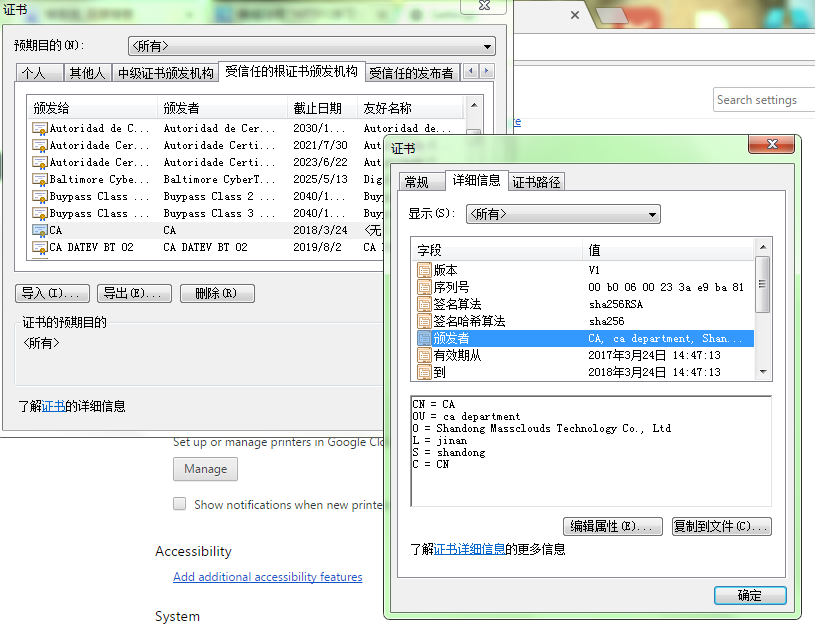
数字证书是网络中用户身份的证明。例如我们访问https://www.baidu.com时就会从baidu接受到它的数字证书。在调试工具中 security -> View certificate 查看数字证书如下:
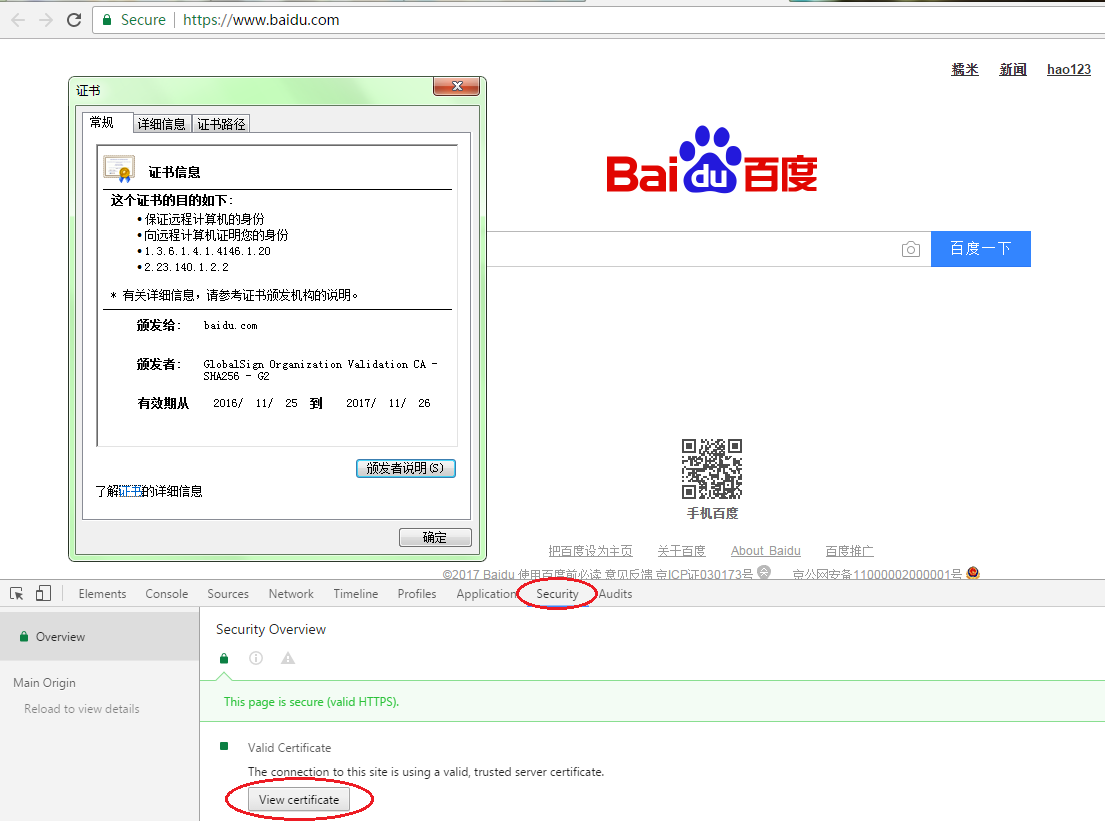
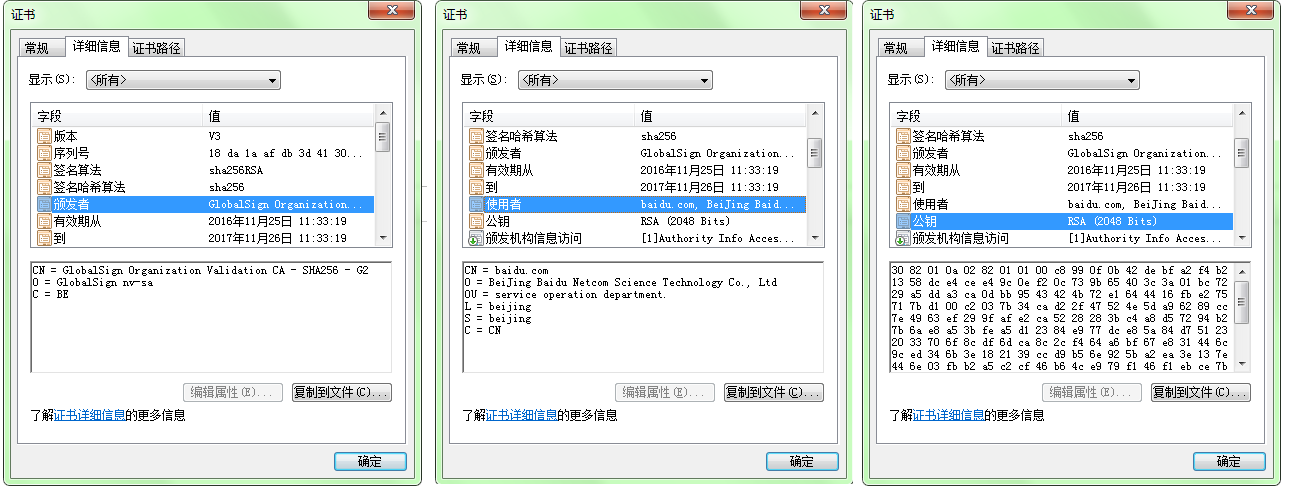
从这个数字证书的详情中我们可以看到证书的颁发机构(CA)、证书使用者、公钥等信息,如下图
客户端可以从以下几个方面对服务器证书进行验证:
1. 日期检测 就是证书中的有效期
2.颁发者可信度检测 在证书中我们可以看到颁发者(CA)一栏,颁发者多是一些权威机构,操作系统中预安装了很多权威CA的根证书。 当然我们可以自签发一些证书,为了能让客户端通过认证,我们需要手动导入自己的根证书。
3. 证书数字签名认证 在证书中除了我们所看到的信息外,它还携带了发证机构的数字签名,当客户端接收到这个数字证书后,就可以使用发证机构的公钥(来自CA根证书)来对这个签名进行认证,从而确定这个证书的确是由相应的CA签发的。
4.站点身份认证 简单的说就是检验服务器的域名与证书中使用者的域名是否匹配,这可以防止服务器复用其他站点的证书。
在企业内部,常常会搭建自己的https服务器,当我们访问它们时也会得到一个数字证书,但是这个证书往往默认是通不过浏览器认证的,如下图:
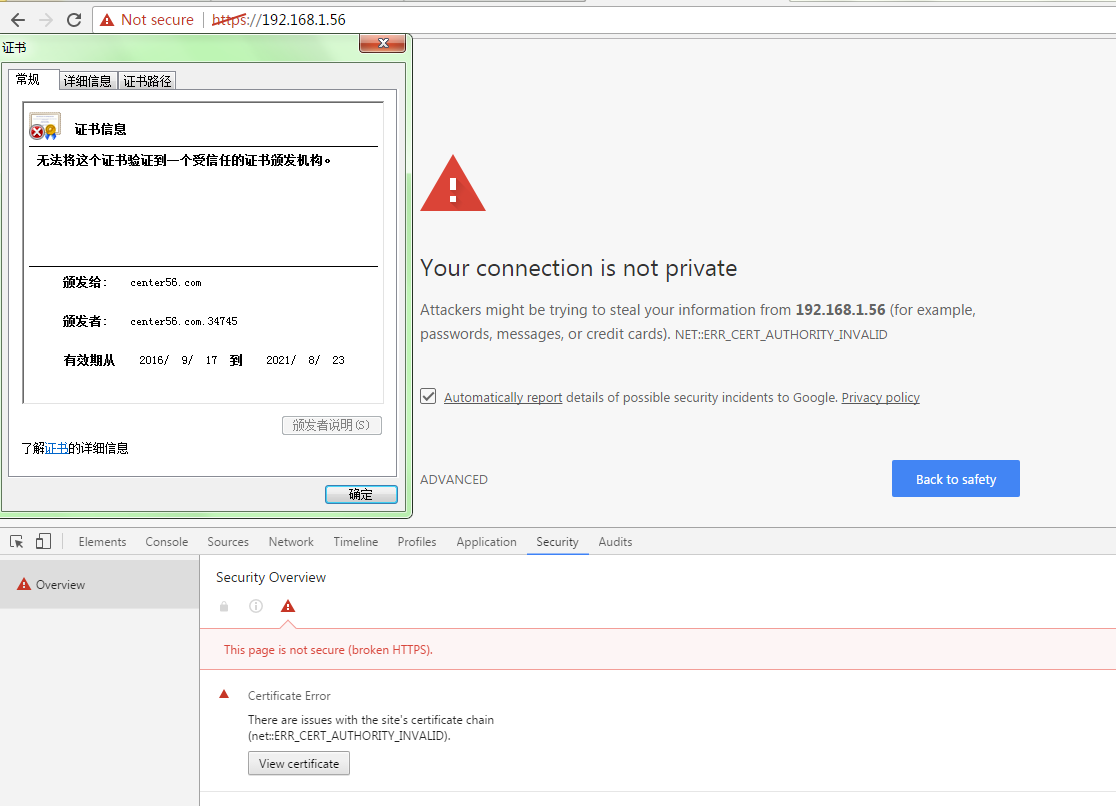
上面我们访问企业内部https服务器得到了一个数字证书,很明显这个证书仅仅通过了日期检测,其他三个都没有通过。 在使用中,我们会让浏览器忽略这些警告继续访问,这是因为在企业内部我们自己肯定是信任所访问的站点的,而这个证书中的公钥信息可以在后续通信中实现加密传输,这个往往才是我们真正需要的。
下面我们通过openssl来生成根证书和服务器端证书。
实验环境: centos 7
centos中默认已经安装了openssl,安装过程就不再赘述了。
1. 修改/etc/pki/tls/openssl.cnf,设定自己的工作目录
dir = /home/massclouds/CA #指定为自己的路径
certs = $dir/certs # Where the issued certs are kept
crl_dir = $dir/crl # Where the issued crl are kept
database = $dir/index.txt # database index file.
2.在上面设定的工作目录下面新建一些目录和文件
# touch index.txt
# echo 01>serial
3.openssl生成随机数
根证书:
1.openssl生成CA私钥
2.生成根证书的签发申请CSR(certificate sign request)
也可以不指定-subj参数,通过交互方式输入证书使用者的信息。
3.签发根证书
服务器证书(由根证书签发)
1.生成服务器私钥
2.生成服务器CSR文件
3.使用根证书签发服务端证书
客户端证书(由根证书签发)
1.生成客户端私钥
2.生成客户端CSR文件
3.使用根证书签发客户端证书
以上这些步骤在《大型分布式网站架构与实践》P175页有更加详细的介绍。
至此我们就得到了根证书和由这个根证书签发的服务端证书,我们现在可以将根证书导入到浏览器中看看是什么样子的。
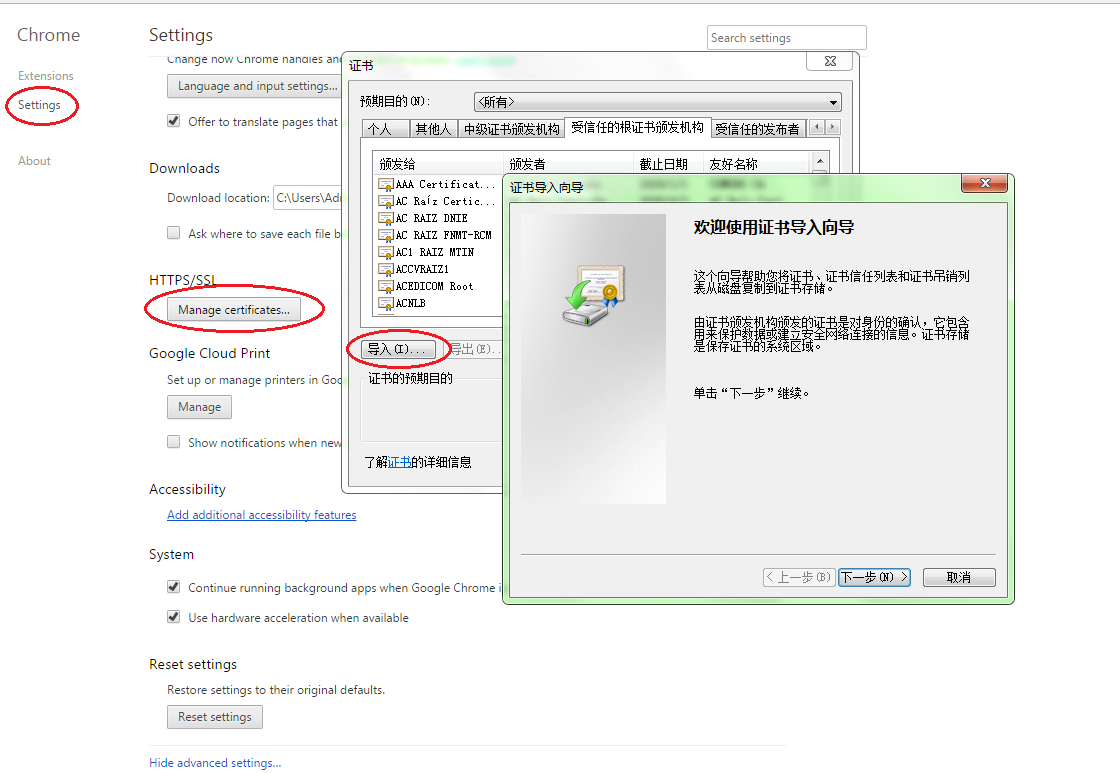
导入后的结果:
至此我们就讨论完了https的所有准备知识,下一篇我们将进入https的讨论。
do what you love and keep going !