1、概述
(1)概念
springmvc的处理器拦截器类似于servlet中的过滤器filter,用于对处理器进行预处理和后处理。开发者可以自己定义一些拦截器(必须实现HandlerInterceptor)来实现特定的功能
(2)过滤器与拦截器
拦截器是AOP思想的具体应用。
过滤器:
servlet规范的一部分,任何javaweb工程都可以使用,在url-pattern中配置了/*之后,可以对所有要访问的资源进行拦截
拦截器:
拦截器是springmvc框架自己的,只有使用了springmvc框架的工程才能使用,拦截器只会拦截访问的控制器方法,如果访问的是jsp/html/css/images是不会进行拦截的
2、拦截器演示
(1)在web.xml中对前端控制器和中文乱码的处理进行配置:
<?xml version="1.0" encoding="UTF-8"?>
<web-app xmlns="http://xmlns.jcp.org/xml/ns/javaee"
         xmlns:xsi="http://www.w3.org/2001/XMLSchema-instance"
         xsi:schemaLocation="http://xmlns.jcp.org/xml/ns/javaee http://xmlns.jcp.org/xml/ns/javaee/web-app_4_0.xsd"
         version="4.0">
    <!-- 前端控制器 -->
    <servlet>
        <servlet-name>springmvc</servlet-name>
        <servlet-class>org.springframework.web.servlet.DispatcherServlet</servlet-class>
        <!--绑定springmvc的配置文件-->
        <init-param>
            <param-name>contextConfigLocation</param-name>
            <param-value>classpath:applicationContext.xml</param-value>
        </init-param>
        <load-on-startup>1</load-on-startup><!--启动服务器即创建-->
    </servlet>
    <servlet-mapping>
        <servlet-name>springmvc</servlet-name>
        <url-pattern>/</url-pattern>
    </servlet-mapping>
    <filter>
        <filter-name>EncodingFilter</filter-name>
        <filter-class>pers.zhb.filter.EncodingFilter</filter-class>
        <init-param>
            <param-name>encoding</param-name>
            <param-value>utf-8</param-value>
        </init-param>
    </filter>
    <filter-mapping>
        <filter-name>EncodingFilter</filter-name>
        <url-pattern>/*</url-pattern>
    </filter-mapping>
</web-app>
书写过滤器:
public class EncodingFilter implements Filter {
    public void init(FilterConfig filterConfig) throws ServletException {

    }

    public void doFilter(ServletRequest servletRequest, ServletResponse servletResponse, FilterChain filterChain) throws IOException, ServletException {
        servletRequest.setCharacterEncoding("utf-8");
        servletResponse.setCharacterEncoding("utf-8");
        filterChain.doFilter(servletRequest,servletResponse);
    }

    public void destroy() {

    }
}
(2)配置文件application:对视图解析器、拦截器等进行配置
<?xml version="1.0" encoding="UTF-8"?>
<beans xmlns="http://www.springframework.org/schema/beans"
       xmlns:xsi="http://www.w3.org/2001/XMLSchema-instance"
       xmlns:context="http://www.springframework.org/schema/context"
       xmlns:mvc="http://www.springframework.org/schema/mvc"
       xsi:schemaLocation="http://www.springframework.org/schema/beans
       http://www.springframework.org/schema/beans/spring-beans.xsd
       http://www.springframework.org/schema/context
       https://www.springframework.org/schema/context/spring-context.xsd
       http://www.springframework.org/schema/mvc
       https://www.springframework.org/schema/mvc/spring-mvc.xsd">
    <!--自动扫描包,让指定包下的注解生效,由IOC容器统一管理-->
    <context:component-scan base-package="pers.zhb.controller"></context:component-scan>
    <!--静态资源过滤,让Springmvc不处理静态资源,如css、js等-->
    <mvc:default-servlet-handler></mvc:default-servlet-handler>
    <!--使得注解生效-->
    <mvc:annotation-driven></mvc:annotation-driven>
    <!--视图解析器,前缀和后缀-->
    <bean class="org.springframework.web.servlet.view.InternalResourceViewResolver" id="internalResourceViewResolver">
        <property name="prefix" value="/"></property>
        <property name="suffix" value=".jsp"></property>
    </bean>
    <mvc:annotation-driven></mvc:annotation-driven>
    <mvc:interceptors>
        <mvc:interceptor>
            <mvc:mapping path="/*"></mvc:mapping><!--包括该请求下的所有请求-->
            <bean class="pers.zhb.config.MyInterceptor"></bean>
        </mvc:interceptor>
    </mvc:interceptors>
</beans>
(3)拦截器:
public class MyInterceptor implements HandlerInterceptor {
    public boolean preHandle(HttpServletRequest request, HttpServletResponse response, Object handler) throws Exception {
        System.out.println("preHandle  qian");
        return true;//return true的话执行下一个拦截器
    }

    public void postHandle(HttpServletRequest request, HttpServletResponse response, Object handler, ModelAndView modelAndView) throws Exception {
        System.out.println("postHandle  hou");
    }

    public void afterCompletion(HttpServletRequest request, HttpServletResponse response, Object handler, Exception ex) throws Exception {
        System.out.println("afterCompletion  qingli");
    }
}
(4)处理器:
@RestController
public class TestController {
    @GetMapping("/test1")
    public String test1(){
        System.out.println("123");
        return "ok";
    }
}
(5)测试:


3、登录判断验证
(1)配置文件:applicationContext.xml,对视图解析器、拦截器进行配置
<?xml version="1.0" encoding="UTF-8"?>
<beans xmlns="http://www.springframework.org/schema/beans"
       xmlns:xsi="http://www.w3.org/2001/XMLSchema-instance"
       xmlns:context="http://www.springframework.org/schema/context"
       xmlns:mvc="http://www.springframework.org/schema/mvc"
       xsi:schemaLocation="http://www.springframework.org/schema/beans
       http://www.springframework.org/schema/beans/spring-beans.xsd
       http://www.springframework.org/schema/context
       https://www.springframework.org/schema/context/spring-context.xsd
       http://www.springframework.org/schema/mvc
       https://www.springframework.org/schema/mvc/spring-mvc.xsd">
    <!--自动扫描包,让指定包下的注解生效,由IOC容器统一管理-->
    <context:component-scan base-package="pers.zhb.controller"></context:component-scan>
    <!--静态资源过滤,让Springmvc不处理静态资源,如css、js等-->
    <mvc:default-servlet-handler></mvc:default-servlet-handler>
    <!--使得注解生效-->
    <mvc:annotation-driven></mvc:annotation-driven>
    <!--视图解析器,前缀和后缀-->
    <bean class="org.springframework.web.servlet.view.InternalResourceViewResolver" id="internalResourceViewResolver">
        <property name="prefix" value="/WEB-INF/jsp/"></property>
        <property name="suffix" value=".jsp"></property>
    </bean>
    <mvc:annotation-driven></mvc:annotation-driven>
    <mvc:interceptors>
        <mvc:interceptor>
            <mvc:mapping path="/user/**"></mvc:mapping><!--包括该请求下的所有请求-->
            <bean class="pers.zhb.config.MyInterceptor"></bean>
        </mvc:interceptor>
    </mvc:interceptors>
</beans>
(2)页面:
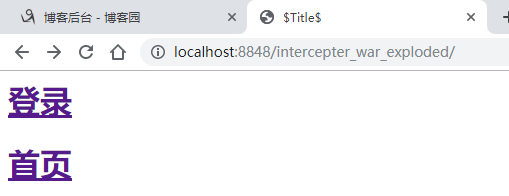
起始页:
<%@ page contentType="text/html;charset=UTF-8" language="java" %>
<html>
  <head>
    <title>$Title$</title>
  </head>
  <body>
  <h1><a href="${pageContext.request.contextPath}/user/gologin">登录</a></h1>
  <h1><a href="${pageContext.request.contextPath}/user/main">首页</a></h1>
  </body>
</html>
主页:
<%@ page contentType="text/html;charset=UTF-8" language="java" %>
<html>
<head>
    <title>Title</title>
</head>
<body>
<h3>首页</h3>
<span>${username}</span>
<p>
    <a href="${pageContext.request.contextPath}/user/goOut">注销</a>
</p>
</body>
</html>
登录页:
<%@ page contentType="text/html;charset=UTF-8" language="java" %>
<html>
<head>
    <title>Login</title>
</head>
<!--在WEB-INF下的所有页面或资源,只能通过servlet或controller进行访问-->
<body>
   <h1>登录页面</h1>
<form action="${pageContext.request.contextPath}/user/login" method="post">
    用户名:<input type="text" name="username">
    密码:<input type="password" name="password">
    <input type="submit" value="提交">
</form>
</body>
</html>
登录页面需要控制器的方法
(3)处理器:
import javax.servlet.http.HttpSession;
@Controller
@RequestMapping("user")
public class LoginController {
    @RequestMapping("main")
    public String main(){
        return "main";
    }

    @RequestMapping("gologin")
    public String login(){
        return "login";
    }

    @RequestMapping("login")
    public String login(HttpSession session, String username, String password, Model model){
        session.setAttribute("userInfo",username);
        model.addAttribute("username",username);
        return "main";
    }

    @RequestMapping("goOut")
    public String goOut(HttpSession session){
        session.removeAttribute("userInfo");
        return "main";
    }
}
因为在WEB-INF下的所有页面或资源,只能通过servlet或controller进行访问,因此,需要书写相应的方法实现页面的跳转
(4)拦截器:
public class MyInterceptor implements HandlerInterceptor {
    public boolean preHandle(HttpServletRequest request, HttpServletResponse response, Object handler) throws Exception {
        HttpSession session=request.getSession();
        if(request.getRequestURI().contains("gologin")){
            return true;
        }
        if(request.getRequestURI().contains("login")){
            return true;
        }
        if(session.getAttribute("userInfo")!=null){
            return true;
        }
        request.getRequestDispatcher("/WEB-INF/jsp/login.jsp").forward(request,response);
            return false;
    }
}
当有名为userInfo的session证明已经登录成功则不进行拦截,在跳转到登录页或者提交登录页信息的时候也不进行拦截。其他情况会被请求转发到登录页,如:未登录的时候在起始页点击首页。
(5)测试:
起始页:

登录页:

登录成功:

返回起始页点击首页:可以直接进入首页

点击注销后,返回起始页再次点击首页,跳转到登录页:

