一、下载安装包
因为使用在线安装特别慢,所有的安装包加起来有9个G左右,所以本教程是通过迅雷下载包,然后上传到服务器,通过配置本地源的方式来实现的离线安装。通过ambari安装需要下载下面的三个主要包:
HDP:http://public-repo-1.hortonworks.com/HDP/centos7/2.x/updates/2.6.3.0/HDP-2.6.3.0-centos7-rpm.tar.gz
ambari:http://public-repo-1.hortonworks.com/ambari/centos7/2.x/updates/2.6.0.0/ambari-2.6.0.0-centos7.tar.gz
HDP-UTILS:http://public-repo-1.hortonworks.com/HDP-UTILS-1.1.0.21/repos/centos7/HDP-UTILS-1.1.0.21-centos7.tar.gz
注意问题:安装的centos系统必选选择英文版本,不然里面有些地方为莫名出错
二、系统环境配置
1、安装jdk(所有机器)
一般linux自带的jdk或者是通过yum安装的jdk都是openjdk,但是最好是使用oracle/sun jdk,前者是开源的,缺失部分功能,后者是官方的。但是如果直接安装oracle的jdk,第三方的依赖包不会安装,所以最有效的额方式是通过yum安装openjdk,并同时安装了第三方依赖包,然后卸载openjdk,通过自己来安装oracle的jdk,就能解决依赖问题。
(1)安装openjdk
[root@master ~]# yum -y install java
[root@master ~]# java -version
openjdk version "1.8.0_161"
OpenJDK Runtime Environment (build 1.8.0_161-b14)
OpenJDK 64-Bit Server VM (build 25.161-b14, mixed mode)
[root@master ~]# rpm -qa|grep java
javapackages-tools-3.4.1-11.el7.noarch
java-1.8.0-openjdk-1.8.0.161-0.b14.el7_4.x86_64
python-javapackages-3.4.1-11.el7.noarch
tzdata-java-2018d-1.el7.noarch
java-1.8.0-openjdk-headless-1.8.0.161-0.b14.el7_4.x86_64
(2)下载oracle
下载地址:http://www.oracle.com/technetwork/java/javase/downloads/jdk8-downloads-2133151.html
选择下载上面标红的jdk的版本1.8.0_161 jdk-8u161-linux-x64.rpm,然后上传到服务器
(3)卸载OpenJDK
[root@master ~]# rpm -e --nodeps java-1.8.0-openjdk-headless-1.8.0.161-0.b14.el7_4.x86_64
[root@master ~]# rpm -e --nodeps java-1.8.0-openjdk-1.8.0.161-0.b14.el7_4.x86_64
(4)安装下载好的jdk
[root@master ~]# rpm -ivh jdk-8u161-linux-x64.rpm
准备中...                          ################################# [100%]
正在升级/安装...
   1:jdk1.8-2000:1.8.0_161-fcs        ################################# [100%]
Unpacking JAR files...
    tools.jar...
    plugin.jar...
    javaws.jar...
    deploy.jar...
    rt.jar...
    jsse.jar...
    charsets.jar...
    localedata.jar...
[root@master ~]# java -version
java version "1.8.0_161"
Java(TM) SE Runtime Environment (build 1.8.0_161-b12)
Java HotSpot(TM) 64-Bit Server VM (build 25.161-b12, mixed mode)
[root@master ~]# javac -version
javac 1.8.0_161
2、修改本机名(所有机器)
通过vi /etc/hostname 进行修改
各个节点修改成相应的名称,分别为master,slave1.slave2.slave3,例
master
然后重启电脑
3、修改/etc/hosts文件(所有机器)
这里主要是为了可以实现通过名称来查找相应的服务器
[root@master ~]# vi /etc/hosts
127.0.0.1   localhost localhost.localdomain localhost4 localhost4.localdomain4
::1         localhost localhost.localdomain localhost6 localhost6.localdomain6
192.168.12.101 master
192.168.12.102 slave1
192.168.12.103 slave2
192.168.12.104 slave3
4、修改/etc/sysconfig/network(所有机器)
[root@master ~]# vi /etc/sysconfig/network
# Created by anaconda
NETWORKING=yes
接下来就可以通过测试一下是否可以通过ping主机名来找到对应的服务器
[root@master ~]# ping slave1
PING slave1 (192.168.12.102) 56(84) bytes of data.
64 bytes from slave1 (192.168.12.102): icmp_seq=1 ttl=63 time=0.134 ms
64 bytes from slave1 (192.168.12.102): icmp_seq=2 ttl=63 time=0.132 ms
64 bytes from slave1 (192.168.12.102): icmp_seq=3 ttl=63 time=0.133 ms
64 bytes from slave1 (192.168.12.102): icmp_seq=4 ttl=63 time=0.133 ms
64 bytes from slave1 (192.168.12.102): icmp_seq=5 ttl=63 time=0.132 ms
^C
--- slave1 ping statistics ---
5 packets transmitted, 5 received, 0% packet loss, time 4000ms
rtt min/avg/max/mdev = 0.132/0.132/0.134/0.014 ms
5、修改文件打开限制(所有机器)
[root@master ~]# vi /etc/security/limits.conf
# End of file
* soft nofile 65536
* hard nofile 65536
* soft nproc 131072
* hard nproc 131072
6、关闭防火墙(所有机器)
[root@master~]#systemctl disable firewalld
[root@master~]#systemctl stop firewalld
除此之外
[root@master ~]# cat /etc/selinux/config
# This file controls the state of SELinux on the system.
# SELINUX= can take one of these three values:
#     enforcing - SELinux security policy is enforced.
#     permissive - SELinux prints warnings instead of enforcing.
#     disabled - No SELinux policy is loaded.
SELINUX=disabled
# SELINUXTYPE= can take one of these two values:
#     targeted - Targeted processes are protected,
#     mls - Multi Level Security protection.
SELINUXTYPE=targeted
7、同步时钟
(1)安装ntp服务(所有机器)
[root@master ~]#yum -y install ntp
(2)设置master为主服务器,开启nptd服务(主服务器)
[root@master ~]#vi /etc/ntp.conf
如图:
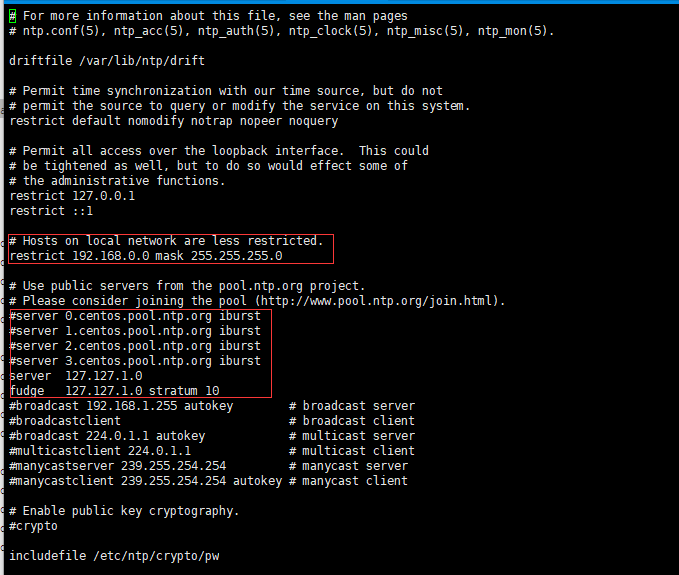
[root@master ~]# systemctl start ntpd.service       #启动服务
[root@master ~]# systemctl enable ntpd.service      #开机自启动
(3)、子节点设置同步(子节点)
主服务器开启ntp服务器以后,子节点就不需要开启了,因为当server与client之间的时间误差过大时(可能是1000秒),处于对修改时间可能对系统和应用带来不可预知的问题,NTP将停止时间同步!所以如果发现NTP启动之后时间并不进行同步时,应该考虑到可能是时间差过大引起的,此时需要先手动进行时间同步!所以直接使用定时手动同步的方式就可以了。
[root@slave1 data]# crontab -e
0-59/10 * * * * /usr/sbin/ntpdate master
crontab: installing new crontab
[root@slave1 data]# crontab -l
0-59/10 * * * * /usr/sbin/ntpdate master
8、SSH无密码登陆(主节点)
配置master节点无密码登录到其他节点,在master节点上操作
[root@master ~]# ssh-keygen -t rsa
Generating public/private rsa key pair.
Enter file in which to save the key (/root/.ssh/id_rsa):
Created directory '/root/.ssh'.
Enter passphrase (empty for no passphrase):
Enter same passphrase again:
Your identification has been saved in /root/.ssh/id_rsa.
Your public key has been saved in /root/.ssh/id_rsa.pub.
The key fingerprint is:
SHA256:NMVPXezqq+MPf95MtP5bzaghnvXSljcC4BH/QFCvm+I root@master
The key's randomart image is:
+---[RSA 2048]----+
|         o+. . o.|
|         o..o . .|
|        o +o . . |
|       . + oo   .|
|        S o.o  ..|
|         . .o..+o|
|         ..o=o.o=|
|        ...+oB*+=|
|         Eo.+**BO|
+----[SHA256]-----+
[root@master ~]# ssh-copy-id slave1
/usr/bin/ssh-copy-id: INFO: Source of key(s) to be installed: "/root/.ssh/id_rsa.pub"
The authenticity of host 'slave1 (192.168.12.102)' can't be established.
ECDSA key fingerprint is SHA256:GG4+viH+NDpVisSLMobnjEYOs171XRVUDoG85EI+mI8.
ECDSA key fingerprint is MD5:f3:bf:63:a6:89:61:c2:08:3c:7d:2a:ed:13:be:d3:ae.
Are you sure you want to continue connecting (yes/no)? yes
/usr/bin/ssh-copy-id: INFO: attempting to log in with the new key(s), to filter out any that are already installed
/usr/bin/ssh-copy-id: INFO: 1 key(s) remain to be installed -- if you are prompted now it is to install the new keys
root@slave1's password:
Permission denied, please try again.
root@slave1's password:
Permission denied, please try again.
root@slave1's password:

Number of key(s) added: 1

Now try logging into the machine, with:   "ssh 'slave1'"
and check to make sure that only the key(s) you wanted were added.

[root@master ~]# ssh-copy-id slave2
/usr/bin/ssh-copy-id: INFO: Source of key(s) to be installed: "/root/.ssh/id_rsa.pub"
The authenticity of host 'slave2 (192.168.12.103)' can't be established.
ECDSA key fingerprint is SHA256:Yv86oeVgTcxv8FCm5FLpiEUBTAnXgH2GOkgGboyoR+8.
ECDSA key fingerprint is MD5:8c:ae:b6:c4:f1:77:1e:ab:a5:16:38:a2:d2:da:4c:af.
Are you sure you want to continue connecting (yes/no)? yes
/usr/bin/ssh-copy-id: INFO: attempting to log in with the new key(s), to filter out any that are already installed
/usr/bin/ssh-copy-id: INFO: 1 key(s) remain to be installed -- if you are prompted now it is to install the new keys
root@slave2's password:

Number of key(s) added: 1

Now try logging into the machine, with:   "ssh 'slave2'"
and check to make sure that only the key(s) you wanted were added.

[root@master ~]# ssh-copy-id slave3
/usr/bin/ssh-copy-id: INFO: Source of key(s) to be installed: "/root/.ssh/id_rsa.pub"
The authenticity of host 'slave3 (192.168.12.104)' can't be established.
ECDSA key fingerprint is SHA256:GbLAIxb/anYb/TSicoZlt88DQnb331Fb0Ob5fu8xOxY.
ECDSA key fingerprint is MD5:2b:60:e4:e4:d2:37:2a:8b:fc:66:c2:e9:96:03:7e:d4.
Are you sure you want to continue connecting (yes/no)? yes
/usr/bin/ssh-copy-id: INFO: attempting to log in with the new key(s), to filter out any that are already installed
/usr/bin/ssh-copy-id: INFO: 1 key(s) remain to be installed -- if you are prompted now it is to install the new keys
root@slave3's password:

Number of key(s) added: 1

Now try logging into the machine, with:   "ssh 'slave3'"
and check to make sure that only the key(s) you wanted were added.

[root@master ~]# ssh-copy-id master
/usr/bin/ssh-copy-id: INFO: Source of key(s) to be installed: "/root/.ssh/id_rsa.pub"
The authenticity of host 'master (192.168.12.101)' can't be established.
ECDSA key fingerprint is SHA256:cdz8o54DsUQzXr5vZyeSJUbVUYYZe6bGhmUPbiGW+eY.
ECDSA key fingerprint is MD5:0f:f1:23:22:29:07:eb:84:21:c9:5e:f1:31:f5:b0:77.
Are you sure you want to continue connecting (yes/no)? yes
/usr/bin/ssh-copy-id: INFO: attempting to log in with the new key(s), to filter out any that are already installed
/usr/bin/ssh-copy-id: INFO: 1 key(s) remain to be installed -- if you are prompted now it is to install the new keys
root@master's password:

Number of key(s) added: 1

Now try logging into the machine, with:   "ssh 'master'"
and check to make sure that only the key(s) you wanted were added.
测试是否实现了无密码登录
[root@master ~]# ssh slave1 date ;ssh slave2 date;ssh slave3 date;ssh master date;
2018年 04月 23日 星期一 14:18:13 CST
2018年 04月 23日 星期一 14:18:13 CST
2018年 04月 23日 星期一 14:18:13 CST
2018年 04月 23日 星期一 14:18:13 CST
将创建的秘钥拷贝出来,因为后面ambari安装的时候需要上传这个秘钥。创建秘钥是在隐藏文件夹/root/.ssh/下面的,所以需要先把秘钥拷贝到可见区域,然后拷贝到电脑上。下面标红的就是秘钥文件
[root@master ~]# cd /root/.ssh/
[root@master .ssh]# ls
authorized_keys  id_rsa  id_rsa.pub  known_hosts
[root@master .ssh]# cp id_rsa /root/
[root@master .ssh]# ls /root/
anaconda-ks.cfg   id_rsa  jdk-8u161-linux-x64.rpm
9、其他系统设置 (所有机器)
[root@master ~]# sudo sh -c "echo umask 0022 >> /etc/profile"
三、修改yum源,实现离线安装
1、安装httpd服务(主服务器)
[root@master ~]# yum -y install httpd
[root@master ~]# service httpd restart
Redirecting to /bin/systemctl restart httpd.service
[root@master ~]# chkconfig httpd on
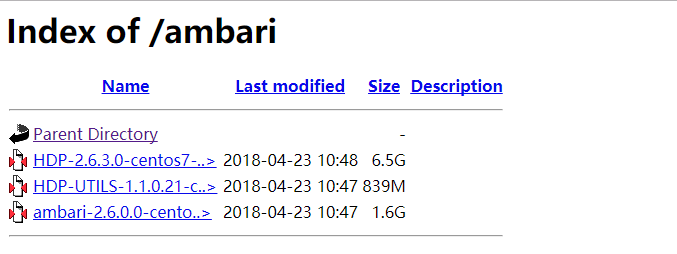
2、将上面下载的三个包放到/var/www/html目录下(主服务器)
[root@master ~]# cd /var/www/html/
[root@master html]# mkdir ambari
拷贝文件到ambari下面
[root@master html]# cd ambari/
[root@master ambari]# ls
ambari-2.6.0.0-centos7.tar.gz  HDP-2.6.3.0-centos7-rpm.tar.gz  HDP-UTILS-1.1.0.21-centos7.tar.gz
[root@master ambari]# tar -zxvf ambari-2.6.0.0-centos7.tar.gz
[root@master ambari]# tar -zxvf HDP-2.6.3.0-centos7-rpm.tar.gz
[root@master ambari]# mkdir HDP-UTILS
[root@master ambari]# tar -zxvf HDP-UTILS-1.1.0.21-centos7.tar.gz -C HDP-UTILS
[root@master ambari]# rm -rf ambari-2.6.0.0-centos7.tar.gz HDP-2.6.3.0-centos7-rpm.tar.gz HDP-UTILS-1.1.0.21-centos7.tar.gz
[root@master ambari]# ls
ambari  HDP  HDP-UTILS
现在可以通过访问http://192.168.12.101/ambari/查看是否能成功访问
3、制作本地源
(1)安装本地源制作相关工具(主服务器)
[root@master ambari]# yum install yum-utils createrepo yum-plugin-priorities -y
[root@master ambari]#  createrepo  ./
(2)修改文件里面的源地址(主服务器)
[root@master ambari]# vi ambari/centos7/2.6.0.0-267/ambari.repo
#VERSION_NUMBER=2.6.0.0-267
[ambari-2.6.0.0]
name=ambari Version - ambari-2.6.0.0
baseurl=http://192.168.12.101/ambari/ambari/centos7/2.6.0.0-267
gpgcheck=1
gpgkey=http://192.168.12.101/ambari/ambari/centos7/2.6.0.0-267/RPM-GPG-KEY/RPM-GPG-KEY-Jenkins
enabled=1
priority=1
[root@master ambari]# cp ambari/centos7/2.6.0.0-267/ambari.repo /etc/yum.repos.d/
[root@master ambari]# vi HDP/centos7/2.6.3.0-235/hdp.repo
#VERSION_NUMBER=2.6.3.0-235
[HDP-2.6.3.0]
name=HDP Version - HDP-2.6.3.0
baseurl=http://192.168.12.101/ambari/HDP/centos7/2.6.3.0-235
gpgcheck=1
gpgkey=http://192.168.12.101/ambari/HDP/centos7/2.6.3.0-235/RPM-GPG-KEY/RPM-GPG-KEY-Jenkins
enabled=1
priority=1


[HDP-UTILS-1.1.0.21]
name=HDP-UTILS Version - HDP-UTILS-1.1.0.21
baseurl=http://192.168.12.101/ambari/HDP-UTILS
gpgcheck=1
gpgkey=http://192.168.12.101/ambari/HDP-UTILS/RPM-GPG-KEY/RPM-GPG-KEY-Jenkins
enabled=1
priority=1
[root@master ambari]# cp HDP/centos7/2.6.3.0-235/hdp.repo /etc/yum.repos.d/
上面就创建好了主机上的文件,然后可以通过下面命令清楚一下yum的缓存就可以了
[root@master ambari]# yum clean all
[root@master ambari]# yum makecache
[root@master ambari]# yum repolist
(3)将创建好的文件拷贝到子节点(主服务器)
[root@master ambari]#cd /etc/yum.repos.d
[root@master yum.repos.d]# scp ambari.repo slave1:/etc/yum.repos.d/
ambari.repo                                                                                        100%  274    16.3KB/s   00:00
[root@master yum.repos.d]# scp ambari.repo slave2:/etc/yum.repos.d/
ambari.repo                                                                                        100%  274   115.7KB/s   00:00
[root@master yum.repos.d]# scp ambari.repo slave3:/etc/yum.repos.d/
ambari.repo                                                                                        100%  274   608.9KB/s   00:00
[root@master yum.repos.d]# scp hdp.repo slave1:/etc/yum.repos.d/
hdp.repo                                                                                           100%  482     1.1MB/s   00:00
[root@master yum.repos.d]# scp hdp.repo slave2:/etc/yum.repos.d/
hdp.repo                                                                                           100%  482   969.5KB/s   00:00
[root@master yum.repos.d]# scp hdp.repo slave3:/etc/yum.repos.d/
hdp.repo
四、安装ambari-server
经过不断的安装,有两种模式,一种是默认postgresql数据库的安装方式,这种不推荐生产环境使用,还有一种方式是使用第三方数据库的安装方式,下面介绍两种安装模式,根据个人需求选择。建议使用自带的postgresql来配置数据库,这样在后面安装过程中不会出现问题,如果使用其它数据库,请参考其它教程来设置
1、默认安装方式,使用默认数据库PostgreSQL(不推荐生产环境使用)(主服务器)
(1)、安装和配置ambari-server
[root@master yum.repos.d]# yum -y install ambari-server
[root@master yum.repos.d]# ambari-server setup
Using python  /usr/bin/python
Setup ambari-server
Checking SELinux...
SELinux status is 'disabled'
Customize user account for ambari-server daemon [y/n] (n)? n
Adjusting ambari-server permissions and ownership...
Checking firewall status...
Checking JDK...
[1] Oracle JDK 1.8 + Java Cryptography Extension (JCE) Policy Files 8
[2] Oracle JDK 1.7 + Java Cryptography Extension (JCE) Policy Files 7
[3] Custom JDK
==============================================================================
Enter choice (1): 3
WARNING: JDK must be installed on all hosts and JAVA_HOME must be valid on all hosts.
WARNING: JCE Policy files are required for configuring Kerberos security. If you plan to use Kerberos,please make sure JCE Unlimited Strength Jurisdiction Policy Files are valid on all hosts.
Path to JAVA_HOME: /usr/java/jdk1.8.0_161
Validating JDK on Ambari Server...done.
Completing setup...
Configuring database...
Enter advanced database configuration [y/n] (n)? n
Configuring database...
Default properties detected. Using built-in database.
Configuring ambari database...
Checking PostgreSQL...
Running initdb: This may take up to a minute.
Initializing database ... OK


About to start PostgreSQL
Configuring local database...
Configuring PostgreSQL...
Restarting PostgreSQL
Creating schema and user...
done.
Creating tables...
done.
Extracting system views...
ambari-admin-2.6.0.0.267.jar
...........
Adjusting ambari-server permissions and ownership...
Ambari Server 'setup' completed successfully.
(2)、启动ambari
[root@master ~]# ambari-server start
成功启动后在浏览器输入Ambari地址:
http://192.168.12.101:8080
2、以mysql为数据库安装(主服务器)
(1)安装mysql数据库
[root@master ~]# wget http://dev.mysql.com/get/mysql-community-release-el7-5.noarch.rpm
[root@master ~]# rpm -ivh mysql-community-release-el7-5.noarch.rpm
[root@master ~]# yum install mysql-community-serve
(2)启动mysql,设置开机启动
[root@master ~]# service mysqld start
[root@master ~]# vi /etc/rc.local
#添加service mysqld start
(3)登录进mysql,初始化设置root密码
[root@master ~]# mysql -uroot

设置登录密码
mysql> set password for 'root'@'localhost' = password('yourPassword');

添加远程登录用户
mysql> grant all privileges on *.* to 'root'@'%' identified by 'yourPassword';

远程登录
#mysql -uroot -h ip(远程的ip地址) -p
[root@master yum.repos.d]# yum -y install ambari-server
(4)登录mysql,执行下面的语句
CREATE DATABASE ambari;
use ambari;
CREATE USER 'ambari'@'%' IDENTIFIED BY 'ambarizk123';
GRANT ALL PRIVILEGES ON *.* TO 'ambari'@'%';
CREATE USER 'ambari'@'localhost' IDENTIFIED BY 'ambarizk123';
GRANT ALL PRIVILEGES ON *.* TO 'ambari'@'localhost';
CREATE USER 'ambari'@'master' IDENTIFIED BY 'ambarizk123';
GRANT ALL PRIVILEGES ON *.* TO 'ambari'@'master';
FLUSH PRIVILEGES;
source /var/lib/ambari-server/resources/Ambari-DDL-MySQL-CREATE.sql
show tables;
use mysql;
select Host User Password from user where user='ambari';
CREATE DATABASE hive;
use hive;
CREATE USER 'hive'@'%' IDENTIFIED BY 'hive';
GRANT ALL PRIVILEGES ON *.* TO 'hive'@'%';
CREATE USER 'hive'@'localhost' IDENTIFIED BY 'hive';
GRANT ALL PRIVILEGES ON *.* TO 'hive'@'localhost';
CREATE USER 'hive'@'master' IDENTIFIED BY 'hive';
GRANT ALL PRIVILEGES ON *.* TO 'hive'@'master';
FLUSH PRIVILEGES;
CREATE DATABASE oozie;
use oozie;
CREATE USER 'oozie'@'%' IDENTIFIED BY 'oozie';
GRANT ALL PRIVILEGES ON *.* TO 'oozie'@'%';
CREATE USER 'oozie'@'localhost' IDENTIFIED BY 'oozie';
GRANT ALL PRIVILEGES ON *.* TO 'oozie'@'localhost';
CREATE USER 'oozie'@'master' IDENTIFIED BY 'oozie';
GRANT ALL PRIVILEGES ON *.* TO 'oozie'@'master';
FLUSH PRIVILEGES;
(5)简历mysql与ambari-server的连接
网上下载mysql-connector-java-5.1.40.jar放到root文件下
mkdir /usr/share/java
cp /root/mysql-connector-java-5.1.40.jar /usr/share/java/mysql-connector-java.jar
cp /usr/share/java/mysql-connector-java.jar /var/lib/ambari-server/resources/mysql-jdbc-driver.jar
vi /etc/ambari-server/conf/ambari.properties
添加server.jdbc.driver.path=/usr/share/java/mysql-connector-java.jar
(6)初始化设置ambari-server并启动
[root@master ~]# ambari-server setup
下面是配置执行流程,按照提示操作
(1) 提示是否自定义设置。输入:y
Customize user account for ambari-server daemon [y/n] (n)? y
(2)ambari-server 账号。
Enter user account for ambari-server daemon (root):
如果直接回车就是默认选择root用户
如果输入已经创建的用户就会显示:
Enter user account for ambari-server daemon (root):ambari
Adjusting ambari-server permissions and ownership...
(3)检查防火墙是否关闭
Adjusting ambari-server permissions and ownership...
Checking firewall...
WARNING: iptables is running. Confirm the necessary Ambari ports are accessible. Refer to the Ambari documentation for more details on ports.
OK to continue [y/n] (y)?
直接回车
(4)设置JDK。输入:3
Checking JDK...
Do you want to change Oracle JDK [y/n] (n)? y
[1] Oracle JDK 1.8 + Java Cryptography Extension (JCE) Policy Files 8
[2] Oracle JDK 1.7 + Java Cryptography Extension (JCE) Policy Files 7
[3] Custom JDK
==============================================================================
Enter choice (1): 3
如果上面选择3自定义JDK,则需要设置JAVA_HOME。输入:/usr/java/jdk1.8.0_161
WARNING: JDK must be installed on all hosts and JAVA_HOME must be valid on all hosts.
WARNING: JCE Policy files are required for configuring Kerberos security. If you plan to use Kerberos,please make sure JCE Unlimited Strength Jurisdiction Policy Files are valid on all hosts.
Path to JAVA_HOME: /usr/java/jdk1.8.0_131
Validating JDK on Ambari Server...done.
Completing setup...
(5)数据库配置。选择:y
Configuring database...
Enter advanced database configuration [y/n] (n)? y
(6)选择数据库类型。输入:3
Configuring database...
==============================================================================
Choose one of the following options:
[1] - PostgreSQL (Embedded)
[2] - Oracle
[3] - MySQL
[4] - PostgreSQL
[5] - Microsoft SQL Server (Tech Preview)
[6] - SQL Anywhere
==============================================================================
Enter choice (3): 3
(7)设置数据库的具体配置信息,根据实际情况输入,如果和括号内相同,则可以直接回车。如果想重命名,就输入。
Hostname (localhost):
Port (3306):
Database name (ambari):
Username (ambari):
Enter Database Password (bigdata):ambarizk123
Re-Enter password: ambarizk123
(8)将Ambari数据库脚本导入到数据库
WARNING: Before starting Ambari Server, you must run the following DDL against the database to create the schema: /var/lib/ambari-server/resources/Ambari-DDL-MySQL-CREATE.sql
Proceed with configuring remote database connection properties [y/n] (y)?
[root@master ~]# ambari-server start
3、错误处理
如果出现错误,请注意查看日志,根据具体的错误内容进行处理,默认ambari-server的日志在/var/log/ambari-server/ambari-server.log里面。如果在处理日志的过程中或者后面安装的过程中出现一些莫名的错误,可以重置的安装。如果上面进行的默认数据库的配置,可以使用下面的代码重置ambari-server
[root@master ~]# ambari-server stop
[root@master ~]# ambari-server reset
[root@master ~]# ambari-server setup
如果选择的是第二种方式,就需要先执行上面的语句,然后手动将mysql里面创建的数据库进行删除。然后再重新执行第二步的操作
[root@master ~]# mysql -uroot -p
mysql> show databases;
+--------------------+
| Database           |
+--------------------+
| information_schema |
| ambari             |
| hive               |
| oozie              |
| performance_schema |
+--------------------+
5 rows in set (0.00 sec)
mysql> drop database ambari;
mysql> drop database hive;
mysql> drop database oozie;
如果在安装的过程中出现了错误,又想重新安装,可以在ambari-server开启的情况下,执行下面的语句来移除已安装的包,然后再通过不同的情况选择上面两种方式的一种对ambari-server进行重置
python /usr/lib/python2.6/site-packages/ambari_agent/HostCleanup.py --silent
五、安装配置部署HDP集群
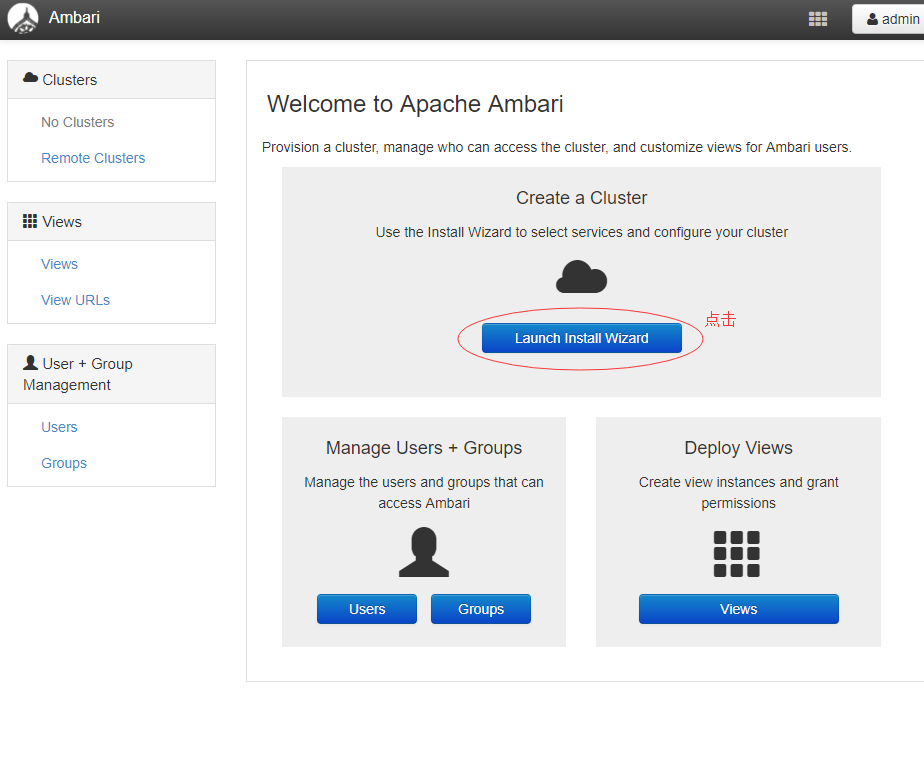
1、登录
登录界面,默认管理员账户登录, 账户:admin 密码:admin
2、安装向导
(1)配置集群的名字为hadoop

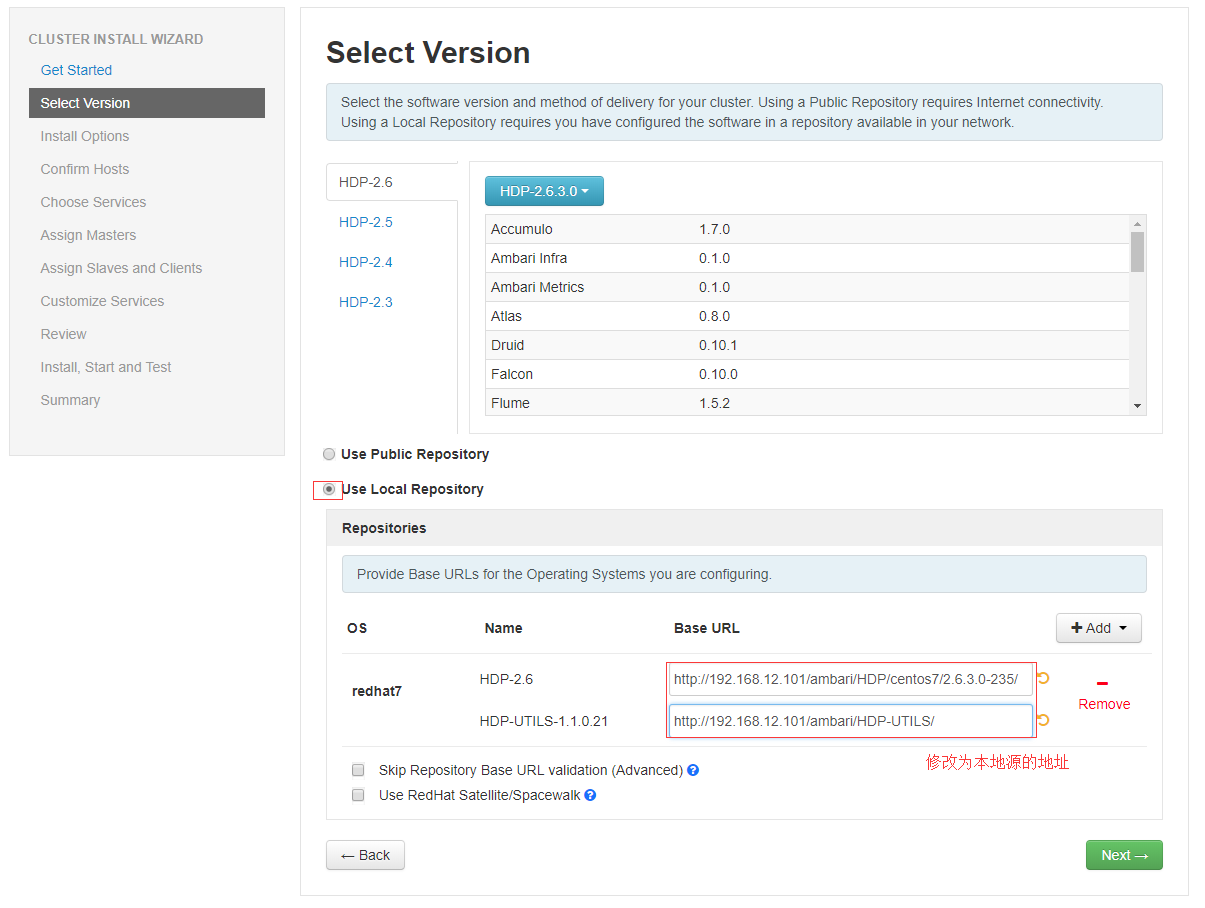
(2)选择版本并修改为本地源地址
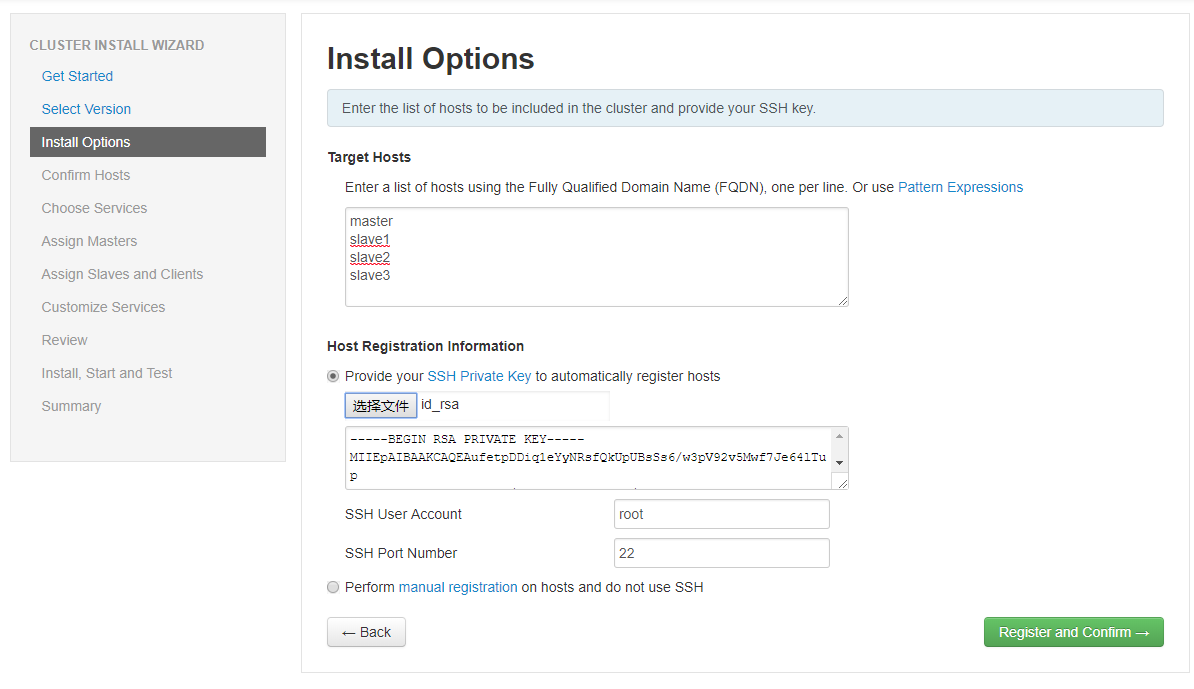
(3)安装配置
选择要安装的服务器和上传上面教程所拷贝出来的秘钥文件id_rsa
(4)安装ambari的agent,同时检查系统问题

如果这里出了问题,请检查上面所有的步骤有没有遗漏和未设置的参数。同时在重新修改了配置以后,最好是重置ambari-server来重新进行安装
[root@master ~]# # ambari-server stop
[root@master ~]# # ambari-server reset   #重置命令
[root@master ~]# # ambari-server setup   #重新设置
[root@master ~]# # ambari-server start
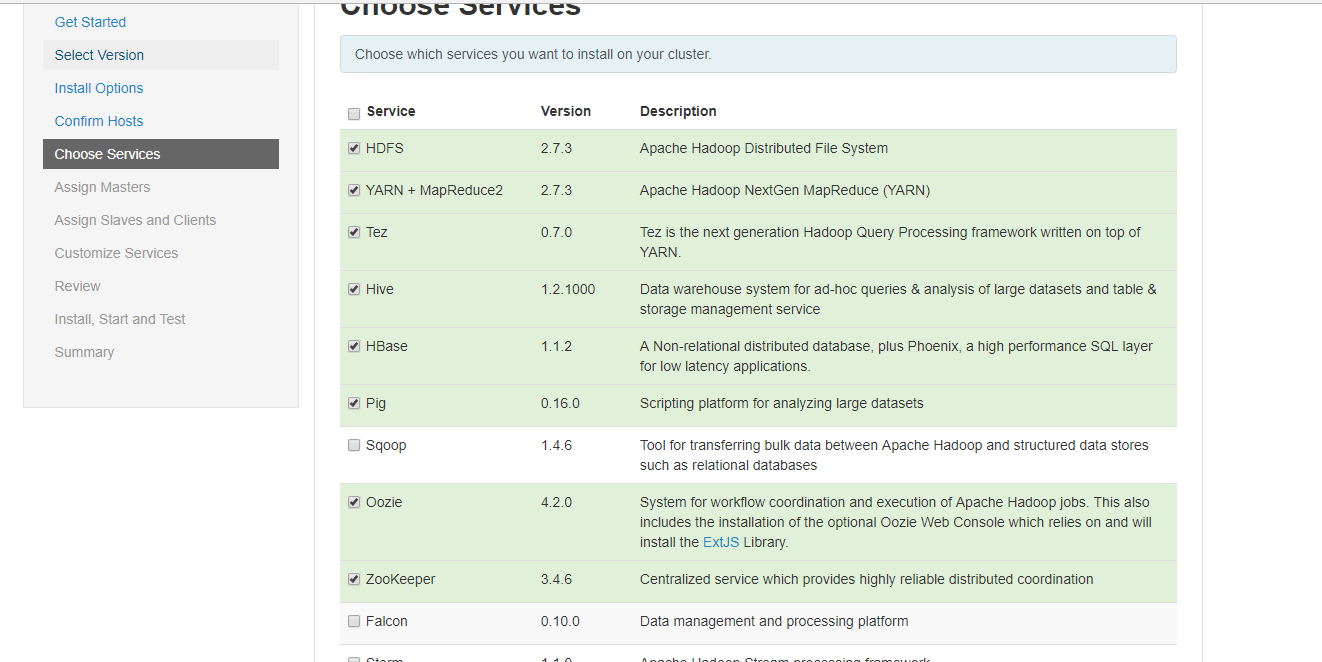
(5)选择要安装的服务
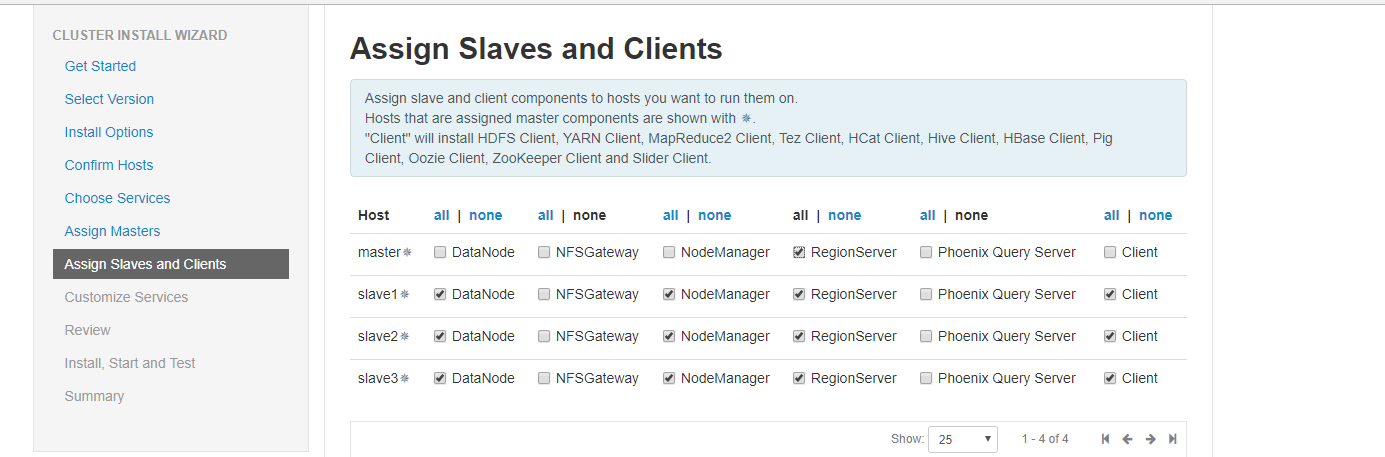
(6)选择分配服务

(7)选择
建议nodemanager、regionserver、client全都勾选上,第一个datanode根据主机的磁盘容量选择。