本文由zhangbaochong原创,转载请注明出处http://www.cnblogs.com/zhangbaochong/p/5634580.html
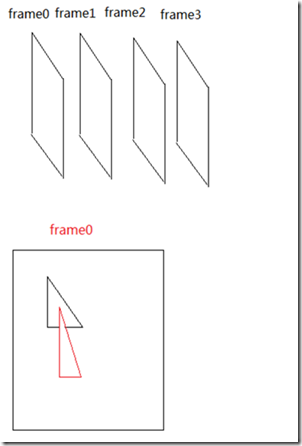
在d3d11中是按frame来渲染物体的,在同一frame中又可能不止一种primitive,例如下图:
gpu实际渲染时,会按帧渲染,像上图中的一帧中含有两个三角形 ,经过vs以后,PA(primitive assemble) block会进行体元装配,然后进行光栅化操作,光栅化操作时候,会比较depth buffer的值,红色三角形的z值更小,所以会将黑色三角形覆盖一部分。
而当混合功能启用时,决定最终的颜色方法会变得不同,当一个片段通过深度测试时,并不是直接取代后缓冲的颜色,而是通过一定的方法比例与之混合,从而显示混合后的颜色。
1.混合方程
混合方程如下:
C是混合结果,Csrc是源颜色,也就是当前要处理的片段颜色,而Cdst是目标颜色,也就是后缓冲区的颜色。F则是对应的混合因子,等会儿会详细说明。这里的![]() 可以看作是分量相乘,即颜色中的R、G、B值分别相乘。
可以看作是分量相乘,即颜色中的R、G、B值分别相乘。![]() 则是混合操作,和四则运算操作类似。
则是混合操作,和四则运算操作类似。
2.混合操作
typedef enum D3D11_BLEND_OP {
  D3D11_BLEND_OP_ADD           = 1,
  D3D11_BLEND_OP_SUBTRACT      = 2,
  D3D11_BLEND_OP_REV_SUBTRACT  = 3,
  D3D11_BLEND_OP_MIN           = 4,
  D3D11_BLEND_OP_MAX           = 5
} D3D11_BLEND_OP;
在MSDN中解释如下:
- D3D11_BLEND_OP_ADD
-
Add source 1 and source 2.
- D3D11_BLEND_OP_SUBTRACT
-
Subtract source 1 from source 2.
- D3D11_BLEND_OP_REV_SUBTRACT
-
Subtract source 2 from source 1.
- D3D11_BLEND_OP_MIN
-
Find the minimum of source 1 and source 2.
- D3D11_BLEND_OP_MAX
-
Find the maximum of source 1 and source 2.
3.混合因子
对于混合因子F,在d3d中也定义为枚举,原型如下:
typedef enum D3D11_BLEND {
  D3D11_BLEND_ZERO              = 1,
  D3D11_BLEND_ONE               = 2,
  D3D11_BLEND_SRC_COLOR         = 3,
  D3D11_BLEND_INV_SRC_COLOR     = 4,
  D3D11_BLEND_SRC_ALPHA         = 5,
  D3D11_BLEND_INV_SRC_ALPHA     = 6,
  D3D11_BLEND_DEST_ALPHA        = 7,
  D3D11_BLEND_INV_DEST_ALPHA    = 8,
  D3D11_BLEND_DEST_COLOR        = 9,
  D3D11_BLEND_INV_DEST_COLOR    = 10,
  D3D11_BLEND_SRC_ALPHA_SAT     = 11,
  D3D11_BLEND_BLEND_FACTOR      = 14,
  D3D11_BLEND_INV_BLEND_FACTOR  = 15,
  D3D11_BLEND_SRC1_COLOR        = 16,
  D3D11_BLEND_INV_SRC1_COLOR    = 17,
  D3D11_BLEND_SRC1_ALPHA        = 18,
  D3D11_BLEND_INV_SRC1_ALPHA    = 19
} D3D11_BLEND;
在MSDN中解释如下:
- D3D11_BLEND_ZERO
-
The blend factor is (0, 0, 0, 0). No pre-blend operation.
- D3D11_BLEND_ONE
-
The blend factor is (1, 1, 1, 1). No pre-blend operation.
- D3D11_BLEND_SRC_COLOR
-
The blend factor is (Rₛ, Gₛ, Bₛ, Aₛ), that is color data (RGB) from a pixel shader. No pre-blend operation.
- D3D11_BLEND_INV_SRC_COLOR
-
The blend factor is (1 - Rₛ, 1 - Gₛ, 1 - Bₛ, 1 - Aₛ), that is color data (RGB) from a pixel shader. The pre-blend operation inverts the data, generating 1 - RGB.
- D3D11_BLEND_SRC_ALPHA
-
The blend factor is (Aₛ, Aₛ, Aₛ, Aₛ), that is alpha data (A) from a pixel shader. No pre-blend operation.
- D3D11_BLEND_INV_SRC_ALPHA
-
The blend factor is ( 1 - Aₛ, 1 - Aₛ, 1 - Aₛ, 1 - Aₛ), that is alpha data (A) from a pixel shader. The pre-blend operation inverts the data, generating 1 - A.
- D3D11_BLEND_DEST_ALPHA
-
The blend factor is (Ad Ad Ad Ad), that is alpha data from a render target. No pre-blend operation.
- D3D11_BLEND_INV_DEST_ALPHA
-
The blend factor is (1 - Ad 1 - Ad 1 - Ad 1 - Ad), that is alpha data from a render target. The pre-blend operation inverts the data, generating 1 - A.
- D3D11_BLEND_DEST_COLOR
-
The blend factor is (Rd, Gd, Bd, Ad), that is color data from a render target. No pre-blend operation.
- D3D11_BLEND_INV_DEST_COLOR
-
The blend factor is (1 - Rd, 1 - Gd, 1 - Bd, 1 - Ad), that is color data from a render target. The pre-blend operation inverts the data, generating 1 - RGB.
- D3D11_BLEND_SRC_ALPHA_SAT
-
The blend factor is (f, f, f, 1); where f = min(Aₛ, 1 - Ad). The pre-blend operation clamps the data to 1 or less.
- D3D11_BLEND_BLEND_FACTOR
-
The blend factor is the blend factor set with ID3D11DeviceContext::OMSetBlendState. No pre-blend operation.
- D3D11_BLEND_INV_BLEND_FACTOR
-
The blend factor is the blend factor set with ID3D11DeviceContext::OMSetBlendState. The pre-blend operation inverts the blend factor, generating 1 - blend_factor.
- D3D11_BLEND_SRC1_COLOR
-
The blend factor is data sources both as color data output by a pixel shader. There is no pre-blend operation. This blend factor supports dual-source color blending.
- D3D11_BLEND_INV_SRC1_COLOR
-
The blend factor is data sources both as color data output by a pixel shader. The pre-blend operation inverts the data, generating 1 - RGB. This blend factor supports dual-source color blending.
- D3D11_BLEND_SRC1_ALPHA
-
The blend factor is data sources as alpha data output by a pixel shader. There is no pre-blend operation. This blend factor supports dual-source color blending.
- D3D11_BLEND_INV_SRC1_ALPHA
-
The blend factor is data sources as alpha data output by a pixel shader. The pre-blend operation inverts the data, generating 1 - A. This blend factor supports dual-source color blending.
4.具体使用方法
在d3d11中,要使用混合首先要创建混合状态接口ID3D11BlendState,创建要调用CreateBlendState函数,原型如下:
HRESULT CreateBlendState(
  [in]            const D3D11_BLEND_DESC *pBlendStateDesc,
  [out, optional]       ID3D11BlendState **ppBlendState
);
D3D11_BLEND_DESC 是描述混合状态的结构,原型如下:
typedef struct D3D11_BLEND_DESC {
  BOOL                           AlphaToCoverageEnable;
  BOOL                           IndependentBlendEnable;
  D3D11_RENDER_TARGET_BLEND_DESC RenderTarget[8];
} D3D11_BLEND_DESC;
第一个参数设置是否打开AlphaToCoverage,AlphaToCoverage在后面会详细介绍,暂时先不用,设置为false;
第二个参数是针对不同的RenderTarget使用不同的混合方式,最多支持8个不同的RenderTarget,我们暂时还用不到设为false;
第三个参数为针对8个不同RenderTarget分别指定的混合状态参数,当第二个参数为false时,这里我们只需要设置第一个元素即可。
D3D11_RENDER_TARGET_BLEND_DESC原型如下:
typedef struct D3D11_RENDER_TARGET_BLEND_DESC {
  BOOL           BlendEnable;
  D3D11_BLEND    SrcBlend;
  D3D11_BLEND    DestBlend;
  D3D11_BLEND_OP BlendOp;
  D3D11_BLEND    SrcBlendAlpha;
  D3D11_BLEND    DestBlendAlpha;
  D3D11_BLEND_OP BlendOpAlpha;
  UINT8          RenderTargetWriteMask;
} D3D11_RENDER_TARGET_BLEND_DESC;
MSDN中解释如下:
BlendEnable
Type: BOOL
Enable (or disable) blending.
SrcBlend
Type: D3D11_BLEND
This blend option specifies the operation to perform on the RGB value that the pixel shader outputs. The BlendOp member defines how to combine the SrcBlend and DestBlend operations.
DestBlend
Type: D3D11_BLEND
This blend option specifies the operation to perform on the current RGB value in the render target. The BlendOp member defines how to combine the SrcBlend and DestBlend operations.
BlendOp
Type: D3D11_BLEND_OP
This blend operation defines how to combine the SrcBlend and DestBlend operations.
SrcBlendAlpha
Type: D3D11_BLEND
This blend option specifies the operation to perform on the alpha value that the pixel shader outputs. Blend options that end in _COLOR are not allowed. The BlendOpAlpha member defines how to combine the SrcBlendAlpha and DestBlendAlpha operations.
DestBlendAlpha
Type: D3D11_BLEND
This blend option specifies the operation to perform on the current alpha value in the render target. Blend options that end in _COLOR are not allowed. The BlendOpAlpha member defines how to combine the SrcBlendAlpha and DestBlendAlpha operations.
BlendOpAlpha
Type: D3D11_BLEND_OP
This blend operation defines how to combine the SrcBlendAlpha and DestBlendAlpha operations.
RenderTargetWriteMask
Type: UINT8
A write mask.
创建好ID3D11BlendState接口后,通过OMSetBlendState函数来设置为指定的状态,原型如下:
void OMSetBlendState(
  [in]       ID3D10BlendState *pBlendState,
  [in] const FLOAT            BlendFactor[4],
  [in]       UINT             SampleMask
);
其中第二个参数,为手动指定的混合因子,如果在刚才指定混合因子时使用D3D11_BLEND_BLEND_FACTOR或D3D11_BLEND_INV_BLEND_FACTOR,则使用第二个参数作为混合因子。
第三个参数为采样点掩码。在d3d11中最多可以支持32重采样,通过该参数来指定使用哪些采样点,参数类型为UINT32位,每位1和0代表使用或丢弃该采样点,如果我们想使用所有采样点,则可以设该参数为0xffffffff。
下面是demo中使用混合的部分代码:
首先在类中定义了渲染状态接口:
ID3D11BlendState* m_pBlendState; //混合状态
然后自定义了一个函数用于创建渲染状态:
bool BlendDemo::BuildBlendState()
{
    D3D11_BLEND_DESC blendStateDescription;
    // 初始化blend描述符
    ZeroMemory(&blendStateDescription, sizeof(D3D11_BLEND_DESC));

    // 创建一个alpha blend状态.
    blendStateDescription.RenderTarget[0].BlendEnable = TRUE;
    blendStateDescription.RenderTarget[0].SrcBlend = D3D11_BLEND_SRC_ALPHA;
    blendStateDescription.RenderTarget[0].DestBlend = D3D11_BLEND_INV_SRC_ALPHA;
    blendStateDescription.RenderTarget[0].BlendOp = D3D11_BLEND_OP_ADD;
    blendStateDescription.RenderTarget[0].SrcBlendAlpha = D3D11_BLEND_ONE;
    blendStateDescription.RenderTarget[0].DestBlendAlpha = D3D11_BLEND_ZERO;
    blendStateDescription.RenderTarget[0].BlendOpAlpha = D3D11_BLEND_OP_ADD;
    blendStateDescription.RenderTarget[0].RenderTargetWriteMask = D3D11_COLOR_WRITE_ENABLE_ALL;

    if (FAILED(m_pd3dDevice->CreateBlendState(&blendStateDescription, &m_pBlendState)))
    {
        MessageBox(NULL, L"Create 'Transparent' blend state failed!", L"Error", MB_OK);
        return false;
    }

    return true;
}
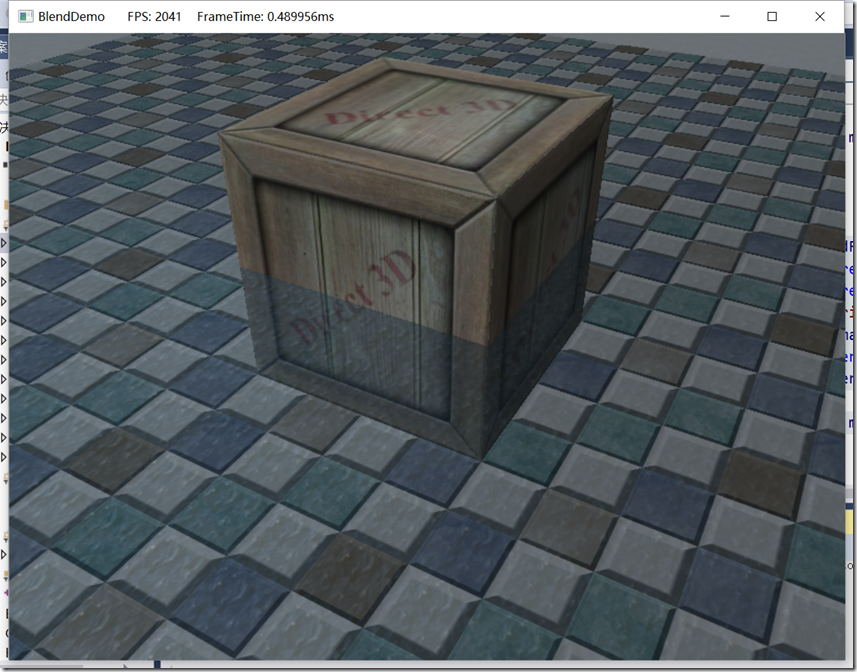
我们利用混合,实现水面的透明效果。当绘制的图形中有透明物体时,绘制的先后顺序就显得尤为重要,一般我们遵循以下原则:首先绘制非透明物体。然后,根据透明物体与摄像机之间的距离进行排序,按照从后向前的顺序绘制透明物体。之所以要按照从后向前的顺序进行绘制,是为了让前面的物体和后面的物体进行混合。如果一个物体是透明的,那么我们就会透过这个物体看到它后面的其他物体。所以,必须将透明物体后面的所有物体先绘制出来,然后才能将透明的源像素和后台缓冲区中的目标像素进行混合。
在demo中,我们一共有3个物体,箱子、地面还有水面。因此我们先绘制箱子和地面,最后在绘制水面的时候开启混合,绘制完毕再关闭混合。
       //绘制箱子...
       //绘制地面...
       //绘制水面
        //开启创建好的blend状态  效果为透明
        float blendFactor[] = { 0.f,0.f,0.f,0.f };
        m_pImmediateContext->OMSetBlendState(m_pBlendState, blendFactor, 0xffffffff);
        Effects::ms_pBasicEffect->m_pFxWorld->SetMatrix(reinterpret_cast<const float*>(&m_worldWater));
        Effects::ms_pBasicEffect->m_pFxWorldViewProj->SetMatrix(reinterpret_cast<const float*>(&m_worldViewProjWater));
        Effects::ms_pBasicEffect->m_pFxWorldInvTranspose->SetMatrix(reinterpret_cast<const float*>(&m_worldInvTransposeWater));
        Effects::ms_pBasicEffect->m_pFxMaterial->SetRawValue(&m_materialWater, 0, sizeof(m_materialWater));
        Effects::ms_pBasicEffect->m_pFxTexTrans->SetMatrix(reinterpret_cast<const float*>(&m_texTransWater));
        Effects::ms_pBasicEffect->m_pFxSR->SetResource(m_pSRVWater);
        tech->GetPassByIndex(i)->Apply(0, m_pImmediateContext);
        m_pImmediateContext->DrawIndexed(m_water.indices.size(), m_waterIStart, m_waterVStart);
        //恢复状态
        m_pImmediateContext->OMSetBlendState(0, 0, 0xffffffff);
5.示例程序
5.1运行效果
由于水面是静态的,截图看的话效果不是很好/(ㄒoㄒ)/~~
5.2源码下载
地址:http://files.cnblogs.com/files/zhangbaochong/BlendDemo.zip
由于源码上传在了博客园的文件管理中,提供的空间很小,因此就不上传整个工程了,只是把代码文件上传了,要想运行的话配置一下用vs重新编译吧O(∩_∩)O~
ps:之前代码中,创建顶点索引缓冲、加载shader、加载图片等我全都给放在一个函数中实现了,随着代码越来越多,感觉易读性非常差。于是就参考龙书的架构,重构了下代码,显得条理了不少…


