以hadoop 2.7.3为例, jdk1.7.0_80 , Eclipse Mars(4.5), Apache Maven 3.0.5 mvn时需要使用root权限,即县切换到root用户,用命令su root.
本节将介绍如何创建一个Hadoop源代码工程以方便阅读源代码. Hadoop源代码hadoop-2.7.3-src不能直接导入Eclipse,会报很多错,因为该源代码工程没有包含它所需的所有JAR包等, 需要Maven编译引入.
首先,介绍一下我自己成功的办法. ( 后面会介绍书上的办法,不过书上的办法会出错,大家仅做参考)
我们可以参考hadoop2.7.3源码编译eclipse项目
还可以看hadoop-2.7.3-src下的BUILDING.txt文件, 该文件教你如何构建Hadoop项目.如下所示:


Build instructions for Hadoop

----------------------------------------------------------------------------------
Requirements:

* Unix System
* JDK 1.7+
* Maven 3.0 or later
* Findbugs 1.3.9 (if running findbugs)
* ProtocolBuffer 2.5.0
* CMake 2.6 or newer (if compiling native code), must be 3.0 or newer on Mac
* Zlib devel (if compiling native code)
* openssl devel ( if compiling native hadoop-pipes and to get the best HDFS encryption performance )
* Linux FUSE (Filesystem in Userspace) version 2.6 or above ( if compiling fuse_dfs )
* Internet connection for first build (to fetch all Maven and Hadoop dependencies)

----------------------------------------------------------------------------------
Installing required packages for clean install of Ubuntu 14.04 LTS Desktop:

* Oracle JDK 1.7 (preferred)
  $ sudo apt-get purge openjdk*
  $ sudo apt-get install software-properties-common
  $ sudo add-apt-repository ppa:webupd8team/java
  $ sudo apt-get update
  $ sudo apt-get install oracle-java7-installer
* Maven
  $ sudo apt-get -y install maven
* Native libraries
  $ sudo apt-get -y install build-essential autoconf automake libtool cmake zlib1g-dev pkg-config libssl-dev
* ProtocolBuffer 2.5.0 (required)
  $ sudo apt-get -y install libprotobuf-dev protobuf-compiler

Optional packages:

* Snappy compression
  $ sudo apt-get install snappy libsnappy-dev
* Bzip2
  $ sudo apt-get install bzip2 libbz2-dev
* Jansson (C Library for JSON)
  $ sudo apt-get install libjansson-dev
* Linux FUSE
  $ sudo apt-get install fuse libfuse-dev

----------------------------------------------------------------------------------
Maven main modules:

  hadoop                            (Main Hadoop project)
         - hadoop-project           (Parent POM for all Hadoop Maven modules.             )
                                    (All plugins & dependencies versions are defined here.)
         - hadoop-project-dist      (Parent POM for modules that generate distributions.)
         - hadoop-annotations       (Generates the Hadoop doclet used to generated the Javadocs)
         - hadoop-assemblies        (Maven assemblies used by the different modules)
         - hadoop-common-project    (Hadoop Common)
         - hadoop-hdfs-project      (Hadoop HDFS)
         - hadoop-mapreduce-project (Hadoop MapReduce)
         - hadoop-tools             (Hadoop tools like Streaming, Distcp, etc.)
         - hadoop-dist              (Hadoop distribution assembler)

----------------------------------------------------------------------------------
Where to run Maven from?

  It can be run from any module. The only catch is that if not run from utrunk
  all modules that are not part of the build run must be installed in the local
  Maven cache or available in a Maven repository.

----------------------------------------------------------------------------------
Maven build goals:

 * Clean                     : mvn clean
 * Compile                   : mvn compile [-Pnative]
 * Run tests                 : mvn test [-Pnative]
 * Create JAR                : mvn package
 * Run findbugs              : mvn compile findbugs:findbugs
 * Run checkstyle            : mvn compile checkstyle:checkstyle
 * Install JAR in M2 cache   : mvn install
 * Deploy JAR to Maven repo  : mvn deploy
 * Run clover                : mvn test -Pclover [-DcloverLicenseLocation=${user.name}/.clover.license]
 * Run Rat                   : mvn apache-rat:check
 * Build javadocs            : mvn javadoc:javadoc
 * Build distribution        : mvn package [-Pdist][-Pdocs][-Psrc][-Pnative][-Dtar]
 * Change Hadoop version     : mvn versions:set -DnewVersion=NEWVERSION

 Build options:

  * Use -Pnative to compile/bundle native code
  * Use -Pdocs to generate & bundle the documentation in the distribution (using -Pdist)
  * Use -Psrc to create a project source TAR.GZ
  * Use -Dtar to create a TAR with the distribution (using -Pdist)

 Snappy build options:

   Snappy is a compression library that can be utilized by the native code.
   It is currently an optional component, meaning that Hadoop can be built with
   or without this dependency.

  * Use -Drequire.snappy to fail the build if libsnappy.so is not found.
    If this option is not specified and the snappy library is missing,
    we silently build a version of libhadoop.so that cannot make use of snappy.
    This option is recommended if you plan on making use of snappy and want
    to get more repeatable builds.

  * Use -Dsnappy.prefix to specify a nonstandard location for the libsnappy
    header files and library files. You do not need this option if you have
    installed snappy using a package manager.
  * Use -Dsnappy.lib to specify a nonstandard location for the libsnappy library
    files.  Similarly to snappy.prefix, you do not need this option if you have
    installed snappy using a package manager.
  * Use -Dbundle.snappy to copy the contents of the snappy.lib directory into
    the final tar file. This option requires that -Dsnappy.lib is also given,
    and it ignores the -Dsnappy.prefix option.

 OpenSSL build options:

   OpenSSL includes a crypto library that can be utilized by the native code.
   It is currently an optional component, meaning that Hadoop can be built with
   or without this dependency.

  * Use -Drequire.openssl to fail the build if libcrypto.so is not found.
    If this option is not specified and the openssl library is missing,
    we silently build a version of libhadoop.so that cannot make use of
    openssl. This option is recommended if you plan on making use of openssl
    and want to get more repeatable builds.
  * Use -Dopenssl.prefix to specify a nonstandard location for the libcrypto
    header files and library files. You do not need this option if you have
    installed openssl using a package manager.
  * Use -Dopenssl.lib to specify a nonstandard location for the libcrypto library
    files. Similarly to openssl.prefix, you do not need this option if you have
    installed openssl using a package manager.
  * Use -Dbundle.openssl to copy the contents of the openssl.lib directory into
    the final tar file. This option requires that -Dopenssl.lib is also given,
    and it ignores the -Dopenssl.prefix option.

   Tests options:

  * Use -DskipTests to skip tests when running the following Maven goals:
    'package',  'install', 'deploy' or 'verify'
  * -Dtest=<TESTCLASSNAME>,<TESTCLASSNAME#METHODNAME>,....
  * -Dtest.exclude=<TESTCLASSNAME>
  * -Dtest.exclude.pattern=**/<TESTCLASSNAME1>.java,**/<TESTCLASSNAME2>.java

----------------------------------------------------------------------------------
Building components separately

If you are building a submodule directory, all the hadoop dependencies this
submodule has will be resolved as all other 3rd party dependencies. This is,
from the Maven cache or from a Maven repository (if not available in the cache
or the SNAPSHOT 'timed out').
An alternative is to run 'mvn install -DskipTests' from Hadoop source top
level once; and then work from the submodule. Keep in mind that SNAPSHOTs
time out after a while, using the Maven '-nsu' will stop Maven from trying
to update SNAPSHOTs from external repos.

----------------------------------------------------------------------------------
Protocol Buffer compiler

The version of Protocol Buffer compiler, protoc, must match the version of the
protobuf JAR.

If you have multiple versions of protoc in your system, you can set in your
build shell the HADOOP_PROTOC_PATH environment variable to point to the one you
want to use for the Hadoop build. If you don't define this environment variable,
protoc is looked up in the PATH.
----------------------------------------------------------------------------------
Importing projects to eclipse

When you import the project to eclipse, install hadoop-maven-plugins at first.

  $ cd hadoop-maven-plugins
  $ mvn install

Then, generate eclipse project files.

  $ mvn eclipse:eclipse -DskipTests

At last, import to eclipse by specifying the root directory of the project via
[File] > [Import] > [Existing Projects into Workspace].

----------------------------------------------------------------------------------
Building distributions:

Create binary distribution without native code and without documentation:

  $ mvn package -Pdist -DskipTests -Dtar

Create binary distribution with native code and with documentation:

  $ mvn package -Pdist,native,docs -DskipTests -Dtar

Create source distribution:

  $ mvn package -Psrc -DskipTests

Create source and binary distributions with native code and documentation:

  $ mvn package -Pdist,native,docs,src -DskipTests -Dtar

Create a local staging version of the website (in /tmp/hadoop-site)

  $ mvn clean site; mvn site:stage -DstagingDirectory=/tmp/hadoop-site

----------------------------------------------------------------------------------
Installing Hadoop

Look for these HTML files after you build the document by the above commands.

  * Single Node Setup:
    hadoop-project-dist/hadoop-common/SingleCluster.html

  * Cluster Setup:
    hadoop-project-dist/hadoop-common/ClusterSetup.html

----------------------------------------------------------------------------------

Handling out of memory errors in builds

----------------------------------------------------------------------------------

If the build process fails with an out of memory error, you should be able to fix
it by increasing the memory used by maven -which can be done via the environment
variable MAVEN_OPTS.

Here is an example setting to allocate between 256 and 512 MB of heap space to
Maven

export MAVEN_OPTS="-Xms256m -Xmx512m"

----------------------------------------------------------------------------------

Building on Windows

----------------------------------------------------------------------------------
Requirements:

* Windows System
* JDK 1.7+
* Maven 3.0 or later
* Findbugs 1.3.9 (if running findbugs)
* ProtocolBuffer 2.5.0
* CMake 2.6 or newer
* Windows SDK 7.1 or Visual Studio 2010 Professional
* Windows SDK 8.1 (if building CPU rate control for the container executor)
* zlib headers (if building native code bindings for zlib)
* Internet connection for first build (to fetch all Maven and Hadoop dependencies)
* Unix command-line tools from GnuWin32: sh, mkdir, rm, cp, tar, gzip. These
  tools must be present on your PATH.

Unix command-line tools are also included with the Windows Git package which
can be downloaded from http://git-scm.com/download/win.

If using Visual Studio, it must be Visual Studio 2010 Professional (not 2012).
Do not use Visual Studio Express.  It does not support compiling for 64-bit,
which is problematic if running a 64-bit system.  The Windows SDK 7.1 is free to
download here:

http://www.microsoft.com/en-us/download/details.aspx?id=8279

The Windows SDK 8.1 is available to download at:

http://msdn.microsoft.com/en-us/windows/bg162891.aspx

Cygwin is neither required nor supported.

----------------------------------------------------------------------------------
Building:

Keep the source code tree in a short path to avoid running into problems related
to Windows maximum path length limitation.  (For example, C:hdc).

Run builds from a Windows SDK Command Prompt.  (Start, All Programs,
Microsoft Windows SDK v7.1, Windows SDK 7.1 Command Prompt.)

JAVA_HOME must be set, and the path must not contain spaces.  If the full path
would contain spaces, then use the Windows short path instead.

You must set the Platform environment variable to either x64 or Win32 depending
on whether you're running a 64-bit or 32-bit system.  Note that this is
case-sensitive.  It must be "Platform", not "PLATFORM" or "platform".
Environment variables on Windows are usually case-insensitive, but Maven treats
them as case-sensitive.  Failure to set this environment variable correctly will
cause msbuild to fail while building the native code in hadoop-common.

set Platform=x64 (when building on a 64-bit system)
set Platform=Win32 (when building on a 32-bit system)

Several tests require that the user must have the Create Symbolic Links
privilege.

All Maven goals are the same as described above with the exception that
native code is built by enabling the 'native-win' Maven profile. -Pnative-win
is enabled by default when building on Windows since the native components
are required (not optional) on Windows.

If native code bindings for zlib are required, then the zlib headers must be
deployed on the build machine.  Set the ZLIB_HOME environment variable to the
directory containing the headers.

set ZLIB_HOME=C:zlib-1.2.7

At runtime, zlib1.dll must be accessible on the PATH.  Hadoop has been tested
with zlib 1.2.7, built using Visual Studio 2010 out of contribvstudiovc10 in
the zlib 1.2.7 source tree.

http://www.zlib.net/

----------------------------------------------------------------------------------
Building distributions:

 * Build distribution with native code    : mvn package [-Pdist][-Pdocs][-Psrc][-Dtar]
----------------------------------------------------------------------------------
Importing projects to eclipse

  # 在源代码目录下, 我的源代码是在 /usr/local/hadoop-2.7.3-src
  $ su root          # 这是我添加的, 用root权限

When you import the project to eclipse, install hadoop-maven-plugins at first.

  $ cd hadoop-maven-plugins
  $ mvn install

Then, generate eclipse project files.

  $ cd ..                     # 这是我添加的
  $ mvn eclipse:eclipse -DskipTests

At last, import to eclipse by specifying the root directory of the project via
[File] > [Import] > [Existing Projects into Workspace].

----------------------------------------------------------------------------------
具体操作: ( mvn时需要使用root权限,即县切换到root用户,用命令su root )
第一步:
$ su root
不这样做很容易因为权限之类的问题导致mvn失败. 而且即使mvn 显示成功,也可能是错的,如我碰到过这种情况,即mvn时没花费多长时间就显示BUILD SUCCESS, 但是它并没有下载东西, 导入Eclipse会出现各种错误. 正确的是第一次mvn是会下载很多东西,花很长时间.
第二步:
$ cd ${HADOOP_HOME}/hadoop-maven-plugins         // 这一步的HADOOP_HOME表示hadoop-2.7.3-src所在的目录, 比如我的是在 /home/hadoop/hadoop-2.7.3-src
$ mvn install        // 这一步会下载很多东西( JAR包或 .pom 文件等 ) , 等一段时间
第三步:
$ cd ${HADOOP_HOME}
$ mvn eclipse:eclipse -DskipTests         // 这一步会下载很多东西( JAR包或 .pom 文件等 ) , 等一段时间
成功的话, 会显示 BUILD SUCCESS .
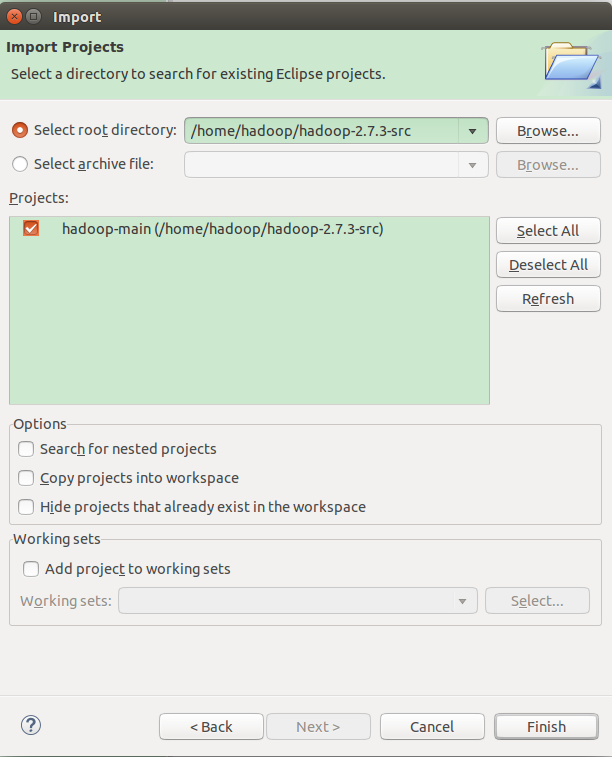
到这一步,准备工作做好了,接下来将源代码该导入Eclipse, 方法是: "File" --> "Import" --> "Existing Projects into Workspace" . 如下图所示:

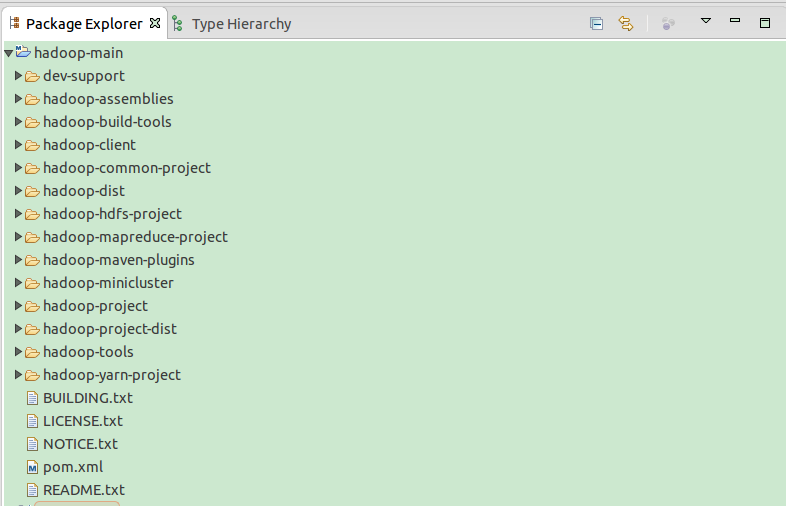
最后项目名称是hadoop-main, 结果如下图所示:
我看书上介绍,总体上说,目前存在两种Hadoop源代码阅读环境搭建方法,分别是构建Maven工程和构建Java工程.两种方法各有利弊:前者可通过网络自动下载依赖的第三方库,但源代码会被分散到多个工程中进而带来阅读上的不便; 后者可将所有源代码组织在一个工程中,但需要自己添加依赖的第三方库,大家可根据自己的喜好选择一种方法.本节将依次介绍这两种方法.(书上介绍的办法不太好用,会出现错误
1. 构建Maven工程
Maven 是根据pom.xml进行编译的,只要文件中包含pom.xml, 就可编译成单独的项目.
通过Maven工程搭建Hadoop源代码阅读环境的步骤如下:
步骤1 解压缩Hadoop源代码.
将下载到的Hadoop源代码压缩包解压到工作目录下,比如 hadoop-2.7.3-src.tar.gz
步骤2 导入Maven工程.
在Eclipse中, 依次选择"File" --> "Import" --> "Maven" --> "Existing Maven Project" , 在弹出的对话框中的 "Root Directory" 后面, 选择Java源代码所在的目录.
单击"Next" 按钮, 在弹出的对话框中选择"Resolve All Later", 并单击"Finish" 按钮完成Maven 项目导入. 之后, Eclipse 会自动通过网络从Maven库中下载依赖的第三方库(JAR包等). 注意, 你所使用的电脑必须能够联网.
将Hadoop 2.7.3源代码导入Maven项目后,会生成50个左右的工程,这些都是通过Maven构建出来的,每个工程是一个代码模块,且彼此相对独立,可以单独编译. 你可以在某个工程下的"src/main/java" 目录下查看相应的源代码.
(我导入之后,还有很多错误,原因未知)
2. 构建Java工程
通过Java工程搭建Hadoop源代码阅读环境的步骤如下:
步骤1 解压缩Hadoop源代码
同"构建Maven工程" 中的步骤1类似.
步骤2 新建Java工程
打开Eclipse, 进入Eclipse可视化界面后,如图1所示, 依次单击"File" --> "New" --> "Java Project", 并在弹出的对话框中去掉"Use default location" 前的勾号, 然后选择Hadoop安装目录的位置,默认情况下,工程名称与Hadoop安装目录名称相同,用户可自行修改. 单击"完成"按钮, Hadoop 源代码工程创建完毕.
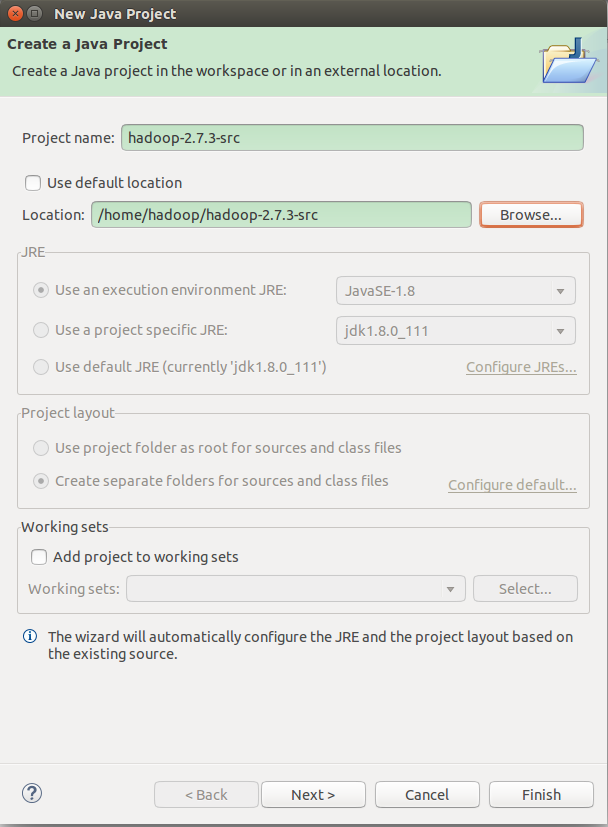
图1 新建Hadoop工程
回到Eclipse主界面后,打开新建的Hadoop工程,可看到整个工程按图2所示组织代码: 按目录组织源代码,且每个目录下以JAR包为单位显示各个Java文件.
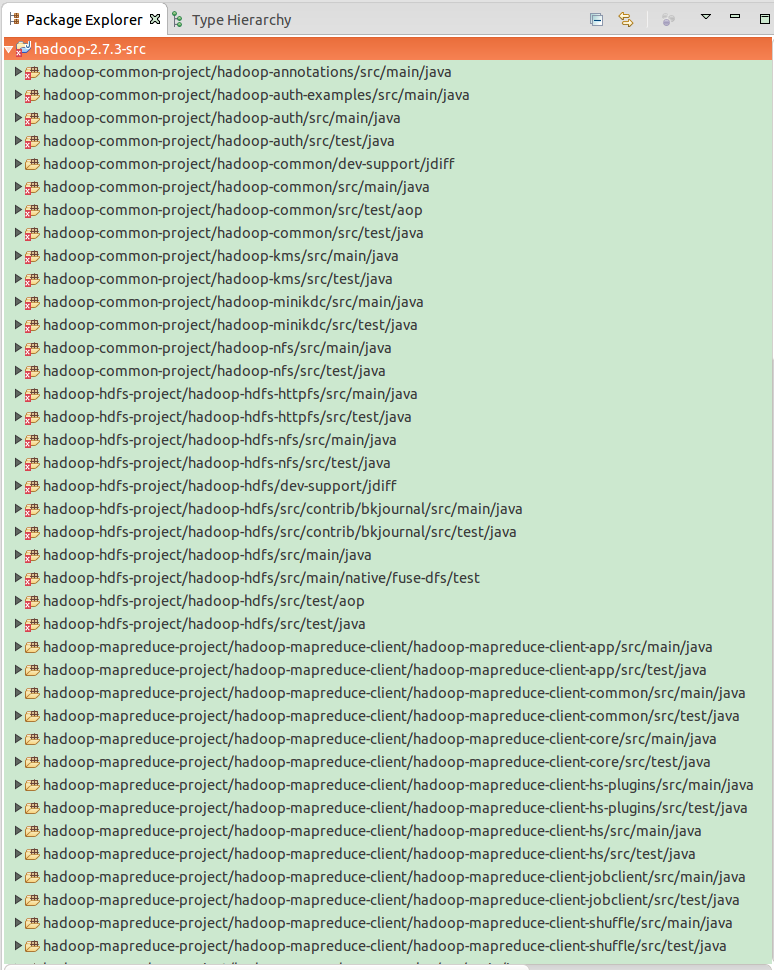
图2 Hadoop工程展示(部分)源代码方式
除了使用源代码压缩包导入Eclipse工程的方法外,读者可尝试直接从Hadoop SVN上导入Hadoop源代码.
需要注意的是,通过以上方法导入Hadoop 2.7.3 源代码后,很多类或着方法找不到对应的JAR包, 为了解决这个问题,你需要将第三方JAR包导入到工程中,如图3所示,方法如下:解压存放JAR包的压缩包(即hadoop-2.7.3.tar.gz), 然后右击Project名称,在弹出的快捷菜单中选择"Properties" 命令, 将会弹出一个界面,然后在该界面依次选择 "Java Build Path" --> "Libraries" --> "Add External JARs..." , 将解压目录中的share/hadoop 目录下各个子目录的中lib文件夹下的JAR包导入工程.
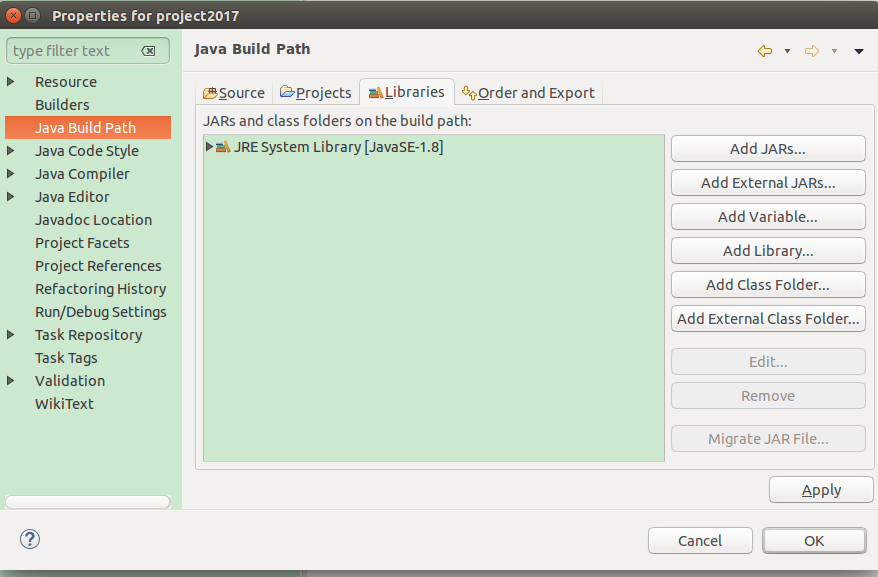
图3 导入依赖的第三方JAR包 (我们以project2017为例,类似)
前面提到CDH版本将源代码和JAR包放在了一起,因此,如果使用CDH版本,则直接按照上述方法将源码导入Eclipse工程即可.
细心的读者在阅读源代码的过程中仍然会发现部分类或者函数无法找到,这是因为Hadoop 2.7.3 使用了Protocol Buffers定义了RPC协议, 而这些Protocol Buffers文件在Maven编译源代码时才会生成对应的Java类,因此若其他类在源代码中引用这些类则暂时无法找到,解决办法是先编译Hadoop 2.7.3 源代码再导入到Eclipse工程,具体方法如下.
首先,使用以下命令安装Eclipse插件hadoop-maven-plugins:
$ cd ${HADOOP_HOME}/hadoop-maven-plugins
$ mvn install
然后生成Eclipse工程文件:
$ cd ${HADOOP_HOME}
$ mvn eclipse:eclipse -DskipTests
最后在Eclipse中按照以下流程导入源代码: "File" --> "Import" --> "Existing Projects into Workspace" .