1 spring概念
(1) spring核心两部分心
(2) spring一站式框架
(3) spring版本
2 spring的入门
()ioc底层原理
(2)ioc门案例
(3)解决配置文件没有提示
3 spring的bean管理(xml配置文件)
(1) bean实例化三种方式
(2) bean标签常用属性
(3) 属性注入方式介绍
(4) spring注入属性(有参构造和set方法)
(5) spring注入对象类型属性(重点)4
(6) p名称空间注入
(7) spring注入复杂数据
5 spring整合Web项目原理。
(1) Servletcontext对象
(2) 监听器
Spring概念
1 spring是开源的轻量级框架
2 spring核心主要两部分:
(1)aop:面向切面编程,扩展功能不是修改源代码实现
(2)ioc:控制反转
-比如有一个类,在类里面有方法(不是静态的方法),调用类里面的方法,创建类的对象,
使用对象调用方法,创建类对象的过程,需要new出来对象
-把对象的创建不是通过new方式实现,而是交给 spring配置创建类对象
3 spring是一站式框架
(1) spring在 javaee三层结构中,每一层都提供不同的解决技术
-web层: springmvc
-service层: spring的ioc
-dao层: spring的 jdbctemplate
4 spring版本
(1) hibernate5.x
(2) spring4.x
Spring的ioc操作
1 把对象的创建交给 spring进行管理
2 ioc操作两部分:
(1) ioc的配置文件方式
(2) ioc的注解方式
IOC底层原理
1 ioc底层原理使用技术
(1)xml配置文件
(2)dom4j解决xml
(3)工厂设计模式
(4)反射
2 画图实现IOC实现原理

IOC入门案例
第一步 导入jar包

第二步 创建类,在类里面创建方法
 1 package cn.itcast.ioc;
 2
 3 public class User {
 4
 5     public void add(){
 6         System.out.println("user........");
 7     }
 8
 9     public static void main(String[] args){
10         User user=new User();
11         user.add();
12     }
13 }
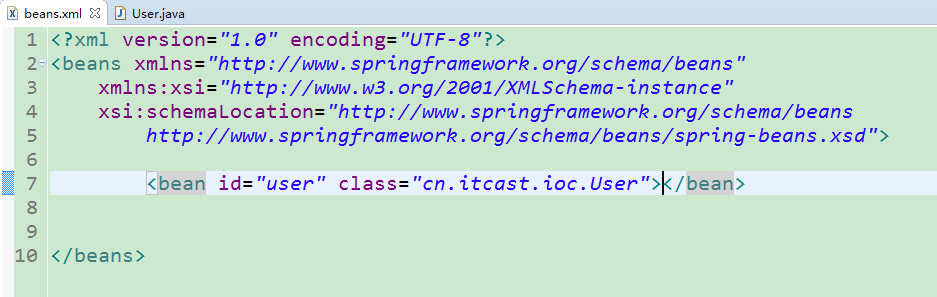
第三步 创建spring配置文件,配置创建类
(1) spring核心配置文件名称和位置不是固定的
建议放到src下面,官方建议 applicationContext.xml
(2) 引入schema约束

第四步 写代码测试对象创建

实体类:
 1 package cn.itcast.ioc;
 2
 3 public class User {
 4
 5     public void add(){
 6         System.out.println("user........");
 7     }
 8
 9     public static void main(String[] args){
10         User user=new User();
11         user.add();
12     }
13 }
配置文件(beans)
测试类:
 1 package cn.itcast.ioc;
 2
 3 import org.junit.Test;
 4 import org.springframework.context.ApplicationContext;
 5 import org.springframework.context.support.ClassPathXmlApplicationContext;
 6
 7 public class TestIOC {
 8
 9     @Test
10     public void testUser(){
11         //1加载spr1ng配置文件,根据创建对象
12         ApplicationContext context=new ClassPathXmlApplicationContext("beans.xml");
13         //2得到配置创建的对象
14         User user=(User)context.getBean("user");
15         System.out.println(user);
16         user.add();
17     }
18 }
Spring的bean管理(xm方式)
Bean实例化的方式
1 在spring里面通过配置文件创建对象
2 bean实例化三种方式实现
第一种 使用类的无参数构造创建(重点)

类里面没有无参的构造,会出现异常
第二种 使用静态工厂创建
(1)创建静态的方法,返回类对象
配置文件

实体类:
 1 package cn.itcast.ioc;
 2
 3 public class User {
 4
 5
 6     public static User getBean(){
 7         return new User();
 8     }
 9
10     public void add(){
11         System.out.println("user........");
12     }
13
14     public static void main(String[] args){
15         User user=new User();
16         user.add();
17     }
18 }
测试类:
 1 package cn.itcast.ioc;
 2
 3 import org.junit.Test;
 4 import org.springframework.context.ApplicationContext;
 5 import org.springframework.context.support.ClassPathXmlApplicationContext;
 6
 7 public class TestIOC {
 8
 9     @Test
10     public void testUser(){
11         //1加载spr1ng配置文件,根据创建对象
12         ApplicationContext context=new ClassPathXmlApplicationContext("beans.xml");
13         //2得到配置创建的对象
14         User user=(User)context.getBean("bean2");
15         System.out.println(user);
16         user.add();
17     }
18 }
第三种 使用实例工厂创建
(2)创建不是静态的方法,返回类对象
实体类:
1 package cn.itcast.ioc;
2
3 public class Bean3 {
4
5
6     public void add() {
7         System.out.println("bean3........");
8     }
9 }
工厂类:
 1 package cn.itcast.ioc;
 2
 3 public class Bean3Factory {
 4
 5
 6     //普通方法返回bean3对象
 7     public Bean3 getBean3() {
 8         return new Bean3();
 9     }
10 }
配置文件:

测试类:
 1 package cn.itcast.ioc;
 2
 3 import org.junit.Test;
 4 import org.springframework.context.ApplicationContext;
 5 import org.springframework.context.support.ClassPathXmlApplicationContext;
 6
 7 public class TestIOC {
 8
 9     @Test
10     public void testUser(){
11         //1加载spr1ng配置文件,根据创建对象
12         ApplicationContext context=new ClassPathXmlApplicationContext("beans.xml");
13         //2得到配置创建的对象
14         Bean3 bean3=(Bean3)context.getBean("bean3");
15         System.out.println(bean3);
16         bean3.add();
17     }
18 }
Bean标签常用属性。
(1)id属性:起名称,id属性值名称任意命名中
id属性值,不能包含特殊符号
根据id值得到配置对象
(2) class属性:创建对象所在类的全路径
(3) name属性:功能和id属性一样的,id属性值不能包含特殊符号,但是在name属性值里面可以包含特殊符号
(4) scope属性
singleton:默认值,单例
prototype:多例
request:创建对象把对象放到 request域里面
session:创建对象把对象放到session域里面
globalsession:创建对象把对象放到 globalsession里面
属性注入
1 创建对象时候,向类里面属性里面设置值
2 属性注入的方式介绍(三种方式)
(1)使用set方法注入
(2)使用有参数构造注入
(3)使用接口注入

3 在spring框架里面,支持前两种方式
(1)set方法注入(重点)
(2)有参数构造注入
有参数构造注入
实体类:
 1 package cn.itcast.ioc;
 2
 3 public class User {
 4
 5
 6     private String userName;
 7
 8
 9     public User(String userName) {
10         this.userName = userName;
11     }
12
13     public void add(){
14         System.out.println("user........"+userName);
15     }
16
17 }
配置文件:

测试类:
 1 package cn.itcast.ioc;
 2
 3 import org.junit.Test;
 4 import org.springframework.context.ApplicationContext;
 5 import org.springframework.context.support.ClassPathXmlApplicationContext;
 6
 7 public class TestIOC {
 8
 9     @Test
10     public void testUser(){
11         //1加载spr1ng配置文件,根据创建对象
12         ApplicationContext context=new ClassPathXmlApplicationContext("beans.xml");
13         //2得到配置创建的对象
14         User user=(User)context.getBean("user");
15         user.add();
16     }
17 }
set方法注入(重点)
实体类:
 1 package cn.itcast.ioc;
 2
 3 public class Book {
 4
 5     private String bookName;
 6
 7     public void setBookName(String bookName) {
 8         this.bookName = bookName;
 9     }
10
11     public void add(){
12         System.out.println("Book........"+bookName);
13     }
14
15 }
测试类:
 1 package cn.itcast.ioc;
 2
 3 import org.junit.Test;
 4 import org.springframework.context.ApplicationContext;
 5 import org.springframework.context.support.ClassPathXmlApplicationContext;
 6
 7 public class TestBook {
 8
 9     @Test
10     public void testBook(){
11         //1加载spr1ng配置文件,根据创建对象
12         ApplicationContext context=new ClassPathXmlApplicationContext("beans.xml");
13         //2得到配置创建的对象
14         Book book=(Book)context.getBean("book");
15         book.add();
16     }
17 }
配置文件:

注入对象:
需要注入的类:
1 package cn.itcast.ioc;
2
3 public class Person {
4     public void name() {
5         System.out.println("this is Person!");
6     }
7 }
需要被注入对象的类:
 1 package cn.itcast.ioc;
 2
 3 public class Company {
 4     private Person person;
 5
 6     public Company() {
 7     }
 8
 9     public Company(Person person) {
10         this.person = person;
11     }
12
13     public void setPerson(Person person) {
14         this.person = person;
15     }
16
17     public void test() {
18         person.name();
19     }
20 }
配置文件:

测试类:
 1 package cn.itcast.ioc;
 2
 3 import org.junit.Test;
 4 import org.springframework.context.ApplicationContext;
 5 import org.springframework.context.support.ClassPathXmlApplicationContext;
 6
 7 public class TestCompany {
 8
 9
10
11     @Test
12     public void testCompany(){
13         //1加载spr1ng配置文件,根据创建对象
14         ApplicationContext context=new ClassPathXmlApplicationContext("beans.xml");
15         //2得到配置创建的对象
16         Company company=(Company) context.getBean("company");
17         company.test();
18     }
19 }

P标签注入

注入方法使用的是set注入
注入复杂类型属性
建议使用set注入,并不是说初始化方法注入不能使用而是在实际开发中意义不大
实体类:
 1 package cn.itcast.ioc;
 2
 3 import java.util.List;
 4 import java.util.Map;
 5 import java.util.Properties;
 6
 7 public class Type {
 8     private String[] arrs;
 9     private List<String> list;
10     private Map<String,String> map;
11     private Properties properties;
12
13     public void setArrs(String[] arrs) {
14         this.arrs = arrs;
15     }
16     public void setList(List<String> list) {
17         this.list = list;
18     }
19     public void setMap(Map<String, String> map) {
20         this.map = map;
21     }
22     public void setProperties(Properties properties) {
23         this.properties = properties;
24     }
25     public void out() {
26         System.out.println("arrs..."+arrs);
27         System.out.println("list..."+list);
28         System.out.println("map..."+map);
29         System.out.println("properties..."+properties);
30     }
31
32 }
配置文件:
 1 <bean id="type" class="cn.itcast.ioc.Type">
 2                 <!-- 数组 -->
 3                 <property name="arrs">
 4                     <list>
 5                         <value>小王</value>
 6                         <value>小李</value>
 7                         <value>小马</value>
 8                     </list>
 9                 </property>
10
11                 <!-- list -->
12                 <property name="list">
13                     <list>
14                         <value>张三</value>
15                         <value>李四</value>
16                         <value>王五</value>
17                     </list>
18                 </property>
19
20                 <!-- map -->
21                 <property name="map">
22                     <map>
23                         <entry key="aa" value="lucy"></entry>
24                         <entry key="bb" value="mary"></entry>
25                         <entry key="cc" value="tom"></entry>
26                     </map>
27                 </property>
28
29                 <!-- properties(键值对) -->
30                 <property name="properties">
31                     <props>
32                         <prop key="姓名">张三</prop>
33                         <prop key="性别">男</prop>
34                         <prop key="年龄">38</prop>
35                     </props>
36                 </property>
37             </bean>
测试类:
 1 package cn.itcast.ioc;
 2
 3 import org.junit.Test;
 4 import org.springframework.context.ApplicationContext;
 5 import org.springframework.context.support.ClassPathXmlApplicationContext;
 6
 7 public class TyepTest {
 8
 9
10     @Test
11     public void testType(){
12         //1加载spr1ng配置文件,根据创建对象
13         ApplicationContext context=new ClassPathXmlApplicationContext("beans.xml");
14         //2得到配置创建的对象
15         Type type=(Type) context.getBean("type");
16         type.out();
17     }
18 }

