参考博客:linux下ElasticSearch.6.2.2集群安装与head、Kibana、X-Pack..插件的配置安装
参考博客:ELK5.5.1 插件安装实践纪要(head/bigdesk/kopf/cerebo/中文分词插件)
参考博客:ELK构建MySQL慢日志收集平台详解
参考博客:针对Logstash吞吐量一次优化
参考博客:ElasticStack系列之十八 & ElasticSearch5.x XPack 过期新 License 更新
1. 主机规划
|
主机名称 |
IP信息 |
内网IP |
操作系统 |
安装软件 |
备注:运行程序 |
|
mini01 |
10.0.0.11 |
172.16.1.11 |
CentOS 7.4 2G内存 |
jdk、elasticsearch、kibana |
插件head、bigdesk、cerebro |
|
mini02 |
10.0.0.12 |
172.16.1.12 |
CentOS 7.4 4G内存 |
jdk、elasticsearch、logstash |
|
|
mini03 |
10.0.0.13 |
172.16.1.13 |
CentOS 7.4 4G内存 |
jdk、elasticsearch、logstash |
|
|
mini04 |
10.0.0.14 |
172.16.1.14 |
CentOS 7.4 |
jdk、logstash |
添加hosts信息,保证每台都可以相互ping通
1 [root@mini01 ~]# cat /etc/hosts
2 127.0.0.1   localhost localhost.localdomain localhost4 localhost4.localdomain4
3 ::1         localhost localhost.localdomain localhost6 localhost6.localdomain6
4
5 10.0.0.11    mini01
6 10.0.0.12    mini02
7 10.0.0.13    mini03
8 10.0.0.14    mini04
9 10.0.0.15    mini05
windows的hosts文件也追加如下信息
1 c:windowssystem32driversetc
2 ########################################## 追加信息如下:
3 10.0.0.11    mini01
4 10.0.0.12    mini02
5 10.0.0.13    mini03
6 10.0.0.14    mini04
7 10.0.0.15    mini05
2. 添加用户账号
1 # 使用一个专门的用户,避免直接使用root用户
2 # 添加用户、指定家目录并指定用户密码
3 useradd -d /app yun && echo '123456' | /usr/bin/passwd --stdin yun
4 # sudo提权
5 echo "yun  ALL=(ALL)       NOPASSWD: ALL" >>  /etc/sudoers
6 # 让其它普通用户可以进入该目录查看信息
7 chmod 755 /app/
3. Jdk【java8】
3.1. 软件安装
 1 [yun@mini01 software]# pwd
 2 /app/software
 3 [yun@mini01 software]# tar xf jdk1.8.0_112.tar.gz
 4 [yun@mini01 software]# ll
 5 total 201392
 6 drwxr-xr-x 8   10  143      4096 Dec 20 13:27 jdk1.8.0_112
 7 -rw-r--r-- 1 root root 189815615 Mar 12 16:47 jdk1.8.0_112.tar.gz
 8 [yun@mini01 software]# mv jdk1.8.0_112/ /app/
 9 [yun@mini01 software]# cd /app/
10 [yun@mini01 app]# ll
11 total 8
12 drwxr-xr-x  8   10   143 4096 Dec 20 13:27 jdk1.8.0_112
13 [yun@mini01 app]# ln -s jdk1.8.0_112/ jdk
14 [yun@mini01 app]# ll
15 total 8
16 lrwxrwxrwx  1 root root    13 May 16 23:19 jdk -> jdk1.8.0_112/
17 drwxr-xr-x  8   10   143 4096 Dec 20 13:27 jdk1.8.0_112
3.2. 环境变量
 1 [root@mini01 ~]$ pwd
 2 /app
 3 [root@mini01 ~]$ ll -d jdk*  # 选择jdk1.8
 4 lrwxrwxrwx 1 yun yun   11 Mar 15 14:58 jdk -> jdk1.8.0_112
 5 drwxr-xr-x 8 yun yun 4096 Dec 20 13:27 jdk1.8.0_112
 6 [root@mini01 profile.d]$ pwd
 7 /etc/profile.d
 8 [root@mini01 profile.d]$ cat jdk.sh # java环境变量
 9 export JAVA_HOME=/app/jdk
10 export JRE_HOME=/app/jdk/jre
11 export CLASSPATH=.:$JAVA_HOME/lib/dt.jar:$JAVA_HOME/lib/tools.jar:$JRE_HOME/lib:$CLASSPATH
12 export PATH=$JAVA_HOME/bin:$PATH
13
14 [root@mini01 profile.d]# source /etc/profile
15 [root@mini01 profile.d]$ java -version
16 java version "1.8.0_112"
17 Java(TM) SE Runtime Environment (build 1.8.0_112-b15)
18 Java HotSpot(TM) 64-Bit Server VM (build 25.112-b15, mixed mode)
4. elasticsearch部署
4.1. 软件部署
1 [yun@mini01 software]$ pwd
2 /app/software
3 [yun@mini01 software]$ tar xf elasticsearch-6.3.2.tar.gz
4 [yun@mini01 software]$ mv elasticsearch-6.3.2 /app/
5 [yun@mini01 software]$ cd /app/
6 [yun@mini01 ~]$ ln -s elasticsearch-6.3.2/ elasticsearch
4.2. 环境变量
所有安装es的机器都要有该配置
1 [root@mini01 profile.d]# pwd
2 /etc/profile.d
3 [root@mini01 profile.d]# cat es.sh
4 export ES_HOME="/app/elasticsearch"
5 export PATH=$ES_HOME/bin:$PATH
6
7 [root@mini01 profile.d]# logout
8 [yun@mini01 es-data]$ source /etc/profile  # 重加在环境变量
4.3. 配置修改
由于node.name使用了变量,所以所有集群的该配置都可以一样
 1 [yun@mini01 config]$ pwd
 2 /app/elasticsearch/config
 3 [yun@mini01 config]$ vim elasticsearch.yml
 4 ………………
 5 # ---------------------------------- Cluster -----------------------------------
 6 #
 7 # Use a descriptive name for your cluster:
 8 #
 9 #cluster.name: my-application
10 # 集群名称
11 cluster.name: zhang-es
12 #
13 # ------------------------------------ Node ------------------------------------
14 #
15 # Use a descriptive name for the node:
16 #
17 #node.name: node-1
18 # 节点名称
19 node.name: ${HOSTNAME}
20
21 #
22 # Add custom attributes to the node:
23 ………………
24 # Path to directory where to store the data (separate multiple locations by comma):
25 #
26 #path.data: /path/to/data
27 # 该目录需要创建
28 path.data: /app/es-data
29
30 #
31 # Path to log files:
32 #
33 #path.logs: /path/to/logs
34 # 该目录需要创建
35 path.logs: /app/es-data/logs
36 ………………
37 # Lock the memory on startup:
38 #
39 # 锁定内存
40 bootstrap.memory_lock: true
41 #
42 ………………
43 # Set the bind address to a specific IP (IPv4 or IPv6):
44 #
45 #network.host: 192.168.0.1
46 # 绑定
47 network.host: 0.0.0.0
48
49 #
50 # Set a custom port for HTTP:
51 #
52 http.port: 9200
53 #
54 ………………
55 # Elasticsearch performs poorly when the system is swapping the memory.
56 #
57 #discovery.zen.ping.unicast.hosts: ["host1", "host2"]
58 # 集群节点ip或者主机
59 discovery.zen.ping.unicast.hosts: ["mini01", "mini02", "mini03"]
60
61 #
62 # Prevent the "split brain" by configuring the majority of nodes (total number of master-eligible nodes / 2 + 1):
63 #
64 # 防止脑裂配置,注意在多master时,这个值应该等于 Math.floor(master候选节点数/2)+1
65 # 意思是master候选节点的数目最少达到多少个,才去选举master
66 # 没有这个配置,在多master时容易造成脑裂,出现多个集群
67 # 这里只有一个master就设置成1即可  【默认为1】
68 #discovery.zen.minimum_master_nodes:
69 ………………
70 #action.destructive_requires_name: true
71
72 # 下面两行配置为haad和bigdesk插件配置,各服务器一致
73 http.cors.enabled: true
74 http.cors.allow-origin: "*"
4.4. 启动es程序
 1 # -d 后台运行   -p 指定pid文件
 2 [yun@mini01 ~]$ elasticsearch -d -p /app/elasticsearch/es.pid  # 添加了环境变量,所以可以在任何地方启动程序
 3 [yun@mini01 ~]$ cat elasticsearch/es.pid
 4 2637
 5 [yun@mini01 ~]$ netstat -lntup | grep '9200'
 6 (Not all processes could be identified, non-owned process info
 7  will not be shown, you would have to be root to see it all.)
 8 tcp6       0      0 :::9200                 :::*                    LISTEN      2637/java
 9 [yun@mini01 ~]$ kill -9 2637   # 停止es
10 [yun@mini01 ~]$ ps -ef | grep 'ela'
11 yun        3263   1807  0 20:56 pts/0    00:00:00 grep --color=auto ela
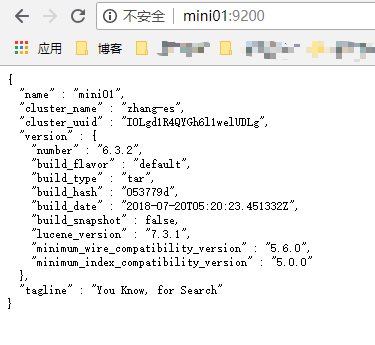
4.5. 浏览器访问
1 http://mini01:9200/
2 http://mini02:9200/
3 http://mini03:9200/
4.6. 启动报错与解决
1 # 启动报错如下:
2 [3] bootstrap checks failed
3 [1]: max file descriptors [65535] for elasticsearch process is too low, increase to at least [65536]
4 [2]: memory locking requested for elasticsearch process but memory is not locked
5 [3]: max virtual memory areas vm.max_map_count [65530] is too low, increase to at least [262144]
4.6.1. 解决1和2
 1 # 将 soft nofile和hard nofile从 65535 改为 131070,如下:
 2 # 添加soft memlock和hard memlock
 3 [yun@mini01 ~]$ tail /etc/security/limits.conf   # 需要退出重新登录才生效
 4 #*               hard    rss             10000
 5 #@student        hard    nproc           20
 6 #@faculty        soft    nproc           20
 7 #@faculty        hard    nproc           50
 8 #ftp             hard    nproc           0
 9 #@student        -       maxlogins       4
10
11 # End of file
12 * soft nofile 131070
13 * hard nofile 131070
14 * soft memlock unlimited
15 * hard memlock unlimited
4.6.2. 解决3
1 [root@mini01 ~]# vim /etc/sysctl.conf  # 追加如下信息
2 ………………
3
4 vm.max_map_count=655360
5 [root@mini01 ~]# sysctl -p  # 生效
5. ES的XPack 过期新 License 更新
当我们直接访问ES的索引,出现如下信息时,表示license已经过期,需要重新更新
其中涉及ES的账号信息------elastic:是可以 build 这个项目的超级用户,对应默认的密码为:changeme
命令行访问
 1 [yun@mini02 ~]$ curl -XGET -u elastic:changeme 'http://mini01:9200/_xpack/license'
 2 {
 3   "license" : {
 4     "status" : "expired",
 5     "uid" : "59bc0e32-685b-48a9-bfdb-ddd373f672ab",
 6     "type" : "trial",
 7     "issue_date" : "2018-06-03T08:56:33.376Z",
 8     "issue_date_in_millis" : 1528016193376,
 9     "expiry_date" : "2018-07-03T08:56:33.376Z",
10     "expiry_date_in_millis" : 1530608193376,
11     "max_nodes" : 1000,
12     "issued_to" : "zhang-es",
13     "issuer" : "elasticsearch",
14     "start_date_in_millis" : -1
15   }
16 }
17 [yun@mini02 ~]$ curl -XGET -u elastic:changeme 'http://mini01:9200/_cat/indices'
18 {"error":{"root_cause":[{"type":"security_exception","reason":"current license is non-compliant for [security]","license.expired.feature":"security"}],"type":"security_exception","reason":"current license is non-compliant for [security]","license.expired.feature":"security"},"status":403}
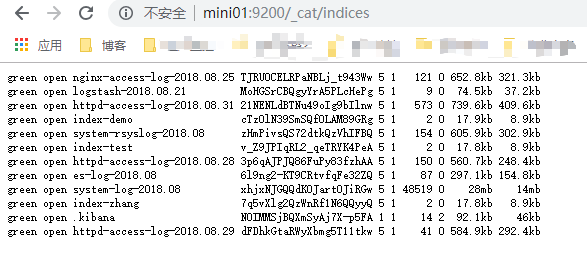
浏览器访问
1 http://mini01:9200/_cat/indices

获取License
1 https://register.elastic.co/marvel_register
需要你输入你对应的邮箱等基本信息,随便填写,但是邮箱和国家必须是真实的,将对应新下载的 license 上传到对应集群的某一台服务器上即可,我将我下载的一堆很长名字的 license 修改为简单的名称即:
mv xxxxx-license.json license.json
更新 license
我们更新最新的 license 不需要重启相应的 ElasticSearch 节点,只需要通过一个命令就可以动态的生效
 1 [yun@mini02 ~]$ curl -XPUT -u elastic:changeme 'http://mini01:9200/_xpack/license?acknowledge=true' -H "Content-Type: application/json" -d @license.json
 2 {"acknowledged":true,"license_status":"valid"}
 3 [yun@mini02 ~]$ curl -XGET -u elastic:changeme 'http://mini01:9200/_xpack/license'
 4 {
 5   "license" : {
 6     "status" : "active",
 7     "uid" : "aad141e1-c24b-453c-92d1-0fdf5ac63540",
 8     "type" : "basic",
 9     "issue_date" : "2018-09-07T00:00:00.000Z",
10     "issue_date_in_millis" : 1536278400000,
11     "expiry_date" : "2019-09-07T23:59:59.999Z",
12     "expiry_date_in_millis" : 1567900799999,
13     "max_nodes" : 100,
14     "issued_to" : "zhang lia (myself)",
15     "issuer" : "Web Form",
16     "start_date_in_millis" : 1536278400000
17   }
18 }
之后就可以正常访问了
1 [yun@mini02 ~]$ curl http://mini01:9200/_cat/indices
2 green open logstash-2018.08.21         MoHGSrCBQgyYrA5PLcHePg 5 1     9 0  74.5kb  37.2kb
3 green open nginx-access-log-2018.08.25 TJRUOCELRPaNBLj_t943Ww 5 1   121 0 652.8kb 321.3kb
4 green open httpd-access-log-2018.08.31 21NENLdBTNu49oIg9bIlnw 5 1   573 0 739.6kb 409.6kb
5 green open index-demo                  cTz0lN39SmSQfOLAM89GRg 5 1     2 0  17.9kb   8.9kb
6 green open system-rsyslog-2018.08      zHmPivsQS72dtkQzVhIFBQ 5 1   154 0 605.9kb 302.9kb
7 ………………