概览
1- flume简介
2- 系统要求
3- 安装和配置
4- 启动和测试
一、flume的简介
官网地址: http://flume.apache.org/
1- 概述
Flume是一种分布式,可靠且可用的服务,用于高效地收集,汇总和移动大量日志数据。它具有基于流式数据流的简单而灵活的架构。它具有可靠的可靠性机制以及许多故障转移和恢复机制,具有强大的容错性和容错能力。它使用一个简单的可扩展数据模型,允许在线分析应用程序。
Apache Flume的使用不仅限于日志数据聚合。由于数据源是可定制的,因此Flume可用于传输大量事件数据,包括但不限于网络流量数据,社交媒体生成的数据,电子邮件消息以及几乎任何可能的数据源。
2- 数据模型
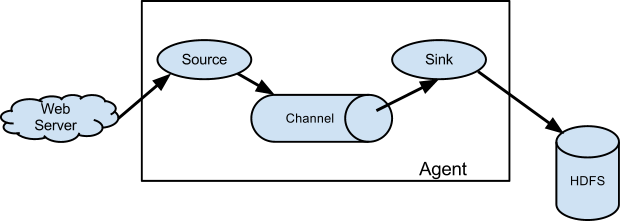
A Flume event is defined as a unit of data flow having a byte payload and an optional set of string attributes. A Flume agent is a (JVM) process that hosts the components through which events flow from an external source to the next destination (hop).- 官网原句。

- Java运行时环境 - Java 1.8或更高版本
- 内存 - 源,通道或接收器使用的配置具有足够的内存
- 磁盘空间 - 通道或接收器使用的配置有足够的磁盘空间
- 目录权限 - 代理使用的目录的读/写权限
[root@master local]# cd /local
[root@master local]# du -sm apache-flume-1.8.0-bin.tar.gz
56 apache-flume-1.8.0-bin.tar.gz
解压并移动至/opt下
[root@master local]# mv apache-flume-1.8.0-bin flume
[root@master local]# mv flume/ /opt/
[root@master flume]# cd conf/
[root@master conf]# cp flume-conf.properties.template flume-conf.properties
[root@master conf]# vim flume-conf.properties
配置内容如下:
# example.conf: A single-node Flume configuration

# Name the components on this agent
a1.sources = r1
a1.sinks = k1
a1.channels = c1

# Describe/configure the source
a1.sources.r1.type = netcat
a1.sources.r1.bind = localhost
a1.sources.r1.port = 44444

# Describe the sink
a1.sinks.k1.type = logger

# Use a channel which buffers events in memory
a1.channels.c1.type = memory
a1.channels.c1.capacity = 1000
a1.channels.c1.transactionCapacity = 100

# Bind the source and sink to the channel
a1.sources.r1.channels = c1
a1.sinks.k1.channel = c1
这里设置的是memory,读的内存,通过telnet localhost 44444 端口连接下会话信息都会被flume监控到。
测试
四 启动和测试
启动flume:
[root@master flume]# bin/flume-ng agent --conf conf --conf-file conf/flume-conf.properties --name a1 -Dflume.root.logger=INFO,console


新建另一个会话

[root@master ~]# telnet localhost 44444
-bash: telnet: command not found
[root@master ~]# yum install
……
Installed:
telnet.x86_64 1:0.17-48.el6
Complete!

查看flume连接的会话

这个信息被捕捉到。
说明flume是正常运行的。
以上只是一个简单的测试。
更多的还有插件,多代理等,以后再续。