Swagger 是一个规范和完整的框架,用于生成、描述、调用和可视化 RESTful 风格的 Web 服务。本文主要介绍了在 Spring Boot 添加 Swagger 支持, 生成可自动维护的 API 文档。
POM 文件
在pom.xml中加入Swagger2的依赖<dependency> <groupId>io.springfox</groupId> <artifactId>springfox-swagger2</artifactId> <version>2.6.1</version> </dependency> <dependency> <groupId>io.springfox</groupId> <artifactId>springfox-swagger-ui</artifactId> <version>2.6.1</version> </dependency>
代码支持
其次我们需要在代码中添加支持,于 Application 同级目录添加 Swagger 配置类,类名随意,但需要增加@EnableSwagger2和@Configuration注解,如下:
import org.springframework.context.annotation.Bean;
import org.springframework.context.annotation.ComponentScan;
import org.springframework.context.annotation.Configuration;
import springfox.documentation.builders.ApiInfoBuilder;
import springfox.documentation.builders.RequestHandlerSelectors;
import springfox.documentation.service.ApiInfo;
import springfox.documentation.service.Contact;
import springfox.documentation.spi.DocumentationType;
import springfox.documentation.spring.web.plugins.Docket;
import springfox.documentation.swagger2.annotations.EnableSwagger2;

@Configuration
@EnableSwagger2
public class Swagger2 {

    @Bean
    public Docket config() {
        return new Docket(DocumentationType.SWAGGER_2)
                .apiInfo(apiInfo())
                .useDefaultResponseMessages(false)
                .select()
                .apis(RequestHandlerSelectors.basePackage("com.pxx.xxx.controller"))
                .build();
    }
    //构建Api文档的详细信息函数
    private ApiInfo apiInfo() {
        return new ApiInfoBuilder()
                .title("Blog系统API文档")
                .contact(new Contact("作者", "访问地址", "联系方式"))
                .build();
    }
}
通过@Configuration注解,让Spring来加载该类配置,@EnableSwagger2注解来启用Swagger2。
再通过createRestApi函数创建Docket的Bean之后,apiInfo()用来创建该Api的基本信息(这些基本信息会展现在文档页面中)。select()函数返回一个ApiSelectorBuilder实例用来控制哪些接口暴露给Swagger来展现,本例采用指定扫描的包路径来定义,Swagger会扫描该包下所有Controller定义的API,并产生文档内容(除了被@ApiIgnore注解的API)
PS:这里需要注意的是.apis(RequestHandlerSelectors.basePackage("com.pxx.xxx.controller")) 指定了 Swagger 的扫描包名, 假如不指定此项, 在 Spring Boot 项目中, 会生成 base-err-controller 的 api 接口项。
访问地址
Ok. 接下来运行项目, 访问 http://项目启动地址/v2/api-docs , 就可以访问到生成的文档的json结构. (如下图 )
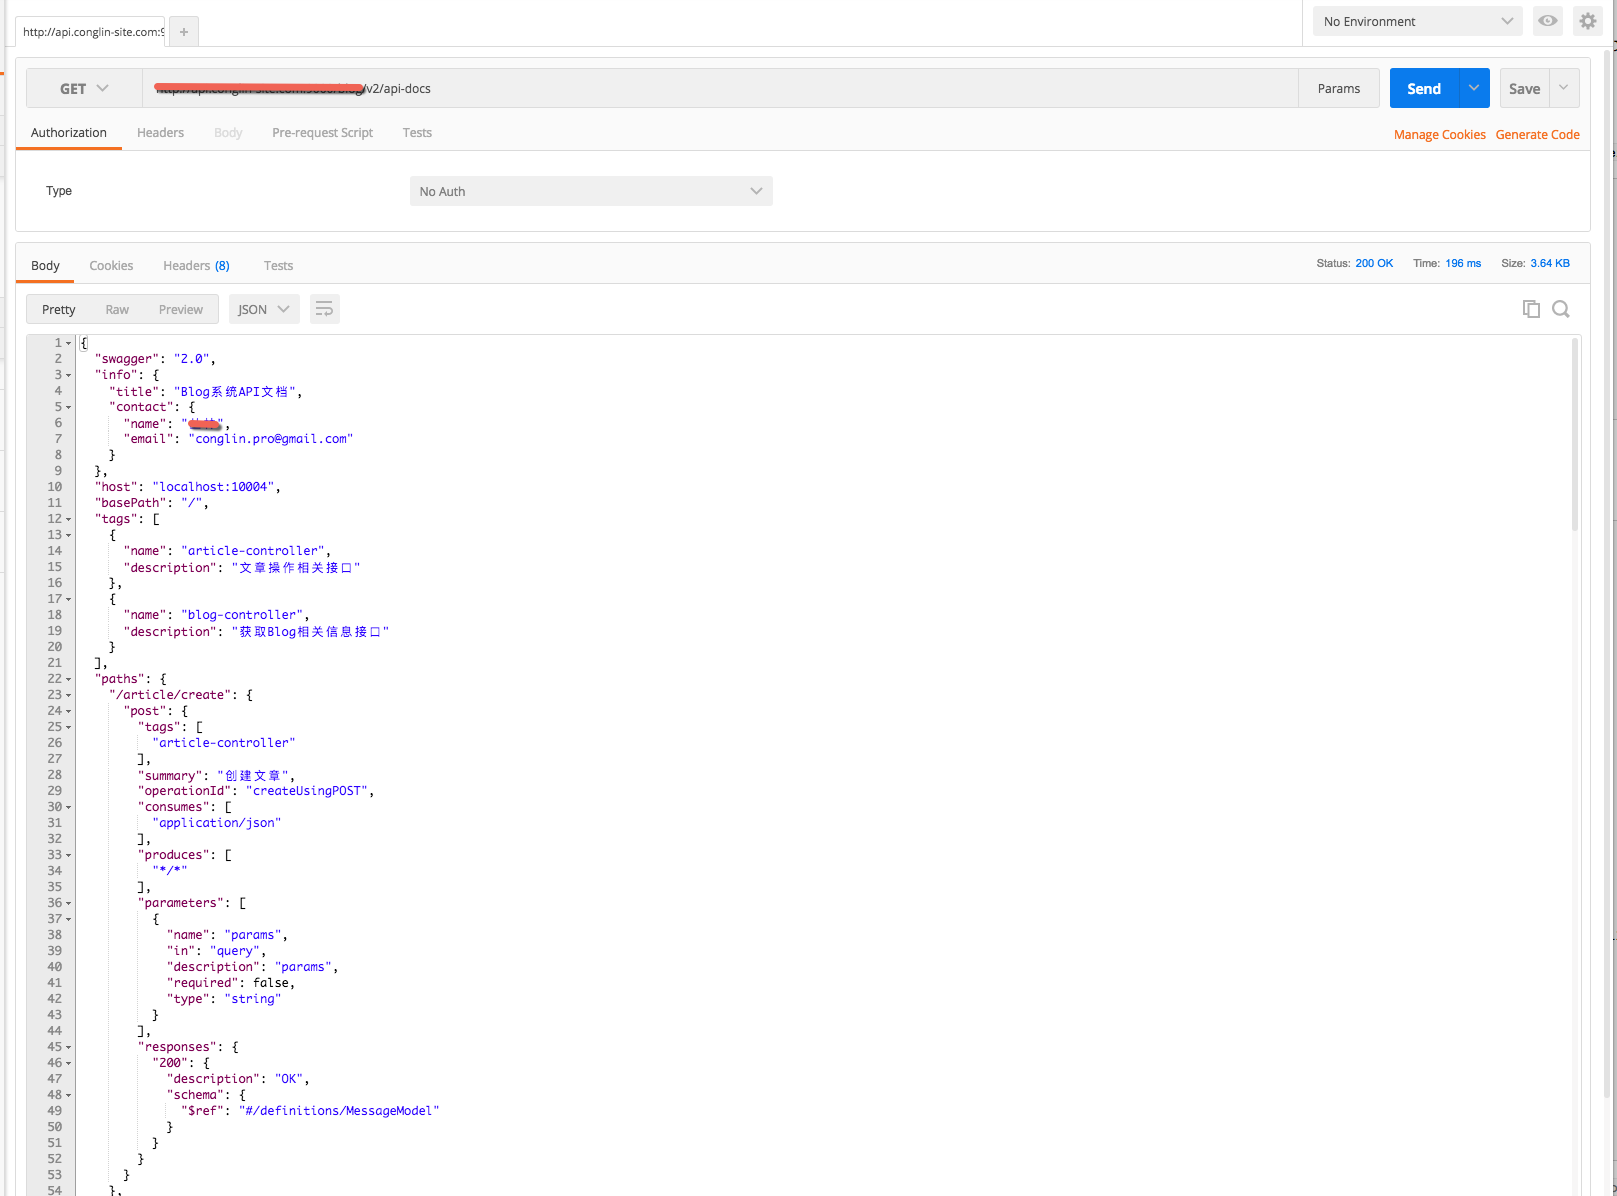
具体结构可参阅 Swagger官方示例
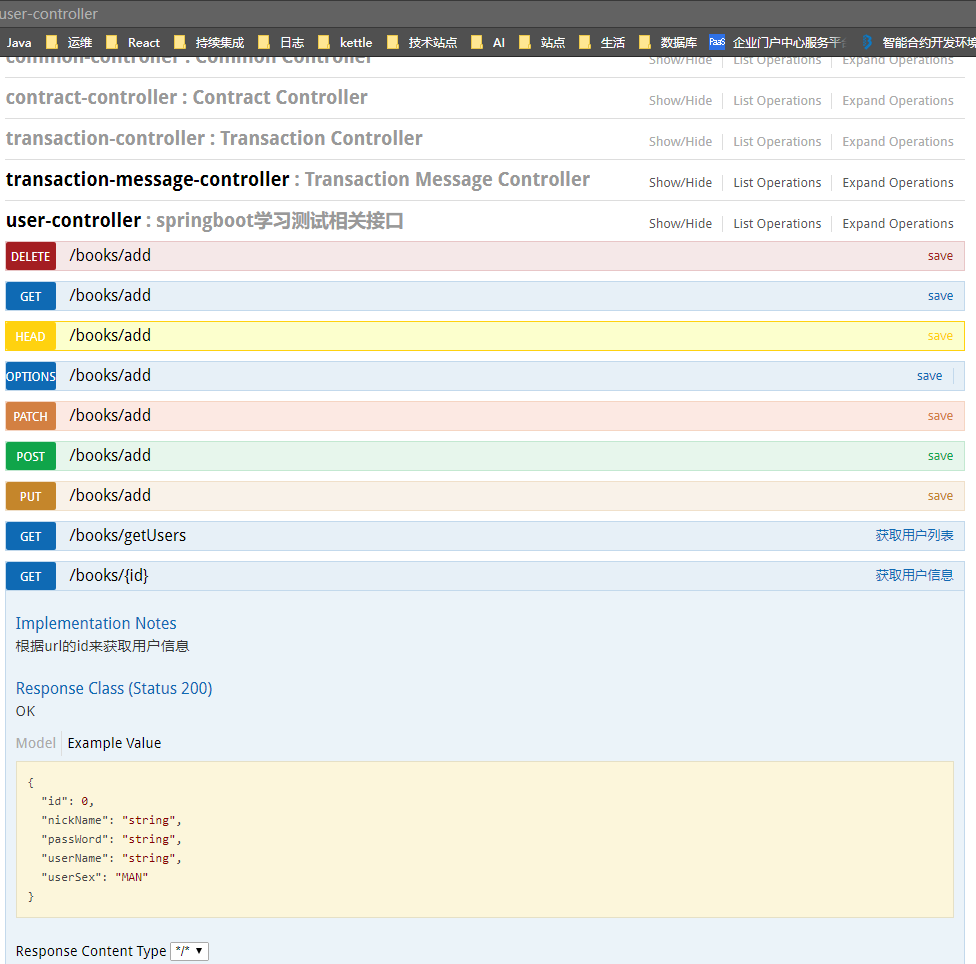
Swagger UI地址: 访问 http://项目启动地址//swagger-ui.html
注解OK. 现在所有工作基本就绪,通过添加相应注解就可以快速生成相关接口文档, 这也是个人认为比较好的一点。
这里开始编写自己的RESTful Controller,跟正常开发没什么区别。主要是接口方法上面新增了几个注解:
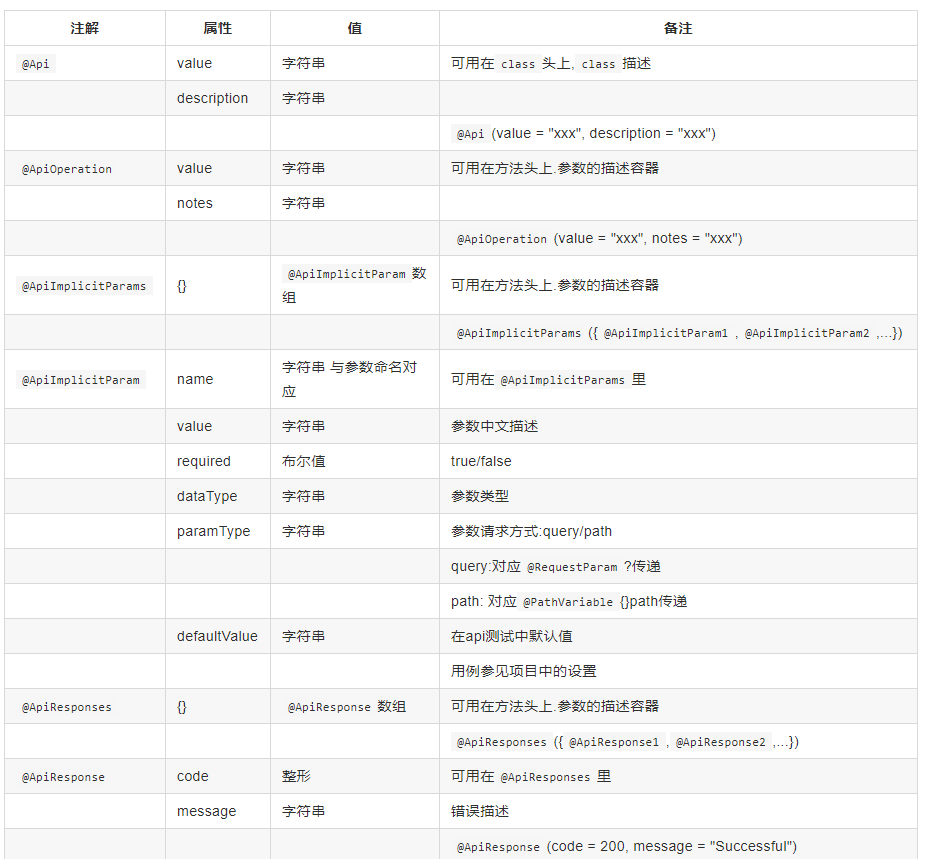
- 通过@ApiOperation注解来给API增加说明
- 通过@ApiImplicitParams、@ApiImplicitParam注解来给参数增加说明
- 通过@ApiIgnore来忽略那些不想让生成RESTful API文档的接口
@Api(description = "文章操作相关接口")
@RestController
@RequestMapping("/article")
public class ArticleController {
    private final Logger logger = LoggerFactory.getLogger(ArticleController.class);

    @Autowired
    private BlogService blogService;


    @Autowired
    private JsonMapper jsonMapper;

    @Autowired
    private Environment env;

    @Autowired
    private PxxHttp pxxHttp;


    @ApiOperation(value="创建文章", notes="")
    @RequestMapping(value = {"/create"} , method = RequestMethod.POST)
    MessageModel create(@ApiParam @RequestParam("params") String params) throws IOException {

        return result;
    }

    @ApiOperation(value="更新文章", notes="")
    @RequestMapping(value = "/update", method = RequestMethod.POST)
    public @ResponseBody
    MessageModel update(@ApiParam @RequestParam("params") String params) throws Exception {

        return result;
    }


    @ApiOperation(value="mns更新文章", notes="")
    @RequestMapping(value = "/updatearticle", method = RequestMethod.POST)
    public @ResponseBody
    MessageModel updateArticle(@ApiParam @RequestParam("params") String params) throws Exception {

        return result;
    }

}
@Api(description = ""): 对整个 Controller 的定义做一个解释@ApiOperation(value="", notes=""): 对 Controller 内 function 定义的内容作一解释@ApiParam: 添加到参数前, Swagger 会自动生成 API 文档中对参数的标示
package com.osp.ethscan.config;

import org.springframework.context.annotation.Bean;
import org.springframework.context.annotation.Configuration;

import springfox.documentation.builders.ApiInfoBuilder;
import springfox.documentation.builders.PathSelectors;
import springfox.documentation.builders.RequestHandlerSelectors;
import springfox.documentation.service.ApiInfo;
import springfox.documentation.service.Contact;
import springfox.documentation.spi.DocumentationType;
import springfox.documentation.spring.web.plugins.Docket;
import springfox.documentation.swagger2.annotations.EnableSwagger2;

/**
 *
 * @author zhangmingcheng
 * @date 2018年9月25日
 */
@Configuration
@EnableSwagger2
public class Swagger2 {

	@Bean
	public Docket createRestApi() {
		return new Docket(DocumentationType.SWAGGER_2).apiInfo(apiInfo()).select()
				.apis(RequestHandlerSelectors.basePackage("com.osp.ethscan.controller")).paths(PathSelectors.any())
				.build();
	}

	/**
	 * 构建Api文档的详细信息函数
	 *
	 * @return
	 */
	private ApiInfo apiInfo() {
		return new ApiInfoBuilder().title("osp-etherscan api文档")
				.description("简单优雅的restful风格,https://www.cnblogs.com/zhangmingcheng")
				.contact(new Contact("zmcheng", "", ""))
				.termsOfServiceUrl("https://www.cnblogs.com/zhangmingcheng").version("1.0").build();
	}
}
Controller:
package com.osp.ethscan.controller;

import java.util.List;

import org.springframework.beans.factory.annotation.Autowired;
import org.springframework.web.bind.annotation.PathVariable;
import org.springframework.web.bind.annotation.RequestMapping;
import org.springframework.web.bind.annotation.RequestMethod;
import org.springframework.web.bind.annotation.RestController;

import com.osp.ethscan.entity.UserEntity;
import com.osp.ethscan.mapper.UserMapper;
import com.osp.ethscan.service.MailService;

import io.swagger.annotations.Api;
import io.swagger.annotations.ApiImplicitParam;
import io.swagger.annotations.ApiOperation;
import springfox.documentation.annotations.ApiIgnore;

@Api(description = "springboot学习测试相关接口")
@RestController
@RequestMapping(value = "/books")
public class UserController {

	@Autowired
	private UserMapper userMapper;

	@Autowired
	private MailService mailService;

	@ApiOperation(value = "获取用户列表", notes = "")
	@RequestMapping(value = "/getUsers", method = { RequestMethod.GET })
	public List<UserEntity> getUsers() {
		List<UserEntity> users = userMapper.getAll();
		mailService.sendSimpleMail("18753377530@163.com", "test simple mail", " hello this is simple mail");
		return users;
	}

	// 如果请求参数在url上,@ApiImplicitParam上加paramType = "path"
	@RequestMapping(value = "/{id}", method = { RequestMethod.GET })
	@ApiImplicitParam(name = "id", value = "用户ID", required = true, dataType = "Long", paramType = "path")
	@ApiOperation(value = "获取用户信息", notes = "根据url的id来获取用户信息")
	public UserEntity getUser(@PathVariable Long id) {
		UserEntity user = userMapper.getOne(id);
		return user;
	}

	@RequestMapping("/add")
	public void save(UserEntity user) {
		userMapper.insert(user);
	}

	@ApiIgnore // 使用该注解忽略这个API
	@RequestMapping(value = "update")
	public void update(UserEntity user) {
		userMapper.update(user);
	}

	@ApiIgnore // 使用该注解忽略这个API
	@RequestMapping(value = "/delete/{id}")
	public void delete(@PathVariable("id") Long id) {
		userMapper.delete(id);
	}

}