前提
1.安装docker服务
参考:https://blog.csdn.net/weixin_36522099/article/details/108861134
老名字:docker、docker-engine【yum install docker】【yum install docker-engine】
新名字:docker-ce(开源)、docker-ee(闭源)
# 安装docker环境依赖
[root@server ~]# yum install -y yum-utils device-mapper-persistent-data lvm2

# 配置国内docker的yum源,这里使用aliyun的
官方源:https://download.docker.com/linux/centos/docker-ce.repo
阿里源:http://mirrors.aliyun.com/docker-ce/linux/centos/docker-ce.repo
清华源:https://mirrors.tuna.tsinghua.edu.cn/docker-ce/linux/centos/docker-ce.repo

# 安装docker
[root@server ~]# yum install docker-ce docker-ce-cli containerd.io -y

# 启动并开机自启
[root@server ~]# systemctl start docker && systemctl enable docker
[root@vm10-20-9-57 Python-3.9.1]# docker version
Client: Docker Engine - Community
 Version:           20.10.2
 API version:       1.41
 Go version:        go1.13.15
 Git commit:        2291f61
 Built:             Mon Dec 28 16:17:48 2020
 OS/Arch:           linux/amd64
 Context:           default
 Experimental:      true

Server: Docker Engine - Community
 Engine:
  Version:          20.10.2
  API version:      1.41 (minimum version 1.12)
  Go version:       go1.13.15
  Git commit:       8891c58
  Built:            Mon Dec 28 16:16:13 2020
  OS/Arch:          linux/amd64
  Experimental:     false
 containerd:
  Version:          1.4.3
  GitCommit:        269548fa27e0089a8b8278fc4fc781d7f65a939b
 runc:
  Version:          1.0.0-rc92
  GitCommit:        ff819c7e9184c13b7c2607fe6c30ae19403a7aff
 docker-init:
  Version:          0.19.0
  GitCommit:        de40ad0
2.安装python3
https://www.cnblogs.com/zhangmingda/p/11561779.html
创建Harbor私有仓库
Harbor项目是由VMWare公司开源的企业级的Docker Registry管理项目,它包括权限管理、LDAP、日志审核、管理界面、自我注册、镜像复制、支持中文等功能。
docker-compose项目是Docker官方的开源项目,负责实现对Docker容器集群的快速编排。配置文件为docker-compose.yml,docker-compose运行目录下必须要有一个配置文件。可以管理多个docker容器实例。
官网地址:https://github.com/goharbor/harbor
1. 下载安装包
# 1. 安装docker服务【前提中所述】
[root@vm10-20-9-57 Python-3.9.1]# python -V
Python 3.9.1
[root@vm10-20-9-57 Python-3.9.1]# docker --version
Docker version 20.10.2, build 2291f61

# 2. 安装docker-compose
yum install epel-release -y
yum install python-pip -y
pip install --upgrade pip
[root@vm10-20-9-57 Python-3.9.1]# pip --version
pip 20.3.3 from /usr/local/python3/lib/python3.9/site-packages/pip (python 3.9)
[root@vm10-20-9-57 Python-3.9.1]# pip install -U -i https://pypi.tuna.tsinghua.edu.cn/simple docker-compose
[root@vm10-20-9-57 Python-3.9.1]# docker-compose -version
/usr/lib/python2.7/site-packages/paramiko/transport.py:33: CryptographyDeprecationWarning: Python 2 is no longer supported by the Python core team. Support for it is now deprecated in cryptography, and will be removed in the next release.
  from cryptography.hazmat.backends import default_backend
docker-compose version 1.26.2, build unknown
# 3. 下载harbor私有仓库
wget 'https://hub.fastgit.org/goharbor/harbor/releases/download/v2.1.0/harbor-offline-installer-v2.1.0.tgz' -O harbor-offline-installer-v2.1.0.tgz
附:github加速地址
参考:https://blog.csdn.net/hajungong007/article/details/109790370
克隆加速
#原地址
git clone https://github.com/kubernetes/kubernetes.git

#改为
git clone https://github.com.cnpmjs.org/kubernetes/kubernetes.git

#或者
git clone https://hub.fastgit.org/kubernetes/kubernetes.git

#或者
git clone https://gitclone.com/github.com/kubernetes/kubernetes.git


release下载加速
#原地址
wget https://github.com/goharbor/harbor/releases/download/v2.0.2/harbor-offline-installer-v2.0.2.tgz

#改为
wget https://hub.fastgit.org/goharbor/harbor/releases/download/v2.0.2/harbor-offline-installer-v2.0.2.tgz

免替换方法

git config --global url."https://hub.fastgit.org".insteadOf https://github.com

#测试
git clone https://github.com/kubernetes/kubernetes.git
2. 配置安装harbor私有仓库
2.1 解压包 配置yml文件
[root@vm10-20-9-57 ~]# ls
harbor-offline-installer-v2.1.0.tgz  Python-3.9.1  Python-3.9.1.tgz
[root@vm10-20-9-57 ~]# tar xzf harbor-offline-installer-v2.1.0.tgz -C /opt
[root@vm10-20-9-57 harbor]# cd /opt/harbor/
[root@vm10-20-9-57 harbor]# ll
total 545268
-rw-r--r-- 1 root root      3361 Sep 16 10:48 common.sh
-rw-r--r-- 1 root root 558317240 Sep 16 10:49 harbor.v2.1.0.tar.gz
-rw-r--r-- 1 root root      8136 Sep 16 10:48 harbor.yml.tmpl
-rwxr-xr-x 1 root root      2523 Sep 16 10:48 install.sh
-rw-r--r-- 1 root root     11347 Sep 16 10:48 LICENSE
-rwxr-xr-x 1 root root      1881 Sep 16 10:48 prepare
# 复制一份harbor.yml文件,并进行配置
[root@vm10-20-9-57 harbor]# cp harbor.yml.tmpl harbor.yml
[root@vm10-20-9-57 harbor]# vim harbor.yml
  5 hostname: 10.20.9.57         # 访问地址
  8 http:
  9   # port for http, default is 80. If https enabled, this port will redirect to     https port
 10  port: 80
 11
 12 # https related config
 13 # https:       # 这里由于没有给nginx配置https协议安全传输,故直接使用http,要把https的相关信息注释掉
 14   # https port for harbor, default is 443
 15   # port: 443
 16   # The path of cert and key files for nginx
 17   # certificate: /your/certificate/path
 18   # private_key: /your/private/key/path
 34 harbor_admin_password: 123456      # harbor管理员登录UI界面的密码,这里修改为123456
 39   password: root123
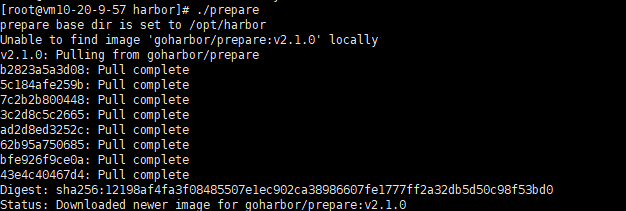
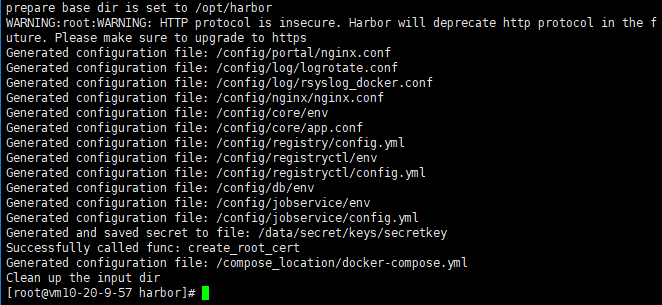
# harbor准备
[root@vm10-20-9-57 harbor]# ./prepare
2.2 解析yml配置文件
2.3 ./install.sh安装

至此,harbor私有仓库就算安装成功了。
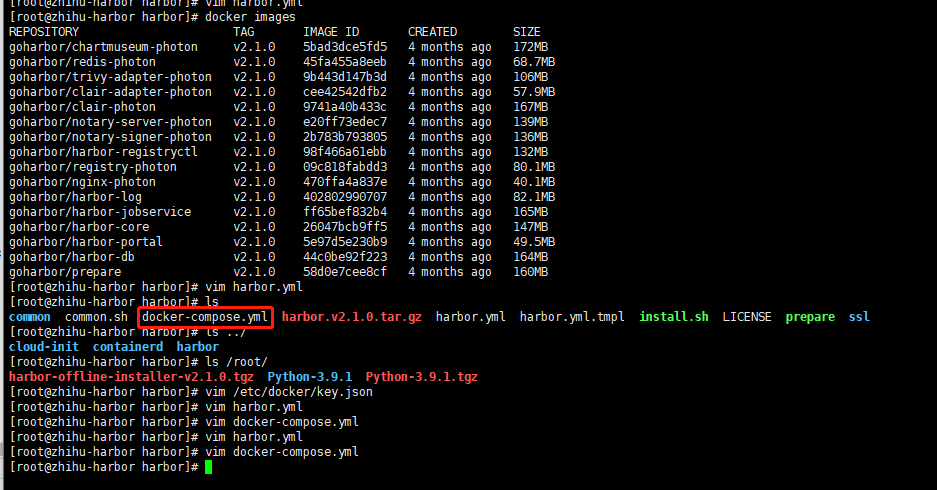
可以看到harbor依赖的镜像和运行的容器如下:

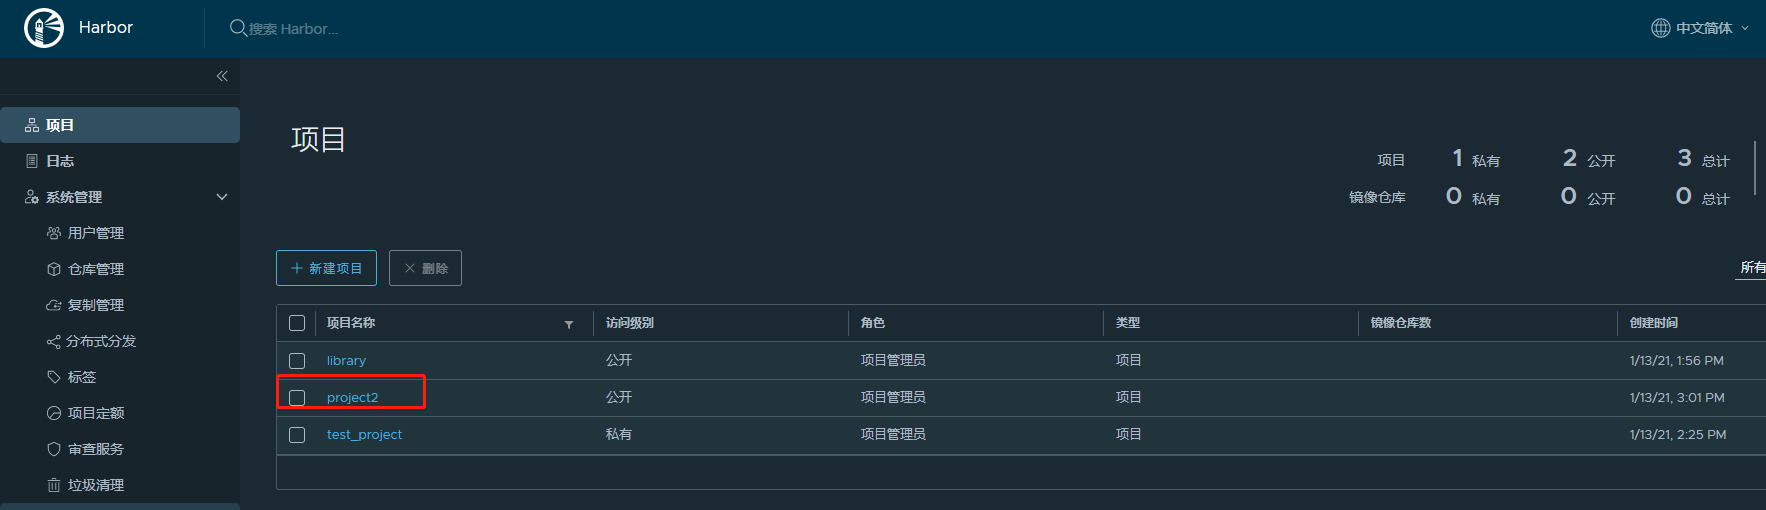
3. harbor后台管理登录
1.打开网址:http://IP地址/harbor/projects

2.创建项目:

3. docker 客户端配置使用仓库
1. 配置允许用http方式登录
192.168.43.76 为实际搭建harbor的服务器IP或者前端LB地址
#vim /etc/docker/daemon.json

{ "insecure-registries":["192.168.43.76"] }

# systemctl daemon-reload && systemctl restart docker

2. login 登录仓库
root@vm10-20-9-246:~# docker login 120.92.13.183
Authenticating with existing credentials...
WARNING! Your password will be stored unencrypted in /root/.docker/config.json.
Configure a credential helper to remove this warning. See
https://docs.docker.com/engine/reference/commandline/login/#credentials-store

Login Succeeded
root@vm10-20-9-246:~#
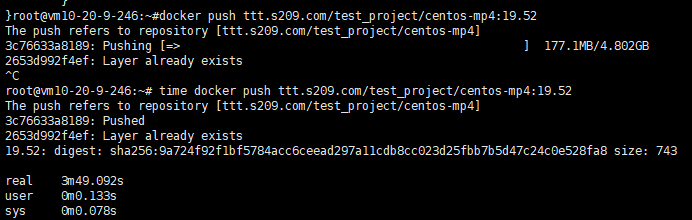
3. 构建镜像上传
root@vm10-20-9-246:~# docker ps
66fa11dac2fc        centos                                      "/bin/bash"              6 hours ago         Up 2 hours                              test-centos

root@vm10-20-9-246:~# docker commit test-centos 120.92.13.183/test_project/centos-mp4:14.47
sha256:de58721093e99876c8c96d3f4c84c1792c3f8dd52ce9b0216be15c3321709fcb
root@vm10-20-9-246:~#docker images
REPOSITORY                                  TAG                 IMAGE ID            CREATED             SIZE
120.92.13.183/test_project/centos-mp4       14.47               de58721093e9        2 hours ago         4.82GB

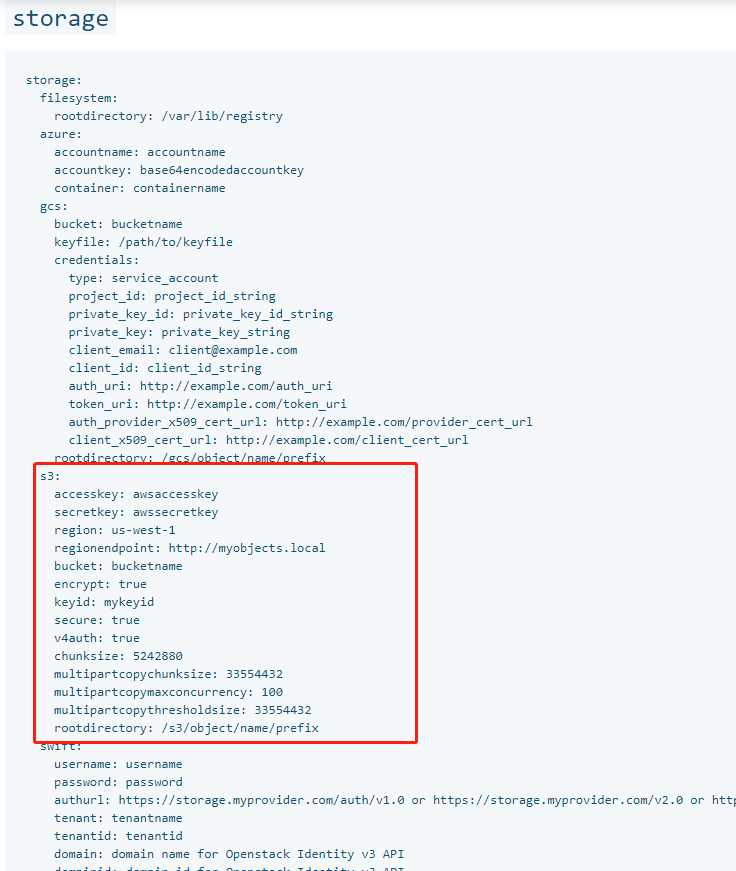
3. 使用对象存储作为存储
修改harbor.yml,注释data_volume: /data
参考:https://docs.docker.com/registry/configuration/
4. 使用自定义存储
修改 docker-compose.yml 里面的registry:
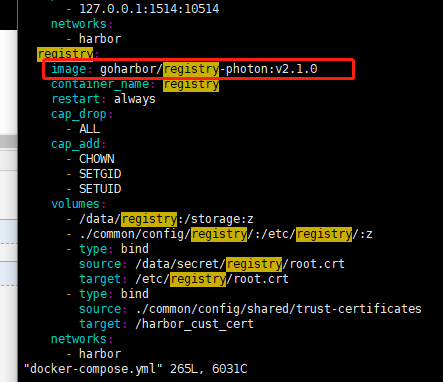 用自己封装的镜像