前面简单介绍了一下Tinker热修复,今天就来分享一下如何在Android中使用,希望对各位有帮助。
1:Tinker 接入指南
在项目的build.gradle中,添加tinker-patch-gradle-plugin的依赖
  dependencies {
        classpath 'com.android.tools.build:gradle:2.2.3'
        classpath ('com.tencent.tinker:tinker-patch-gradle-plugin:1.9.1')
        // NOTE: Do not place your application dependencies here; they belong
        // in the individual module build.gradle files
    }
然后在app的gradle文件app/build.gradle,我们需要添加tinker的库依赖以及apply tinker的gradle插件.
dependencies {
    //可选,用于生成application类
    provided('com.tencent.tinker:tinker-android-anno:1.9.1')
    //tinker的核心库
    compile('com.tencent.tinker:tinker-android-lib:1.9.1')
}
...
//apply tinker插件
apply plugin: 'com.tencent.tinker.patch'
 <uses-permission android:name="android.permission.WRITE_EXTERNAL_STORAGE"/>
 <uses-permission android:name="android.permission.READ_EXTERNAL_STORAGE"/>
可以参考官方配置或者我的Demo中两个gradle文件的配置
2:API主要就是初始化和loadPacth
初始化Application
@SuppressWarnings("unused")
@DefaultLifeCycle(application = "tinker.sample.android.app.SampleApplication",
                  flags = ShareConstants.TINKER_ENABLE_ALL,
                  loadVerifyFlag = false)
public class SampleApplicationLike extends DefaultApplicationLike {
    private static final String TAG = "Tinker.SampleApplicationLike";

    public SampleApplicationLike(Application application, int tinkerFlags, boolean tinkerLoadVerifyFlag,
                                 long applicationStartElapsedTime, long applicationStartMillisTime, Intent tinkerResultIntent,
                                 Resources[] resources, ClassLoader[] classLoader, AssetManager[] assetManager) {
        super(application, tinkerFlags, tinkerLoadVerifyFlag, applicationStartElapsedTime, applicationStartMillisTime, tinkerResultIntent, resources, classLoader, assetManager);
    }

    /**
     * install multiDex before install tinker
     * so we don't need to put the tinker lib classes in the main dex
     *
     * @param base
     */
    @TargetApi(Build.VERSION_CODES.ICE_CREAM_SANDWICH)
    @Override
    public void onBaseContextAttached(Context base) {
        super.onBaseContextAttached(base);
        //you must install multiDex whatever tinker is installed!
        MultiDex.install(base);

        SampleApplicationContext.application = getApplication();
        SampleApplicationContext.context = getApplication();
        TinkerManager.setTinkerApplicationLike(this);
        TinkerManager.initFastCrashProtect();
        //should set before tinker is installed
        TinkerManager.setUpgradeRetryEnable(true);

        //optional set logIml, or you can use default debug log
        TinkerInstaller.setLogIml(new MyLogImp());

        //installTinker after load multiDex
        //or you can put com.tencent.tinker.** to main dex
        TinkerManager.installTinker(this);
    }

    @TargetApi(Build.VERSION_CODES.ICE_CREAM_SANDWICH)
    public void registerActivityLifecycleCallbacks(Application.ActivityLifecycleCallbacks callback) {
        getApplication().registerActivityLifecycleCallbacks(callback);
    }

}
  <application
        android:name=".app.SampleApplication"
        android:icon="@mipmap/ic_launcher"
        android:label="@string/app_name"
        android:theme="@style/AppTheme">
第一个是验证补丁是否修复成功,第二个按钮是补丁修复操作
  textView.setOnClickListener(new View.OnClickListener() {
            @Override
            public void onClick(View v) {
                //以此来验证是否修复
                Toast.makeText(MainActivity.this,"未修复",Toast.LENGTH_SHORT).show();
            }
        });
  loadPatchButton.setOnClickListener(new View.OnClickListener() {
            @Override
            public void onClick(View v) {
                TinkerInstaller.onReceiveUpgradePatch(getApplicationContext(),
                        Environment.getExternalStorageDirectory().getAbsolutePath() + "/patch_signed_7zip.apk");
            }
3:编译运行apk
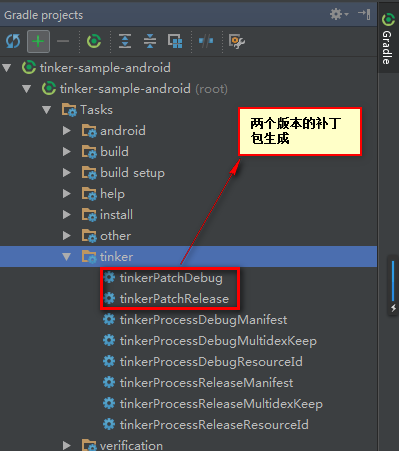
as工具右边点击 Gradle --->点击展开目录,如图:

点击assembleDebug生成apk ,如下图: (如果出错 则需要关闭Instant Run )

4:效果图
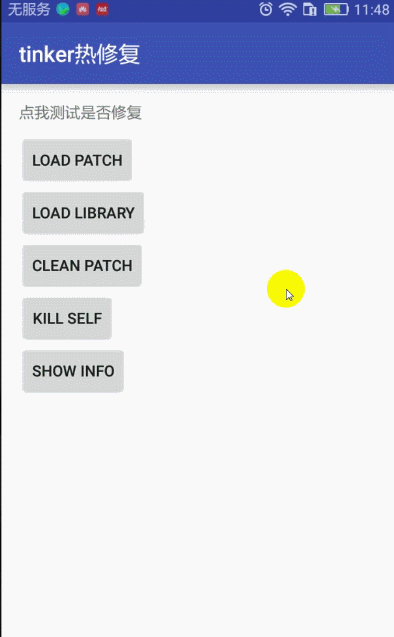
点击文字测试显示 未修复 消息
点击按钮Load Patch 出现 文件不存在,那是因为补丁文件还没有打包生成,
5:热修复补丁文件生成
先修改我们程序上面要修改的错误,我的只是测试很简单
 textView.setOnClickListener(new View.OnClickListener() {
            @Override
            public void onClick(View v) {
                //以此来验证是否修复
                Toast.makeText(MainActivity.this,"已修复",Toast.LENGTH_SHORT).show();
            }
        });
在app下面的bulid.gradle文件中改成对应日期需要修复的apk名称
    tinkerOldApkPath = "${bakPath}/app-debug-0302-17-14-53.apk"
    //proguard mapping file to build patch apk
    tinkerApplyMappingPath = "${bakPath}/app-debug-0302-17-14-53-mapping.txt"
    //resource R.txt to build patch apk, must input if there is resource changed
    tinkerApplyResourcePath = "${bakPath}/app-debug-0302-17-14-53-R.txt"

    //only use for build all flavor, if not, just ignore this field
    tinkerBuildFlavorDirectory = "${bakPath}/app-debug-0302-17-14-53-R.txt"
oldApk = "${bakPath}/app-debug-0302-17-14-53.apk"
改好之后我们就可以生成修复补丁包了,点击tinkerPatchDebug 生成,如图:
生成补丁包,如图:
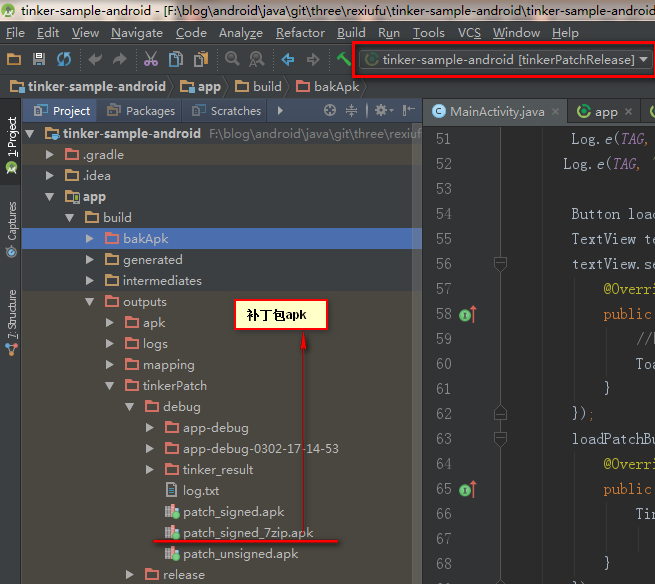
补丁包生成成功
6:为什么要使用热修复,补丁文件apk的使用
原因:比如你们公司上线一个app,用户反应有重大bug,需要紧急修复。如果按照通
常做法,那就是程序猿加班搞定bug,然后测试,重新打包并发布。这样带来的问题就是成本高,效率低。于是,热
修复就应运而生.一般通过事先设定的接口从网上下载无Bug的代码来替换有Bug的代码。这样就省事多了,用
户体验也好。
这里我们通过adb命令来上传到手机本地内存目录下,然后修复错误,
adb命令相关请看博客: http://www.cnblogs.com/zhangqie/p/8505252.html
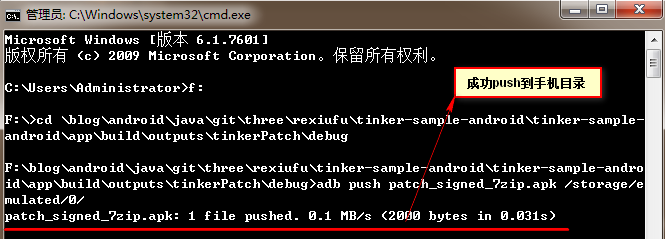
到手机内部存储去看看有没有 patch_signed_7zip.apk 文件(此文件一般很小,根据你修改的bug来计) 如图:
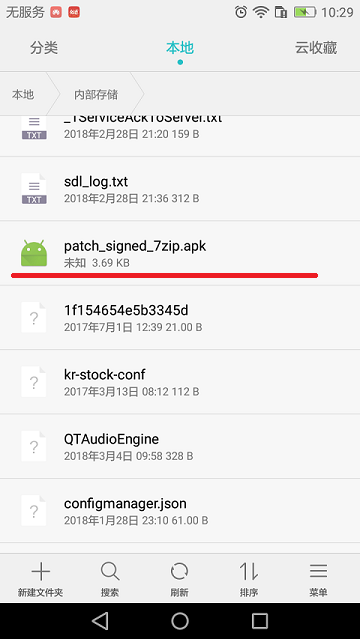
成功了
7:修复补丁,查看app修复后的效果
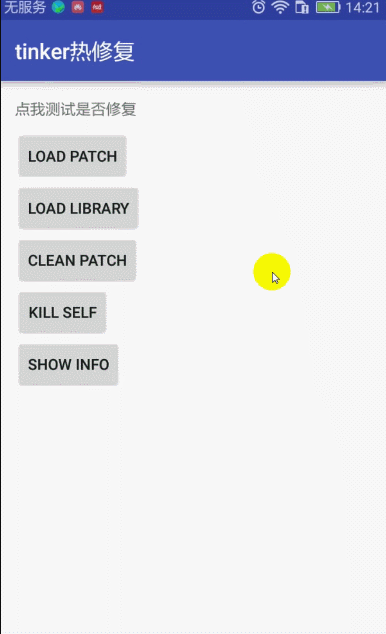
点击按钮Load Patch 显示修复完成消息,点击文字依然是没有效果的,
得结束应用,重启才会有效果。
8:项目中使用
一般正式的项目不会这样去需要用户点击某个按钮来加载修复包(patch apk),而是用户一开始进入我们app的时候,第一个界面就应该去服务器访问(一般一个App中都会有一个接口,用来获取服务器给客户端的全局配置)。
假设服务器返回有更新的包,应该就应该弹框去下载patch包,这个时候用户是什么都做不了的,最好加个进度条,当下载完成后,然后合并patch包,最后在跳到主界面。
最好使用HTTPS保证数据的安全,当我们访问服务器是否有修复包的时候,如果有,服务器应该返回修复包patch的下载地址和文件的MD5值,
然后客户端下载完成后对文件进行MD5,然后和服务器的返回的MD5值进行对比看是否一致,因为文件可能被篡改,安全问题,对MD5加密的值和后台人员商议,一致即可。
9:Tinker原理

由图可以看出:
tinker将old.apk和new.apk做了diff,拿到patch.dex,然后将patch.dex与本机中apk的classes.dex做了合并,
生成新的classes.dex,运行时通过反射将合并后的dex文件放置在加载的dexElements数组的前面。
结语:
我的Demo中 debug版和 release版 (需要配置签名)我都测试成功了,可以下载参考
Github:https://github.com/DickyQie/android-tinker
Tinker官网源码和案例:https://github.com/Tencent/tinker
Tinker相关信息: https://github.com/Tencent/tinker/wiki/Tinker