一、安装nginx
我们这边默认安装的nginx的是1.12.2的版本,所以我们需要安装1.16.1版本的nginx的,才好,所以我们这边先更新yum源,步骤如下:
1、添加yum源:
[root@shtw-nk08 sbin]# cd /etc/yum.repos.d/
[root@shtw-nk08 sbin]# vim nginx.repo
[nginx-stable]
name=nginx stable repo
baseurl=http://nginx.org/packages/centos/$releasever/$basearch/
gpgcheck=1
enabled=1
gpgkey=https://nginx.org/keys/nginx_signing.key
[nginx-mainline]
name=nginx mainline repo
baseurl=http://nginx.org/packages/mainline/centos/$releasever/$basearch/
gpgcheck=1
enabled=0
gpgkey=https://nginx.org/keys/nginx_signing.key
2、yum安装nginx
[root@shtw-nk08 nginx]#yum install nginx
3、查看nginx的版本
[root@shtw-nk08 yum.repos.d]# nginx -v
nginx version: nginx/1.16.1
4、nginx.conf的配置
user nginx;
worker_processes 8;
error_log /var/log/nginx/error.log;
pid /run/nginx.pid;

# Load dynamic modules. See /usr/share/nginx/README.dynamic.
include /usr/share/nginx/modules/*.conf;

events {
    worker_connections 40960;
}

http {
    log_format  main  '$remote_addr - $remote_user [$time_local] "$request" '
                      '$status $body_bytes_sent "$http_referer" '
                      '"$http_user_agent" "$http_x_forwarded_for"';

    access_log  /var/log/nginx/access.log  main;

    sendfile            on;
    tcp_nopush          on;
    tcp_nodelay         on;
    keepalive_timeout   65;
    types_hash_max_size 2048;

    #限制包上传大小
    client_header_timeout 120s;        #调大点
    client_body_timeout 120s;          #调大点
    client_max_body_size 100m;         #主要是这个参数,限制了上传文件大大小
    client_body_buffer_size 256k;

    #gzip压缩
    gzip  on;
    gzip_min_length  1k;
    gzip_buffers     4 16k;
    gzip_http_version 1.1;
    gzip_comp_level 9;
    gzip_types       text/plain application/x-javascript text/css application/xml text/javascript application/x-httpd-php;
    gzip_vary on;

    #proxy_buffering off;

    include             /etc/nginx/mime.types;
    default_type        application/octet-stream;

    # Load modular configuration files from the /etc/nginx/conf.d directory.
    # See http://nginx.org/en/docs/ngx_core_module.html#include
    # for more information.
    #include /etc/nginx/conf.d/*.conf;

    include server/*.conf;


}
5、imgs.conf静态文档访问配置
server {

      listen 8083;

      location / {

         #autoindex on;  #autoindex => on 允许访问,off不允许访问
         autoindex off;
         root /data/;

      }


      location ^/imgs/~*.(log|txt|png)$ {
                add_header Content-Type text/plain;
                root /data/;
        }

}
6、正常服务conf
server {
        listen       80;
        listen       443 ssl;
        server_name  download.twrsp.com;

        #charset koi8-r;
        #access_log  logs/host.access.log  main;
        #ssl on;  #ssl on只允许443端口,注释之后,80和443端口都允许
        ssl_certificate /etc/nginx/ssl_download_certificate/3468751_download.twrsp.com.pem;
        ssl_certificate_key /etc/nginx/ssl_download_certificate/3468751_download.twrsp.com.key;

        location / {
           proxy_read_timeout 1200;
           proxy_send_timeout 1200;
           proxy_connect_timeout 1200;
           proxy_set_header  X-Real-IP  $remote_addr;
           proxy_set_header  X-Forwarded-For $proxy_add_x_forwarded_for;
           proxy_set_header Host $http_host;
           proxy_redirect off;
           proxy_pass http://download.twrsp.com/;
         }
     }

upstream download.twrsp.com {
	#SHTW-RspApp01
	server 10.55.201.20:8082 weight=50;
}
7、重启、关闭、测试nginx
[root@shtw-nk08 nginx]# nginx  -s  reload  #重启nginx
[root@shtw-nk08 nginx]# nginx  -s  stop  #停止nginx
[root@shtw-nk08 nginx]# nginx  -t  #测试
nginx: the configuration file /etc/nginx/nginx.conf syntax is ok
nginx: configuration file /etc/nginx/nginx.conf test is successful
8、如果nginx -s reload报错了,则执行下面脚本:
[root@shtw-nk08 nginx]# nginx -c /etc/nginx/nginx.conf
二、安装keepalived
1、IP的准备
| 主(nginx) | 10.55.202.213 |
| 从(nginx) | 10.55.202.214 |
| 虚拟ip(主) | 10.55.202.107 |
| 虚拟ip(从) | 10.55.202.108 |
2、安装keepalived
说明:主备都需要安装:
[root@shtw-nk08 keepalived]# yum install keepalived
3、配置文件修改
主nginx的keepalived修改:
[root@shtw-nk08 keepalived]# cd /etc/keepalived/
[root@shtw-nk08 keepalived]# mv keepalived.conf  keepalived.conf.bak
[root@shtw-nk08 keepalived]# vim keepalived.conf
! Configuration File for keepalived

group {

    VI_1

}

vrrp_script chk_http_port {
    script "/usr/local/sbin/check_ng.sh"
    interval 2
    weight -20
}

vrrp_instance VI_1 {
    state MASTER      #表示主的nginx
    interface eth0
    virtual_router_id 51
    priority 100
    advert_int 1
    mcast_src_ip 10.55.202.213    #主nginx的ip地址
    authentication {
        auth_type PASS
        auth_pass 1111
    }
    track_script {
       chk_http_port
    }
    virtual_ipaddress {
        10.55.202.107    #主的虚拟ip
    }
}
#单台虚拟ip可以不用
vrrp_instance VI_2 {
    state BACKUP    #备份的意思
    interface eth0
    virtual_router_id 61
    priority 99
    advert_int 1
    mcast_src_ip 10.55.202.213   #还是主的ip地址
    authentication {
        auth_type PASS
        auth_pass 1111
    }
    track_script {
       chk_http_port
    }
    virtual_ipaddress {
        10.55.202.108    #备份的虚拟ip地址
    }
}
从的nginx的keepalived的配置:
[root@shtw-nk08 keepalived]# cd /etc/keepalived/
[root@shtw-nk08 keepalived]# mv keepalived.conf  keepalived.conf.bak
[root@shtw-nk08 keepalived]# vim keepalived.conf
! Configuration File for keepalived

group {

    VI_1

}

vrrp_script chk_http_port {
    script "/usr/local/sbin/check_ng.sh"
    interval 2
    weight -20
}

vrrp_instance VI_1 {
    state BACKUP   #表示从的nginx
    interface eth0
    virtual_router_id 51
    priority 99
    advert_int 1
    mcast_src_ip 10.55.202.214  #从的ip地址
    authentication {
        auth_type PASS
        auth_pass 1111
    }
    track_script {
       chk_http_port
    }
    virtual_ipaddress {
        10.55.202.107
    }
}

#单台虚拟ip可以不用
vrrp_instance VI_2 {
    state MASTER    #表示从的
    interface eth0
    virtual_router_id 61
    priority 100
    advert_int 1
    mcast_src_ip 10.55.202.214   #从的ip地址
    authentication {
        auth_type PASS
        auth_pass 1111
    }
    track_script {
       chk_http_port
    }
    virtual_ipaddress {
        10.55.202.108    #从的虚拟ip地址
    }
}
4、配置keepalived双活脚本
说明:这个脚本主从两台机器都需要配置,配置好之后,保存(wq)并退出
[root@shtw-nk05 sbin]# cd /usr/local/sbin
[root@shtw-nk05 sbin]# vim check_ng.sh
#!/bin/bash
#时间变量,用于记录日志
d=`date --date today +%Y%m%d_%H:%M:%S`
#计算nginx进程数量
n=`ps -C nginx --no-heading|wc -l`
#如果进程为0,则启动nginx,并且再次检测nginx进程数量,
#如果还为0,说明nginx无法启动,此时需要关闭keepalived
if [ $n -eq "0" ]; then
        /etc/init.d/nginx start
        n2=`ps -C nginx --no-heading|wc -l`
        if [ $n2 -eq "0"  ]; then
                echo "$d nginx down,keepalived will stop" >> /var/log/check_ng.log
                systemctl stop keepalived
        fi
fi
[root@shtw-nk05 sbin]# chmod 755 check_ng.sh  #赋权限
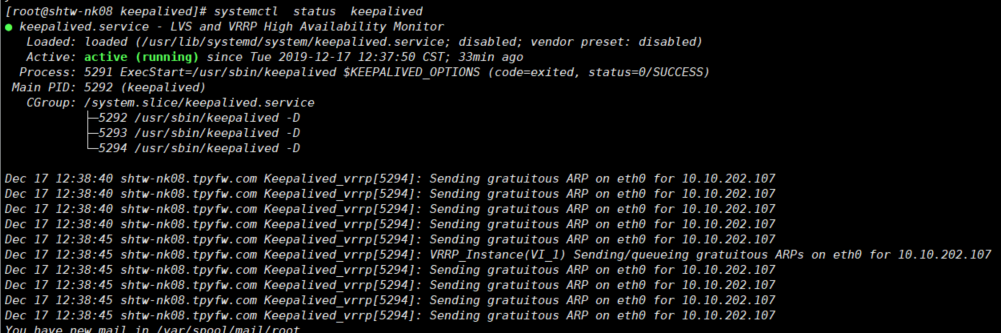
5、启动keepalived
[root@shtw-nk08 keepalived]# systemctl  start  keepalived  #启动keepalived

[root@shtw-nk08 keepalived]# systemctl  status  keepalived  #查看keepalived状态
如图:
6、启动验证
nginx和keepalived全部启动之后,在浏览器中测试一下:
1、先输入 10.55.202.213 => 访问成功
2、输入 10.55.202.214 => 访问成功
3、输入 10.55.202.107 和 10.55.202.108 =>访问成功
4、关停 10.55.202.213 之后测试 => 访问失败 ,输入10.55.202.107 => 访问成功