滑动日历效果
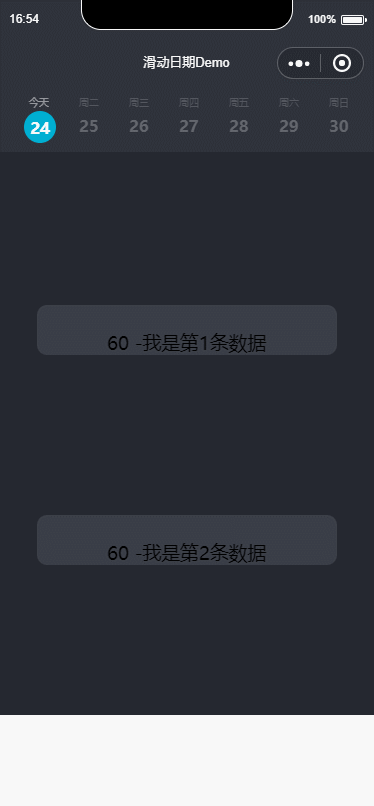
效果预览
实现要求:顶部固定悬浮的是获取未来一周的日期,分为上下两部分,上面部分显示星期,下面则显示具体日期。今天则显示今天,可点击头部具体日期,可向左向右滑动。
实现代码
顶部日历

页面部分的代码
       <view wx:for="{{dayList}}" wx:for-index="index" class="tab-item {{currentSwiper==index ?'active':'noactive'}}" wx:key="index" bindtap='changeTab' data-current="{{index}}">
          <view class="TimeOrderBox scroll-view-item bc_red {{id == index ? 'coloBack':''}}" id="{{index}}" data-selectTime="{{item.month}}/{{item.day}}" data-week="{{item.week}}">
            <view class="TimesWD">
              <text class="TimeOrderText" wx:if="{{NowDay==item.day}}">今天</text>
              <text class="TimeOrderText" wx:else>周{{item.week}}</text>
              <view class="TimeOrderDay">
                <text class="TimeOrderTextDay">{{item.day}}</text>
              </view>
            </view>
          </view>
        </view>
      </view>
这里我们用View标签 包裹起来,然后剩下的就是我们组装日期数据。我们来看js部分
 weekDate: function () {
    //获取周数据
    var myDate = new Date();// hehe
    myDate.toLocaleDateString();
    var month = myDate.getMonth() + 1;
    var time = myDate.getFullYear() + '年' + month + '月' + myDate.getDate() + '日';

    var total = 1;// 个数
    var dayList = [];
    dayList.push({
      'day': myDate.getDate(),
      'month': myDate.getMonth() + total,
      'week': toWeekDay(myDate.getDay()),
      'year': myDate.getFullYear()
    });
    for (var i = 0; i < 6; i++) {
      myDate.setDate(myDate.getDate() + total); // number 是最近几天  则会自动计算
      // 需求  月份-日   星期几
      dayList.push({
        'day': myDate.getDate(),
        'month': myDate.getMonth() + total,
        'week': toWeekDay(myDate.getDay()),
        'year': myDate.getFullYear()
      });
    }
    return dayList;
  }
function toWeekDay(weekDay) {// 传入数据  讲一周的某一天返回成中文状态下的字符
    switch (weekDay) {
        case 1: return '一'; break;
        case 2: return '二'; break;
        case 3: return '三'; break;
        case 4: return '四'; break;
        case 5: return '五'; break;
        case 6: return '六'; break;
        case 0: return '日'; break;
        default: break;
    }
    return '传入未知参数';
}
我们将一周的数据都封装进dayList中,然后返回。我们看下dayList返回了什么?
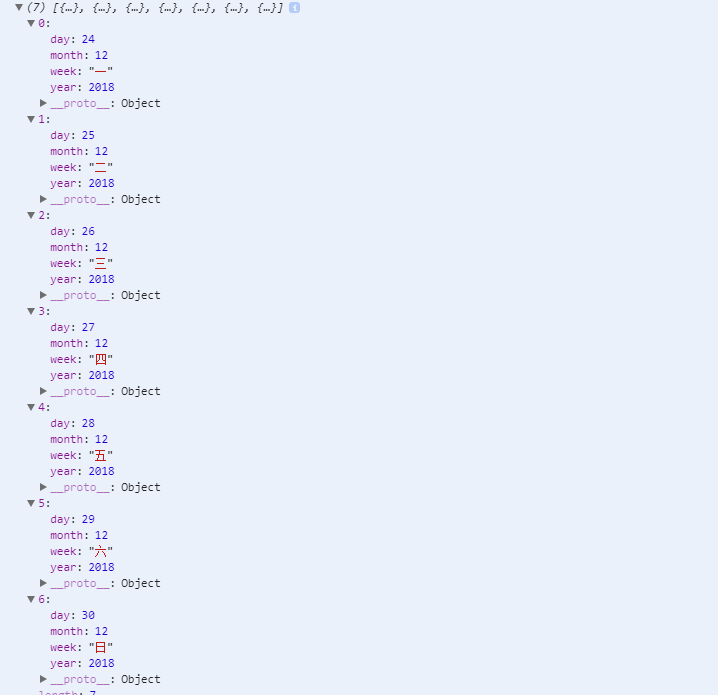
我们可以看到,通过上面js方法,我们得到了7条数据,分别有年、月、日以及星期几的数据。接下来我们看看css如何布局:
/* 循环周天样式 Start */
.tab-item{
  float: left;
  margin-left:20rpx;
  box-sizing: border-box;
  /* background-color: #2E323B;
  margin-top: -7rpx; */
  position: relative;
  /* padding-top: 20rpx; */
  top:8rpx;
}

.pageTop{
  /* 100%; */
  height: 140rpx;
  background-color: #2E323B;
  padding-left: 40rpx;
  margin-top: -5rpx;
  position: fixed;
  top: 0;
  z-index: 99999;
  width: 100%;
}
.TimeOrder{width:1036rpx;height:106rpx;border-top:1px solid #eee;border-bottom:1px solid #eee;overflow-x: auto;}
/* .TimeOrderBox{148rpx;height:106rpx;border-right:1px solid #eee;text-align: center;line-height: 106rpx;} */

.coloBack{color:#003a70;border-bottom:2px solid #003a70}
.scroll-header{
display: flex;
white-space: nowrap;
background:#fff;

}
.scroll-header .TimeOrderBox{
height:120rpx;
width:100rpx;
/* border:1px solid #eee; */
display: inline-block;
/* font-size: 50rpx; */
/* background:#fff; */
}
.TimeOrderText{
left: 50rpx;
top: 170rpx;
width: 20rpx;
height: 12rpx;
line-height: 24rpx;
opacity: 0.5;
color: #787B81;
font-size: 10px;
text-align: center;
font-weight:400;
font-family: PingFangSC-Regular;
font-size: 20rpx;
/* margin-left: 10rpx; */
}

.TimeOrderTextDay{
  width:100%;
  height:60rpx;
  display: block;
  /* opacity: 0.5; */
  line-height: 60rpx;
  flex-direction: column;
  margin-right: 0rpx;
  color: #96989D;
  font-size: 32rpx;
  text-align: left;
  font-family: CenturyGothic-Bold;
  font-weight:bold;
}


.TimeOrderBox{
  width:100%;
  height:137rpx;
}
.TimeOrderBoxCon{
  width:100%;
  height:127rpx;
  border-bottom: 1rpx solid #000;
}
.TimeDayBox{
  width:100%;
  height:auto;
}
.TimeDayBoxCon{}
.whatTime{width:175rpx;height:105rpx;font-size:26rpx;text-align: center;line-height: 105rpx;background:#fff;border-radius: 10rpx;margin-right:10rpx;margin-bottom:10rpx;color:#000;}
.whatTime1{width:175rpx;height:105rpx;font-size:26rpx;text-align: center;line-height: 105rpx;background:#003a70 !important;border-radius: 10rpx;margin-right:10rpx;margin-bottom:10rpx;color:#fff;}
.whatTime2{width:175rpx;height:105rpx;font-size:26rpx;text-align: center;line-height: 105rpx;background:#fdfdfd;border-radius: 10rpx;margin-right:10rpx;margin-bottom:10rpx;color:#dbdbdb;}
/* 选中时缩小字体 */
.narrowFontSize{
   font-size: 22rpx;
}
.selectTimeLeft{padding-left:12rpx;}
.SelectTimeBtn{width:100%;height:98rpx;line-height: 98rpx;text-align: center;color:#fff;position: fixed;bottom:0;background:#003a70;}
.SelectTimeBtnBox{width:100%;height:98rpx;background:#fff;}
.nowTime{
   background-color: #e4e4e4 ;
}
.TimesWD{
  width:80rpx;

}
.active .TimeOrderDay{
  margin-left:-10rpx;
  /* top: 250rpx; */
  width: 56rpx;
  height: 56rpx;
  background-color: #00AFD2;
  border-radius: 50%;
  padding: 5rpx;
  font-size:32rpx;
  font-family:CenturyGothic-Bold;
  font-weight:bold;
  color:#FFF;
  line-height:36rpx;
  text-align: center;
  /* margin-top:2rpx; */
}
.active   .TimeOrderTextDay{
  color:#fff;
  text-align: center;
  /* margin-left: 2rpx; */
}
.active  .TimeOrderText{
  color: rgba(255,255,255,1);
  font-family: CenturyGothic-Bold;
  text-align: center;
  font-size: 20rpx;


}
.noactive .TimeOrderTextDay{
  opacity: 0.5;
  /* margin-left:0rpx; */
}
swiper {
   position: absolute;
   height: 100%;
   width: 100%;
}
scroll-view{
  height: 100%;
  overflow: scroll;
  background-color:#252830;
}
swiper-item{
  overflow: scroll;
}


/*循环周天样式  End*/
我们需要实现滑动效果,可以使用swiper组件。关于swiper的参数和用法,感兴趣的可以查下,我们快速讲下实现。
因为我们需要一些滑动展示不同的数据,这里我们mock一些 json数据仿照通过api返回过来的数据来解析:


{
  "isSuccess": true,
    "errorCode": 0,
      "errorMsg": null,
        "result": {
    "courseSeries": [
      {
        "date": "2018-12-24T00:00:00",
        "trainings": [
          {
            "id": 0,
            "duration": 90,

          },
          {
            "id": 0,
            "startTime": "2018-12-24T15:00:00",
            "duration": 60,
            "total": 0,
            "bookedNumber": 0
          },
          {
            "id": 0,
            "startTime": "2018-12-24T16:00:00",
            "duration": 60,
            "total": 0,
            "bookedNumber": 0
          }
        ]
      },
      {
        "date": "2018-12-25T00:00:00",
        "trainings": [
          {
            "id": 0,
            "startTime": "2018-12-25T08:00:00",
            "duration": 120,
            "total": 0,
            "bookedNumber": 0
          },
          {
            "id": 0,
            "startTime": "2018-12-25T08:00:00",
            "duration": 90,
            "total": 0,
            "bookedNumber": 0
          },
          {
            "id": 0,
            "startTime": "2018-12-25T10:00:00",
            "duration": 90,
            "total": 0,
            "bookedNumber": 0
          },
          {
            "id": 0,
            "startTime": "2018-12-25T12:00:00",
            "duration": 120,
            "total": 0,
            "bookedNumber": 0
          },
          {
            "id": 0,
            "startTime": "2018-12-25T16:00:00",
            "duration": 120,
            "total": 0,
            "bookedNumber": 0
          }
        ]
      },
      {
        "date": "2018-12-26T00:00:00",
        "trainings": [
          {
            "id": 0,
            "startTime": "2018-12-26T08:00:00",
            "duration": 120,
            "total": 0,
            "bookedNumber": 0
          },
          {
            "id": 0,
            "startTime": "2018-12-26T10:00:00",
            "duration": 120,
            "total": 0,
            "bookedNumber": 0
          },
          {
            "id": 0,
            "startTime": "2018-12-26T14:00:00",
            "duration": 120,
            "total": 0,
            "bookedNumber": 0
          },
          {
            "id": 0,
            "startTime": "2018-12-26T16:00:00",
            "duration": 120,
            "total": 0,
            "bookedNumber": 0
          }
        ]
      },
      {
        "date": "2018-12-27T00:00:00",
        "trainings": []

      },
      {
        "date": "2018-12-28T00:00:00",
        "trainings": []

      },
      {
        "date": "2018-12-29T00:00:00",
        "trainings": []

      },
      {
        "date": "2018-12-30T00:00:00",
        "trainings": []
      }
    ]
  }
然后我们js中直接获取该Json数据。并解析成七条数据,因为我们显示的是一周数据
  onLoad: function () {
    let that=this;
    allList = [];
    that.filterday(mock.listData()["result"]["courseSeries"], that);
  },
 filterday: (res, options) => {
    let that = options;
    _.forEach(res, function (value) {
      that.coursesData(value, options);
    });
  },
  coursesData: (options, pargam) => {
    let that = pargam;
    if (options.trainings.length > 0) {
      let list = [];
      _.forEach(options.trainings, function (item, key) {
        list.push(item);
      });
      allList.push(list);
    } else {
      var objectData = {};
      allList = _.concat(allList, objectData);
    }
    let NowDay = new Date();
    console.log(that.weekDate());
    that.setData({
      dayList: that.weekDate(),
      dataShow: allList,
      NowDay: NowDay.getDate(),
    });
  },
其他需要注意的是滑动的时候有个滑动事件:switchSwiper,需要实现
 switchSwiper: function (e) {
    this.setData({
      currentSwiper: e.detail.current
    });
  },
另外,我们需要点击,所以此处也有点击周数据的时候 点击事件:
changeTab: function (e) {
    console.log(e);
    this.setData({
      currentTab: e.currentTarget.dataset.current
    });
  },
最后我们的页面部分代码是:
  <swiper circular="circular"  bindchange="switchSwiper" current="{{currentTab}}" indicator-dots="{{indicatorDots}}" autoplay="{{autoplay}}" interval="{{interval}}" duration="{{duration}}">
    <block wx:for="{{dataShow}}" wx:key="index">
      <swiper-item>
       <view wx:if="{{dataShow[index].length>0}}">
         <view wx:for="{{dataShow[index]}}" wx:for-item="key" wx:key="index">
           <scroll-view scroll-y="{{true}}">
            <view class="contentBody">
               <text>
                {{key.duration}} -我是第{{index}}条数据
               </text>
             </view>
            <view class='heightView'></view>
           </scroll-view>
          </view>
        </view>
       <view wx:else><view class="contentBody"><text>暂无数据</text></view></view>
     </swiper-item>
   </block>
 </swiper>
这样的话,我们就可以展现出我们mock的一些数据
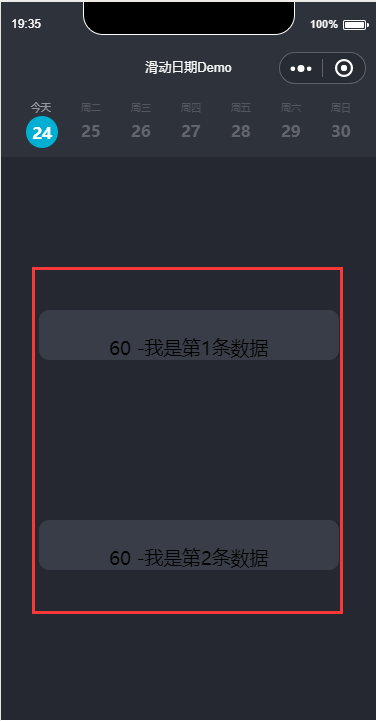
需要注意的是,上面当我们滑动的时候,我们是需要凸显当前所在的日期。
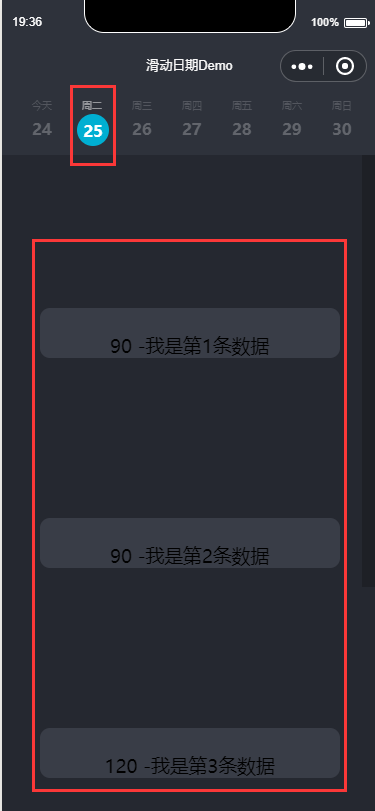
所以,在顶部周数据的时候,需要稍微做下处理。
<view class="TimeOrderBox scroll-view-item bc_red {{id == index ? 'coloBack':''}}" id="{{index}}" data-selectTime="{{item.month}}/{{item.day}}" data-week="{{item.week}}">
这样基本上 就已经实现了整体代码,
源码Demo
End