需求
假设现在有一个H5需要有微信登录、手机号登录、邮箱登录 三种登录方式。让我们一起来看看微信登录如何实现吧
界面:
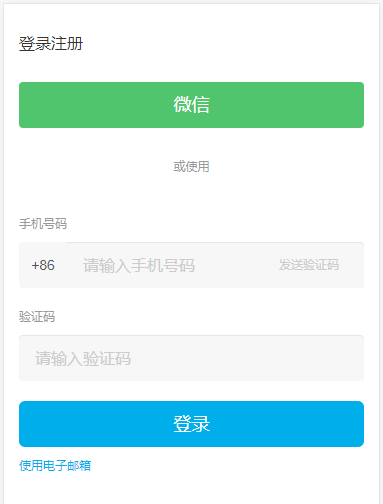
最终实现的效果图(登录成功后返回个人页):

因为微信登录目前没有实现移动端的其他浏览器授权登录,所以,再用除微信以外的浏览器操作登录时,我们需要给出用户提醒,比如这样:
实现
准备工作
登录服务号或订阅号的微信公众号后台,找到AppId以及AppSecret。后面会用到

在公众号设置中,设置安全域名、js域名以及网页授权域名
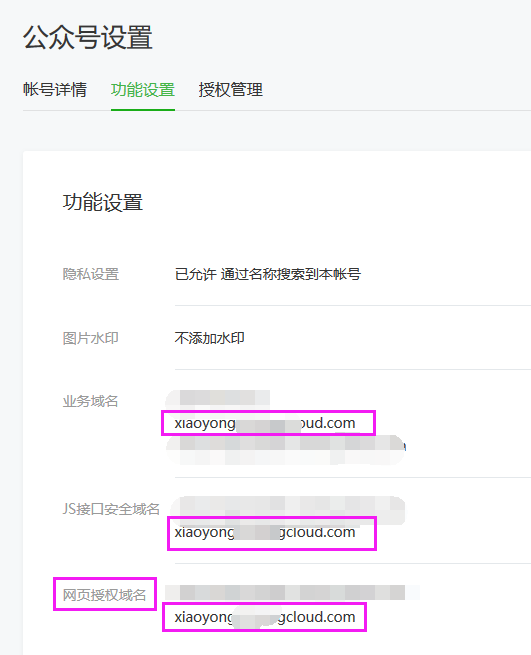
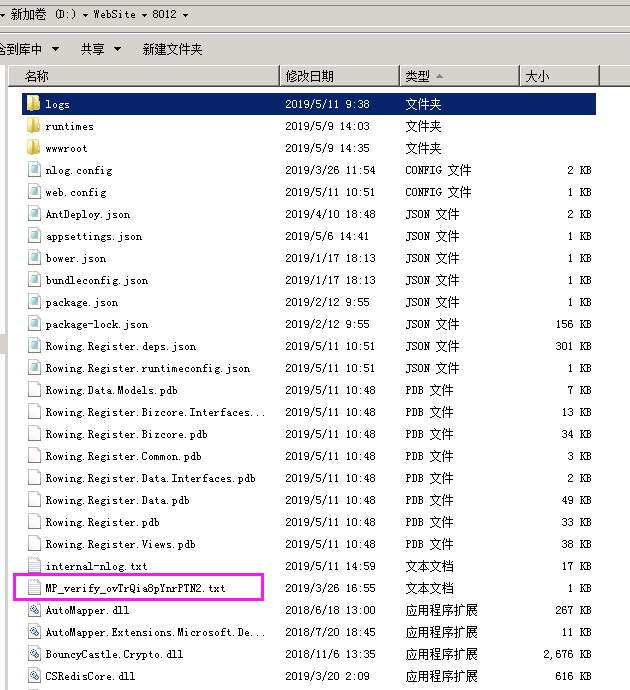
其中再网页授权域名设置的时候需要注意,将腾讯提供的一个唯一标识文件存放于项目根目录下

 、
、
数据库部分
新建一张Login表,用于存放用户登录信息
CREATE TABLE `NewTable` (
`id`  int(11) NOT NULL AUTO_INCREMENT ,
`loginaccount`  varchar(100) CHARACTER SET utf8 COLLATE utf8_bin NOT NULL ,
`password`  varchar(45) CHARACTER SET utf8 COLLATE utf8_bin NULL DEFAULT NULL ,
`type`  tinyint(4) NOT NULL ,
`userid`  int(11) NULL DEFAULT 0 ,
`isvalid`  tinyint(2) NULL DEFAULT 1 ,
PRIMARY KEY (`id`)
)
ENGINE=InnoDB
DEFAULT CHARACTER SET=utf8 COLLATE=utf8_bin
AUTO_INCREMENT=28
ROW_FORMAT=DYNAMIC
;

前端部分
前端要做的 比较简单,放置一个button按钮,以及js处理判断是否是微信内点击即可:
<div class="row">
    <div class="col-xs-12">
        <button type="button" class="btn  btn-lg btn-block wechatBtn" id="weChatLogin">微信</button>
    </div>
</div>
对应的js部分为:
$("#weChatLogin").on("click",
        function () {
            var layerLoading = layer.load(1, {
                icon: 0,
                shade: [0.3, 'black']
            });
            var result = isWeiXin();
            if (result === 0) {
                setTimeout(function () {
                    layer.closeAll();
                    var local = "回调地址";
                    window.location.href =
                        'https://open.weixin.qq.com/connect/oauth2/authorize?appid=服务号的appId&redirect_uri=' +
                        encodeURIComponent(local) +
                        '&response_type=code&scope=snsapi_base&state=a#wechat_redirect';
                },
                    500);
            } else {
                setTimeout(function () {
                    layer.closeAll();
                    layer.msg("请在微信内打开~<br/>或尝试下其他登录方式哦");

                },500);
            }
        });
上面这段js代码中,有两个黄色背景的代码需要注意,函数isWeiXin是用于判断当前用户打开的浏览器是否是微信浏览器,而参数snsapi_base则表示微信登录时采取的静默授权方式(即这样 只能获取到用户的Openid,无法获取到其他资料).
isWeiXin函数如下
 //判断是否是微信浏览器的函数
    function isWeiXin() {
        //window.navigator.userAgent属性包含了浏览器类型、版本、操作系统类型、浏览器引擎类型等信息,这个属性可以用来判断浏览器类型
        if (browser.versions.mobile) {//判断是否是移动设备打开。browser代码在下面
            var ua = navigator.userAgent.toLowerCase();//获取判断用的对象
            if (ua.match(/MicroMessenger/i) == "micromessenger") {
                return 0;
            } else {
                return 1;
            }
        } else {
            //否则就是PC浏览器打开
            return 2;
        }
    }

    var browser = {
        versions: function () {
            var u = navigator.userAgent, app = navigator.appVersion;
            return {         //移动终端浏览器版本信息
                trident: u.indexOf('Trident') > -1, //IE内核
                presto: u.indexOf('Presto') > -1, //opera内核
                webKit: u.indexOf('AppleWebKit') > -1, //苹果、谷歌内核
                gecko: u.indexOf('Gecko') > -1 && u.indexOf('KHTML') == -1, //火狐内核
                mobile: !!u.match(/AppleWebKit.*Mobile.*/), //是否为移动终端
                ios: !!u.match(/(i[^;]+;( U;)? CPU.+Mac OS X/), //ios终端
                android: u.indexOf('Android') > -1 || u.indexOf('Linux') > -1, //android终端或uc浏览器
                iPhone: u.indexOf('iPhone') > -1, //是否为iPhone或者QQHD浏览器
                iPad: u.indexOf('iPad') > -1, //是否iPad
                webApp: u.indexOf('Safari') == -1 //是否web应该程序,没有头部与底部
            };
        }(),
        language: (navigator.browserLanguage || navigator.language).toLowerCase()
    }
后端部分
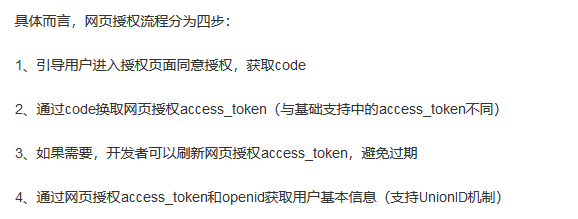
其中code和state是微信服务器发起请求的时候会带过来。code有效期为5分钟,state为自定义的一个参数,具体可参考微信网页授权文档:https://mp.weixin.qq.com/wiki?t=resource/res_main&id=mp1421140842
 public async Task<IActionResult> Index()
 {
            var code = Request.Query["code"];
            var state = Request.Query["state"];
            OAuthToken tokenModel = new OAuthToken();
            if (!string.IsNullOrEmpty(code) && !string.IsNullOrEmpty(state))
            {
                tokenModel = await _dataServices.LoginWeChat(code, _config[ConfigurationKeys.PAY_APPID]);//调取接口
           _logger.LogError($"微信登录:{tokenModel.Openid}");
           code = string.Empty;
                if (tokenModel.errmsg.Contains("success"))
                {
                    var model = await _dataServices.GetUserByIdAccount(tokenModel.Openid);//具体可根据自己的项目业务来操作
                    //TODO

                }
            }
        return View("~/Views/Home/Index.cshtml");
 }
上述代码中从第一个OAuthToken说起,它是一个自定义存放微信授权的实体类,内容如下
public class OAuthToken:BaseRes
    {
        /// <summary>
        /// 网页授权接口调用凭证。注意:此access_token与基础支持的access_token不同
        /// </summary>
        [JsonProperty("access_token")]
        public string AccessToken { get; set; }

        private int _expiresIn;

        /// <summary>
        /// access_token接口调用凭证超时时间,单位(秒)
        /// </summary>
        [JsonProperty("expires_in")]
        public int ExpiresIn
        {
            get { return _expiresIn; }
            set
            {
                ExpiresTime = DateTime.Now.AddSeconds(value);
                _expiresIn = value;
            }
        }
        /// <summary>
        /// 用于刷新access_token
        /// </summary>
        [JsonProperty("refresh_token")]
        public string RefreshToken { get; set; }

        /// <summary>
        /// 用户唯一标识。请注意,在未关注公众号时,用户访问公众号的网页,也会产生一个用户和公众号唯一的openid
        /// </summary>
        [JsonProperty("openid")]
        public string Openid { get; set; }

        /// <summary>
        /// 用户授权的作用域,使用逗号(,)分隔
        /// </summary>
        [JsonProperty("scope")]
        public string Scope { get; set; }

        [JsonProperty("expires_time")]
        public DateTime ExpiresTime { get; set; }


        [JsonProperty("unionid")]
        public string Unionid { get; set; }
    }
其中BaseRes,是返回的错误实体类
public class BaseRes
{
   public BaseRes()
   {
     errmsg = "success";
   }

   public int errcode { get; set; }
   public string errmsg { get; set; }

}
第二个ConfigurationKeys.PAY_APPID是获取配置项
第三个LoginWeChat,我们来看看这个接口中是如何实现的
首先我们看到这个接口接收两个参数,和上面我们请求的参数与对应,一个是code,另一个是appId
        [Route("[controller]/LoginByWeChat")]
        [HttpGet]
        public async Task<OAuthTokenDto> LoginByWeChat(string code, string appid = "")
        {
            return await _authenticationService.LoginByWeChat(code, appid);
        }
请求微信登录:
/// <summary>
        /// 通过code换取网页授权access_token
        /// </summary>
        /// <param name="appid">公众号的唯一标识</param>
        /// <param name="code">填写第一步获取的code参数</param>
        /// <returns></returns>
        public  async Task<OAuthTokenModel> LoginByWeChat(string code, string appid = "")
        {
            var config = OpenApi.GetConfig(appid, PlatformType.Mp);
            var url =
                $"https://api.weixin.qq.com/sns/oauth2/access_token?appid={config.AppId}&secret={config.AppSecret}&code={code}&grant_type=authorization_code";
            return await HttpUtil.GetResultAsync<OAuthTokenModel>(url);
        }
        /// <summary>
        /// 根据appid,获取对应的接口参数信息
        /// </summary>
        /// <param name="appid"></param>
        /// <returns></returns>
        public static ApiConfig GetConfig(string appid = "", PlatformType platform = PlatformType.Mp)
        {
            if (string.IsNullOrEmpty(appid) && apiConfigs?.Count > 0)
            {
                return apiConfigs.FirstOrDefault(a => a.Platform == platform);
            }
            return apiConfigs.FirstOrDefault(a => a.AppId == appid);
        }
    public class ApiConfig
    {
        public string AppId { get; set; }
        public string AppSecret { get; set; }
        public PlatformType Platform { get; set; } = PlatformType.Mp;
    }
    public enum PlatformType
    {
        /// <summary>
        /// 公众号
        /// </summary>
        Mp,
        /// <summary>
        /// 小程序
        /// </summary>
        Mini,
        /// <summary>
        /// 开放平台
        /// </summary>
        Open,
        /// <summary>
        /// 企业号
        /// </summary>
        Qy
    }
        /// <summary>
        /// 发起GET请求,并获取请求返回值
        /// </summary>
        /// <typeparam name="T">返回值类型</typeparam>
        /// <param name="url">接口地址</param>
        public static async Task<T> GetResultAsync<T>(string url)
        {
            var retdata = await HttpGetAsync(url);
            return JsonConvert.DeserializeObject<T>(retdata);
        }
这里我们调用了Get异步请求:
        public static async Task<string> HttpGetAsync(string url)
        {
            var request = CreateRequest(url, HttpMethod.GET);
            return await GetResponseStringAsync(request);
        }

        private static HttpWebRequest CreateRequest(string url, HttpMethod method, string postData = "", string certpath = "", string certpwd = "")
        {
            var request = (HttpWebRequest)WebRequest.Create(url);
            request.Method = method.ToString();
            request.ContentType = "application/x-www-form-urlencoded";
            request.Accept = "*/*";
            request.Timeout = 15000;
            request.AllowAutoRedirect = false;
            ServicePointManager.ServerCertificateValidationCallback = new RemoteCertificateValidationCallback((a, b, c, d) => true);
            if (!string.IsNullOrEmpty(certpath) && !string.IsNullOrEmpty(certpwd))
            {
                X509Certificate2 cer = new X509Certificate2(certpath, certpwd,
                    X509KeyStorageFlags.PersistKeySet | X509KeyStorageFlags.MachineKeySet);
                request.ClientCertificates.Add(cer);
            }
            if (method == HttpMethod.POST)
            {
                using (var sw = new StreamWriter(request.GetRequestStream()))
                {
                    sw.Write(postData);
                }
            }
            return request;
        }

       private static async Task<string> GetResponseStringAsync(HttpWebRequest request)
        {
            using (var response = await request.GetResponseAsync() as HttpWebResponse)
            {
                using (StreamReader reader = new StreamReader(response.GetResponseStream(), Encoding.UTF8))
                {
                    return reader.ReadToEnd();//获取响应
                }
            }
        }
    public enum HttpMethod
    {
        GET,
        POST
    }
这样,我们就可以拿到返回的响应结果了
 OAuthToken resultDto = JsonConvert.DeserializeObject<OAuthToken>(resultDetail);
  _logger.LogError($"OpenId:{resultDto.Openid},ErrorMsg:{resultDto.errmsg}");

 return Task.FromResult(resultDto);
我们查看日志,可以看到OpenId已经被打印出来了

这样,我们只需要将我们的Openid 再数据库中进行查找,就可以知道是否存在此用户,若不存在,则可以操作新增
//判断是否数据库有登录记录 ,若无则新增
                if (!string.IsNullOrEmpty(model.Openid))
                {
                    var result = await _authenticationDataServices.FindAccountById(model.Openid);
                    if (string.IsNullOrEmpty(result.LoginAccount))
                    {
                        LoginUserModel userData = new LoginUserModel
                        {
                            LoginAccount = model.Openid,
                            Password = string.Empty,
                            Type = (int) LoginType.Wexin,
                            UserId = 0,
                            IsValid = true
                        };
                        var res =await _authenticationDataServices.AddLoginUser(userData);
                        if (res <= 0) logger.Error(res);
                    }
                }
查找用户的实现
public async Task<LoginUserModel> FindAccountById(string account)
        {
            using (var conn = GetMySqlConnection())
            {
                if (conn.State == ConnectionState.Closed)
                {
                    await conn.OpenAsync();
                }

                try
                {
                    string sql =
                        @"select Loginaccount,Password,Type,Userid,Isvalid from centraldb.login  where loginaccount=@recordId;";

                    var user = conn.Query<LoginUserModel>(sql, new { recordId = account }, commandType: CommandType.Text).FirstOrDefault();
                    return user ?? new LoginUserModel();
                }
                catch (Exception e)
                {
                    throw;
                }

            }
        }
新增的实现
 public async Task<int> AddLoginUser(LoginUserModel loginUser)
        {
            using (var conn = GetMySqlConnection())
            {
                if (conn.State == ConnectionState.Closed)
                {
                    await conn.OpenAsync();
                }

                const string sql =
                    @"insert into centraldb.login(loginaccount, `password`, `type`, userid, isvalid)
                            values(@loginaccount, @password, @type, @userid, @isvalid);
                      select max(id) from centraldb.login;";

                try
                {
                    var userId = (await conn.QueryAsync<int>(sql, new
                    {
                        loginaccount = loginUser.LoginAccount, password = loginUser.Password,
                        type = loginUser.Type, userid = loginUser.UserId, isvalid = loginUser.IsValid
                    }, commandType: CommandType.Text)).FirstOrDefault();

                    return userId;
                }
                catch (Exception e)
                {
                    return -1;
                }
            }
        }
这样,运行项目之后,数据库中就会插入相应的数据:
