一、简介
1. 需要实现操作系统的部署
foreman提供了一个基于kickstart的部署工具,输入一台服务器的部署网卡的mac地址和hostname、ip等信息,就能自动的帮我们部署完,并且,还可以生成一个部署iso,用于该服务器的重新部署。
foreman通过代理DNS、DHCP、TFTP完成了kickstart、cobbler、jumpstart等各种自动化安装系统工具的图形统一管理串口,实现的结果是只需要在foreman上指定各种模板(pxe、ks),不同的模板还可以嵌套各种片段(snippet)达到统一、简化的目的。完成之后,便可以添加节点,关联定义的各种模板生成各种pxe和ks文件实现自动化安装。
2、foreman工作流程
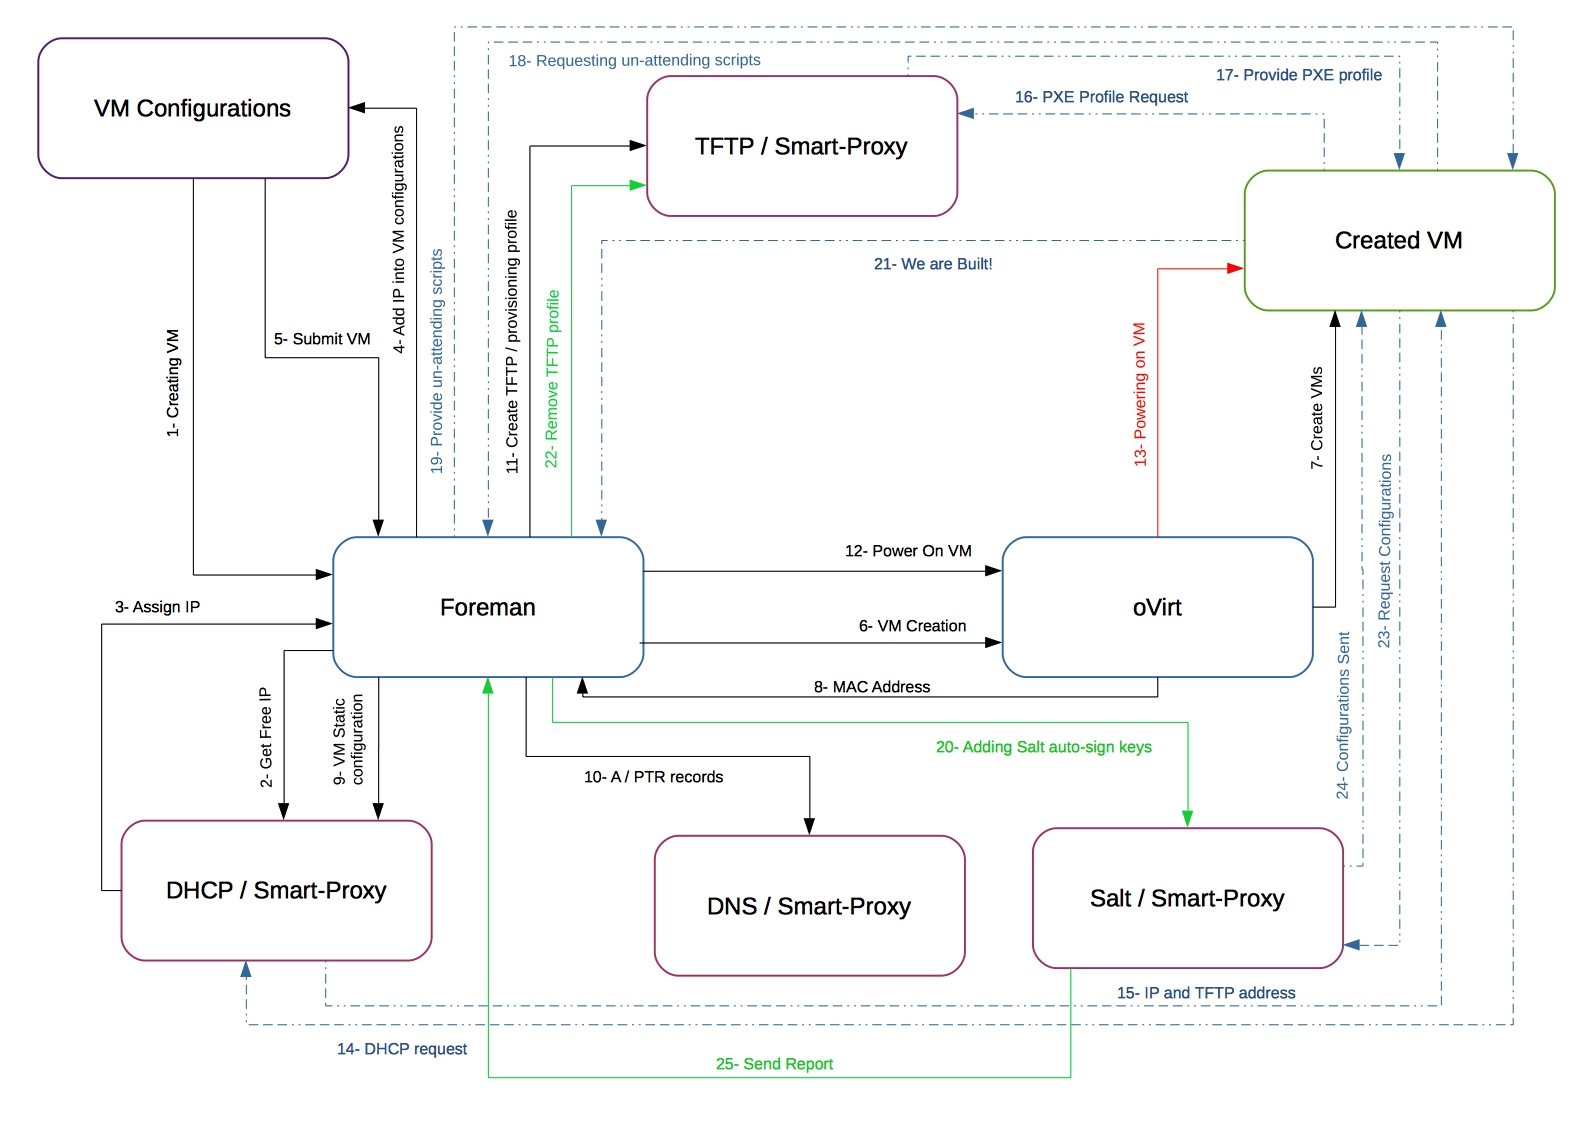
Steps
- On the New Host page, the default VM configuration is shown and compute profiles can be applied.
- An unused IP address is requested from the DHCP smart proxy associated with the subnet.
- The IP address field is filled in on the New Host page.
- n/a
- The New Host page is submitted.
- Foreman contacts the compute resource to create the virtual machine.
- The compute resource creates a virtual machine on a hypervisor.
- The VM’s MAC address is returned from the compute resource and stored on the host.
- A reservation is created on the DHCP smart proxy associated with the subnet.
- DNS records are set up:
- A forward DNS record is created on the smart proxy associated with the domain.
- A reverse DNS record is created on the DNS smart proxy associated with the subnet.
- A PXELinux menu is created for the host in the TFTP smart proxy associated with the subnet.
- Foreman contacts the compute resource to power on the VM.
- The compute resource powers up the virtual machine.
- The host requests a DHCP lease from the DHCP server.
- The DHCP lease response is returned with TFTP options (next-server, filename) set.
- The host requests the bootloader and menu from the TFTP server.
- The PXELinux menu and OS installer for the host is returned over TFTP.
- The installer requests the “provision” template/script from Foreman.
- Foreman renders the template and returns the resulting kickstart/preseed to the host.
- Autosigning configuration for Salt (or Puppet) is added on the Salt or Puppet CA smart proxy.
- The installer notifies Foreman of a successful build in the postinstall script.
- The PXELinux menu is reverted to a “local boot” template.
- The host requests its configuration from Salt or Puppet.
- The host receives appropriate configuration using data defined in Foreman.
- Configuration reports and facts are sent from Salt or Puppet to Foreman and stored.
3、具体部署围着如下流程:
安装软件源---》安装foreman---》web界面设置 Provisioning Setup---》手动配置智能代理(dhcp、dns、tftp等)---》web界面部署第一个节点---》开启虚拟机开始自动安装os
web界面设置包括如下:(其中第一个节点加入foreman后,foreman会利用这个台节点创建一些信息,我们也可以按照需求新建一些信息,这个示例利用了这些信息,我们主要是配置安装源及模板的设置。)
architectures:定义软件架构
hardware models:软件架构
installation media:安装源
partition tables:分区方法
provisioning templates:部署模板
operating systems:最后一项配置,依赖之前的几项配置,选各种配置如软硬件架构,各种模板
4、foreman的安装可以参考
二、设置资源及host菜单
1、解决安装源
1)先挂载光盘
2)用httpd做源
我们前面已经部署了foreman所以系统已经部署了apache服务,
把挂载的光盘内容放在httpd目录
mkdir -p /mnt/repo/centos7
mount /dev/cdrom /media
查看http目录关注标红的行即可,知道其默认目录为
cat /etc/httpd/conf.d/05-foreman.conf
root@www pxelinux.cfg]# cat /etc/httpd/conf.d/05-foreman.conf
# ************************************
# Vhost template in module puppetlabs-apache
# Managed by Puppet
# ************************************

<VirtualHost *:80>
  ServerName www.puppet-foreman.com

  ## Vhost docroot
  DocumentRoot "/usr/share/foreman/public"

  ## Directories, there should at least be a declaration for /usr/share/foreman/public

  <Directory "/usr/share/foreman/public">
    Options SymLinksIfOwnerMatch
    AllowOverride None
    Require all granted
  </Directory>。。。。。。。。。。。。。。。。。。。。。。。。。。。。。。。。。。。。
。。。。。。。。。。。。。。。。。。。
。。。。。。。

<Directory ~ /usr/share/foreman/public/(assets|webpack)>

  # Use standard http expire header for assets instead of ETag
  <IfModule mod_expires.c>
    Header unset ETag
    FileETag None
    ExpiresActive On
    ExpiresDefault "access plus 1 year"
  </IfModule>。。。。。。。。。。。。。。。。。。。。。。。。。。。。。。。。。。。。。。。。。。。
。。。。。。。。。。。。。。。。。。。。
。。。。。
</VirtualHost>
PassengerPreStart http://www.puppet-foreman.com:80
[root@www pxelinux.cfg]#
得知目录进行mv
mv /mnt/repo/ /usr/share/foreman/public/
3)创建安装源文件
vim /etc/yum.repo.d/all_deps.repo
[root@www pxelinux.cfg]# cat /etc/yum.repos.d/all_deps.repo
[centos7]
name=centos7
baseurl=http://192.168.216.234/repo/centos7
gpgcheck=0
enabled=1
添加好源后记得yum clean all yum makecache
2、了解host导航菜单

架构,定义x86_64,i386,unix,windows等
硬件型号,定义硬件具体型号
安装介质,定义安装源媒介或者路径
操作系统,定义操作系统具体型号比如centos,redhat,bsdfree等
模板
分区表
置备模板
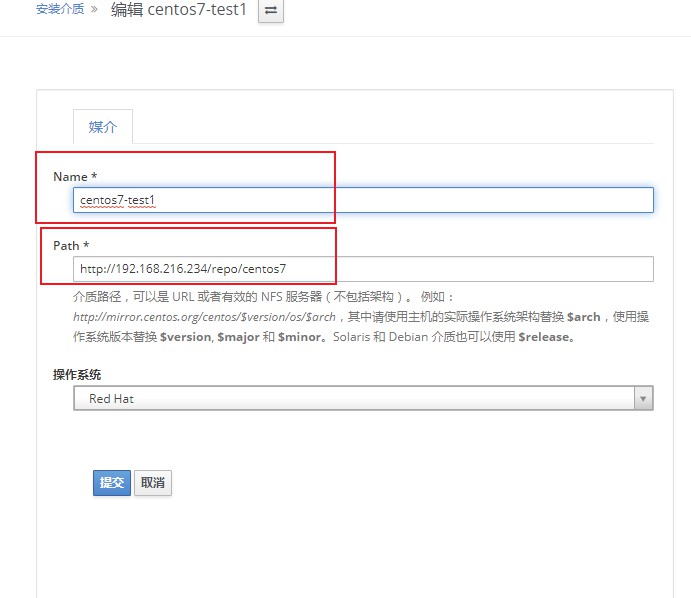
3、设置安装介质
我们现在添加安装介质,可以是URL或者nfs,我们用刚刚添加源的URL
http://192.168.216.234/repo/centos7
由于架构和硬件型号及操作系统,我们装玩foreman后本机就已经识别好,所以先添加安装介质
流程:主机---》安装介质---》创建媒体---》添加:name、path、操作系统

4、克隆置备模板并自定义编写ks
编辑模板需要具有ks知识,我这里随便克隆一下,也没改,先测试一下
流程:主机---》置备模板---》选则kickstart default pxelinux 模板 克隆按钮---》编辑相应的信息---》name,code---》类型-这里选pxelinux---》组合-这里操作系统选centos7---》提交
图示如下:
1)主机---》置备模板---》

2)选则kickstart default pxelinux 模板 克隆按钮---》
 3)编辑相应的信息---》name,code---》

4)类型-这里选pxelinux---》

5)组合-这里操作系统选centos7---》提交

5、设置操作系统(operating system)
流程:主机---》操作系统--->点击主机”CentOS 7.6.1810“ ---》操作系统参数---》分区表---》安装介质---》模板---》提交
1)主机---》操作系统--->点击主机”CentOS 7.6.1810“ ---》

2)操作系统参数---》

3)分区表---》

4)安装介质

5)模板---》提交

注意:创建主机可以添加三个模板,一个是pxelinux模板,一个是置备模板,一个是完全模板,并且不是锁定状态,所以需要克隆一个新的模板,
1、三个原始模板分别是:完成模板:kickstart default finish
置备模板:kickstart default
pxelinux模板:kickstart default pxelinux
2、可以运行一下看看效果
3、克隆时我们分别在原名称上添加test字样即可,随便改名字
(上面小结“4”已经说明如何克隆模板,这里不做介绍了)
具体请参考另外一篇文章,具体介绍模板,文章更新后在加上连接
三、设置代理及tftp文件
新版本我没有找到Infrastructure->Provisioning setup导航,这个导航可以就像一个初始化指导一样如图下,输入可用信息,然后生成配置步骤

1、手动设置代理服务及设置
os部署需要tftp及dhcp,dns可以暂时不部署
[root@www repodata]# foreman-installer
> --enable-foreman-proxy
> --foreman-proxy-tftp=true
> --foreman-proxy-tftp-servername=192.168.216.234
> --foreman-proxy-dhcp=true
> --foreman-proxy-dhcp-interface=ens33
> --foreman-proxy-dhcp-gateway=192.168.216.234
> --foreman-proxy-range="192.168.216.155 192.168.216.165"
如果是没联网的机器关闭下面这个源
> --foreman-configure-epel-repo=false 关闭
2、部署tftp还需要copy那个几个文件
tftp需要提供bootloader,及内核文件,具体什么作用可以参考pxe+http+kickstart实验原理
文档上也有写:https://www.theforeman.org/manuals/1.21/index.html#4.3.9TFTP
作用:
vmlinuz kenrnel file
vesamenu.32 图形菜单
isolinux.cfg 开机菜单设定
initrd.img 开启过程中核心组件参数
  cd  /usr/share/foreman/public/repo/centos7
 cp isolinux/isolinux.cfg /var/lib/tftpboot/pxelinux.cfg/default   #这个其实不用拷了,后面说说
 cp images/pxeboot/{vmlinuz,initrd.img} /var/lib/tftpboot/boot
 cp isolinux/{vesamenu.c32,boot.msg,splash.png} /var/lib/tftpboot/
这里手动设置其实非常简单几个要点
1、tftp默认目录必须存在
2、pxe引导先决条件:(/usr/share/syslinux中)
pxelinux.0
menu.c32
chain.c32
3、内核文件放在/var/lib/tftpboot/boot/
4、需要准备/var/lib/tftpboot/pxelinux.cfg/default
其实这个文件不需要手动写,我们在定义host得时候其实可以pxe和ks一起部署了,只是之前没有找到方法耽误了很长时间。下面介绍如何操作
四、开始部署节点
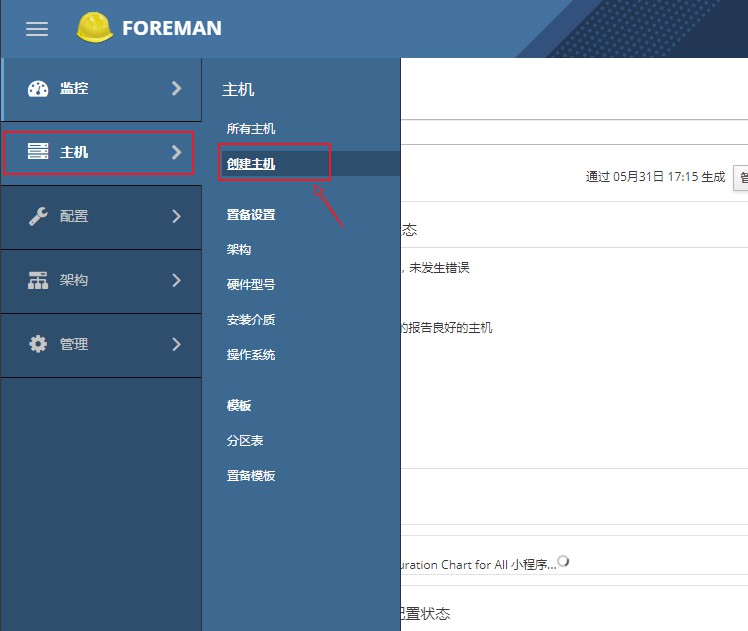
1、主机导航菜单创建主机
流程:主机---》创建主机---》主机---》操作系统---》接口---》puppet类---》参数---》附加信息
1)主机---》创建主机
2)主机---》

3)操作系统---》
4)接口---》
点击编辑添加箭头指向的信息,也就是你需要创建主机的mac/ip/域名

虚拟机得mac在下图可以看到

5)puppet类---》参数---》
这里我们暂时不用设置
6)附加信息

2、提交后
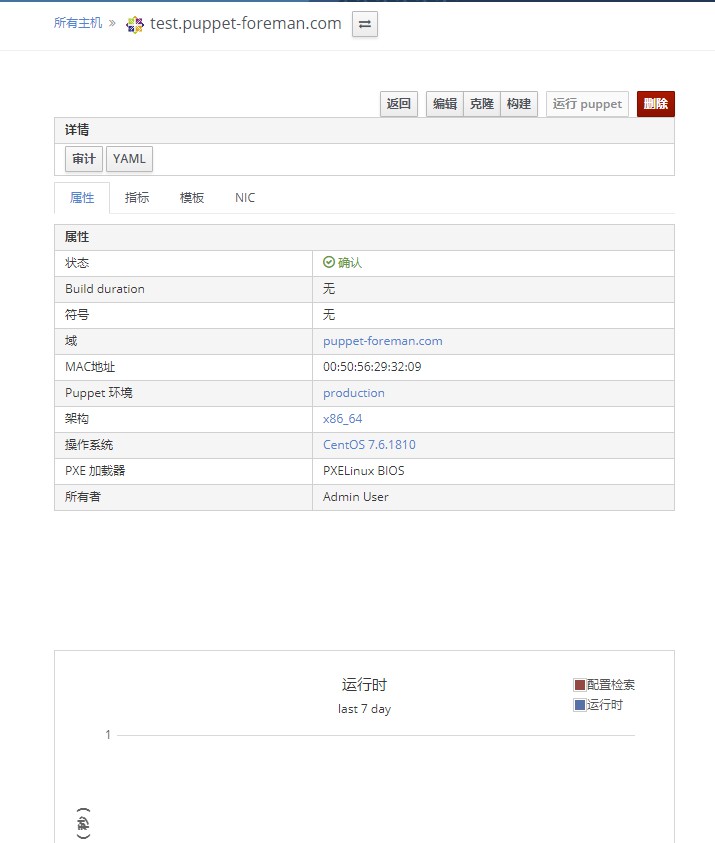
3、创建好后自动创建pxe文件
之前还纳闷没有pxe文件怎么执行安装菜单那,原理foreman创建主机后就已经生成了以mac为名称的文件
下面是示例,因为之前又克隆一个主机所以是新的主机,所哟mac地址不同
[root@www pxelinux.cfg]# ll
total 16
-rw-r--r-- 1 foreman-proxy foreman-proxy  557 Jun  4 11:53 01-00-50-56-2f-4e-fe
-rw-r--r-- 1 foreman-proxy foreman-proxy 1058 Jun  3 17:49 default
drwxr-xr-x 2 root          root           142 Jun  3 15:33 test

[root@www pxelinux.cfg]# cat 01-00-50-56-2f-4e-fe
# This file was deployed via 'Kickstart default PXELinux test' template


DEFAULT menu
MENU TITLE Booting into OS installer (ESC to stop)
TIMEOUT 100
ONTIMEOUT installer

LABEL installer
  MENU LABEL Kickstart default PXELinux test
  KERNEL boot/centos7-test1-pPa2hWu9wvb7-vmlinuz
  APPEND initrd=boot/centos7-test1-pPa2hWu9wvb7-initrd.img ks=http://www.puppet-foreman.com/unattended/provision?token=241cc771-e27d-4f81-99a9-30e4cbc7628b  network ksdevice=bootif ks.device=bootif BOOTIF=00-00-50-56-2f-4e-fe kssendmac ks.sendmac inst.ks.sendmac
  IPAPPEND 2
3、启动虚拟机
创建虚拟机的步骤这里就省略了,可以自行创建即可
启动虚拟机
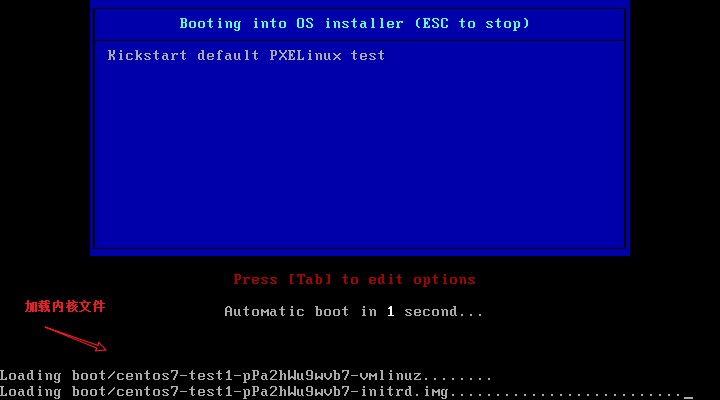
看到菜单

回车下一步就自行安装了,上面已经部署了分区及置备的ks 需要什么添加什么即可,开始自动部署之旅吧
五、排错
1、出现如下错误的情况
![]()
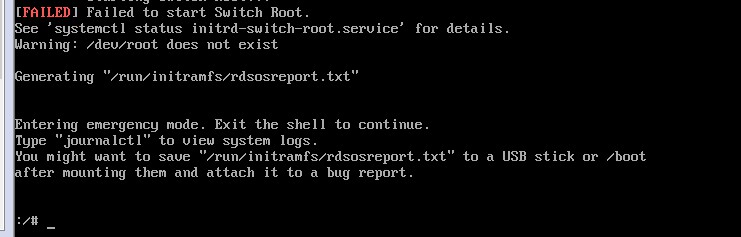
注意出错的信息:failed to fetch kickstart 获取ks失败
因为实验环境没有设置dns,所以我们可以把pxe文件的里面的ks=http://www.puppet-foreman.com域名换成你的ip即可。
参考1:https://www.theforeman.org/manuals/1.20/index.html#7.3GettingHelp
参考2:https://www.cnblogs.com/zhangxingeng/p/9560221.html
参考3:https://www.cnblogs.com/zhangxingeng/p/10248601.html
参考4:https://projects.theforeman.org/projects/foreman/wiki/TemplateWriting#PXE-Menus
参考5:https://projects.theforeman.org/projects/foreman/wiki
参考6:https://projects.theforeman.org/projects/foreman/wiki/Dynamic_disk_partitioning
转载请注明出处:https://www.cnblogs.com/zhangxingeng/p/10268171.html