一、简介
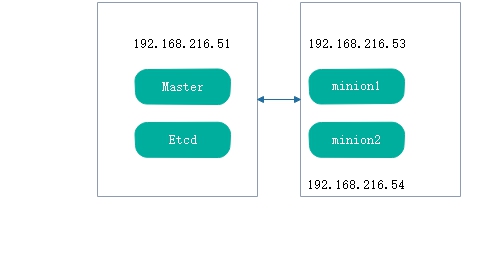
1、环境依旧是kubernetes之前文章的架构
2、需要docker的镜像
1)php-forntend web 前端镜像
docker.io-kubeguide-guestbook-php-frontend.tar
2)redis master
docker.io-kubeguide-redis-master.tar
3)redis slave
docker.io-kubeguide-guestbook-redis-slave.tar
web前端通过javascript redis api 和redis master交互,可以在阿里上或自行下载
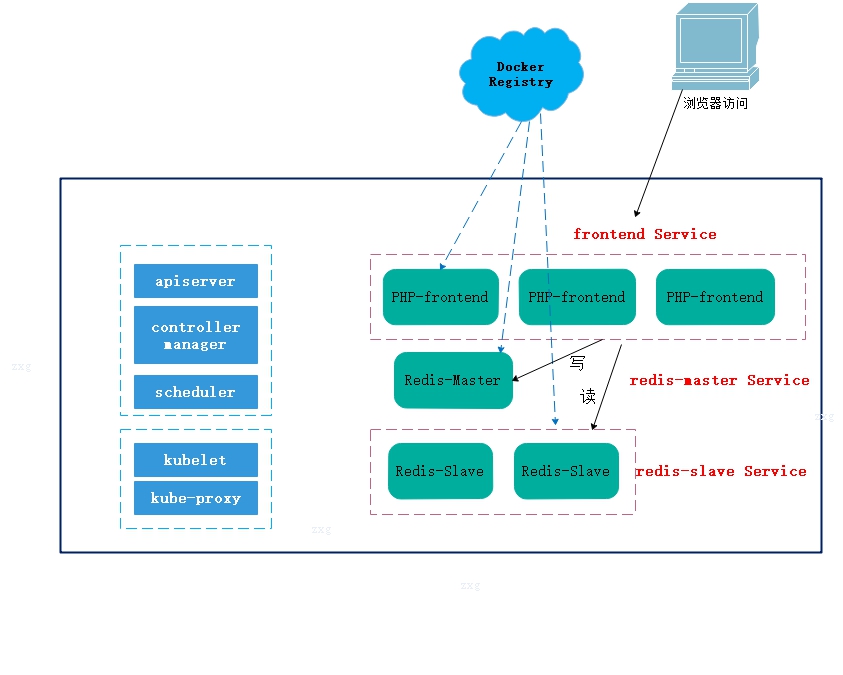
3、架构示意图
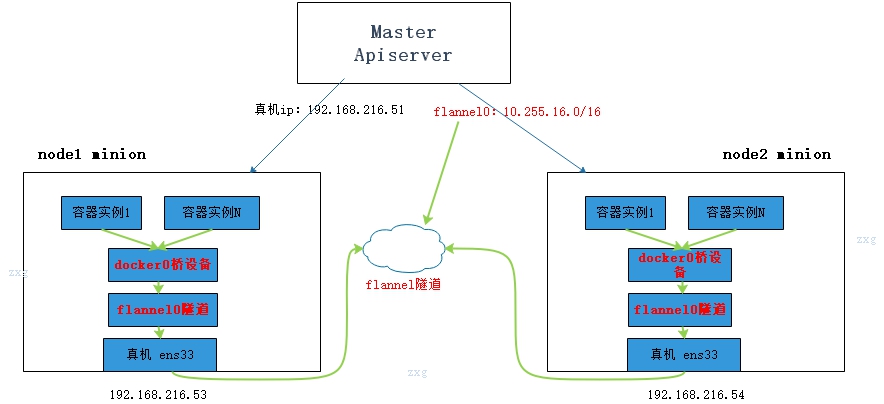
4、底层网络架构图
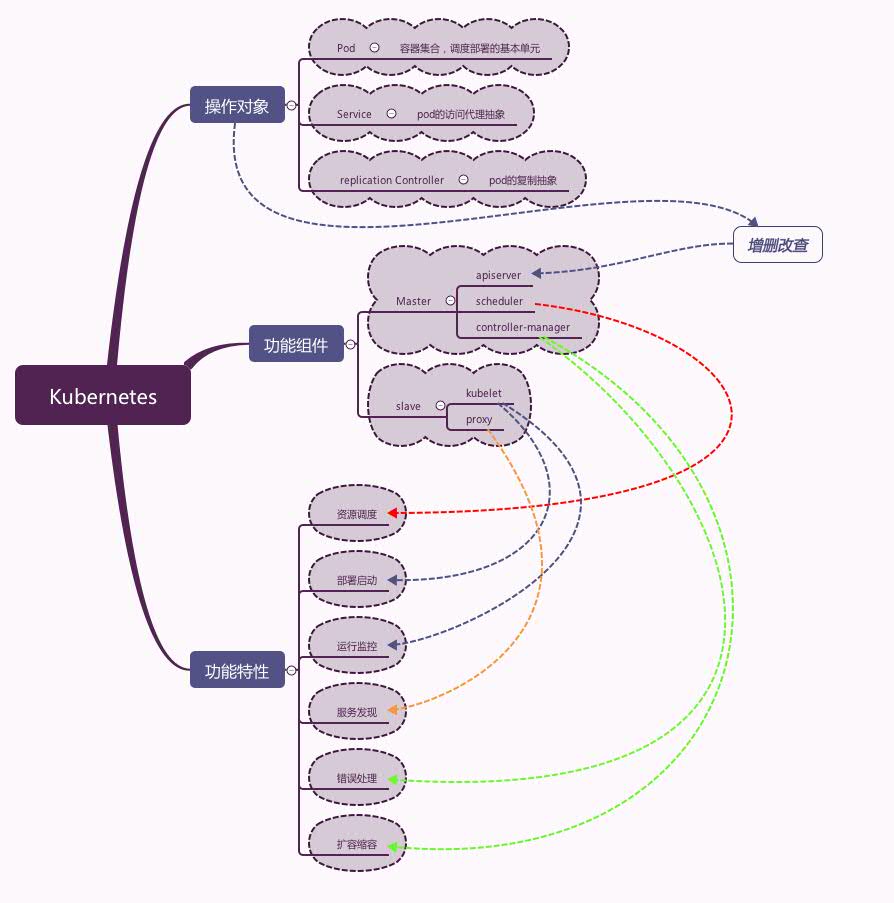
5、补充kubernetes系统架构图
二、开始部署
1、上传导入镜像
先下载相关镜像
互联网自行下载,或者直接docker pull
docker load导入
[root@node1 k8s]# docker load -i docker.io-kubeguide-redis-master.tar               #---导入redis-master
[root@node1 k8s]# docker load -i docker.io-kubeguide-guestbook-php-frontend.tar         #---导入guestbook-php-frontend
[root@node1 k8s]# docker load -i docker.io-kubeguide-guestbook-redis-slave.tar          #---导入guestbook-redis-slave
2、创建redis master deployment配置文件
回顾:deployment作用,是描述想要的目标状态是什么
1)创建vim redis-master-deployment.yaml
[root@master k8s]# cd /etc/kubernetes/yaml/
[root@master k8s]# vim redis-master-deployment.yaml
apiVersion: extensions/v1beta1
kind: Deployment
metadata:
  name: redis-master
  # these labels can be applied automatically
  # from the labels in the pod template if not set              #---如果没有设置,这些标签可以自动应用于POD模板中的标签
  # labels:
  #   app: redis
  #   role: master
  #   tier: backend
spec:
  # this replicas value is default
  # modify it according to your case
  replicas: 1                                    #---此副本值,根据情况修改
  # selector can be applied automatically
  # from the labels in the pod template if not set              #---如果没有设置
  # selector:
  #   matchLabels:
  #     app: guestbook
  #     role: master
  #     tier: backend
  template:                                     #---模板,如果没有设置,选择自动使用从此模板中默认的标签
    metadata:
      labels:
        app: redis
        role: master
        tier: backend
    spec:
      containers:
      - name: master
        image: docker.io/kubeguide/redis-master:latest           #---自行修改,镜像地址
        imagePullPolicy: IfNotPresent
        resources:
          requests:
            cpu: 100m
            memory: 100Mi
        ports:
        - containerPort: 6379
2)启动这个deployment
[root@master yaml]# kubectl create -f /etc/kubernetes/yaml/redis-master-deployment.yaml
deployment "redis-master" created
[root@master yaml]# kubectl get deployment
NAME           DESIRED   CURRENT   UP-TO-DATE   AVAILABLE   AGE
nginx          2         2         2            2           21h
redis-master   1         1         1            1           4s
[root@master yaml]# kubectl get deployment
NAME           DESIRED   CURRENT   UP-TO-DATE   AVAILABLE   AGE
nginx          2         2         2            2           21h
redis-master   1         1         1            1           6s
3、创建redis master service配置文件
1)编辑redis-master-service.yaml
[root@master yaml]# vim /etc/kubernetes/yaml/redis-master-service.yaml

apiVersion: v1
kind: Service
metadata:                                       #---metadata.name定义了service的服务名,spec.selector确定了pod对应到本服务
  name: redis-master
  labels:                                        #---这里的定义表面拥有redis-master标签的pod属于redis-master服务
    app: redis
    role: master
    tier: backend
spec:
  ports:
    # the port that this service should serve on
  - port: 6379                                    #---ports部分中targetport属性用来确定提供该服务的容器所暴露(expose)的端口号,port定义server的虚拟端口
    targetPort: 6379
  selector:
    app: redis
    role: master
    tier: backend
2)启动这个service
[root@master yaml]# kubectl create -f /etc/kubernetes/yaml/redis-master-service.yaml
service "redis-master" created
[root@master yaml]# kubectl get svc
NAME           CLUSTER-IP     EXTERNAL-IP   PORT(S)        AGE
kubernetes     10.254.0.1     <none>        443/TCP        14d
nginx          10.254.8.125   <nodes>       80:31011/TCP   9d
redis-master   10.254.16.93   <none>        6379/TCP       6s
[root@master yaml]#
4、创建redis slave deployment配置文件
1)创建redis-salve-deployment
[root@master yaml]# vim redis-slave-deployment.yaml

apiVersion: extensions/v1beta1
kind: Deployment
metadata:
  name: redis-slave
  # these labels can be applied automatically
  # from the labels in the pod template if not set
  # labels:
  #   app: redis
  #   role: slave
  #   tier: backend
spec:
  # this replicas value is default
  # modify it according to your case
  replicas: 2
  # selector can be applied automatically
  # from the labels in the pod template if not set
  # selector:
  #   matchLabels:
  #     app: guestbook
  #     role: slave
  #     tier: backend
  template:
    metadata:
      labels:
        app: redis
        role: slave
        tier: backend
    spec:
      containers:
      - name: slave
        image: docker.io/kubeguide/guestbook-redis-slave:latest
        imagePullPolicy: IfNotPresent
        resources:
          requests:
            cpu: 100m
            memory: 100Mi
        env:
        - name: GET_HOSTS_FROM
          value: env
          # If your cluster config does not include a dns service, then to
          # instead access an environment variable to find the master
          # service's host, comment out the 'value: dns' line above, and
          # uncomment the line below.
          # value: env
        ports:
        - containerPort: 6379
2)启动redis-slave-deployment
[root@master yaml]# kubectl create -f /etc/kubernetes/yaml/redis-slave-deployment.yaml
deployment "redis-slave" created
[root@master yaml]# kubectl get deploy                                   #---查看deployment
NAME           DESIRED   CURRENT   UP-TO-DATE   AVAILABLE   AGE
nginx          2         2         2            2           22h
redis-master   1         1         1            1           11m
redis-slave    2         2         2            2           7s
[root@master yaml]# kubectl get pods                                    #---查看pods
NAME                            READY     STATUS    RESTARTS   AGE
nginx-2187705812-n5wsr          1/1       Running   1          22h
nginx-2187705812-zngv0          1/1       Running   1          22h
redis-master-3671804942-vjx86   1/1       Running   0          30m
redis-slave-2377017994-9nk3l    1/1       Running   0          19m
redis-slave-2377017994-vfd4b    1/1       Running   0          19m
[root@master yaml]# kubectl get pods -o wide                                #---查看pod 详细信息,可以看到一个master两个slave
NAME                            READY     STATUS    RESTARTS   AGE       IP             NODE
nginx-2187705812-n5wsr          1/1       Running   1          22h       10.255.101.2   node2
nginx-2187705812-zngv0          1/1       Running   1          22h       10.255.58.2    node1
redis-master-3671804942-vjx86   1/1       Running   0          31m       10.255.58.3    node1
redis-slave-2377017994-9nk3l    1/1       Running   0          19m       10.255.101.4   node2
redis-slave-2377017994-vfd4b    1/1       Running   0          19m       10.255.58.4    node1
[root@master yaml]#
5、创建slave service 配置文件
1)创建redis-slave-service.yaml
[root@master yaml]# vim /etc/kubernetes/yaml/redis-slave-service.yaml

apiVersion: v1
kind: Service
metadata:
  name: redis-slave
  labels:
    app: redis
    role: slave
    tier: backend
spec:
  ports:
    # the port that this service should serve on
  - port: 6379
  selector:
    app: redis
    role: slave
    tier: backend
2)启动这service
[root@master yaml]# kubectl create -f /etc/kubernetes/yaml/redis-slave-service.yaml
service "redis-slave" created
[root@master yaml]# kubectl get svc -o wide
NAME           CLUSTER-IP      EXTERNAL-IP   PORT(S)        AGE       SELECTOR
kubernetes     10.254.0.1      <none>        443/TCP        14d       <none>
nginx          10.254.8.125    <nodes>       80:31011/TCP   9d        name=nginx
redis-master   10.254.16.93    <none>        6379/TCP       32m       app=redis,role=master,tier=backend
redis-slave    10.254.22.156   <none>        6379/TCP       10s       app=redis,role=slave,tier=backend
[root@master yaml]#
6、创建fronteng guestbook deployment配置文件
这个是一个简单的PHP服务,用来和master service (写请求),slave service(读请求)交互
1)创建编辑frontend-deployment.yaml
[root@master yaml]# vim frontend-deployment.yaml

apiVersion: extensions/v1beta1
kind: Deployment
metadata:
  name: frontend
  # these labels can be applied automatically
  # from the labels in the pod template if not set
  # labels:
  #   app: guestbook
  #   tier: frontend
spec:
  # this replicas value is default
  # modify it according to your case
  replicas: 3
  # selector can be applied automatically
  # from the labels in the pod template if not set
  # selector:
  #   matchLabels:
  #     app: guestbook
  #     tier: frontend
  template:
    metadata:
      labels:
        app: guestbook
        tier: frontend
    spec:
      containers:
      - name: php-redis
        image: docker.io/kubeguide/guestbook-php-frontend:latest
        imagePullPolicy: IfNotPresent
        resources:
          requests:
            cpu: 100m
            memory: 100Mi
        env:
        - name: GET_HOSTS_FROM
          value: env
          # If your cluster config does not include a dns service, then to
          # instead access environment variables to find service host
          # info, comment out the 'value: dns' line above, and uncomment the
          # line below.
          # value: env
        ports:
        - containerPort: 80
2)启动这个deployment
可以看到三个frontend,一个master,两个slave
[root@master yaml]# kubectl create -f frontend-deployment.yaml
deployment "frontend" created
[root@master yaml]# kubectl get deploy
NAME           DESIRED   CURRENT   UP-TO-DATE   AVAILABLE   AGE
frontend       3         3         3            3           10s
nginx          2         2         2            2           22h
redis-master   1         1         1            1           48m
redis-slave    2         2         2            2           37m
[root@master yaml]# kubectl get pods -o wide
NAME                            READY     STATUS    RESTARTS   AGE       IP             NODE
frontend-1186687533-0g08q       1/1       Running   0          24s       10.255.58.5    node1
frontend-1186687533-fxf29       1/1       Running   0          24s       10.255.101.5   node2
frontend-1186687533-q38fx       1/1       Running   0          24s       10.255.101.6   node2
nginx-2187705812-n5wsr          1/1       Running   1          22h       10.255.101.2   node2
nginx-2187705812-zngv0          1/1       Running   1          22h       10.255.58.2    node1
redis-master-3671804942-vjx86   1/1       Running   0          49m       10.255.58.3    node1
redis-slave-2377017994-9nk3l    1/1       Running   0          37m       10.255.101.4   node2
redis-slave-2377017994-vfd4b    1/1       Running   0          37m       10.255.58.4    node1
[root@master yaml]#
7、创建frontend guestbook service 配置文件
1)创建frontend-service.yaml
[root@master yaml]# vim frontend-service.yaml

apiVersion: v1
kind: Service
metadata:
  name: frontend
  labels:
    app: guestbook
    tier: frontend
spec:
  # if your cluster supports it, uncomment the following to automatically create
  # an external load-balanced IP for the frontend service.
  # type: LoadBalancer
  type: NodePort
  ports:
    # the port that this service should serve on
  - port: 80
    nodePort: 30001
  selector:
    app: guestbook
    tier: frontend
2)启动这个service
[root@master yaml]# kubectl create -f /etc/kubernetes/yaml/frontend-service.yaml
service "frontend" created
[root@master yaml]# kubectl get svc -o wide
NAME           CLUSTER-IP       EXTERNAL-IP   PORT(S)        AGE       SELECTOR
frontend       10.254.129.194   <nodes>       80:30001/TCP   4m        app=guestbook,tier=frontend
kubernetes     10.254.0.1       <none>        443/TCP        14d       <none>
nginx          10.254.8.125     <nodes>       80:31011/TCP   9d        name=nginx
redis-master   10.254.16.93     <none>        6379/TCP       52m       app=redis,role=master,tier=backend
redis-slave    10.254.22.156    <none>        6379/TCP       20m       app=redis,role=slave,tier=backend
[root@master yaml]#
3)node1 查看端口
[root@node1 k8s]# netstat -antup |grep 30001
tcp6       0      0 :::30001                :::*                    LISTEN      1110/kube-proxy
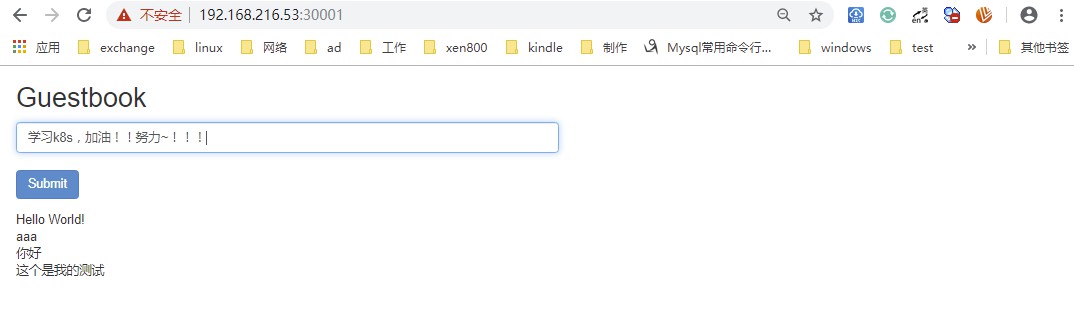
三、验证
1、访问web端
http://192.168.216.53:30001/
参考:互联网内容
总结流程:准备deployment和service配置文件》导入镜像》启动deployment和service
kubernetes系列文章请见:
部署:请见Kubernetes2-K8s的集群部署
kubectl:请见Kubernetes3-kubectl管理Kubernetes容器平台-1
kubectl:请见Kubernetes3-kubectl管理Kubernetes容器平台-2
Kubernetes Dashboard web界面:请见Kubernetes4-web管理界面