The Xilinx® Platform Studio (XPS) main window comprises several viewing panels. The numbered sections of the main window are described below.
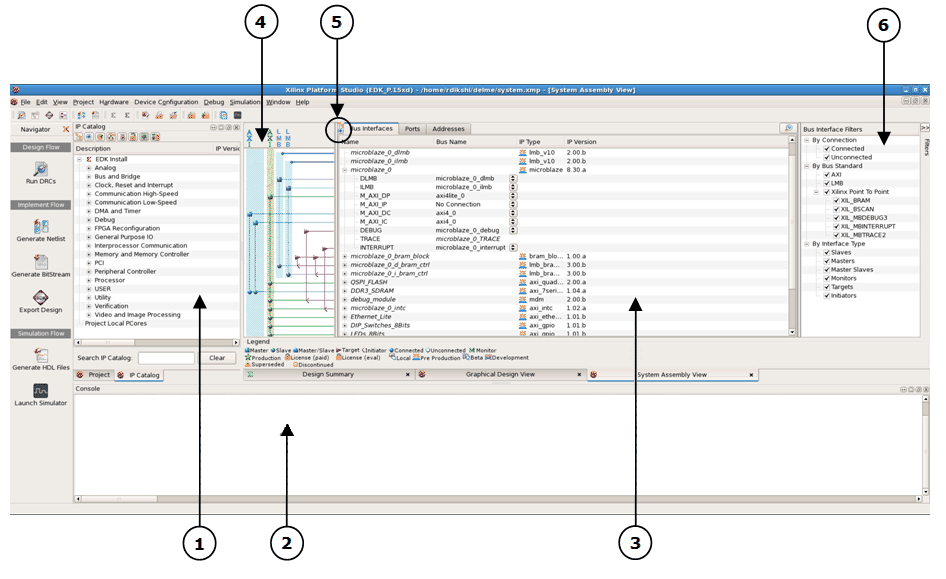
The Project Information Area (1)
The Project Information Area has three tabs:
- Project Tab
The Project tab opens the Project Explorer, which lists references to project-related files. This information is grouped together in the following general categories:
- Project Files: This category includes all project-specific files. These include the Microprocessor Hardware Specification (MHS) files, User Constraints File (UCF) file, iMPACT Command files, Implementation Option file, and BitGen Option files, and software ELF files associated with each processor instance. For more information on these files, refer to XPS Project Files.
- Project Options: This category includes all project-specific options. The options include Device, Netlist, Implementation, Hardware Description Language (HDL), and Sim Model. Double-click or right-click any entry to open the Project Options dialog box, in which you can change the option assignments.
- Design Summary: Double-click to open the Design Summary, which provides quick access to various report files. You can also use the Design Summary to filter and sort messages for various stages of design generation.
- IP Catalog Tab
The IP Catalog tab opens the IP Catalog, which lists all the EDK IP cores, as well as any custom IP cores that you created. Only the IP cores compatible with the target Xilinx® device architecture are displayed. The catalog lists information about the IP cores, including release version, status (PRODUCTION, DISCONTINUED, PRE_PRODUCTION, SUPERSEDED, DEVELOPMENT, BETA, REMOVED), lock (not licensed, locked, or unlocked), processor support and a short description. Additional details about the IP core, including the version change history, data sheet, and Microprocessor Peripheral Description file (MPD), are available in the right-click menu. By default the IP cores are grouped by function, but alternately can be viewed in a flattened list.
The System Assembly view displays when an XPS project is open, and it closes when the project is closed. This view allows you to view and edit your hardware platform. Select the Bus Interface, Ports, and Addresses tabs to view the corresponding aspects of your design. The default is Hierarchical view, in which the information of your design is grouped into a tree by the IP core instances in your hardware platform. Refer to the following topics for more information about using these tabs:
- Bus Interface tab: Making Bus Connections Among IP Modules
- Ports tab: Making Port Connections Among IP Modules
- Addresses tab: Generating the Bus Address
- Viewing the hardware platform using the System Assembly View, including filtering and hiding ports and bus interfaces: Adding IP Modules to the Hardware Platform
You can change the layout of the information using the layout tool bar buttons (5) at the top of the pane.
- Click the Change to Flat View/Change to Hierarchical View toggle button
 to change between flat view and hierarchical view. In the flat view, you can sort the table in alphanumeric order by any column.
Note In Flat mode, IPs without bus interfaces are NOT shown.
- Click the Collapse All Tree Nodes/Expand All Tree Nodes button
 /
/  to expand or collapse all the nodes in the IP instance tree. You can also expand and collapse an individual tree node by clicking on the + or - sign next to it.
Note To tile the System Assembly view with another file open in the main window, use the tile buttons in the toolbar.
The Console Window acts as a console for output, warning, and error messages from XPS and from other tools invoked by XPS. Error, warning, and output messages are separated in tabbed windows. Click the Error and Warning links to open associated answer records. If you right-click or double-click an error that has an associated file name and line number, you can navigate to that file in the editor.
The Connectivity panel is part of the System Assembly View when the Bus Interface tab is selected. This panel is a graphical representation of the bus connectivity of your hardware platform. Each rectangle represents a bus, and each horizontal line represents the bus interfaces for an IP core. For a shared bus, a vertical line represents the bus connection. On an AXI design, multiple vertical lines within an AXI interconnect are present. Each vertical line represents a master connection within that AXI interconnect, which connects to an existing AXI master bus interface. A connector is displayed at the intersection if a compatible connection can be made among the bus and IP core bus interfaces. The rectangles and connectors are color-coded to show the compatibility. The different shapes of the connections symbolize the mastership of the IP core bus interface. A hollow connector represents a potential connection that you can make, and a filled connector represents a connection made. To make or disconnect a connection, click the connector symbol.
Note You can now view potential connections by selecting Edit > Preferences. Select System Assembly View in the Category panel on the left and select the Show Potential Connections check box. When the check box is unchecked, you can mouse over the Patch Panel and the potential connections are displayed. When the check box is checked, you can see the potential connections in the Patch Panel all the time.
You can use the Filter pane to create filters for bus interfaces or ports. The pane changes when you click the view tabs. To add or remove a search type, click to select or deselect the corresponding check box. The System Assembly View automatically updates when you make changes to the Filter pane.
The Filter Pane is collapsable to maximize the viewable area of the System Assembly View.