1. Java RMI介绍
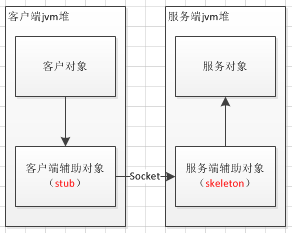
RMI:远程方法调用(Remote Method Invocation)。能够让在某个java虚拟机上的对象像调用本地对象方法一样调用另一个java 虚拟机中的对象上的方法。

1.RMI远程调用步骤
- 客户对象调用客户端辅助对象上的方法
- 客户端辅助对象打包调用信息(变量,方法名),通过网络发送给服务端辅助对象
- 服务端辅助对象将客户端辅助对象发送来的信息解包,找出真正被调用的方法以及该方法所在对象
- 调用真正服务对象上的真正方法,并将结果返回给服务端辅助对象
- 服务端辅助对象将结果打包,发送给客户端辅助对象
- 客户端辅助对象将返回值解包,返回给客户对象
- 客户对象获得返回值
2.RMI优缺点
- 优点: 移植性好,服务器代码可移植到客户端;
- 缺点: 服务端和客户端都需要是Java。
对于客户对象来说,步骤2-6是完全透明的。
以上简明扼要的介绍了什么是RMI和调用步骤,接下来,说说在程序中是如何使用rmi的。
2. 仅在jdk下程序中的使用
1. RMI服务端
1.创建一个服务端项目rmi-server
2.创建远程方法接口,该接口需要实现Remote接口
public interface IHelloService extends Remote {

    public String sayHello(String name) throws RemoteException;

    public int sum(int a, int b) throws RemoteException;
}
3.创建远程方法接口实现类,然后执行main方法就等于启动了rmi服务端了
public class HelloServiceImpl extends UnicastRemoteObject implements IHelloService {

    public HelloServiceImpl() throws RemoteException {
        super();
    }
    @Override
    public String sayHello(String name) throws RemoteException {
        return "hello: " + name;
    }

    @Override
    public int sum(int a, int b) throws RemoteException {
        return a + b;
    }

    public static void main(String args[]) {
        try {
            //创建一个远程对象
            IHelloService helloService = new HelloServiceImpl();
            //生成远程对象注册表Registry的实例,并指定端口为8888(默认端口是1099)
            LocateRegistry.createRegistry(8888);

            //把远程对象注册到RMI注册服务器上,并命名为RHello
            //绑定的URL标准格式为:rmi://host:port/name(协议名可以省略,下面两种写法都可以)
            Naming.bind("rmi://127.0.0.1:8888/HelloService", helloService);

            System.out.println(">>INFO:远程IHello对象绑定成功!");
        } catch (RemoteException e) {
            System.out.println("创建远程对象发生异常!");
            e.printStackTrace();
        } catch (AlreadyBoundException e) {
            System.out.println("发生重复绑定对象异常!");
            e.printStackTrace();
        } catch (MalformedURLException e) {
            System.out.println("发生URL畸形异常!");
            e.printStackTrace();
        }
    }
}
2. RMI客户端
1.新建一个客户端项目rmi-client
2.复制服务端的远程方法接口IHelloService,注意,包名要一致
3.测试类调用RMI服务
public class HelloServiceClientTest {
    @Test
    public void testSayHello() {
        try {
            // 在RMI服务注册表中查找名称为RHello的对象,并调用其上的方法
            IHelloService rhello = (IHelloService) Naming.lookup("rmi://127.0.0.1:8888/HelloService");
            System.out.println(rhello.sayHello("world"));
            System.out.println(rhello.sum(454, 5457));
        } catch (Exception e) {
            e.printStackTrace();
        }
    }
}
2. 在spring封装下程序中的使用
1. RMI服务端
1.创建一个基于Sringboot的项目rmi-server
2.创建一个远程方法接口
package com.wp.learn.spring.remoting;

import java.rmi.Remote;
import java.rmi.RemoteException;

public interface IHelloService extends Remote {

    public String sayHello(String name) throws RemoteException;

    public int sum(int a, int b) throws RemoteException;
}
3.实现远程方法接口
package com.wp.learn.spring.remoting.impl;

import com.wp.learn.jdk.remoting.IHelloService;
import org.springframework.stereotype.Service;

import java.rmi.RemoteException;


@Service
public class HelloServiceImpl implements IHelloService {

    @Override
    public String sayHello(String name) throws RemoteException {
        try {
            Thread.sleep(10000);
        } catch (InterruptedException e) {
            e.printStackTrace();
        }
        return "hello: " + name;
    }

    @Override
    public int sum(int a, int b) throws RemoteException {
        return a + b;
    }
}
4.rmi相关配置
@Configuration
public class RMIConfig {

    @Autowired
    @Qualifier("helloServiceImpl")
    private HelloServiceImpl helloService;

    @Bean
    public RmiServiceExporter initRmiServiceExporter(){
        RmiServiceExporter exporter=new RmiServiceExporter();
        exporter.setServiceInterface(IHelloService.class);
        exporter.setServiceName("HelloService");
        exporter.setService(helloService);
        exporter.setRegistryPort(10086);
        return exporter;
    }
}
2. RMI客户端
1.创建一个基于springboot的项目rmi-client
2.创建和服务端一样的远程方法接口,注意包名一致
3.rmi配置
@Configuration
public class RMIClientConfig {

    @Bean(name = "helloService")
    public RmiProxyFactoryBean initRmiProxyFactoryBean() {
        RmiProxyFactoryBean factoryBean = new RmiProxyFactoryBean();
        factoryBean.setServiceUrl("rmi://127.0.0.1:10086/HelloService");
        factoryBean.setServiceInterface(IHelloService.class);
        factoryBean.setLookupStubOnStartup(false);
        factoryBean.setRefreshStubOnConnectFailure(true);
//        lookupStubOnStartup : 这个属性是表示,不在容器启动的时候创建与Server端的连接;
//        refreshStubOnConnectFailure : 这个属性是表示是否连接出错时自动重连;
//        registryClientSocketFactory : 这个是客户端与服务端创建SOCKECT的一个工厂。
        return factoryBean;
    }
}
4.调用接口测试
@RestController
@RequestMapping(value = "/v1/")
public class RMIClientController {

//    @Autowired
//    @Qualifier(value = "helloService")
//    IHelloService helloService;

    @Autowired
    IHelloService helloService;

    @RequestMapping(value = "/test")
    public String test1() {
//        IHelloService helloService = (IHelloService) factoryBean.getObject();
        try {
            System.out.println(helloService.sayHello("小青"));
            System.out.println("----------------------------------");
            System.out.println(helloService.sum(132, 355));
        } catch (RemoteException e) {
            e.printStackTrace();
        }
        return "123";
    }
}
大功告成!源码地址: https://gitee.com/wangpinggs/learn/tree/master
相关博客:
http://www.blogjava.net/zhenyu33154/articles/320245.html
http://elf8848.iteye.com/blog/1961205