一、简介
Ocelot:Ocelot是一个用.NET Core实现并且开源的API网关,它功能强大,包括了:路由、请求聚合、服务发现、认证、鉴权、限流熔断、并内置了负载均衡器与Service Fabric、Butterfly Tracing集成,官方文档:https://ocelot.readthedocs.io/en/latest/index.html
Consul:Consul本质上是一个Socket通信中间件。它主要实现了两个功能,服务注册与发现与自身的负载均衡的集群。官方文档:https://www.consul.io/docs
二、API网关搭建
1、新建一个ASP.NET Core Web项目,选用空模板创建
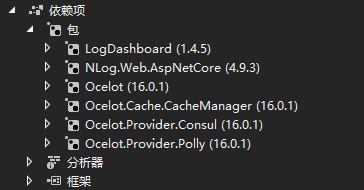
2、安装Ocelot相关包
3、在Startup中配置Ocelot
public void ConfigureServices(IServiceCollection services)
        {
            services.AddLogDashboard(opt =>
            {
                //授权登陆
                opt.AddAuthorizationFilter(new LogDashboardBasicAuthFilter("admin", "123qwE*"));
                //请求追踪
                opt.CustomLogModel<RequestTraceLogModel>();
            });

            services
                    .AddOcelot()
                    //服务发现
                    .AddConsul()
                    //缓存
                    .AddCacheManager(x =>
                    {
                        x.WithDictionaryHandle();
                    })
                    //服务质量控制
                    .AddPolly();

            services.AddCors(options =>
            {
                options.AddPolicy(_defaultCorsPolicyName,
                    builder => builder
                        .WithOrigins(
                            this.Configuration["App:CorsOrigins"]
                                .Split(",", StringSplitOptions.RemoveEmptyEntries)
                                .ToArray()
                        )
                        .AllowAnyMethod()
                        .AllowAnyHeader());
            });
        }
public void Configure(IApplicationBuilder app, IWebHostEnvironment env)
        {
            if (env.IsDevelopment())
            {
                app.UseDeveloperExceptionPage();
            }

       app.UseCors(_defaultCorsPolicyName);
            app.UseLogDashboard();

            app.UseOcelot().Wait();

        }
网关IdentityServer4鉴权只需要加如下配置即可:
/**
             * IdentityServer4鉴权:
             * 1、安装IdentityServer4.AccessTokenValidation NuGet包
             * 2、在Routes下加配置文件:
             * "AuthenticationOptions": {
                "AuthenticationProviderKey": "AuthKey",
                "AllowedScopes": []
              }
               3、注册中间件:
                services.AddAuthentication()
                    .AddIdentityServerAuthentication("AuthKey", options =>
                    {
                        options.Authority = "http://localhost:7889";
                        options.RequireHttpsMetadata = false;
                        options.ApiName = "api";
                        options.SupportedTokens = SupportedTokens.Both;
                        options.ApiSecret = "secret";
                    });
             */
新建Ocelot.json文件,这里开启了服务发现,后面讲解服务发现配置,具体如下:
{
  "Routes": [
    {
      //服务名称,开启服务发现时需要配置
      "ServiceName": "web-api",
      //是否开启服务发现
      "UseServiceDiscovery": true,
      //下游服务路由模板
      "DownstreamPathTemplate": "/{url}",
      //下游服务http schema
      "DownstreamScheme": "http",
      //下游服务的地址,如果使用LoadBalancer的话这里可以填多项
      //"DownstreamHostAndPorts": [
      //  {
      //    "Host": "192.168.1.205",
      //    "Port": 12000
      //  }
      //],
      "UpstreamPathTemplate": "/{url}",
      //上游请求http方法,可使用数组
      "UpstreamHttpMethod": [ "GET", "POST", "PUT", "DELETE", "OPTIONS" ],
      /**
       * 负载均衡的算法:
       * LeastConnection        – 跟踪哪些服务正在处理请求,并将新请求发送到具有最少现有请求的服务。算法状态没有分布在Ocelot集群中。
       * RoundRobin             – 遍历可用服务并发送请求。算法状态没有分布在Ocelot集群中。
       * NoLoadBalance          – 从配置或服务发现中获取第一个可用服务
       * CookieStickySessions   -  使用cookie将所有请求粘贴到特定服务器
       */
      "LoadBalancerOptions": {
        "Type": "LeastConnection"
        //以下配置再设置了 CookieStickySessions 后需要开启
        //用于粘性会话的cookie的密钥
        //"Key": "ASP.NET_SessionId",
        //会话被阻塞的毫秒数
        //"Expiry": 1800000
      },
      //缓存
      "FileCacheOptions": {
        "TtlSeconds": 15
        //"Region": ""
      },
      //限流
      "RateLimitOptions": {
        //包含客户端白名单的数组。这意味着该阵列中的客户端将不受速率限制的影响
        "ClientWhitelist": [],
        //是否启用端点速率限制
        "EnableRateLimiting": true,
        //指定限制所适用的期间,例如1s,5m,1h,1d等。如果在该期间内发出的请求超出限制所允许的数量,则需要等待PeriodTimespan过去,然后再发出其他请求
        "Period": "1s",
        //指定可以在一定秒数后重试
        "PeriodTimespan": 1,
        //指定客户端在定义的时间内可以发出的最大请求数
        "Limit": 10
      },
      //熔断
      "QoSOptions": {
        //允许多少个异常请求
        "ExceptionsAllowedBeforeBreaking": 3,
        //熔断的时间,单位为毫秒
        "DurationOfBreak": 1000,
        //如果下游请求的处理时间超过多少则自如将请求设置为超时
        "TimeoutValue": 5000
      },
      "HttpHandlerOptions": {
        //是否开启路由追踪
        "UseTracing": false
      }
    }
  ],
  "GlobalConfiguration": {
    "RequestIdKey": "OcelotRequestId",
    //Consul服务发现
    "ServiceDiscoveryProvider": {
      "Scheme": "http",
      "Host": "192.168.1.205",
      "Port": 8500,
      "Type": "Consul"
    },
    //外部暴露的Url
    "BaseUrl": "http://localhost:17450",
    //限流扩展配置
    "RateLimitOptions": {
      //指定是否禁用X-Rate-Limit和Retry-After标头
      "DisableRateLimitHeaders": false,
      //当请求过载被截断时返回的消息
      "QuotaExceededMessage": "Oh,Oops!",
      //当请求过载被截断时返回的http status
      "HttpStatusCode": 4421,
      //用来识别客户端的请求头,默认是 ClientId
      "ClientIdHeader": "ClientId"
    }
  }
}
appsettings.json配置如下:
{
  "Logging": {
    "LogLevel": {
      "Default": "Information",
      "Microsoft": "Warning",
      "Microsoft.Hosting.Lifetime": "Information"
    }
  },
  "App": {
    "CorsOrigins": "http://192.168.1.205:4422"
  }
}
修改Program.cs,安装NLog,因为网关启用了日志面板
public class Program
    {
        public static void Main(string[] args)
        {
            var logger = NLog.Web.NLogBuilder.ConfigureNLog("nlog.config").GetCurrentClassLogger();
            try
            {
                logger.Debug("init main");
                CreateWebHostBuilder(args).Build().Run();
            }
            catch (Exception ex)
            {
                //NLog: catch setup errors
                logger.Error(ex, "Stopped program because of exception");
                throw;
            }
            finally
            {
                // Ensure to flush and stop internal timers/threads before application-exit (Avoid segmentation fault on Linux)
                NLog.LogManager.Shutdown();
            }
        }

        private static IWebHostBuilder CreateWebHostBuilder(string[] args) =>
            WebHost.CreateDefaultBuilder(args)
                .ConfigureAppConfiguration((hostingContext, builder) =>
                {
                    builder
                        .SetBasePath(hostingContext.HostingEnvironment.ContentRootPath)
                        .AddJsonFile("appsettings.json", true, true)
                        .AddJsonFile($"appsettings.{hostingContext.HostingEnvironment.EnvironmentName}.json", true, true)
                        .AddJsonFile("Ocelot.json");
                })
                .UseStartup<Startup>()
                .ConfigureLogging(logging =>
                {
                    logging.ClearProviders();
                    logging.SetMinimumLevel(Microsoft.Extensions.Logging.LogLevel.Trace);
                })
                .UseNLog();  // NLog: setup NLog for Dependency injection
    }
nlog.config配置如下:
<?xml version="1.0" encoding="utf-8" ?>
<nlog xmlns="http://www.nlog-project.org/schemas/NLog.xsd"
      xmlns:xsi="http://www.w3.org/2001/XMLSchema-instance"
      autoReload="true"
      throwExceptions="false"
      internalLogLevel="Off" internalLogFile="nlog-internal.log">

  <variable name="myvar" value="myvalue"/>

  <targets>
    <target xsi:type="file" name="File" fileName="App_Data/Logs/${shortdate}.log"
            layout="${longdate}||${level}||${logger}||${message}||${exception:format=ToString:innerFormat=ToString:maxInnerExceptionLevel=10:separator=
} || ${aspnet-traceidentifier} ||end" />
</targets>

  <rules>
    <logger name="*" minlevel="Debug" writeTo="file" />
  </rules>
</nlog>
至此网关配置完成,接下来开始配置服务发现
三、服务注册、发现
下载consul,使用以下命令启动服务(这里不讲解集群搭建方式):
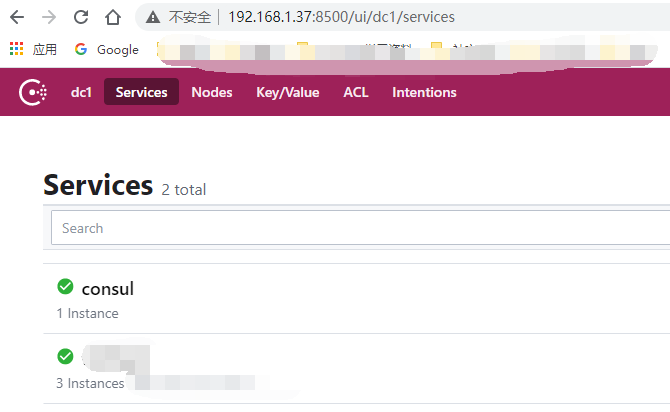
consul agent -server -ui -bootstrap-expect=1 -data-dir=/tmp/consul -node=consul-1 -client=0.0.0.0 -bind=192.168.1.37 -datacenter=dc1
浏览器打开UI界面如下:
新建WebApi项目,同时安装Consul包到你的项目

添加服务发现扩展类ServiceDiscoveryExtensions.cs
public static class ServiceDiscoveryExtensions
    {
        public static void AddConsul(this IServiceCollection serviceCollection)
        {
            IConfiguration configuration;
            using (var serviceProvider = serviceCollection.BuildServiceProvider())
            {
                configuration = serviceProvider.GetService<IConfiguration>();
            }

            ConsulOptions option = configuration.GetSection("Consul").Get<ConsulOptions>();

            if (option.Enabled)
            {
                serviceCollection.AddSingleton<IConsulClient>(c => new ConsulClient(cfg =>
                {
                    //Consul主机地址
                    if (!string.IsNullOrEmpty(option.Host))
                    {
                        cfg.Address = new Uri(option.Host);
                    }
                }));
            }
        }

        public static void UseConsul(this IApplicationBuilder app, IApplicationLifetime lifetime)
        {
            using (var scope = app.ApplicationServices.CreateScope())
            {
                var configuration = scope.ServiceProvider.GetService<IConfiguration>();

                ConsulOptions option = configuration.GetSection("Consul").Get<ConsulOptions>();

                if (option.Enabled)
                {
                    Guid serviceId = Guid.NewGuid();
                    string consulServiceID = $"{ option.App.Name }:{ serviceId }";

                    var client = scope.ServiceProvider.GetService<IConsulClient>();

                    //健康检查
                    var httpCheck = new AgentServiceCheck()
                    {
                        DeregisterCriticalServiceAfter = TimeSpan.FromSeconds(5),//服务启动多久后注册
                        Interval = TimeSpan.FromSeconds(10),//间隔固定的时间访问一次
                        HTTP = $"{ option.App.Scheme }://{ option.App.Host }:{ option.App.Port }/api/Health/Check",//健康检查地址
                        Timeout = TimeSpan.FromSeconds(5)
                    };

                    var consulServiceRistration = new AgentServiceRegistration
                    {
                        ID = consulServiceID,
                        Name = option.App.Name,
                        Address = option.App.Host,//注意:这个地方不能带Schema,否则网关会找不到服务;网关配置文件里面需要配置DownstreamScheme
                        Port = option.App.Port,
                        Tags = option.App.Tags,
                        Checks = new[] { httpCheck }
                    };

                    client.Agent.ServiceRegister(consulServiceRistration);

                    lifetime.ApplicationStopping.Register(() =>
                    {
                        client.Agent.ServiceDeregister(consulServiceRistration.ID).Wait();
                    });
                }
            }
        }
    }
配置实体ConsulOptions.cs:
/// <summary>
    /// Consul配置项目
    /// </summary>
    public class ConsulOptions
    {
        /// <summary>
        /// 是否启用
        /// </summary>
        public bool Enabled { get; set; }
        /// <summary>
        /// Consul主机地址
        /// </summary>
        public string Host { get; set; }
        /// <summary>
        /// 应用信息
        /// </summary>
        public AppInfo App { get; set; }
    }

    public class AppInfo
    {
        /// <summary>
        /// 应用名称
        /// </summary>
        public string Name { get; set; }
        /// <summary>
        /// 协议
        /// </summary>
        public string Scheme { get; set; }
        /// <summary>
        /// 应用主机地址
        /// </summary>
        public string Host { get; set; }
        /// <summary>
        /// 应用监听端口
        /// </summary>
        public int Port { get; set; }
        /// <summary>
        /// 标签
        /// </summary>
        public string[] Tags { get; set; }
    }
分别在ConfigureServices和Configure添加如下代码:
services.AddConsul();

app.UseConsul(lifetime);
appsetting.json添加如下配置项目:
"Consul": {
    //是否启用
    "Enabled": true,
    //Consul主机地址
    "Host": "http://192.168.1.37:8500",
    "App": {
      //应用名称
      "Name": "web-api",
      //协议
      "Scheme": "http",
      //应用主机地址
      "Host": "localhost",
      //应用监听端口
      "Port": 10002,
      //标签
      "Tags": [
        "web-api-node-1"
      ]
    }
  }
至此代码部分就完成了,接下来分别发布你的网关、API服务到服务器,访问你的网关地址:

可能会遇到的跨域问题解决:
            /**
             * 解决PUT和DELETE请求跨域问题(https://brockallen.com/2012/10/18/cors-iis-and-webdav/):
             * WebDAV 是超文本传输协议 (HTTP) 的一组扩展,为 Internet 上计算机之间的编辑和文件管理提供了标准.
             * 利用这个协议用户可以通过Web进行远程的基本文件操作,如拷贝、移动、删除等。
             * 在IIS 7.0中,WebDAV是作为独立扩展模块,需要单独进行下载,而IIS 7.5中将集成WebDAV,
             * 然而WebDav把Put,Delete给移除了,
             * 所以在IIS 7.5上部署的RESTful服务(WCF Data Service,WCF Rest Service,ASP.NET Web API,ASP.Net MVC)就悲剧了,
             * 当发送Put请求就会发生HTTP Error 405.0 – Method Not Allowed错误,解决方法也很简单,在Web.config里面加入如下设置:
             *
             * <system.webServer>
                  <modules>
                    <remove name="WebDAVModule" />
                  </modules>
                  <handlers>
                    <remove name="WebDAV" />
                  </handlers>
                </system.webServer>
             */