MySQL主从复制与读写分离
MySQL主从复制(Master-Slave)与读写分离(MySQL-Proxy)实践
Mysql作为目前世界上使用最广泛的免费数据库,相信所有从事系统运维的工程师都一定接触过。但在实际的生产环境中,由单台Mysql作为独立的数据库是完全不能满足实际需求的,无论是在安全性,高可用性以及高并发等各个方面。
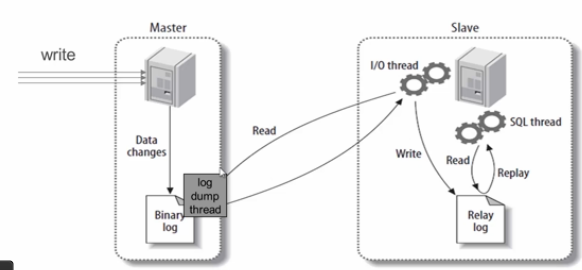
因此,一般来说都是通过 主从复制(Master-Slave)的方式来同步数据,再通过读写分离(MySQL-Proxy)来提升数据库的并发负载能力 这样的方案来进行部署与实施的。
如下图所示:
.png)

操作步鄹:
准备2台机子 分别启动数据库,一台为master,一台slave
master 10.0.0.1 3000
slave 10.0.0.2 3003
一.修改master配置文件 vim /etc/my.conf
log-bin = 3306-bin 开启bin-log,也可以指定路径
erver-id = 1 唯一标示
二.在master库创建个用户允许从库来同步
mysql> grant replication slave on *.* to 'rep'@'60.206.137.244' identified by 'test123';
ERROR 1290 (HY000): The MySQL server is running with the --skip-grant-tables option so it cannot execute this statement ####如果报错mysql> flush privileges;下在执行创建用户
# mysqldump -h127.0.0.1 -uroot -poldboy -P3000 -A -B --master-data=2 --events > /tmp/mysql.sql ##把主的数据备份出来
# mysql -h127.0.0.1 -uroot -poldboy -P3003 < mysql.sql ##把主库的数据导入到从库
三,修改从配置文件
修改slave配置文件 vim /etc/my.conf
log-bin = 3306-bin 开启bin-log,也可以指定路径
server-id = 2 唯一标示 ##主从要不一样
通过命令行登录管理MySQL服务器
mysql -uroot -p'密码'
执行从库SQL语句
change master to
master_host='60.206.137.244',
master_port=3000,
master_user='rep',
master_password='test123',
master_log_file='3306-bin.000001',
master_log_pos=333;
正确执行后启动Slave同步进程
mysql> start slave;
主从同步检查
mysql> show slave statusG
mysql> show slave statusG
*************************** 1. row ***************************
               Slave_IO_State: Waiting for master to send event
                  Master_Host: 60.206.137.244
                  Master_User: rep
                  Master_Port: 3000
                Connect_Retry: 60
              Master_Log_File: 3306-bin.000001
          Read_Master_Log_Pos: 606
               Relay_Log_File: 3308-relay-bin.000002
                Relay_Log_Pos: 555
        Relay_Master_Log_File: 3306-bin.000001
             Slave_IO_Running: Yes                          ###如果是OK  证明成功
            Slave_SQL_Running: Yes                         ###如果是OK 证明成功
              Replicate_Do_DB:
          Replicate_Ignore_DB:
           Replicate_Do_Table:
       Replicate_Ignore_Table:
      Replicate_Wild_Do_Table:
  Replicate_Wild_Ignore_Table:
                   Last_Errno: 0
                   Last_Error:
                 Skip_Counter: 0
          Exec_Master_Log_Pos: 606
              Relay_Log_Space: 727
              Until_Condition: None
               Until_Log_File:
                Until_Log_Pos: 0
           Master_SSL_Allowed: No
           Master_SSL_CA_File:
           Master_SSL_CA_Path:
              Master_SSL_Cert:
            Master_SSL_Cipher:
               Master_SSL_Key:
        Seconds_Behind_Master: 0            ##和master相差的数据差 一般是0
Master_SSL_Verify_Server_Cert: No
                Last_IO_Errno: 0
                Last_IO_Error:
               Last_SQL_Errno: 0
               Last_SQL_Error:
  Replicate_Ignore_Server_Ids:
             Master_Server_Id: 1
                  Master_UUID: 1f18ad9e-8e2d-11e8-9752-5254005c6bc7
             Master_Info_File: /data/ops/app/mysql-5.6.23/3308/master.info
                    SQL_Delay: 0
          SQL_Remaining_Delay: NULL
      Slave_SQL_Running_State: Slave has read all relay log; waiting for the slave I/O thread to update it
           Master_Retry_Count: 86400
                  Master_Bind:
      Last_IO_Error_Timestamp:
     Last_SQL_Error_Timestamp:
               Master_SSL_Crl:
           Master_SSL_Crlpath:
           Retrieved_Gtid_Set:
            Executed_Gtid_Set:
                Auto_Position: 0
验证:
mysql> create database test; ##主库创建库
Query OK, 1 row affected (0.00 sec)
mysql> show databases; ##从库能收到数据证明成功