一、起因&思路
不知不觉,已经好几天没写博客了。。。近来除了研究React,还做了公司官网。。。
一直想写一个原生js拖拽效果,又加上近来学react学得比较嗨。所以就用react来实现这个拖拽效果。
首先,其实拖拽效果的思路是很简单的。主要就是三个步骤:
1.onmousedown的时候,启动可拖拽事件,记录被拖拽元素的原始坐标参数。
2.onmousemove的时候,实时记录鼠标移动的距离,结合被拖拽元素第一阶段的坐标参数,计算并设置新的坐标值。
3.onmouseup的时候,关闭可拖拽事件,记录新的坐标值。
注意:这里主要是通过绝对定位的top和left来确定元素的位置的,因此被拖拽元素的css一定要设置绝对定位。
二、辅助工具
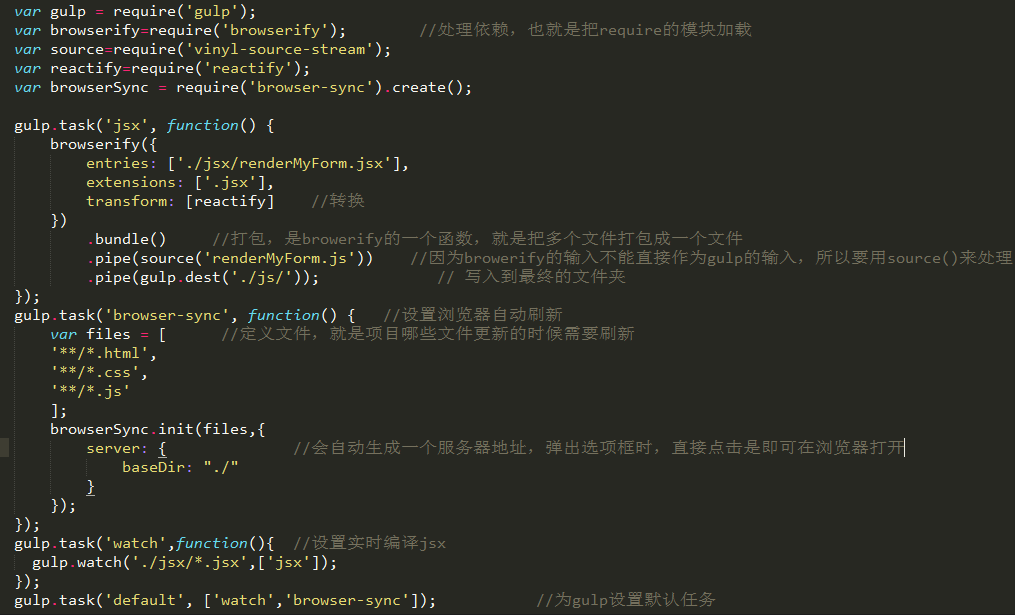
辅助工具主要就是是开发过程变得高效,而且酷炫的。在这个demo中,要给大家推荐一个gulp+browser-sync的开发工具,gulp有很多功能,在这个demo中gulp的作用主要是可以设置实时编译react中的jsx文件,当然如果你写css用的是sass,也可以设置实时编译sass。用browser-sync这个呢,主要就是可以自动实时刷新页面,我们平时做页面,看效果的时候,通常都是通过F5来刷新浏览器,然后看到页面的。但是用了这个插件,你写完代码的时候,只要按下,ctrl+s保存,新的效果就会自动在浏览器中刷新,然后看得到了。
用法详解:
安装:
1.在node的环境下,安装gulp,这里就不详说了,具体过程可参考我的博文《react.js入门必须知道的那些事》
2.安装gulp-livereload,在命令行或者git bash ,输入npm install --save-dev gulp-livereload
3.安装gulp-watch,在命令行或者git bash ,输入npm install --save-dev gulp-watch
4.安装browser-sync,在命令行或者git bash ,输入npm install --save-dev browser-sync
配置及解释如图:
三、定义组件构建页面
备注:这里的代码说明均在react相关模块安装好的情况下,安装过程见我的博文《react.js入门必须知道的那些事》.
效果图:

组件拆分思路:
我当时觉得组件拆分得细一点好,所以我把input、button分别做成了一个组件:
|
1
2
3
4
5
6
7
8
9
10
11
12
13
14
15
16
|
var React=require('react');var MyInput=React.createClass({ render:function(){ return ( <div className="form-group"> <label htmlFor={this.props.labelId} className="col-sm-2 control-label{this.props.labelTip</label> <div className="col-sm-10"> <input name={this.props.name} type={this.props.type} onChange={this.props.onChange} className="form-control" id={this.props.labelId} placeholder={this.props.placeholder}/> </div> </div> ); }});module.exports=MyInput; |
|
1
2
3
4
5
6
7
8
9
10
11
|
var React=require('react');var Button=React.createClass({ render:function(){ return ( <button type={this.props.type} className="loginButton">{this.props.ButtonTip}</button> ); }})module.exports=Button; |
由于input有很多都是需要指定的,这种情况下,如果像我这样定义需要传太多参数,而且其实登陆的input大多都是固定且没必要复用的,所以这样其实不大好。这里的input直接写比较好。
写好之后的父组件:
|
1
2
3
4
5
6
7
8
9
10
11
12
13
14
15
16
17
18
19
20
|
render:function(){ return ( <form className="form-horizontal" id="form" ref="dragBox" onSubmit={this.submitHandler} onMouseMove={this.move} onMouseUp={this.endDrag}> <DragArea callbackParent={this.onChildChanged} /> <div id="form-wrap"> <MyInput name="username" labelId={"userId"} labelTip={"用户名"} type={"text"} placeholder={"请输入用户名"} value={this.state.username} onChange={this.handleChange}/> <MyInput name="password" labelId={"pw"} labelTip={"密码"} type={"password"} placeholder={"请输入密码"} value={this.state.password} onChange={this.handleChange}/> <div className="form-group"> <div className="col-sm-offset-2 col-sm-10"> <div className="checkbox"> <label> <input name="checked" type="checkbox" checked={this.state.checked} onChange={this.handleChange} /> 记住我 </label> </div> </div> </div> <MyButton type={"submit"} ButtonTip={"登陆"}/> </div> </form> ); |
备注:因为demo中需要获取真实的dom节点,所以定义了ref。
再加上css样式,页面就完成啦!最后,重点来啦!!!
四、父子组件间通信实现拖拽
说明:由于我要实现的效果是,鼠标按住子组件DragArea的时候,拖动的是整个form,所以启动拖拽的是DragArea,而响应的是form。所以,一开始必须把父组件的一些状态属性传给子组件,然后鼠标在DragArea按下的的时候,必须通过子组件DragArea找到父组件的原始坐标参数,然后更新父组件里面的状态属性,并且告诉父组件可以进行拖拽了。父组件给子组件传参就是直接传递的。而子组件给父组件传参需要通过事件。所以在父组件中定义这么一个函数:
|
1
2
3
|
onChildChanged:function(newState){ //因为参数过多,所以把参数放到对象里面,通过对象来传 this.setState(newState);}, |
而子组件需要绑定这个函数,如上面的代码:callbackParent={this.onChildChanged}
在子组件中,响应的函数为:
|
1
2
3
4
5
6
7
8
9
10
11
12
13
|
startDrag:function(e){ var dragBox=document.getElementById('form'); var newState={}; var event=e||window.event; event.preventDefault(); var computedStyle=document.defaultView.getComputedStyle(dragBox,null); newState.left=computedStyle.left; newState.top=computedStyle.top; newState.currentX=event.clientX; newState.currentY=event.clientY; newState.flag=true; this.props.callbackParent(newState);} |
这样,在子组件中就启动了拖拽开关,并且已经更新了from的相关参数,from的两外两个事件,move和endDrag分别为:
|
1
2
3
4
5
6
7
8
9
10
11
12
13
14
15
16
17
|
move:function(event){ var e = event ? event : window.event; //兼容IE的写法 if (this.state.flag) { var nowX = e.clientX, nowY = e.clientY; var disX = nowX - this.state.currentX, disY = nowY - this.state.currentY; ReactDOM.findDOMNode(this.refs.dragBox).style.left = parseInt(this.state.left) + disX + "px"; ReactDOM.findDOMNode(this.refs.dragBox).style.top = parseInt(this.state.top) + disY + "px"; }},endDrag:function(){ var computedStyle=document.defaultView.getComputedStyle(ReactDOM.findDOMNode(this.refs.dragBox),null); this.setState({ left:computedStyle.left, top:computedStyle.top, flag:false });} |
至此,拖拽实现!
五、反思回顾
1.理论上来说,拖拽效果可以在任意元素中实现,拖拽的思路都是一致的,所以理论上来说,拖拽各个过程的函数可以抽离出来,做成一个Mixin,然后可以反复调用。我一开始的思路就是这样,但是在传参、响应、绑定元素上面总是出错。查找了一下资料,没找到react与拖拽的简单写法资料,只有一些react的专用插件,而且是用ES6的写法,由于现在的水平还没能看懂。所以暂时放弃了这种写法。希望有相关想法的大神们和我交流一下。
2.文中子组件获取from的参数时,用了var dragBox=document.getElementById('form');去找dom,这样好像违反了react的一些理念。但是我还不是很熟悉该怎么从子组件获取父组件的dom。我试过在父组件定义refs=this.refs.dragBox。然后传给子组件,但是不知道为什么浏览器一直报错说这个不是dom节点。求大神指教。
3.拖拽事件的一般写法,是在document上面定义mousemove和mouseup事件,但是这两个事件都关联到from的参数,这样的话,如果我在react中定义在document,就跟踪不了相关参数。所以我就定义在了from上面。是不是有更好的方法呢?求分享!
4.革命尚未成功,同志仍需努力!