future初识
通过下面脚本来对future进行一个初步了解:
例子1:普通通过循环的方式
 1 import os
 2 import time
 3 import sys
 4
 5 import requests
 6
 7
 8 POP20_CC = (
 9     "CN IN US ID BR PK NG BD RU JP MX PH VN ET EG DE IR TR CD FR"
10 ).split()
11
12
13 BASE_URL = 'http://flupy.org/data/flags'
14
15 DEST_DIR = 'downloads/'
16
17
18 def save_flag(img,filename):
19     path = os.path.join(DEST_DIR,filename)
20     with open(path,'wb') as fp:
21         fp.write(img)
22
23
24 def get_flag(cc):
25     url = "{}/{cc}/{cc}.gif".format(BASE_URL,cc=cc.lower())
26     resp = requests.get(url)
27     return resp.content
28
29
30 def show(text):
31     print(text,end=" ")
32     sys.stdout.flush()
33
34
35 def download_many(cc_list):
36     for cc in sorted(cc_list):
37         image = get_flag(cc)
38         show(cc)
39         save_flag(image,cc.lower()+".gif")
40
41     return len(cc_list)
42
43
44 def main(download_many):
45     t0 = time.time()
46     count = download_many(POP20_CC)
47     elapsed = time.time()-t0
48     msg = "
{} flags downloaded in {:.2f}s"
49     print(msg.format(count,elapsed))
50
51
52 if __name__ == '__main__':
53     main(download_many)
例子2:通过future方式实现,这里对上面的部分代码进行了复用
 1 from concurrent import futures
 2
 3 from flags import save_flag, get_flag, show, main
 4
 5
 6 MAX_WORKERS = 20
 7
 8
 9 def download_one(cc):
10     image = get_flag(cc)
11     show(cc)
12     save_flag(image, cc.lower()+".gif")
13     return cc
14
15
16 def download_many(cc_list):
17     workers = min(MAX_WORKERS,len(cc_list))
18     with futures.ThreadPoolExecutor(workers) as executor:
19         res = executor.map(download_one, sorted(cc_list))
20
21     return len(list(res))
22
23
24 if __name__ == '__main__':
25     main(download_many)
分别运行三次,两者的平均速度:13.67和1.59s,可以看到差别还是非常大的。
future
future是concurrent.futures模块和asyncio模块的重要组件
从python3.4开始标准库中有两个名为Future的类:concurrent.futures.Future和asyncio.Future
这两个类的作用相同:两个Future类的实例都表示可能完成或者尚未完成的延迟计算。与Twisted中的Deferred类、Tornado框架中的Future类的功能类似
注意:通常情况下自己不应该创建future,而是由并发框架(concurrent.futures或asyncio)实例化
原因:future表示终将发生的事情,而确定某件事情会发生的唯一方式是执行的时间已经安排好,因此只有把某件事情交给concurrent.futures.Executor子类处理时,才会创建concurrent.futures.Future实例。
如:Executor.submit()方法的参数是一个可调用的对象,调用这个方法后会为传入的可调用对象排定时间,并返回一个future
客户端代码不能应该改变future的状态,并发框架在future表示的延迟计算结束后会改变期物的状态,我们无法控制计算何时结束。
这两种future都有.done()方法,这个方法不阻塞,返回值是布尔值,指明future链接的可调用对象是否已经执行。客户端代码通常不会询问future是否运行结束,而是会等待通知。因此两个Future类都有.add_done_callback()方法,这个方法只有一个参数,类型是可调用的对象,future运行结束后会调用指定的可调用对象。
.result()方法是在两个Future类中的作用相同:返回可调用对象的结果,或者重新抛出执行可调用的对象时抛出的异常。但是如果future没有运行结束,result方法在两个Futrue类中的行为差别非常大。
对concurrent.futures.Future实例来说,调用.result()方法会阻塞调用方所在的线程,直到有结果可返回,此时,result方法可以接收可选的timeout参数,如果在指定的时间内future没有运行完毕,会抛出TimeoutError异常。
而asyncio.Future.result方法不支持设定超时时间,在获取future结果最好使用yield from结构,但是concurrent.futures.Future不能这样做
不管是asyncio还是concurrent.futures.Future都会有几个函数是返回future,其他函数则是使用future,在最开始的例子中我们使用的Executor.map就是在使用future,返回值是一个迭代器,迭代器的__next__方法调用各个future的result方法,因此我们得到的是各个futrue的结果,而不是future本身
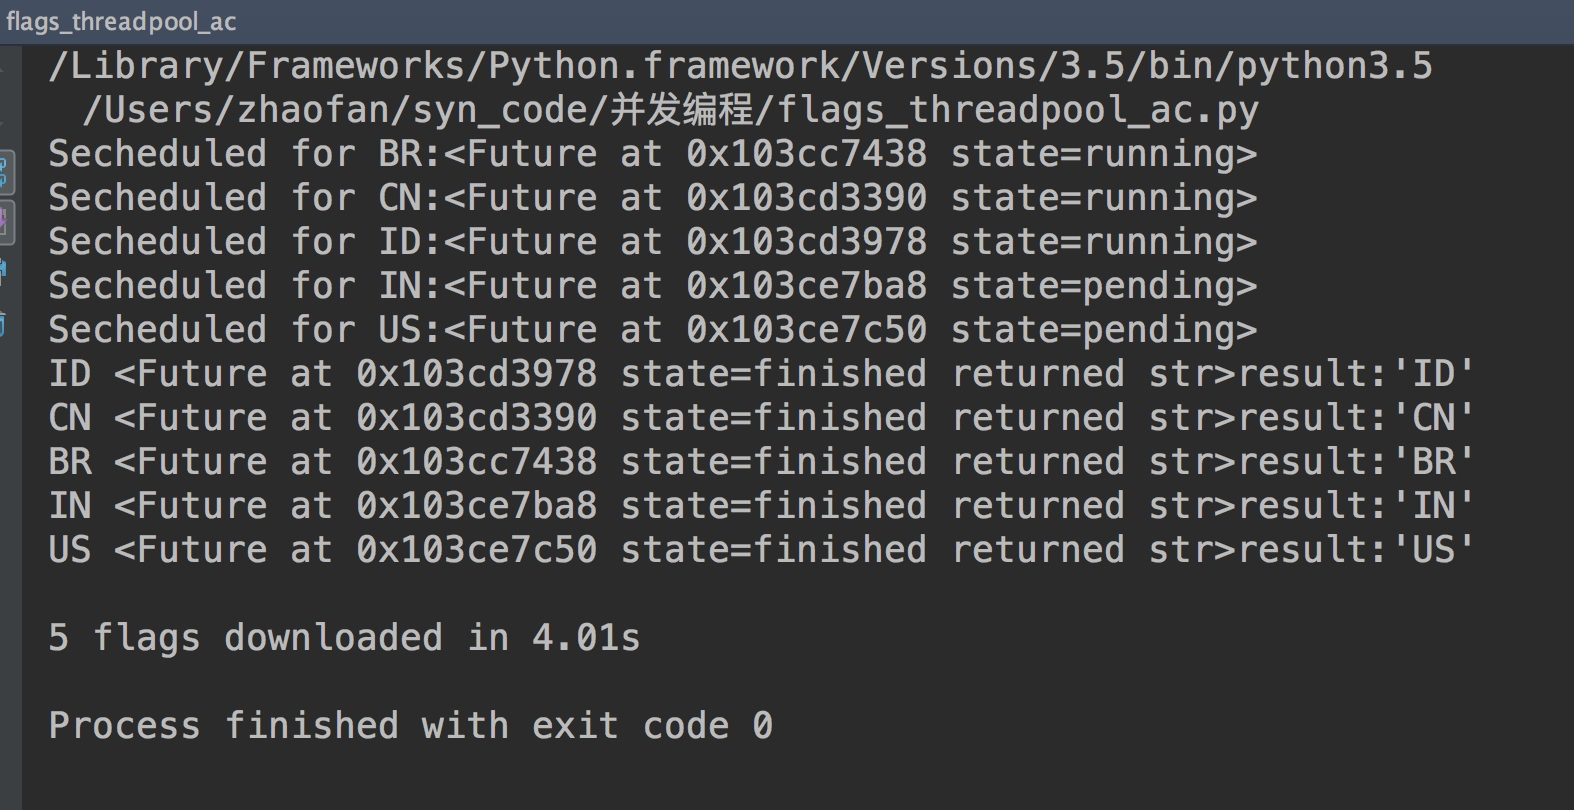
关于future.as_completed函数的使用,这里我们用了两个循环,一个用于创建并排定future,另外一个用于获取future的结果
 1 from concurrent import futures
 2
 3 from flags import save_flag, get_flag, show, main
 4
 5
 6 MAX_WORKERS = 20
 7
 8
 9 def download_one(cc):
10     image = get_flag(cc)
11     show(cc)
12     save_flag(image, cc.lower()+".gif")
13     return cc
14
15
16 def download_many(cc_list):
17     cc_list = cc_list[:5]
18     with futures.ThreadPoolExecutor(max_workers=3) as executor:
19         to_do = []
20         for cc in sorted(cc_list):
21             future = executor.submit(download_one,cc)
22             to_do.append(future)
23             msg = "Secheduled for {}:{}"
24             print(msg.format(cc,future))
25
26         results = []
27         for future in futures.as_completed(to_do):
28             res = future.result()
29             msg = "{}result:{!r}"
30             print(msg.format(future,res))
31             results.append(res)
32
33     return len(results)
34
35
36 if __name__ == '__main__':
37     main(download_many)
结果如下:

注意:Python代码是无法控制GIL,标准库中所有执行阻塞型IO操作的函数,在等待操作系统返回结果时都会释放GIL.运行其他线程执行,也正是因为这样,Python线程可以在IO密集型应用中发挥作用
以上都是concurrent.futures启动线程,下面通过它启动进程
concurrent.futures启动进程
concurrent.futures中的ProcessPoolExecutor类把工作分配给多个Python进程处理,因此,如果需要做CPU密集型处理,使用这个模块能绕开GIL,利用所有的CPU核心。
其原理是一个ProcessPoolExecutor创建了N个独立的Python解释器,N是系统上面可用的CPU核数。
使用方法和ThreadPoolExecutor方法一样