本文为自学记录,部分内容转载于
python3网络爬虫实战
知乎专栏:写点python
如有侵权,请联系删除。
语法
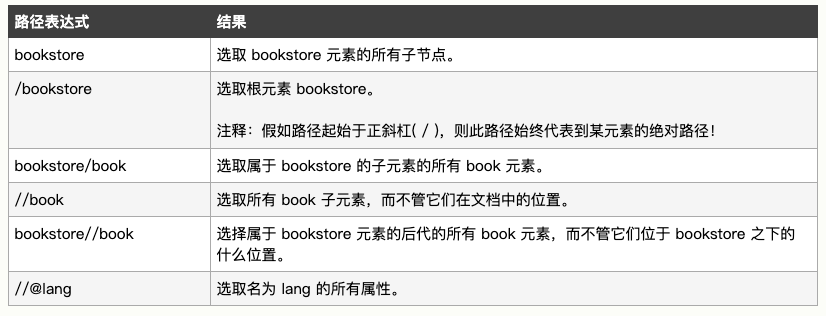
1、选取节点
XPath 使用路径表达式在 XML 文档中选取节点。节点是通过沿着路径或者 step 来选取的。

实例解释

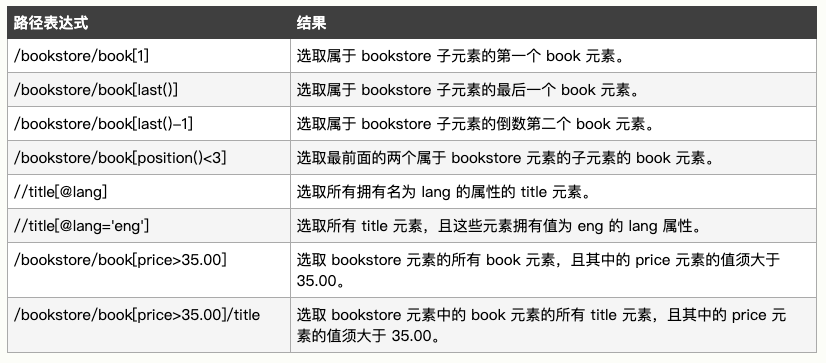
2、谓语
谓语用来查找某个特定的节点或者包含某个指定的值的节点。
谓语被嵌在方括号中。

text ='''
<bookstore>
<book>
  <title lang="eng">Harry Potter</title>
  <price>29.99</price>
</book>
<book>
  <title lang="eng">Learning XML</title>
  <price>39.95</price>
</book>
</bookstore>
'''

from lxml import etree

# 初始化,构造xpath解析对象
html = etree.HTML(text)
# 修正HTML代码,结果为bytes类型,还需要转化为str类型
# html  = etree.tostring(html,encoding='utf-8')
result = html.xpath('//@lang')
print(result)

结果:
['eng', 'eng']
3、选取未知节点

4、选取若干路径

实例
from lxml import etree
myPage = '''<html>
        <title>TITLE</title>
        <body>
        <h1>我的博客</h1>
        <div>我的文章</div>
        <div id="photos">
         <img src="pic1.jpeg"/><span id="pic1">PIC1 is beautiful!</span>
         <img src="pic2.jpeg"/><span id="pic2">PIC2 is beautiful!</span>
         <p><a href="http://www.example.com/more_pic.html">更多美图</a></p>
         <a href="http://www.baidu.com">去往百度</a>
         <a href="http://www.163.com">去往网易</a>
         <a href="http://www.sohu.com">去往搜狐</a>
        </div>
        <p class="myclassname">Hello,
world!<br/>-- by Adam</p>
        <div class="foot">放在尾部的其他一些说明</div>
        </body>
        </html>'''

html = etree.HTML(myPage)

# 定位
div1 = html.xpath('//div')
div2 = html.xpath('//div[@id]')
div3 = html.xpath('//div[@class="foot"]')
div4 = html.xpath('//div[@*]')
div5 = html.xpath('//div[1]')
div6 = html.xpath('//div[last()-1]')
div7 = html.xpath('//div[position()<3]')
div8 = html.xpath('//div|//h1')
div9 = html.xpath('//div[not(@*)]')

# 取文本text()区别html.xpath('string()')
text1 = html.xpath('//div/text()')
text2 = html.xpath('//div[@id]/text()')
text3 = html.xpath('//div[@class="foot"]/text()')
text4 = html.xpath('//div[@*]/text()')
text5 = html.xpath('//div[1]/text()')
text6 = html.xpath('//div[last()-1]/text()')
text7 = html.xpath('//div[position()<3]/text()')
text8 = html.xpath('//div/text()|//h1/text()')
text9 = html.xpath('//div[not(@*)]/text()')

# 取属性
value1 = html.xpath('//a/@href')
value2 = html.xpath('//img/@src')
value3 = html.xpath('div[2]/span/@id')

# print(value1)
# print(value2)
# print(value3)
# 定位(进阶)
a_href = html.xpath('//div[position()<3]/a/@href')
print(a_href)


a_href = html.xpath('//div[position()<3]//a/@href')
print(a_href)
实例2
在上一篇爬取猫眼TOP100里面,我们是用正则表达式去进行解析的,这里用xpath进行解析测试
from lxml import etree
html = '''
<dd>
                        <i class="board-index board-index-1">1</i>
    <a href="/films/1203" title="霸王别姬" class="image-link" data-act="boarditem-click" data-val="{movieId:1203}">
      <img src="//s0.meituan.net/bs/?f=myfe/mywww:/image/loading_2.e3d934bf.png" alt="" class="poster-default" />
      <img data-src="https://p1.meituan.net/movie/20803f59291c47e1e116c11963ce019e68711.jpg@160w_220h_1e_1c" alt="霸王别姬" class="board-img" />
    </a>
    <div class="board-item-main">
      <div class="board-item-content">
              <div class="movie-item-info">
        <p class="name"><a href="/films/1203" title="霸王别姬" data-act="boarditem-click" data-val="{movieId:1203}">霸王别姬</a></p>
        <p class="star">
                主演:张国荣,张丰毅,巩俐
        </p>
<p class="releasetime">上映时间:1993-01-01</p>    </div>
    <div class="movie-item-number score-num">
<p class="score"><i class="integer">9.</i><i class="fraction">5</i></p>
    </div>

      </div>
    </div>

                </dd>
'''

# 初始化
html = etree.HTML(html)
# html = etree.tostring(html, encoding='utf-8')
# print(html.decode('utf-8'))
# print(type(html))
# print(html)
# 排名
index = html.xpath('//dd/i[@class="board-index board-index-1"]/text()')
print(index)
# 图片
image = html.xpath('//dd/a/img/@data-src')
print(image)
# 标题
title = html.xpath('//dd/div/div/div/p/a/text()')
print(title)
# 演员
star = html.xpath('//dd/div/div/div/p[@class="star"]/text()')
print(star)
# 上映时间
time = html.xpath('//dd/div/div/div/p[@class="releasetime"]/text()')
print(time)
# 评分
sorce = html.xpath('//dd/div/div/div/p/i[@class="integer"]/text()')
print(sorce)
sorce2 = html.xpath('//dd/div/div/div/p/i[@class="fraction"]/text()')
print(sorce2)
结果:
