All Hadoop sub-projects such as Hive, Pig, and HBase support Linux operating system. Therefore, you need to install any Linux flavored OS. The following simple steps are executed for Hive installation:
Step 1: Verifying JAVA Installation
Java must be installed on your system before installing Hive. Let us verify java installation using the following command:
$ java –version
If Java is already installed on your system, you get to see the following response:
java version "1.7.0_71"
Java(TM) SE Runtime Environment (build 1.7.0_71-b13)
Java HotSpot(TM) Client VM (build 25.0-b02, mixed mode)
If java is not installed in your system, then follow the steps given below for installing java.
Installing Java
Step I:
Download java (JDK <latest version> - X64.tar.gz) by visiting the following link http://www.oracle.com/technetwork/java/javase/downloads/jdk7-downloads-1880260.html.
Then jdk-7u71-linux-x64.tar.gz will be downloaded onto your system.
Step II:
Generally you will find the downloaded java file in the Downloads folder. Verify it and extract the jdk-7u71-linux-x64.gz file using the following commands.
$ cd Downloads/
$ ls
jdk-7u71-linux-x64.gz
$ tar zxf jdk-7u71-linux-x64.gz
$ ls
jdk1.7.0_71 jdk-7u71-linux-x64.gz
Step III:
To make java available to all the users, you have to move it to the location “/usr/local/”. Open root, and type the following commands.
$ su
password:
# mv jdk1.7.0_71 /usr/local/
# exit
Step IV:
For setting up PATH and JAVA_HOME variables, add the following commands to ~/.bashrc file.
export JAVA_HOME=/usr/local/jdk1.7.0_71
export PATH=$PATH:$JAVA_HOME/bin
Now apply all the changes into the current running system.
$ source ~/.bashrc
Step V:
Use the following commands to configure java alternatives:
# alternatives --install /usr/bin/java java usr/local/java/bin/java 2
# alternatives --install /usr/bin/javac javac usr/local/java/bin/javac 2
# alternatives --install /usr/bin/jar jar usr/local/java/bin/jar 2
# alternatives --set java usr/local/java/bin/java
# alternatives --set javac usr/local/java/bin/javac
# alternatives --set jar usr/local/java/bin/jar
Now verify the installation using the command java -version from the terminal as explained above.
Step 2: Verifying Hadoop Installation
Hadoop must be installed on your system before installing Hive. Let us verify the Hadoop installation using the following command:
$ hadoop version
If Hadoop is already installed on your system, then you will get the following response:
Hadoop 2.4.1 Subversion https://svn.apache.org/repos/asf/hadoop/common -r 1529768
Compiled by hortonmu on 2013-10-07T06:28Z
Compiled with protoc 2.5.0
From source with checksum 79e53ce7994d1628b240f09af91e1af4
If Hadoop is not installed on your system, then proceed with the following steps:
Downloading Hadoop
Download and extract Hadoop 2.4.1 from Apache Software Foundation using the following commands.
$ su
password:
# cd /usr/local
# wget http://apache.claz.org/hadoop/common/hadoop-2.4.1/
hadoop-2.4.1.tar.gz
# tar xzf hadoop-2.4.1.tar.gz
# mv hadoop-2.4.1/* to hadoop/
# exit
Installing Hadoop in Pseudo Distributed Mode
The following steps are used to install Hadoop 2.4.1 in pseudo distributed mode.
Step I: Setting up Hadoop
You can set Hadoop environment variables by appending the following commands to ~/.bashrc file.
export HADOOP_HOME=/usr/local/hadoop
export HADOOP_MAPRED_HOME=$HADOOP_HOME
export HADOOP_COMMON_HOME=$HADOOP_HOME
export HADOOP_HDFS_HOME=$HADOOP_HOME
export YARN_HOME=$HADOOP_HOME
export HADOOP_COMMON_LIB_NATIVE_DIR=$HADOOP_HOME/lib/native export
PATH=$PATH:$HADOOP_HOME/sbin:$HADOOP_HOME/bin
Now apply all the changes into the current running system.
$ source ~/.bashrc
Step II: Hadoop Configuration
You can find all the Hadoop configuration files in the location “$HADOOP_HOME/etc/hadoop”. You need to make suitable changes in those configuration files according to your Hadoop infrastructure.
$ cd $HADOOP_HOME/etc/hadoop
In order to develop Hadoop programs using java, you have to reset the java environment variables in hadoop-env.sh file by replacing JAVA_HOME value with the location of java in your system.
export JAVA_HOME=/usr/local/jdk1.7.0_71
Given below are the list of files that you have to edit to configure Hadoop.
core-site.xml
The core-site.xml file contains information such as the port number used for Hadoop instance, memory allocated for the file system, memory limit for storing the data, and the size of Read/Write buffers.
Open the core-site.xml and add the following properties in between the <configuration> and </configuration> tags.
<configuration>
   <property>
      <name>fs.default.name</name>
      <value>hdfs://localhost:9000</value>
   </property>
</configuration>
hdfs-site.xml
The hdfs-site.xml file contains information such as the value of replication data, the namenode path, and the datanode path of your local file systems. It means the place where you want to store the Hadoop infra.
Let us assume the following data.
dfs.replication (data replication value) = 1

(In the following path /hadoop/ is the user name.
hadoopinfra/hdfs/namenode is the directory created by hdfs file system.)

namenode path = //home/hadoop/hadoopinfra/hdfs/namenode

(hadoopinfra/hdfs/datanode is the directory created by hdfs file system.)
datanode path = //home/hadoop/hadoopinfra/hdfs/datanode
Open this file and add the following properties in between the <configuration>, </configuration> tags in this file.
<configuration>
   <property>
      <name>dfs.replication</name>
      <value>1</value>
   </property>
   <property>
      <name>dfs.name.dir</name>
      <value>file:///home/hadoop/hadoopinfra/hdfs/namenode</value>
   </property>
   <property>
      <name>dfs.data.dir</name>
      <value>file:///home/hadoop/hadoopinfra/hdfs/datanode</value >
   </property>
</configuration>
Note: In the above file, all the property values are user-defined and you can make changes according to your Hadoop infrastructure.
yarn-site.xml
This file is used to configure yarn into Hadoop. Open the yarn-site.xml file and add the following properties in between the <configuration>, </configuration> tags in this file.
<configuration>
   <property>
      <name>yarn.nodemanager.aux-services</name>
      <value>mapreduce_shuffle</value>
   </property>
</configuration>
mapred-site.xml
This file is used to specify which MapReduce framework we are using. By default, Hadoop contains a template of yarn-site.xml. First of all, you need to copy the file from mapred-site,xml.template to mapred-site.xml file using the following command.
$ cp mapred-site.xml.template mapred-site.xml
Open mapred-site.xml file and add the following properties in between the <configuration>, </configuration> tags in this file.
<configuration>
   <property>
      <name>mapreduce.framework.name</name>
      <value>yarn</value>
   </property>
</configuration>
Verifying Hadoop Installation
The following steps are used to verify the Hadoop installation.
Step I: Name Node Setup
Set up the namenode using the command “hdfs namenode -format” as follows.
$ cd ~
$ hdfs namenode -format
The expected result is as follows.
10/24/14 21:30:55 INFO namenode.NameNode: STARTUP_MSG:
/************************************************************
STARTUP_MSG: Starting NameNode
STARTUP_MSG: host = localhost/192.168.1.11
STARTUP_MSG: args = [-format]
STARTUP_MSG: version = 2.4.1
...
...
10/24/14 21:30:56 INFO common.Storage: Storage directory
/home/hadoop/hadoopinfra/hdfs/namenode has been successfully formatted.
10/24/14 21:30:56 INFO namenode.NNStorageRetentionManager: Going to
retain 1 images with txid >= 0
10/24/14 21:30:56 INFO util.ExitUtil: Exiting with status 0
10/24/14 21:30:56 INFO namenode.NameNode: SHUTDOWN_MSG:
/************************************************************
SHUTDOWN_MSG: Shutting down NameNode at localhost/192.168.1.11
 ************************************************************/
Step II: Verifying Hadoop dfs
The following command is used to start dfs. Executing this command will start your Hadoop file system.
$ start-dfs.sh
The expected output is as follows:
10/24/14 21:37:56
Starting namenodes on [localhost]
localhost: starting namenode, logging to /home/hadoop/hadoop-2.4.1/logs/hadoop-hadoop-namenode-localhost.out
localhost: starting datanode, logging to /home/hadoop/hadoop-2.4.1/logs/hadoop-hadoop-datanode-localhost.out
Starting secondary namenodes [0.0.0.0]
Step III: Verifying Yarn Script
The following command is used to start the yarn script. Executing this command will start your yarn daemons.
$ start-yarn.sh
The expected output is as follows:
starting yarn daemons
starting resourcemanager, logging to /home/hadoop/hadoop-2.4.1/logs/yarn-hadoop-resourcemanager-localhost.out
localhost: starting nodemanager, logging to /home/hadoop/hadoop-2.4.1/logs/yarn-hadoop-nodemanager-localhost.out
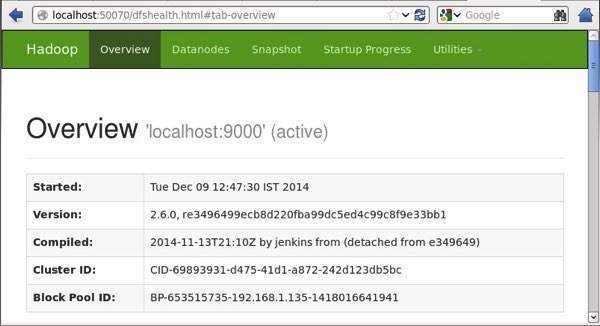
Step IV: Accessing Hadoop on Browser
The default port number to access Hadoop is 50070. Use the following url to get Hadoop services on your browser.
http://localhost:50070/
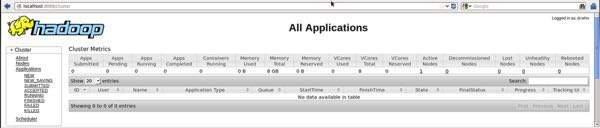
Step V: Verify all applications for cluster
The default port number to access all applications of cluster is 8088. Use the following url to visit this service.
http://localhost:8088/
Step 3: Downloading Hive
We use hive-0.14.0 in this tutorial. You can download it by visiting the following link http://apache.petsads.us/hive/hive-0.14.0/. Let us assume it gets downloaded onto the /Downloads directory. Here, we download Hive archive named “apache-hive-0.14.0-bin.tar.gz” for this tutorial. The following command is used to verify the download:
$ cd Downloads
$ ls
On successful download, you get to see the following response:
apache-hive-0.14.0-bin.tar.gz
Step 4: Installing Hive
The following steps are required for installing Hive on your system. Let us assume the Hive archive is downloaded onto the /Downloads directory.
Extracting and verifying Hive Archive
The following command is used to verify the download and extract the hive archive:
$ tar zxvf apache-hive-0.14.0-bin.tar.gz
$ ls
On successful download, you get to see the following response:
apache-hive-0.14.0-bin apache-hive-0.14.0-bin.tar.gz
Copying files to /usr/local/hive directory
We need to copy the files from the super user “su -”. The following commands are used to copy the files from the extracted directory to the /usr/local/hive” directory.
$ su -
passwd:

# cd /home/user/Download
# mv apache-hive-0.14.0-bin /usr/local/hive
# exit
Setting up environment for Hive
You can set up the Hive environment by appending the following lines to ~/.bashrc file:
export HIVE_HOME=/usr/local/hive
export PATH=$PATH:$HIVE_HOME/bin
export CLASSPATH=$CLASSPATH:/usr/local/Hadoop/lib/*:.
export CLASSPATH=$CLASSPATH:/usr/local/hive/lib/*:.
The following command is used to execute ~/.bashrc file.
$ source ~/.bashrc
Step 5: Configuring Hive
To configure Hive with Hadoop, you need to edit the hive-env.sh file, which is placed in the $HIVE_HOME/conf directory. The following commands redirect to Hive config folder and copy the template file:
$ cd $HIVE_HOME/conf
$ cp hive-env.sh.template hive-env.sh
Edit the hive-env.sh file by appending the following line:
export HADOOP_HOME=/usr/local/hadoop
Hive installation is completed successfully. Now you require an external database server to configure Metastore. We use Apache Derby database.
Step 6: Downloading and Installing Apache Derby
Follow the steps given below to download and install Apache Derby:
Downloading Apache Derby
The following command is used to download Apache Derby. It takes some time to download.
$ cd ~
$ wget http://archive.apache.org/dist/db/derby/db-derby-10.4.2.0/db-derby-10.4.2.0-bin.tar.gz
The following command is used to verify the download:
$ ls
On successful download, you get to see the following response:
db-derby-10.4.2.0-bin.tar.gz
Extracting and verifying Derby archive
The following commands are used for extracting and verifying the Derby archive:
$ tar zxvf db-derby-10.4.2.0-bin.tar.gz
$ ls
On successful download, you get to see the following response:
db-derby-10.4.2.0-bin db-derby-10.4.2.0-bin.tar.gz
Copying files to /usr/local/derby directory
We need to copy from the super user “su -”. The following commands are used to copy the files from the extracted directory to the /usr/local/derby directory:
$ su -
passwd:
# cd /home/user
# mv db-derby-10.4.2.0-bin /usr/local/derby
# exit
Setting up environment for Derby
You can set up the Derby environment by appending the following lines to ~/.bashrc file:
export DERBY_HOME=/usr/local/derby
export PATH=$PATH:$DERBY_HOME/bin
export CLASSPATH=$CLASSPATH:$DERBY_HOME/lib/derby.jar:$DERBY_HOME/lib/derbytools.jar
The following command is used to execute ~/.bashrc file:
$ source ~/.bashrc
Create a directory to store Metastore
Create a directory named data in $DERBY_HOME directory to store Metastore data.
$ mkdir $DERBY_HOME/data
Derby installation and environmental setup is now complete.
Step 7: Configuring Metastore of Hive
Configuring Metastore means specifying to Hive where the database is stored. You can do this by editing the hive-site.xml file, which is in the $HIVE_HOME/conf directory. First of all, copy the template file using the following command:
$ cd $HIVE_HOME/conf
$ cp hive-default.xml.template hive-site.xml
Edit hive-site.xml and append the following lines between the <configuration> and </configuration> tags:
<property>
   <name>javax.jdo.option.ConnectionURL</name>
   <value>jdbc:derby://localhost:1527/metastore_db;create=true</value>
   <description>JDBC connect string for a JDBC metastore</description>
</property>
Create a file named jpox.properties and add the following lines into it:
javax.jdo.PersistenceManagerFactoryClass = org.jpox.PersistenceManagerFactoryImpl
org.jpox.autoCreateSchema = false
org.jpox.validateTables = false
org.jpox.validateColumns = false
org.jpox.validateConstraints = false
org.jpox.storeManagerType = rdbms
org.jpox.autoCreateSchema = true
org.jpox.autoStartMechanismMode = checked
org.jpox.transactionIsolation = read_committed
javax.jdo.option.DetachAllOnCommit = true
javax.jdo.option.NontransactionalRead = true
javax.jdo.option.ConnectionDriverName = org.apache.derby.jdbc.ClientDriver
javax.jdo.option.ConnectionURL = jdbc:derby://hadoop1:1527/metastore_db;create = true
javax.jdo.option.ConnectionUserName = APP
javax.jdo.option.ConnectionPassword = mine
Step 8: Verifying Hive Installation
Before running Hive, you need to create the /tmp folder and a separate Hive folder in HDFS. Here, we use the /user/hive/warehouse folder. You need to set write permission for these newly created folders as shown below:
chmod g+w
Now set them in HDFS before verifying Hive. Use the following commands:
$ $HADOOP_HOME/bin/hadoop fs -mkdir /tmp
$ $HADOOP_HOME/bin/hadoop fs -mkdir /user/hive/warehouse
$ $HADOOP_HOME/bin/hadoop fs -chmod g+w /tmp
$ $HADOOP_HOME/bin/hadoop fs -chmod g+w /user/hive/warehouse
The following commands are used to verify Hive installation:
$ cd $HIVE_HOME
$ bin/hive
On successful installation of Hive, you get to see the following response:
Logging initialized using configuration in jar:file:/home/hadoop/hive-0.9.0/lib/hive-common-0.9.0.jar!/hive-log4j.properties
Hive history file=/tmp/hadoop/hive_job_log_hadoop_201312121621_1494929084.txt
………………….
hive>
The following sample command is executed to display all the tables:
hive> show tables;
OK
Time taken: 2.798 seconds
hive>