Jedis源码分析
Jedis继承关系
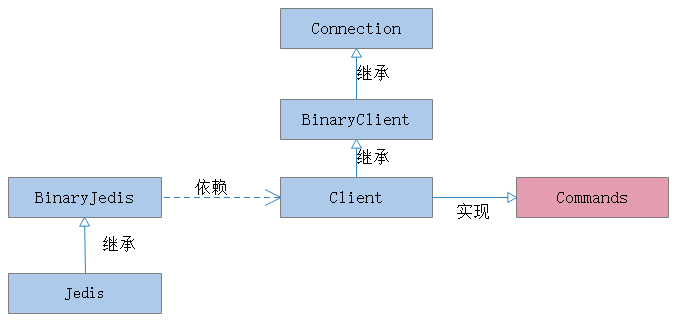
Jedis提供了redis的客户端的连接和命令查询.从jedis继承关系中,Jedis实现很多的命令接口,每个接口都定义了不同的操作形式,这符合面向对象开发原则中的接口隔离原则和单一职责原则。下面的接口声明了相关的redis命令操作,每个接口都负责对一部分的命令进行方法声明。
下列接口由父类BinaryJedis所依赖的接口
- BasicCommands:提供基础的查询命令,如ping,quit,flushdb
- BinaryJedisCommands:提供了针对redis数据结构的CURD等操作,其中参数(K-V)必须以byte数组形式提供
- MultiKeyBinaryCommands:提供了针对redis数据结构的CURD等批量操作,其中参数(K-V)必须以byte数组形式提供
- AdvancedBinaryJedisCommands:提供高级操作redis的命令,如config相关,slowlog,client等命令,其中参数(K-V)必须以byte数组形式提供
- BinaryScriptingCommands:提供Lua脚本运行命令,命令必须以byte数组形式提供。
Jedis所依赖的接口
- JedisCommands:提供了针对redis数据结构的CURD等操作,其中参数(K-V)必须以String形式提供
- MultiKeyCommands:提供了针对redis数据结构的CURD等批量操作,其中参数(K-V)必须以String数组形式提供
- AdvancedJedisCommands:提供高级操作redis的命令,如config相关,slowlog,client等命令,其中参数(K-V)必须以String形式提供
- ScriptingCommands:提供Lua脚本运行命令,命令必须以String形式提供。
- BasicCommands:提供如ping,quit,flushDb运维类命令
- ClusterCommands:提供集群状态查看,集群操作的命令
- SentinelCommands:提供哨兵操作命令
- ModuleCommands:提供redis模块加载和卸载命令
除了方法接口声明之外,Jedis提供了客户端接口Client,使用该类仍然可以连接Redis服务端并进行相关的命令操作.Client本身只是提供相关的命令方法,而各方法的声明则需要Commands接口,连接操作则需要Connection类,也就是说Client类类似于一个前台,可以提供各种服务,而具体的实现则依赖于Connection和Commands.Client提供方法与jedis基本一致,少于不同的是,Client类不提供get()方法的返回值。
package com.zzz.jedis.service;
import org.junit.Test;
import redis.clients.jedis.Client;
public class ClientTest {
    @Test
    public void testClient() {
        Client client = new Client("localhost");
        client.connect();
        System.out.println(client.isConnected());
        client.set("a", "zhangsan");
        client.close();
    }
}
Jedis如何连接服务端
Jedis通过Socket对Redis 服务端进行连接,而Jedis和Client本身并没有socket连接方法的实现,相关的连接方法都在Connection类中,观察如下的继承关系,Connection类是其顶层的实现类。Jedis或者Client发送命令时,必须通过Connection类的connect()方法建立TCP连接。

在使用Connection类时,需提供相关的参数进行实例化,从构造方法可以看到,需要提供主机名,如果不设置,则使用默认名localhost.连接端口,不设置则使用默认端口6379,连接超时时长(如果不进行设置,则默认与socketTimeout保持一致),socket读取超时时长(如果不进行设置,则使用默认时长2000ms),SSL加密传输则是可选的。在连接时必须判断当前对象的连接状态,如代码2-1所示,如果符合条件则新建Socket实例。
代码1-1:Connection构造方法
  public Connection(final String host, final int port, final boolean ssl,
      SSLSocketFactory sslSocketFactory, SSLParameters sslParameters,
      HostnameVerifier hostnameVerifier) {
    this.host = host;
    this.port = port;
    this.ssl = ssl;
    this.sslSocketFactory = sslSocketFactory;
    this.sslParameters = sslParameters;
    this.hostnameVerifier = hostnameVerifier;
  }
代码2-1:socket是否连接状态
 public boolean isConnected() {
    return socket != null && socket.isBound() && !socket.isClosed() && socket.isConnected()
        && !socket.isInputShutdown() && !socket.isOutputShutdown();
  }
代码2-2:socket连接
public void connect() {
    if (!isConnected()) {
      try {
        socket = new Socket();
        // ->@wjw_add
        socket.setReuseAddress(true);
        socket.setKeepAlive(true); // Will monitor the TCP connection is
        // valid
        socket.setTcpNoDelay(true); // Socket buffer Whetherclosed, to
        // ensure timely delivery of data
        socket.setSoLinger(true, 0); // Control calls close () method,
        // the underlying socket is closed
        // immediately
        // <-@wjw_add

        socket.connect(new InetSocketAddress(host, port), connectionTimeout);
        socket.setSoTimeout(soTimeout);
        //SSL 加密连接
        if (ssl) {
          if (null == sslSocketFactory) {
            sslSocketFactory = (SSLSocketFactory)SSLSocketFactory.getDefault();
          }
          socket = sslSocketFactory.createSocket(socket, host, port, true);
          if (null != sslParameters) {
            ((SSLSocket) socket).setSSLParameters(sslParameters);
          }
          if ((null != hostnameVerifier) &&
              (!hostnameVerifier.verify(host, ((SSLSocket) socket).getSession()))) {
            String message = String.format(
                "The connection to '%s' failed ssl/tls hostname verification.", host);
            throw new JedisConnectionException(message);
          }
        }
        //获取socket对象的输入输出流
        outputStream = new RedisOutputStream(socket.getOutputStream());
        inputStream = new RedisInputStream(socket.getInputStream());
      } catch (IOException ex) {
        broken = true;
        throw new JedisConnectionException("Failed connecting to host "
            + host + ":" + port, ex);
      }
    }
  }
向Redis服务端发送命令
Jedis和Client类通过Connection对象的sendCommand()方法进行命令传输,在传输命令时必须将字符串转为字节数组,如果类似于ping,ask这样的命令,只需要将命令转为字节即可。转换完成之后写入到输出流中,将字节流发送给Redis 服务端。
代码3:发送命令
  public void sendCommand(final ProtocolCommand cmd) {
    sendCommand(cmd, EMPTY_ARGS);
  }

  public void sendCommand(final ProtocolCommand cmd, final String... args) {
    final byte[][] bargs = new byte[args.length][];
    for (int i = 0; i < args.length; i++) {
      bargs[i] = SafeEncoder.encode(args[i]);
    }
    sendCommand(cmd, bargs);
  }

  public void sendCommand(final ProtocolCommand cmd, final byte[]... args) {
    try {
      connect();
      Protocol.sendCommand(outputStream, cmd, args);
    } catch (JedisConnectionException ex) {
      /*
       * When client send request which formed by invalid protocol, Redis send back error message
       * before close connection. We try to read it to provide reason of failure.
       */
      try {
        String errorMessage = Protocol.readErrorLineIfPossible(inputStream);
        if (errorMessage != null && errorMessage.length() > 0) {
          ex = new JedisConnectionException(errorMessage, ex.getCause());
        }
      } catch (Exception e) {
        /*
         * Catch any IOException or JedisConnectionException occurred from InputStream#read and just
         * ignore. This approach is safe because reading error message is optional and connection
         * will eventually be closed.
         */
      }
      // Any other exceptions related to connection?
      broken = true;
      throw ex;
    }
  }