HAProxy介绍
(1)HAProxy 是一款提供高可用性、负载均衡以及基于TCP(第四层)和HTTP(第七层)应用的代理软件,支持虚拟主机,它是免费、快速并且可靠的一种解决方案。 HAProxy特别适用于那些负载特大的web站点,这些站点通常又需要会话保持或七层处理。HAProxy运行在时下的硬件上,完全可以支持数以万计的 并发连接。并且它的运行模式使得它可以很简单安全的整合进您当前的架构中, 同时可以保护你的web服务器不被暴露到网络上。
(2)HAProxy 实现了一种事件驱动、单一进程模型,此模型支持非常大的并发连接数。多进程或多线程模型受内存限制 、系统调度器限制以及无处不在的锁限制,很少能处理数千并发连接。事件驱动模型因为在有更好的资源和时间管理的用户端(User-Space) 实现所有这些任务,所以没有这些问题。此模型的弊端是,在多核系统上,这些程序通常扩展性较差。这就是为什么他们必须进行优化以 使每个CPU时间片(Cycle)做更多的工作。
(3)HAProxy 支持连接拒绝 : 因为维护一个连接的打开的开销是很低的,有时我们很需要限制攻击蠕虫(attack bots),也就是说限制它们的连接打开从而限制它们的危害。 这个已经为一个陷于小型DDoS攻击的网站开发了而且已经拯救了很多站点,这个优点也是其它负载均衡器没有的。
(4)HAProxy 支持全透明代理(已具备硬件防火墙的典型特点): 可以用客户端IP地址或者任何其他地址来连接后端服务器. 这个特性仅在Linux 2.4/2.6内核打了cttproxy补丁后才可以使用. 这个特性也使得为某特殊服务器处理部分流量同时又不修改服务器的地址成为可能。
性能,HAProxy借助于OS上几种常见的技术来实现性能的最大化:
(1)单进程、事件驱动模型显著降低了上下文切换的开销及内存占用。
(2)O(1)事件检查器(event checker)允许其在高并发连接中对任何连接的任何事件实现即时探测。
(3)在任何可用的情况下,单缓冲(single buffering)机制能以不复制任何数据的方式完成读写操作,这会节约大量的CPU时钟周期及内存带宽。
(4)借助于Linux 2.6 (>= 2.6.27.19)上的splice()系统调用,HAProxy可以实现零复制转发(Zero-copy forwarding),在Linux 3.5及以上的OS中还可以实现零复制启动(zero-starting)。
(5)内存分配器在固定大小的内存池中可实现即时内存分配,这能够显著减少创建一个会话的时长。
(6)树型存储:侧重于使用作者多年前开发的弹性二叉树,实现了以O(log(N))的低开销来保持计时器命令、保持运行队列命令及管理轮询及最少连接队列。
(7)优化的HTTP首部分析:优化的首部分析功能避免了在HTTP首部分析过程中重读任何内存区域。
(8)精心地降低了昂贵的系统调用,大部分工作都在用户空间完成,如时间读取、缓冲聚合及文件描述符的启用和禁用等。
所有的这些细微之处的优化实现了在中等规模负载之上依然有着相当低的CPU负载,甚至于在非常高的负载场景中,5%的用户空间占用率和95%的系统空间占用率也是非常普遍的现象,这意味着HAProxy进程消耗比系统空间消耗低20倍以上。因此,对OS进行性能调优是非常重要的。即使用户空间的占用率提高一倍,其CPU占用率也仅为10%,这也解释了为何7层处理对性能影响有限这一现象。由此,在高端系统上HAProxy的7层性能可轻易超过硬件负载均衡设备。
在生产环境中,在7层处理上使用HAProxy作为昂贵的高端硬件负载均衡设备故障故障时的紧急解决方案也时长可见。硬件负载均衡设备在“报文”级别处理请求,这在支持跨报文请求(request across multiple packets)有着较高的难度,并且它们不缓冲任何数据,因此有着较长的响应时间。对应地,软件负载均衡设备使用TCP缓冲,可建立极长的请求,且有着较大的响应时间。
系统环境centos7.0
[root@bogon ~]# uname -r
3.10.0-327.10.1.el7.x86_64
haproxy 192.168.231.129
apache 192.168.231.128:80
apache 192.168.231.130:80/8080
软件haproxy+apache做负载均衡
[root@192.168.231.128]$ apache(httpd-2.2.26)
[root@192.168.231.128]$ tar –zxvf httpd-2.2.26.tar.gz
[root@192.168.231.128]$ cd httpd-2.2.26
[root@httpd-2.2.26]$./configure --prefix=/usr/local/apache

--with-apr=/usr/local/apr-httpd/

--with-apr-util=/usr/local/apr-util-httpd/ --enable-so

--enable-mods-shared=all --with-mpm=worker
[root@httpd-2.2.26]$ make && make install
[root@httpd-2.2.26]$ ln -s /usr/local/apache/bin/* /usr/local/bin
[root@httpd-2.2.26]$ /usr/local/apache/bin/apachectl start
[root@httpd-2.2.26]$cat /etc/init.d/httpd


#!/bin/bash
#
# Startup script for the Apache Web Server
#
# chkconfig: - 85 15
# description: Apache is a World Wide Web server. It is used to serve
# HTML files and CGI.
# processname: httpd
# pidfile: /usr/local/apache/logs/httpd.pid
# config: /usr/local/apache/conf/httpd.conf

# Source function library.
. /etc/rc.d/init.d/functions

if [ -f /etc/sysconfig/httpd ]; then
 . /etc/sysconfig/httpd
fi

# This will prevent initlog from swallowing up a pass-phrase prompt if
# mod_ssl needs a pass-phrase from the user.
INITLOG_ARGS=""

# Path to the apachectl script, server binary, and short-form for messages.
apachectl=/usr/local/apache/bin/apachectl
httpd=/usr/local/apache/bin/httpd
pid=/usr/local/apache/logs/httpd.pid
prog=httpd
RETVAL=0


# The semantics of these two functions differ from the way apachectl does
# things -- attempting to start while running is a failure, and shutdown
# when not running is also a failure. So we just do it the way init scripts
# are expected to behave here.
start() {
 echo -n $"Starting $prog: "
 daemon $httpd $OPTIONS
 RETVAL=$?
 echo
 [ $RETVAL = 0 ] && touch /var/lock/subsys/httpd
 return $RETVAL
}
stop() {
 echo -n $"Stopping $prog: "
 killproc $httpd
 RETVAL=$?
 echo
 [ $RETVAL = 0 ] && rm -f /var/lock/subsys/httpd $pid
}
reload() {
 echo -n $"Reloading $prog: "
 killproc $httpd -HUP
 RETVAL=$?
 echo
}

# See how we were called.
case "$1" in
 start)
  start
 ;;
 stop)
  stop
 ;;
 status)
  status $httpd
  RETVAL=$?
 ;;
 restart)
  stop
  start
 ;;
 condrestart)
 if [ -f $pid ] ; then
 stop
 start
 fi
 ;;
 reload)
 reload
;;
 graceful|help|configtest|fullstatus)
 $apachectl $@
 RETVAL=$?
 ;;
 *)
echo $"Usage: $prog {start|stop|restart|condrestart|reload|status"
 echo $"|fullstatus|graceful|help|configtest}"
 exit 1
esac
exit $RETVAL
[root@httpd-2.2.26]$ chmod 755 /etc/init.d/httpd
[root@httpd-2.2.26]$ chkconfig –add httpd
[root@httpd-2.2.26]$ chkconfig --level 345 httpd on
做域名的虚拟服务器
[root@192.168.231.130]$ cat /usr/local/http/confhttpd.conf
1 ServerName 192.168.231.130:80
2
3 Include conf/vhost/*.conf
[root@httpd-2.2.26]$ cat /usr/local/apacache2/conf/vhost/accp.conf
1 NameVirtualHost *:8080
2 <VirtualHost *:8080>
3 DocumentRoot "/usr/local/apacache2/htdocs/accp"
4 ServerName www.accp.com
5 ErrorLog "logs/accp.err.log"
6 CustomLog "logs/accp.acc.log" common
7 </VirtualHost>
[root@192.168.231.129]$tar -zxvf haproxy-1.49.tar.gz
[root@192.168.231.129]$ cd haproxy-1.4.9
[root@192.168.231.129]$make TARGET=linux26 PREFIX=/haproxy
[root@192.168.231.129]$ make install PREFIX=/haproxy
[root@192.168.231.129]$mkdir /home/haproxy/logs/
[root@192.168.231.129]$mkdir /etc/haproxy/
[root@haproxy]$cat haproxy.conf
global
       log 127.0.0.1   local3
       #log 127.0.0.1  local1 notice
       #log loghost    local0 info
       maxconn 4096
       #chroot /usr/local/haproxy
       #chroot /home/haproxy
       uid 502
       gid 502
       daemon
       nbproc 1
       pidfile /home/haproxy/logs/haproxy.pid
       #debug
       #quiet
    defaults
       log     global
       mode    http
       option  httplog
       option  dontlognull
       option  forwardfor
       option  redispatch
       log     127.0.0.1 local3
       retries 3
       maxconn 32000
       balance roundrobin
       stats   uri     /haproxy-stats
       contimeout      5000
       clitimeout      50000
       srvtimeout      50000

  listen web_proxy *:80
       appsession JSESSIONID len 52 timeout 3h
       #插入cookie的方式
       cookie SRV insert indirect nocache
       #模式有http tcp health
       mode http
       stats enable
       stats hide-version
       #查看状态
        stats uri /haproxy-stats
       stats refresh 10s
       monitor-uri /haproxy_test
       #负载均衡方案:轮调
        balance roundrobin
       option httpclose
       #后端可以获取客户端的真实ip
       option forwardfor
       #健康检查
        option httpchk HEAD /login HTTP/1.0
       #option  httpchk GET /ping.jsp
       #后端真实服务
        server  webA  192.168.231.128:80 cookie A check
        server  webB 192.168.231.130:8080 cookie B check

   server  webB 192.168.231.130:8080 cookie B check

backend web
     mode http
     balance roundrobin
     cookie SEESSION_COOKIE insert indirect nocache
     server web1 192.168.231.129:8080 #cookie 11 check inter 1500 rise 3 fall 3 weight 1
     server web2     192.168.231.128:80 cookie 11 check inter 1500 rise 3 fall 3 weight 1
     server web3     192.168.231.129:8090 cookie 11 check inter 1500 rise 3 fall 3 weight 1

frontend  webs
     bind 0.0.0.0:83
     default_backend web
####################全局配置信息########################
#######参数是进程级的,通常和操作系统(OS)相关#########
global
       maxconn 20480                   #默认最大连接数
       log 127.0.0.1 local3            #[err warning info debug]
       chroot /var/haproxy             #chroot运行的路径
       uid 99                          #所属运行的用户uid
       gid 99                          #所属运行的用户组
       daemon                          #以后台形式运行haproxy
       nbproc 1                        #进程数量(可以设置多个进程提高性能)
       pidfile /var/run/haproxy.pid    #haproxy的pid存放路径,启动进程的用户必须有权限访问此文件
       ulimit-n 65535                  #ulimit的数量限制

       #####################默认的全局设置######################
       ##这些参数可以被利用配置到frontend,backend,listen组件##
defaults
       log global
       mode http                       #所处理的类别 (#7层 http;4层tcp  )
       maxconn 20480                   #最大连接数
       option httplog                  #日志类别http日志格式
       option httpclose                #每次请求完毕后主动关闭http通道
       option dontlognull              #不记录健康检查的日志信息
       option forwardfor               #如果后端服务器需要获得客户端真实ip需要配置的参数,可以从Http Header中获得客户端ip
       option redispatch               #serverId对应的服务器挂掉后,强制定向到其他健康的服务器
       option abortonclose             #当服务器负载很高的时候,自动结束掉当前队列处理比较久的连接
       stats refresh 30                #统计页面刷新间隔
       retries 3                       #3次连接失败就认为服务不可用,也可以通过后面设置
       balance roundrobin              #默认的负载均衡的方式,轮询方式
      #balance source                  #默认的负载均衡的方式,类似Nginx的ip_hash
      #balance leastconn               #默认的负载均衡的方式,最小连接
       contimeout 5000                 #连接超时
       clitimeout 50000                #客户端超时
       srvtimeout 50000                #服务器超时
       timeout check 2000              #心跳检测超时

      ####################监控页面的设置#######################
listen admin_status                    #Frontend和Backend的组合体,监控组的名称,按需自定义名称
        bind 0.0.0.0:65532             #监听端口
        mode http                      #http的7层模式
        log 127.0.0.1 local3 err       #错误日志记录
        stats refresh 5s               #每隔5秒自动刷新监控页面
        stats uri /admin?stats         #监控页面的url
        stats realm itnihao itnihao   #监控页面的提示信息
        stats auth admin:admin         #监控页面的用户和密码admin,可以设置多个用户名
        stats auth admin1:admin1       #监控页面的用户和密码admin1
        stats hide-version             #隐藏统计页面上的HAproxy版本信息
        stats admin if TRUE            #手工启用/禁用,后端服务器(haproxy-1.4.9以后版本)

       errorfile 403 /etc/haproxy/errorfiles/403.http
       errorfile 500 /etc/haproxy/errorfiles/500.http
       errorfile 502 /etc/haproxy/errorfiles/502.http
       errorfile 503 /etc/haproxy/errorfiles/503.http
       errorfile 504 /etc/haproxy/errorfiles/504.http

      #################HAProxy的日志记录内容设置###################
       capture request  header host           len 40
       capture request  header Content-Length len 10
       capture request  header Referer        len 200
       capture response header Server         len 40
       capture response header Content-Length len 10
       capture response header Cache-Control  len 8

      #######################网站监测listen配置#####################
       ###########此用法主要是监控haproxy后端服务器的监控状态############
listen site_status
       bind 0.0.0.0:1081                    #监听端口
       mode http                            #http的7层模式
       log 127.0.0.1 local3 err             #[err warning info debug]
       monitor-uri /site_status             #网站健康检测URL,用来检测HAProxy管理的网站是否可以用,正常返回200,不正常返回503
       acl site_dead nbsrv(server_web) lt 2 #定义网站down时的策略当挂在负载均衡上的指定backend的中有效机器数小于1台时返回true
       acl site_dead nbsrv(server_blog) lt 2
       acl site_dead nbsrv(server_bbs)  lt 2
       monitor fail if site_dead            #当满足策略的时候返回503,网上文档说的是500,实际测试为503
       monitor-net 192.168.16.2/32          #来自192.168.16.2的日志信息不会被记录和转发
       monitor-net 192.168.16.3/32

      ########frontend配置############
       #####注意,frontend配置里面可以定义多个acl进行匹配操作########
frontend http_80_in
       bind 0.0.0.0:80      #监听端口,即haproxy提供web服务的端口,和lvs的vip端口类似
       mode http            #http的7层模式
       log global           #应用全局的日志配置
       option httplog       #启用http的log
       option httpclose     #每次请求完毕后主动关闭http通道,HA-Proxy不支持keep-alive模式
       option forwardfor    #如果后端服务器需要获得客户端的真实IP需要配置次参数,将可以从Http Header中获得客户端IP
       ########acl策略配置#############
       acl itnihao_web hdr_reg(host) -i ^(www.itnihao.cn|ww1.itnihao.cn)$
       #如果请求的域名满足正则表达式中的2个域名返回true -i是忽略大小写
       acl itnihao_blog hdr_dom(host) -i blog.itnihao.cn
       #如果请求的域名满足www.itnihao.cn返回true -i是忽略大小写
       #acl itnihao    hdr(host) -i itnihao.cn
       #如果请求的域名满足itnihao.cn返回true -i是忽略大小写
       #acl file_req url_sub -i  killall=
       #在请求url中包含killall=,则此控制策略返回true,否则为false
       #acl dir_req url_dir -i allow
       #在请求url中存在allow作为部分地址路径,则此控制策略返回true,否则返回false
       #acl missing_cl hdr_cnt(Content-length) eq 0
       #当请求的header中Content-length等于0时返回true

      ########acl策略匹配相应#############
       #block if missing_cl
       #当请求中header中Content-length等于0阻止请求返回403
       #block if !file_req || dir_req
       #block表示阻止请求,返回403错误,当前表示如果不满足策略file_req,或者满足策略dir_req,则阻止请求
       use_backend  server_web  if itnihao_web
       #当满足itnihao_web的策略时使用server_web的backend
       use_backend  server_blog if itnihao_blog
       #当满足itnihao_blog的策略时使用server_blog的backend
       #redirect prefix http://blog.itniaho.cn code 301 if itnihao
       #当访问itnihao.cn的时候,用http的301挑转到http://192.168.16.3
       default_backend server_bbs
       #以上都不满足的时候使用默认server_bbs的backend


       ##########backend的设置##############
       #下面我将设置三组服务器 server_web,server_blog,server_bbs
###########################backend server_web#############################
backend server_web
       mode http            #http的7层模式
       balance roundrobin   #负载均衡的方式,roundrobin平均方式
       cookie SERVERID      #允许插入serverid到cookie中,serverid后面可以定义
       option httpchk GET /index.html #心跳检测的文件
       server web1 192.168.16.2:80 cookie web1 check inter 1500 rise 3 fall 3 weight 1
       #服务器定义,cookie 1表示serverid为web1,check inter 1500是检测心跳频率rise 3是3次正确认为服务器可用,
       #fall 3是3次失败认为服务器不可用,weight代表权重
       server web2 192.168.16.3:80 cookie web2 check inter 1500 rise 3 fall 3 weight 2
       #服务器定义,cookie 1表示serverid为web2,check inter 1500是检测心跳频率rise 3是3次正确认为服务器可用,
       #fall 3是3次失败认为服务器不可用,weight代表权重

##################################backend server_blog###############################################
backend server_blog
       mode http            #http的7层模式
       balance roundrobin   #负载均衡的方式,roundrobin平均方式

       cookie SERVERID      #允许插入serverid到cookie中,serverid后面可以定义
       option httpchk GET /index.html #心跳检测的文件
       server blog1 192.168.16.2:80 cookie blog1 check inter 1500 rise 3 fall 3 weight 1
       #服务器定义,cookie 1表示serverid为web1,check inter 1500是检测心跳频率rise 3是3次正确认为服务器可用,fall 3是3次失败认为服务器不可用,weight代表权重
       server blog2 192.168.16.3:80 cookie blog2 check inter 1500 rise 3 fall 3 weight 2
        #服务器定义,cookie 1表示serverid为web2,check inter 1500是检测心跳频率rise 3是3次正确认为服务器可用,fall 3是3次失败认为服务器不可用,weight代表权重

##################################backend server_bbs###############################################

backend server_bbs
       mode http            #http的7层模式
       balance roundrobin   #负载均衡的方式,roundrobin平均方式
       cookie SERVERID      #允许插入serverid到cookie中,serverid后面可以定义
       option httpchk GET /index.html #心跳检测的文件
       server bbs1 192.168.16.2:80 cookie bbs1 check inter 1500 rise 3 fall 3 weight 1
       #服务器定义,cookie 1表示serverid为web1,check inter 1500是检测心跳频率rise 3是3次正确认为服务器可用,fall 3是3次失败认为服务器不可用,weight代表权重
       server bbs2 192.168.16.3:80 cookie bbs2 check inter 1500 rise 3 fall 3 weight 2
        #服务器定义,cookie 1表示serverid为web2,check inter 1500是检测心跳频率rise 3是3次正确认为服务器可用,fall 3是3次失败认为服务器不可用,weight代表权重
[root@haproxy]$ haparoxy -f haproxy.conf 检查配置文件
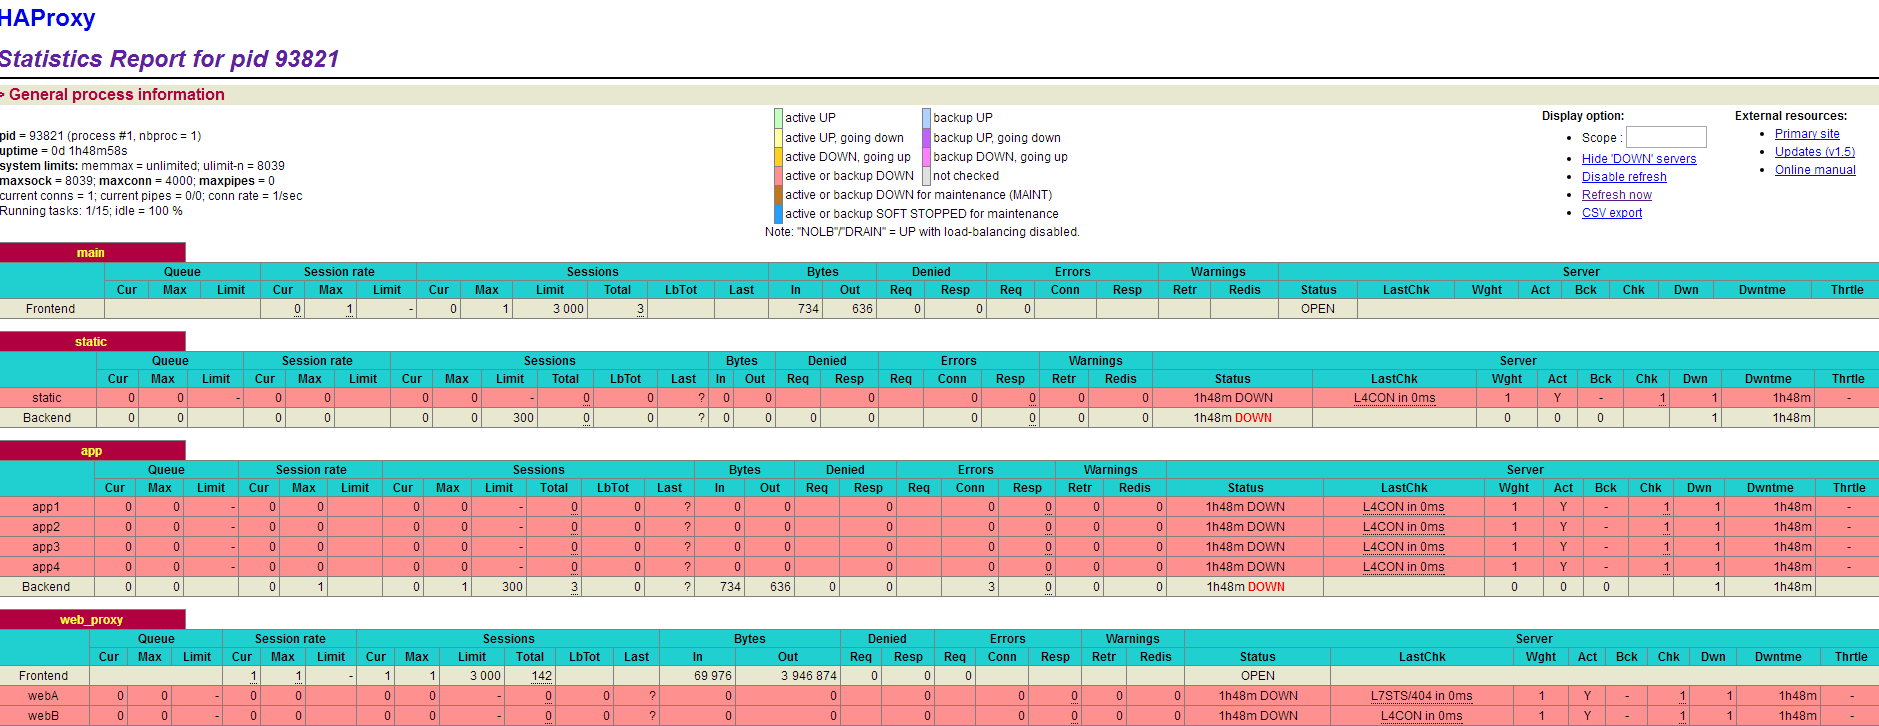
测试haproxy监控
http://192.168.231.129:81/haproxy-stats
 测试网站代理
http://192.168.231.129:83