1、整合思路
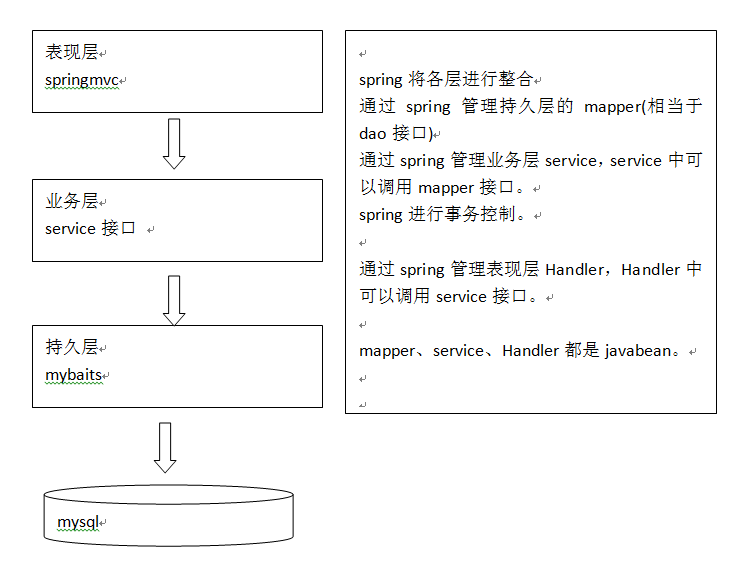
①、表现层,也就是 Controller,由 SpringMVC 来控制,而SpringMVC 是Spring 的一个模块,故不需要整合。
②、业务层,也就是 service,通常由 Spring 来管理 service 接口,我们会使用 xml 配置的方式来将 service 接口配置到 spring 配置文件中。而且事务控制一般也是在 service 层进行配置。
③、持久层,也就是 dao 层,而且包括实体类,由 MyBatis 来管理,通过 spring 来管理 mapper 接口,使用mapper的扫描器自动扫描mapper接口在spring中进行注册。
很明显,spring 在三大框架的整合中占据至关重要的地位,类似于一个大管家,将 MyBatis 和 SpringMVC 揉合在一起。
2、准备环境
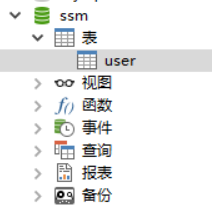
①、数据库环境
数据库类型:MySQL 5.1
数据库名称:ssm
数据表:user
②、开发工具 eclipse
③、JDK 1.7
④、mybatis 3.3
⑤、SpringMVC 4.2.4
⑥、Spring 4.2.4
⑦、数据库连接池 dbcp1.2.2
⑧、数据库驱动包mysql5.1.26
⑨、日志 log4j 1.2
案例需求:输入用户名和密码进行登录验证
具体的 jar 下载见上面的源码下载链接!
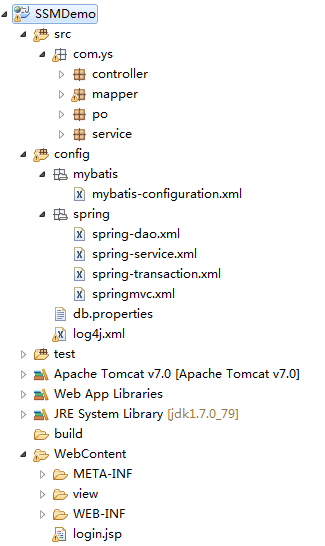
项目的目录结构为:
3、整合 Dao 层
也就是整合 MyBatis 和 Spring
①、在 db.properties 文件中,保存数据库连接的基本信息
|
1
2
3
4
5
6
|
#db.propertiesdataSource=org.apache.commons.dbcp.BasicDataSourcedriver=com.mysql.jdbc.Driverurl=jdbc:mysql://localhost:3306/ssmusername=rootpassword=root |
分别是数据库连接池数据源,数据库连接驱动,数据库连接URL,数据库连接用户名,数据库连接密码
②、mybatis全局配置文件 mybatis-configuration.xml
|
1
2
3
4
5
6
7
8
9
10
11
12
13
14
15
16
17
18
19
20
21
22
|
<?xml version="1.0" encoding="UTF-8"?><!DOCTYPE configuration PUBLIC "-//mybatis.org//DTD Config 3.0//EN" "http://mybatis.org/dtd/mybatis-3-config.dtd"><configuration> <!-- 全局 setting 配置,根据需要添加 --> <!--开启二级缓存 --> <settings> <setting name="cacheEnabled" value="true"/> </settings> <!-- 配置别名 --> <typeAliases> <!-- 批量扫描别名 --> <package name="com.ys.po"/> </typeAliases> <!-- 配置mapper,由于使用 spring 和mybatis 的整合包进行 mapper 扫描,这里不需要配置了 必须遵循:mapper.xml 和 mapper.java 文件同名且在同一个目录下 --> <!-- <mappers> </mappers> --> </configuration> |
通过 mapper 接口来加载映射文件,具体可以看这篇博客:http://www.cnblogs.com/ysocean/p/7301548.html,必须满足下面四点:
1、xxxMapper 接口必须要和 xxxMapper.xml 文件同名且在同一个包下,也就是说 UserMapper.xml 文件中的namespace是UserMapper接口的全类名
2、xxxMapper接口中的方法名和 xxxMapper.xml 文件中定义的 id 一致
3、xxxMapper接口输入参数类型要和 xxxMapper.xml 中定义的 parameterType 一致
4、xxxMapper接口返回数据类型要和 xxxMapper.xml 中定义的 resultType 一致
③、配置 Spring 文件
我们需要配置数据源、SqlSessionFactory以及mapper扫描器,由于这是对 Dao 层的整合,后面还有对于 业务层,表现层等的整合,为了使条目更加清新,我们新建 config/spring 文件夹,这里将配置文件取名为 spring-dao.xml 放入其中。
spring-dao.xml
|
1
2
3
4
5
6
7
8
9
10
11
12
13
14
15
16
17
18
19
20
21
22
23
24
25
26
27
28
29
30
31
32
33
34
35
36
37
38
39
40
41
42
43
44
45
46
47
48
49
|
<?xml version="1.0" encoding="UTF-8"?><beans xmlns="http://www.springframework.org/schema/beans" xmlns:xsi="http://www.w3.org/2001/XMLSchema-instance" xmlns:mvc="http://www.springframework.org/schema/mvc" xmlns:context="http://www.springframework.org/schema/context" xmlns:aop="http://www.springframework.org/schema/aop" xmlns:tx="http://www.springframework.org/schema/tx" xsi:schemaLocation="http://www.springframework.org/schema/beans http://www.springframework.org/schema/beans/spring-beans-3.2.xsd http://www.springframework.org/schema/mvc http://www.springframework.org/schema/mvc/spring-mvc-3.2.xsd http://www.springframework.org/schema/context http://www.springframework.org/schema/context/spring-context-3.2.xsd http://www.springframework.org/schema/aop http://www.springframework.org/schema/aop/spring-aop-3.2.xsd http://www.springframework.org/schema/tx http://www.springframework.org/schema/tx/spring-tx-3.2.xsd"> <!--第一步: 配置数据源 --> <!-- 加载db.properties文件中的内容,db.properties文件中的key名要有一定的特殊性 --> <context:property-placeholder location="classpath:db.properties" /> <bean id="dataSource" class="org.apache.commons.dbcp.BasicDataSource" destroy-method="close"> <property name="driverClassName" value="${jdbc.driver}"></property> <property name="url" value="${jdbc.url}"></property> <property name="username" value="${jdbc.username}"></property> <property name="password" value="${jdbc.password}"></property> <property name="maxActive" value="30"></property> <property name="maxIdle" value="5"></property> </bean> <!-- 第二步:创建sqlSessionFactory。生产sqlSession --> <bean id="sqlSessionFactory" class="org.mybatis.spring.SqlSessionFactoryBean"> <!-- 数据库连接池 --> <property name="dataSource" ref="dataSource"></property> <!-- 加载mybatis全局配置文件,注意这个文件的目录 --> <property name="configLocation" value="classpath:mybatis/mybatis-configuration.xml"></property> </bean> <!-- 第三步:配置 mapper 扫描器 * 接口类名和映射文件必须同名 * 接口类和映射文件必须在同一个目录下 * 映射文件namespace名字必须是接口的全类路径名 * 接口的方法名必须和映射Statement的id一致 --> <bean class="org.mybatis.spring.mapper.MapperScannerConfigurer"> <!-- 扫描的包路径,如果需要扫描多个包,中间使用逗号分隔 --> <property name="basePackage" value="com.ys.mapper"></property> <property name="sqlSessionFactoryBeanName" value="sqlSessionFactory"></property> </bean> </beans> |
④、根据逆向工程生成 po 类以及 mapper 文件
如何使用逆向工程,可以参考这篇博客:http://www.cnblogs.com/ysocean/p/7360409.html,我们逆向工程要是一个额外的工程,生成我们所需的po类以及mapper文件后,在将其复制到我们当前项目中,如下:

由于我们这里是进行登录验证,所以在 UserMapper.java 中添加如下代码:
|
1
2
3
4
5
6
7
8
9
10
11
12
|
package com.ys.mapper;import com.ys.po.User;import java.util.List;import org.apache.ibatis.annotations.Param;public interface UserMapper { //通过用户名和密码查询User User selectUserByUsernameAndPassword(User user);} |
UserMapper.xml
|
1
2
3
4
|
<!-- 通过用户名和密码查询User --> <select id="selectUserByUsernameAndPassword" resultType="com.ys.po.User" parameterType="com.ys.po.User"> select * from user where username = #{username,jdbcType=VARCHAR} and password = #{password,jdbcType=VARCHAR} </select> |
dao 层整合完毕之后,我们进行一个测试,要养成每做完一个小模块必须测试的习惯。步步为营,如果整个项目配置完了然后在进行测试,那么有问题进行排除会变得很困难。
|
1
2
3
4
5
6
7
8
9
10
11
12
13
14
15
16
17
18
19
20
21
22
23
24
25
26
27
|
package com.ys.test;import org.junit.Before;import org.junit.Test;import org.springframework.context.ApplicationContext;import org.springframework.context.support.ClassPathXmlApplicationContext;import com.ys.mapper.UserMapper;import com.ys.po.User;public class DaoTest { ApplicationContext context = null; @Before public void init(){ context = new ClassPathXmlApplicationContext("classpath:spring/application-dao.xml"); } @Test public void testSelectByPrimaryKey(){ UserMapper userMapper = (UserMapper) context.getBean("userMapper"); User user = userMapper.selectByPrimaryKey(1); System.out.println(user.getPassword()); } } |
这里是根据 user 表的 id 进行查询。如果能打印出user对象的值,那么前面的配置是 OK的。
4、整合 service
前面我们整理了,这层就是用 Spring 来管理 service 接口,我们会使用 xml 配置的方式来将 service 接口配置到 spring 配置文件中。而且事务控制也是在 service 层进行配置。
这里我们以登录
①、定义 service 接口
|
1
2
3
4
5
6
7
8
9
10
|
package com.ys.service.impl;import com.ys.po.User;public interface IUserService { //通过用户名和密码查询User public User selectUserByUsernameAndPassword(User user);} |
②、编写 service 实现类
|
1
2
3
4
5
6
7
8
9
10
11
12
13
14
15
16
17
18
19
20
21
|
package com.ys.service;import org.springframework.beans.factory.annotation.Autowired;import com.ys.mapper.UserMapper;import com.ys.po.User;import com.ys.service.impl.IUserService;public class UserServiceImpl implements IUserService{ @Autowired private UserMapper userMapper; //通过@Autowired向spring容器注入UserMapper //通过用户名和密码查询User @Override public User selectUserByUsernameAndPassword(User user) { User u = userMapper.selectUserByUsernameAndPassword(user); return u; }} |
通过@Autowired向spring容器注入UserMapper,它会通过spring配的扫描器扫描到,并将对象装载到spring容器中。
③、在spring容器中配置 Service 接口,这里我们使用 xml 的方式
在 config/spring 目录下,新建 spring-service.xml
|
1
2
3
4
5
6
7
8
9
10
11
12
13
14
15
16
17
18
19
20
|
<?xml version="1.0" encoding="UTF-8"?><beans xmlns="http://www.springframework.org/schema/beans" xmlns:xsi="http://www.w3.org/2001/XMLSchema-instance" xmlns:mvc="http://www.springframework.org/schema/mvc" xmlns:context="http://www.springframework.org/schema/context" xmlns:aop="http://www.springframework.org/schema/aop" xmlns:tx="http://www.springframework.org/schema/tx" xsi:schemaLocation="http://www.springframework.org/schema/beans http://www.springframework.org/schema/beans/spring-beans-3.2.xsd http://www.springframework.org/schema/mvc http://www.springframework.org/schema/mvc/spring-mvc-3.2.xsd http://www.springframework.org/schema/context http://www.springframework.org/schema/context/spring-context-3.2.xsd http://www.springframework.org/schema/aop http://www.springframework.org/schema/aop/spring-aop-3.2.xsd http://www.springframework.org/schema/tx http://www.springframework.org/schema/tx/spring-tx-3.2.xsd"> <!--配置UserServiceImpl --> <bean id="userService" class="com.ys.service.UserServiceImpl"></bean> </beans> |
④、在spring容器中配置 事务处理
在 config/spring 目录下,新建 spring-transaction.xml
|
1
2
3
4
5
6
7
8
9
10
11
12
13
14
15
16
17
18
19
20
21
22
23
24
25
26
27
28
29
30
31
32
33
34
35
36
37
38
39
40
41
|
<?xml version="1.0" encoding="UTF-8"?><beans xmlns="http://www.springframework.org/schema/beans" xmlns:xsi="http://www.w3.org/2001/XMLSchema-instance" xmlns:mvc="http://www.springframework.org/schema/mvc" xmlns:context="http://www.springframework.org/schema/context" xmlns:aop="http://www.springframework.org/schema/aop" xmlns:tx="http://www.springframework.org/schema/tx" xsi:schemaLocation="http://www.springframework.org/schema/beans http://www.springframework.org/schema/beans/spring-beans-3.2.xsd http://www.springframework.org/schema/mvc http://www.springframework.org/schema/mvc/spring-mvc-3.2.xsd http://www.springframework.org/schema/context http://www.springframework.org/schema/context/spring-context-3.2.xsd http://www.springframework.org/schema/aop http://www.springframework.org/schema/aop/spring-aop-3.2.xsd http://www.springframework.org/schema/tx http://www.springframework.org/schema/tx/spring-tx-3.2.xsd"> <!-- 事务管理器 --> <!-- 对mybatis操作数据事务控制,spring使用jdbc的事务控制类 --> <bean id="transactionManager" class="org.springframework.jdbc.datasource.DataSourceTransactionManager"> <!-- 数据源dataSource在spring-dao.xml中配置了 --> <property name="dataSource" ref="dataSource"/> </bean> <!-- 通知 --> <tx:advice id="txAdvice" transaction-manager="transactionManager"> <tx:attributes> <tx:method name="save*" propagation="REQUIRED"/> <tx:method name="delete*" propagation="REQUIRED"/> <tx:method name="update*" propagation="REQUIRED"/> <tx:method name="insert*" propagation="REQUIRED"/> <tx:method name="find*" propagation="SUPPORTS" read-only="true"/> <tx:method name="get*" propagation="SUPPORTS" read-only="true"/> <tx:method name="select*" propagation="SUPPORTS" read-only="true"/> </tx:attributes> </tx:advice> <aop:config> <!-- com.ys.service.impl包里面的所有类,所有方法,任何参数 --> <aop:advisor advice-ref="txAdvice" pointcut="execution(* com.ys.service.impl.*.*(..))"/> </aop:config> </beans> |
4、整合 SpringMVC
①、配置前端控制器
在 web.xml 文件中添加如下代码:
|
1
2
3
4
5
6
7
8
9
10
11
12
13
14
15
16
17
18
19
20
21
22
23
24
25
26
27
28
29
|
<?xml version="1.0" encoding="UTF-8"?><web-app xmlns:xsi="http://www.w3.org/2001/XMLSchema-instance" xmlns="http://java.sun.com/xml/ns/javaee" xsi:schemaLocation="http://java.sun.com/xml/ns/javaee http://java.sun.com/xml/ns/javaee/web-app_3_0.xsd" id="WebApp_ID" version="3.0"> <display-name>SpringMVC_01</display-name> <!-- 配置前端控制器DispatcherServlet --> <servlet> <servlet-name>springmvc</servlet-name> <servlet-class>org.springframework.web.servlet.DispatcherServlet</servlet-class> <!--springmvc.xml 是自己创建的SpringMVC全局配置文件,用contextConfigLocation作为参数名来加载 如果不配置 contextConfigLocation,那么默认加载的是/WEB-INF/servlet名称-servlet.xml,在这里也就是 springmvc-servlet.xml --> <init-param> <param-name>contextConfigLocation</param-name> <param-value>classpath:spirng/springmvc.xml</param-value> </init-param> </servlet> <servlet-mapping> <servlet-name>springmvc</servlet-name> <!--第一种配置:*.do,还可以写*.action等等,表示以.do结尾的或者以.action结尾的URL都由前端控制器DispatcherServlet来解析 第二种配置:/,所有访问的 URL 都由DispatcherServlet来解析,但是这里最好配置静态文件不由DispatcherServlet来解析 错误配置:/*,注意这里是不能这样配置的,应为如果这样写,最后转发到 jsp 页面的时候,仍然会由DispatcherServlet进行解析, 而这时候会找不到对应的Handler,从而报错!!! --> <url-pattern>/</url-pattern> </servlet-mapping></web-app> |
②、配置处理器映射器、处理器适配器、视图解析器
在 config/spring 目录下新建 springmvc.xml文件
|
1
2
3
4
5
6
7
8
9
10
11
12
13
14
15
16
17
18
19
20
21
22
23
24
25
26
27
28
29
30
31
32
33
|
<?xml version="1.0" encoding="UTF-8"?><beans xmlns="http://www.springframework.org/schema/beans" xmlns:xsi="http://www.w3.org/2001/XMLSchema-instance" xmlns:mvc="http://www.springframework.org/schema/mvc" xmlns:context="http://www.springframework.org/schema/context" xmlns:aop="http://www.springframework.org/schema/aop" xmlns:tx="http://www.springframework.org/schema/tx" xsi:schemaLocation="http://www.springframework.org/schema/beans http://www.springframework.org/schema/beans/spring-beans-4.2.xsd http://www.springframework.org/schema/mvc http://www.springframework.org/schema/mvc/spring-mvc-4.2.xsd http://www.springframework.org/schema/context http://www.springframework.org/schema/context/spring-context.xsd http://www.springframework.org/schema/aop http://www.springframework.org/schema/aop/spring-aop-4.2.xsd http://www.springframework.org/schema/tx http://www.springframework.org/schema/tx/spring-tx.xsd"> <!--使用mvc:annotation-driven可以代替上面的映射器和适配器 这里面会默认加载很多参数绑定方法,比如json转换解析器就默认加载,所以优先使用下面的配置 --> <mvc:annotation-driven></mvc:annotation-driven> <!--批量配置Handler,指定扫描的包全称 --> <context:component-scan base-package="com.ys.controller"></context:component-scan> <!--配置视图解析器 --> <bean class="org.springframework.web.servlet.view.InternalResourceViewResolver"> </bean></beans> |
③、编写 Handler,也就是 Controller
在 com.ys.controller 包下新建 UserController.java 文件
|
1
2
3
4
5
6
7
8
9
10
11
12
13
14
15
16
17
18
19
20
21
22
23
24
25
26
27
28
29
30
31
32
|
package com.ys.controller;import org.springframework.beans.factory.annotation.Autowired;import org.springframework.stereotype.Controller;import org.springframework.web.bind.annotation.RequestMapping;import org.springframework.web.servlet.ModelAndView;import com.ys.po.User;import com.ys.service.impl.IUserService;@Controllerpublic class UserController { @Autowired public IUserService userService; @RequestMapping("/login") public ModelAndView login(User user){ ModelAndView mv = new ModelAndView(); User u = userService.selectUserByUsernameAndPassword(user); //根据用户名和密码查询user,如果存在,则跳转到 success.jsp 页面 if(u != null){ mv.addObject("username", u.getUsername()); mv.addObject("user", u); mv.setViewName("view/success.jsp"); }else{ //如果不存在,则跳转到 login.jsp页面重新登录 return new ModelAndView("redirect:/login.jsp"); } return mv; }} |
④、加载 Spring 容器
我们在 classpath/spring 目录下新建了 spring-dao.xml,spring-service.xml,spring-transaction.xml 这些文件,里面有我们配置的 mapper,controller,service,那么如何将这些加载到 spring 容器中呢?
在 web.xml 文件中添加如下代码:
|
1
2
3
4
5
6
7
8
|
<!-- 加载spring容器 --><context-param> <param-name>contextConfigLocation</param-name> <param-value>classpath:spring/spring-*.xml</param-value></context-param><listener> <listener-class>org.springframework.web.context.ContextLoaderListener</listener-class></listener> |
由于配置文件比较多,我们使用通配符加载的方式。注意:这段代码最好要加在前端控制器的前面。
至此 SSM 三大框架整合就完成了,接下来我们进行测试。
5、测试
在 WebContent 目录下创建 login.jsp 页面,以及 success.jsp页面,如下图:

login.jsp
|
1
2
3
4
5
6
7
8
9
10
11
12
13
14
15
16
17
18
19
|
<%@ page language="java" contentType="text/html; charset=UTF-8" pageEncoding="UTF-8"%><!DOCTYPE html PUBLIC "-//W3C//DTD HTML 4.01 Transitional//EN" "http://www.w3.org/TR/html4/loose.dtd"><html><head><meta http-equiv="Content-Type" content="text/html; charset=UTF-8"><title>Insert title here</title></head><body> <form action="login" method="post"> <label>账号:</label> <input type="text" id="txtUsername" name="username" placeholder="请输入账号" /><br/> <label>密码:</label> <input type="password" id="txtPassword" name="password" placeholder="请输入密码" /><br/> <input type="submit" value="提交" /> <input type="reset" value="重置" /> </form></body></html> |
success.jsp
|
1
2
3
4
5
6
7
8
9
10
11
12
|
<%@ page language="java" contentType="text/html; charset=UTF-8" pageEncoding="UTF-8"%><!DOCTYPE html PUBLIC "-//W3C//DTD HTML 4.01 Transitional//EN" "http://www.w3.org/TR/html4/loose.dtd"><html><head><meta http-equiv="Content-Type" content="text/html; charset=UTF-8"><title>Insert title here</title></head><body> Hello ${user.username}</body></html> |
1、将项目发布到 tomcat,如何发布可以参考这篇博客:http://www.cnblogs.com/ysocean/p/6893446.html
2、在浏览器输入:http://localhost:8080/SSMDemo/login.jsp
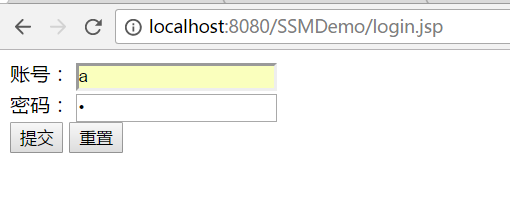
点击提交:
