环境搭建
1、linux安装maven
tar zxvf apache-maven-3.0.5-bin.tar.gz
mv apache-maven-3.0.5 /usr/local/apache-maven-3.0.5
vi /etc/profile
增加:
export MAVEN_HOME=/usr/local/apache-maven-3.0.5
export PATH=$PATH:$MAVEN_HOME/bin
export PATH=$PATH:$MAVEN_HOME/bin
source /etc/profile
mvn -v
2、linux安装nexus
需要的安装包:nexus-2.11.4-01-bundle.tar(csdn下载地址:http://download.csdn.net/detail/carboncomputer/9595216)
需要jdk版本1.7以上
tar zxvf nexus-2.11.4-01-bundle.tar
端口配置文件,可修改端口:/nexus-2.11.4-01/conf/nexus.properties
cd nexus-2.11.4-01/bin
./nexus start
如果启动成功,就会显示如下:

如果在启动过程中说要求root权限的。可以百度解决,或者用sudo sh nexus start启动。
用默认的账号密码登录:admin/admin123
环境就部署好了,现在是使用maven仓库。
注意:严重不提倡使用nexus3.0以上的版本,一开始用这个,安装时很多问题需要解决,此外,新的界面很难使用。官网上也是推荐使用maven时采用nexus2.X版本。
maven仓库使用及版本发布管理
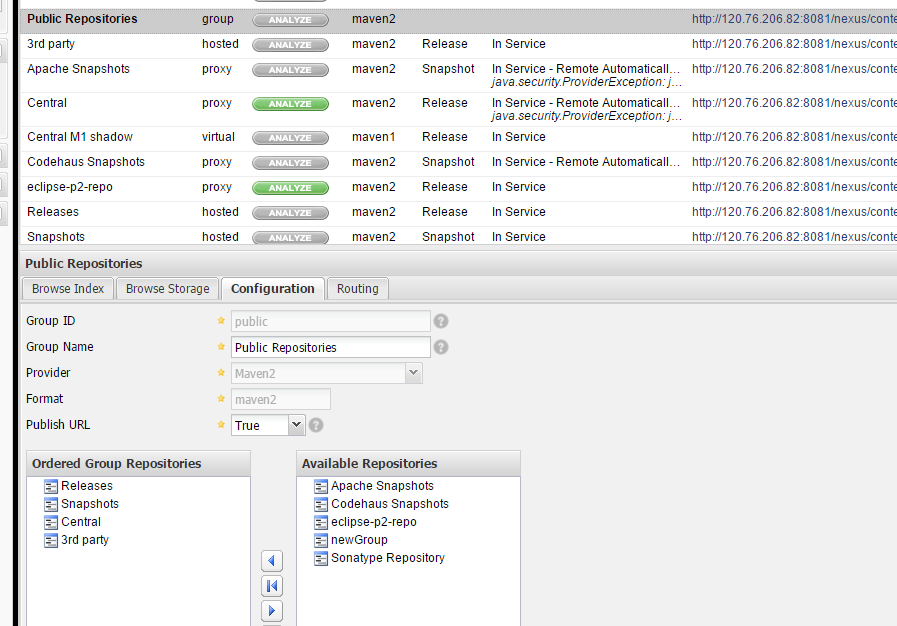
点击仓库列表

主要是两个类型:
snapshots:开发过程中的版本仓库
release:正式发布的版本仓库
public是maven主库
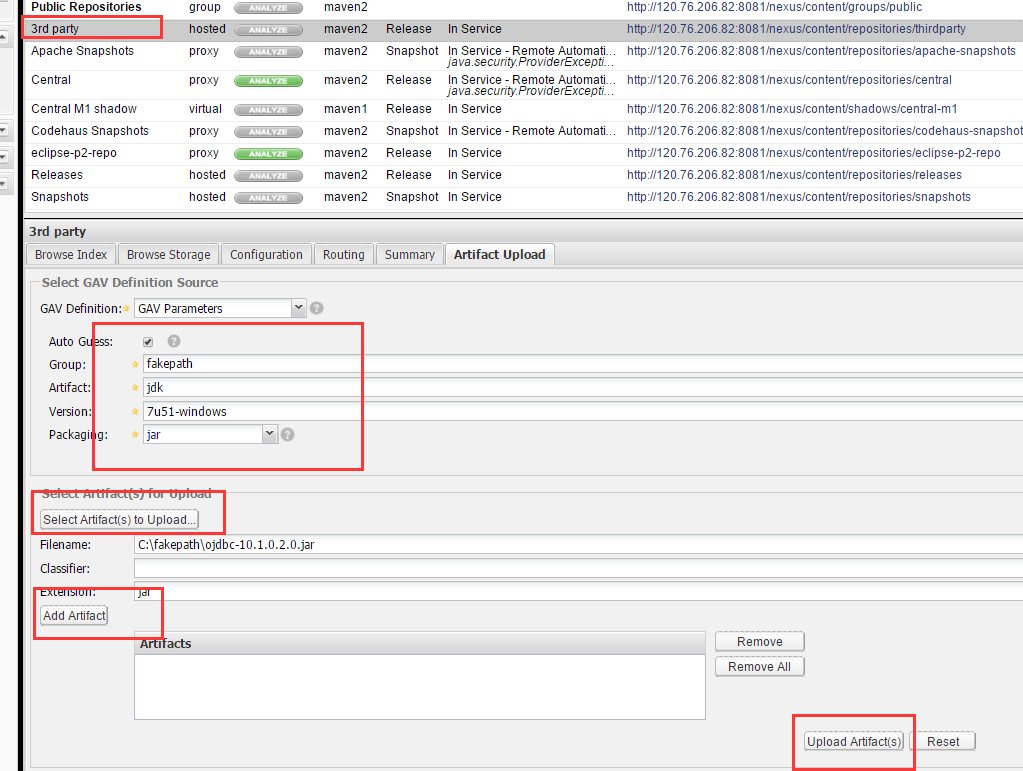
nexus默认新建了一个库:3rd party,专门存放第三方的jar,这个所搜搜几篇文章看看就有说明了。这里对于这个不一一说了,主要是介绍如何使用nexus来管理版本和本地开发过程。
上传第三方的jar如下:
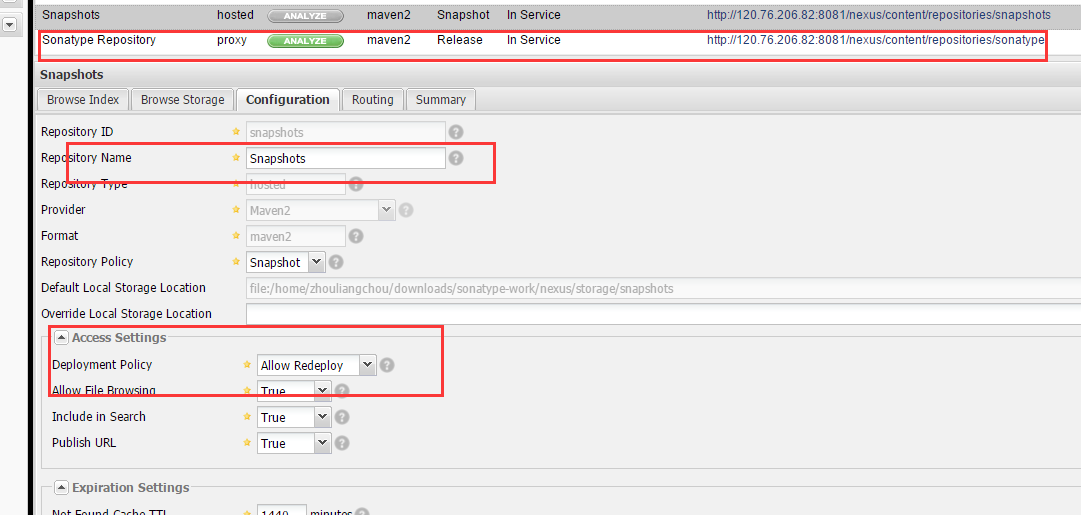
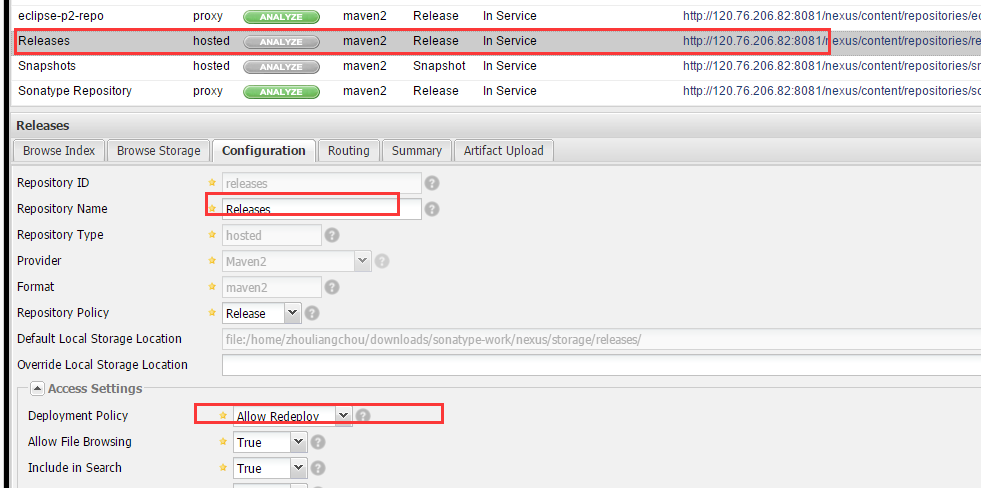
snapshots、release全部开发允许部署的权限,如下
本地是windows下的myeclipse10进行开发的,myeclipse10自带maven插件,直接使用,不需要加载这个插件,其他的比如eclipse需要自行处理。
myeclipse配置setting.xml
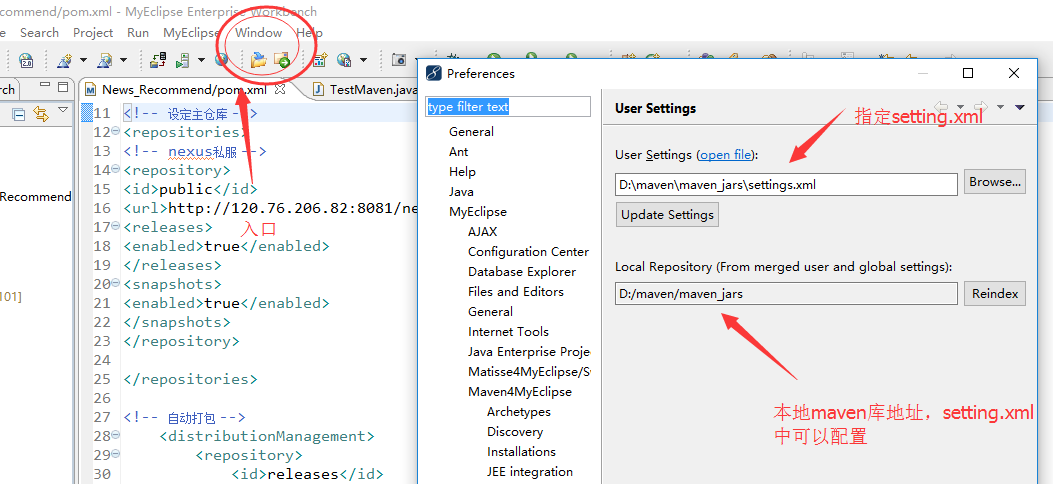
现在来看看setting.xml文件

<settings xmlns="http://maven.apache.org/SETTINGS/1.0.0"
xmlns:xsi="http://www.w3.org/2001/XMLSchema-instance"
xsi:schemaLocation="http://maven.apache.org/SETTINGS/1.0.0 http://maven.apache.org/xsd/settings-1.0.0.xsd">
<localRepository>D:/maven/maven_jars</localRepository>
<pluginGroups>
</pluginGroups>
<proxies>
</proxies>
<servers>
<server>
<id>releases</id>
<username>deployment</username>
<password>admin123</password>
</server>
<server>
<id>snapshots</id>
<username>deployment</username>
<password>admin123</password>
</server>
<server>
<id>public</id>
<username>deployment</username>
<password>admin123</password>
</server>
</servers>
<mirrors>
<mirror>
<id>nexus</id>
<mirrorOf>nexus</mirrorOf>
<name>nexus Repositories</name>
<url>http://xxx.xx.xx.xx:8081/nexus/content/repositories/thirdparty/</url>
</mirror>
</mirrors>
<profiles>
<activeProfiles>
<activeProfile>dev</activeProfile>
</activeProfiles>
</settings>
建立maven工程

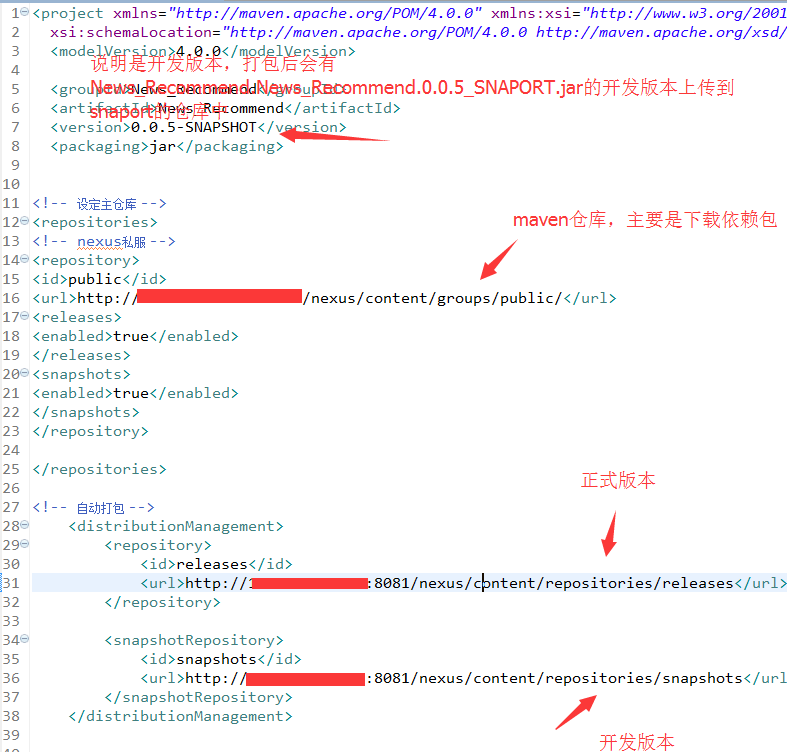
pom.xml的内容设置如下:
< project xmlns= "http://maven.apache.org/POM/4.0.0" xmlns:xsi= "http://www.w3.org/2001/XMLSchema-instance"
xsi:schemaLocation= "http://maven.apache.org/POM/4.0.0 http://maven.apache.org/xsd/maven-4.0.0.xsd">
< modelVersion >4.0.0 </modelVersion >
< groupId> News_Recommend</ groupId>
< artifactId> News_Recommend</ artifactId>
< version> 0.0.5-SNAPSHOT</ version>
< packaging> jar</ packaging>
<!-- 设定主仓库 -->
< repositories>
<!-- nexus私服 -->
< repository>
< id> public</ id>
< url> http://xxxx:8081/nexus/content/groups/public/ </url >
< releases>
< enabled> true</ enabled>
</ releases>
< snapshots>
< enabled> true</ enabled>
</ snapshots>
</ repository>
</ repositories>
<!-- 自动打包 -->
<distributionManagement >
<repository >
<id >releases </id >
< url> http://xxxx:8081/nexus/content/repositories/releases </url >
</repository >
<snapshotRepository >
<id >snapshots </id >
< url> http://xxxx:8081/nexus/content/repositories/snapshots </url >
</snapshotRepository >
</distributionManagement >
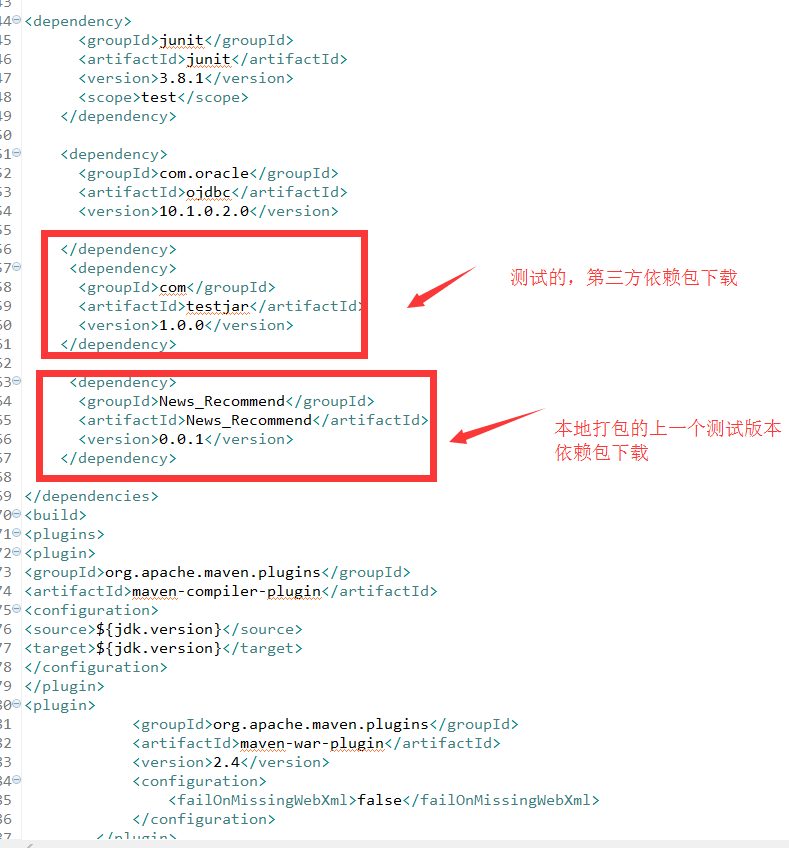
< dependencies>
< dependency>
<groupId > junit</ groupId>
<artifactId > junit</ artifactId>
<version >3.8.1 </version >
<scope >test </scope >
</dependency >
<dependency >
<groupId >com.oracle </groupId >
<artifactId > ojdbc</ artifactId>
<version >10.1.0.2.0 </version >
</dependency >
<dependency >
<groupId > com</ groupId>
<artifactId > testjar</ artifactId>
<version >1.0.0 </version >
</dependency >
<dependency >
<groupId >News_Recommend </groupId >
<artifactId >News_Recommend </artifactId >
<version >0.0.1 </version >
</dependency >
</ dependencies>
< build>
< plugins>
< plugin>
< groupId> org.apache.maven.plugins</ groupId>
< artifactId> maven-compiler- plugin</ artifactId>
< configuration>
< source> ${jdk.version}</ source>
< target> ${jdk.version}</ target>
</ configuration>
</ plugin>
< plugin>
<groupId >org.apache.maven.plugins </groupId >
<artifactId > maven-war-plugin </artifactId >
<version >2.4 </version >
<configuration >
<failOnMissingWebXml >false </failOnMissingWebXml >
</configuration >
</plugin >
</ plugins>
< finalName> News_Recommend</ finalName>
</ build>
</ project>
下面来生成开发版本的jar并自动上传到snaport仓库
工程右键-->run as-->run configuration
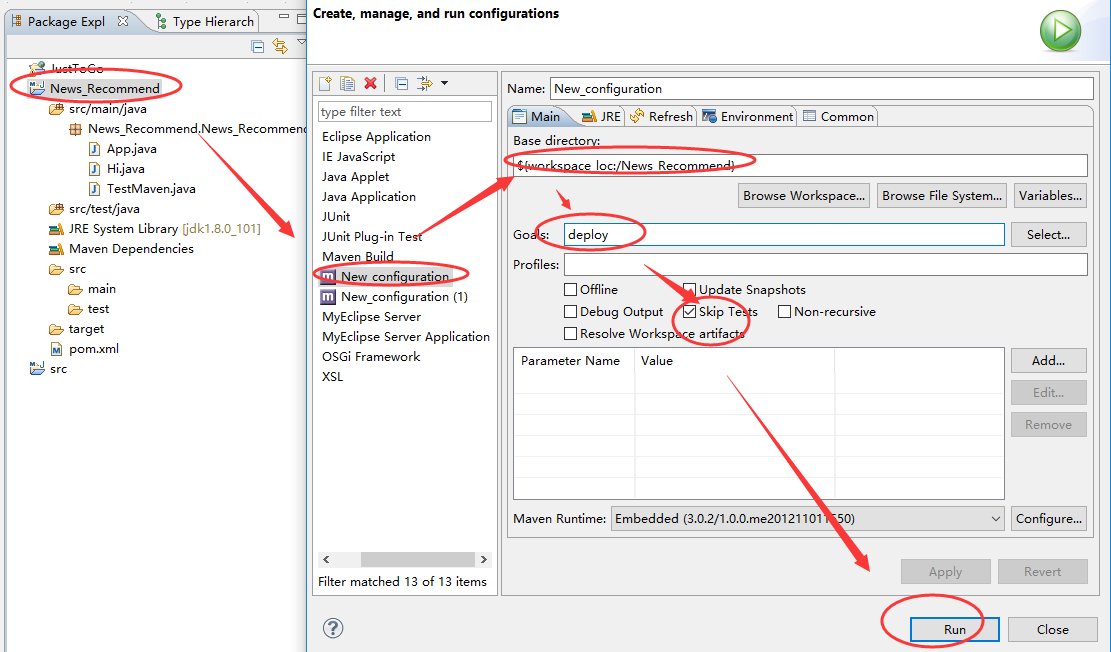

打开nexus后台可以看到打包成功并上传的jar:

接下来,如何生成release版本呢,只需要修改pom.xml
将
< groupId> News_Recommend</ groupId>
< artifactId> News_Recommend</ artifactId>
< version> 0.0.5-SNAPSHOT</ version>
< packaging> jar</ packaging>
改为
< groupId> News_Recommend</ groupId>
< artifactId> News_Recommend</ artifactId>
< version> 0.0.5</ version>
< packaging> jar</ packaging>
即可。
打开nexus后台查看正式版本:

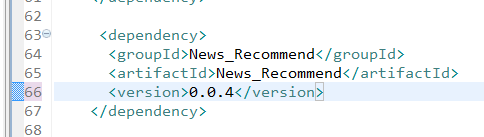
工程进行正式升级时只需要在pom.xml配置新增的jar依赖包即可,如下:
原文地址:http://www.cnblogs.com/zhongshengzhen/p/nexus_maven.html
弄了两天才有了眉目,希望对大家有用,不吝赐教和点赞,谢谢。