在Erlang In Anger第二章中讲到使用rebar来创建一个Erlang项目(Application或Project)
但美中不足的只是给出了指引,但没有给出详细的步骤。
下面我们就使用rebar一步步来创建一个典型的Application。
但在此之前,最好先理解下Erlang In Anger中第二章节所讲关于application结构的部分:http://zhongwencool.gitbooks.io/erlang_in_anger/
通过本小节,你可以了解使用rebar加入开源依赖项目的完整步骤。
本示例github地址:https://github.com/zhongwencool/autoload
1. 下载并安装rebar:
$ git clone git://github.com/rebar/rebar.git
$ cd rebar
$ ./bootstrap
Recompile: src/getopt
...
Recompile: src/rebar_utils
==> rebar (compile)
Congratulations! You now have a self-contained script called "rebar" in
your current working directory. Place this script anywhere in your path
and you can use rebar to build OTP-compliant apps.
为了全局使用rebar,把你的路径加到PATH下:在~/.profile里面加入:
export PATH=$PATH:Your_Rebar_Path
然后重启你的shell或source ~/.profile使它生效
2.创建application:
./rebar create-app appid=autoload
==> rebar (create-app)
Writing src/autoload.app.src
Writing src/autoload_app.erl
Writing src/autoload_sup.erl
生成上面三个模板文件(也可以修改rebar配置自定义模板),
myapp.app.src- The OTP application specification用于rebar自动生成.app文件放到ebin/下。myapp_app.erl- An implementation of the OTP Application behaviour:实现你代码逻辑的地方。myapp_sup.erl- An implementation of the OTP Supervisor behaviour (top level supervisor of the application)此application最高等级的监控树。
3.监控指定目录的逻辑是用的开源项目:inotify: https://github.com/sheyll/inotify
因为不想去自己用erlang实现一个每秒循环监控目录下文件的gen_server【这样很没效率喂!】
其实把引用依赖项目很简单,只需要在rebar.config里面加入:
{deps, [{inotify, ".*", {git,
"https://github.com/sheyll/inotify.git"}}]}.
4. 编写自己的逻辑:
4.1 把指定节点名和cookie,指定的监控目录,和log文件存放的位置都放到application的配置文件autoload.app.src中:
{env, [{autoload_path,"./dev_patch/"},   {node_cookie,[{test1@localhost,best},{test2@localhost,best}]},
 {log,"./log/console.log"}]}.
这样设置后就可以在代码里使用:
{ok,NodeCookies} = application:get_env(autoload,node_cookie).
这样的函数在全局中得到对应的值。
4.2 建立一个autoload.erl(gen_server)把它放到auto_load_sup监控树下: 在auto_load_sup.erl里面修改:
 init([]) ->
       {ok, { {one_for_one, 5, 10}, [?CHILD(autoload,worker)]} }.
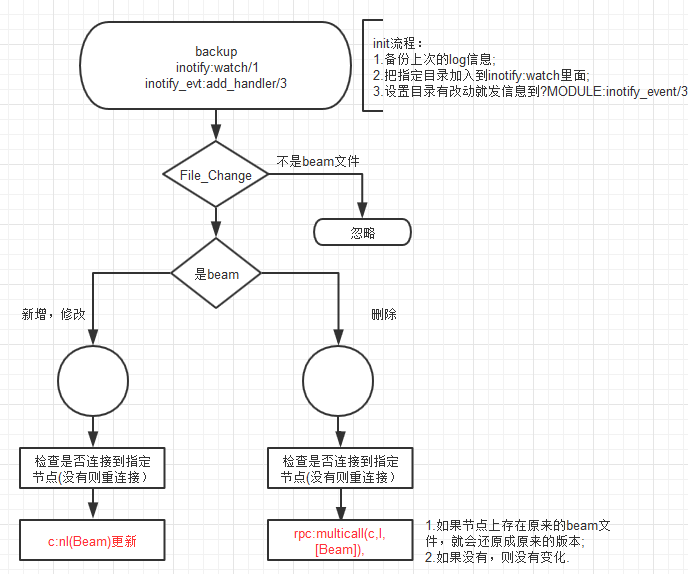
4.3 在autoload.erl gen_server里面写逻辑:
5. 编译代码:
$rebar get-deps
$ rebar compile
6. 启动application
erl -pa "./ebin" -pz "./dev_patch" -sname autoload -s autoload -detached
把启动命令写到start.sh里面
这个命令会启动application并把日志记录在log/console.log中
使用下面命令查看日志:tail ./log/console.log -f
以上就是使用依赖项目创建自己的application的过程,
结论:rebar非常简单好用。
PS:rebar还集成了release,eunit,coverage statistics doc功能。
如果感兴趣,可以去官网了解下,非常全面的文档哦。
参考资料:
1.Rebar github地址:https://github.com/rebar/rebar
2.Erlang In Anger中英对照版本:http://zhongwencool.gitbooks.io/erlang_in_anger/
3.本项目github地址:https://github.com/zhongwencool/autoload