在Orchard:如何生成Hello World模块中介绍了如何生成一个不带Model的模块,本篇接着上面示例给大家讲解一下如何生成一个Content Part。如果还没有生成HelloWorld模块,请参考上篇做完练习再回来接着做本次练习。
Content Part
在开源社区项目Orchard基本概念在介绍了Orchard中Content Type是由一些小的构件块(parts)组成,我们叫做content parts, Content parts 是跨内容类型的可重用的原子内容。例如一个blog由多部分组成,回复、tags或者打分等content parts,这些part都是可以在其他内容类型中重用的。
下面将为大家介绍如何给Orchard增加一个自定义的Content Part。
|
|

生成Content Part需要生成的对象列表
- A content part itself
- A content part record
- A handler
- A driver
- Display shapes (.cshtml Razor view files)
- Data migration
生成model
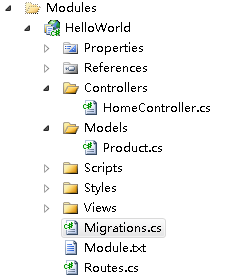
在HelloWorld/Models目录下生成一个Product.cs:
using System.ComponentModel.DataAnnotations;
using Orchard.ContentManagement;
using Orchard.ContentManagement.Records;
namespace HelloWorld.Models
{
public class ProductPartRecord : ContentPartRecord
{
public virtual string Sku { get; set; }
public virtual float Price { get; set; }
}
public class ProductPart : ContentPart<ProductPartRecord>
{
[Required]
public string Sku
{
get { return Record.Sku; }
set { Record.Sku = value; }
}
[Required]
public float Price
{
get { return Record.Price; }
set { Record.Price = value; }
}
}
}
在这里我们生成了一个代表产品记录的类ProductPartRecord,它将存储在数据库中。它有两个属性:Sku和Price。这里还生成了一个展现数据的content part ProductPart,它暴露出了两个公开属性SKU和price,这些属性将在UI中展现。
为了让项目编译,打开HelloWorld.csproj 增加
<Compile Include="Models\Product.cs" />
生成初始化数据迁移data migration
第一次听到Data migration这个概念是在Ruby领域中,不知道这里的data migration是不是参考Ruby社区的呢。Data migration是一个能够平滑的对应用或组件进行版本升级的一种模式。这个模式的主要思路是让系统能够跟踪当前安装版本以及每次数据升级带来与上一版本之间改变的描述。如果系统检测到存在一个新的版本,那么网站管理员会收到提示来进行升级,升级后数据版本和代码版本将保持同步。
下面我们先来生成初始化数据迁移代码,进入Orchard命令行,输入
codegen datamigration HelloWorld
将会在HelloWorld项目下增加一个Migration.cs文件:
using System;
using System.Collections.Generic;
using System.Data;
using Orchard.ContentManagement.Drivers;
using Orchard.ContentManagement.MetaData;
using Orchard.ContentManagement.MetaData.Builders;
using Orchard.Core.Contents.Extensions;
using Orchard.Data.Migration;
namespace HelloWorld {
public class Migrations : DataMigrationImpl {
public int Create() {
// Creating table ProductPartRecord
SchemaBuilder.CreateTable("ProductPartRecord", table => table
.ContentPartRecord()
.Column("Sku", DbType.String)
.Column("Price", DbType.Single)
);
return 1;
}
}
}
方法名【Create】是命名约定的,它用来生成数据的初始版本,通过SchemaBuilder.CreateTable 方法来生成一个"ProductPartRecord" 表,表比ContentPartRecord多两个字段:Sku 和Price。Create方法现在返回1,表示当前的版本号是1。
模块会有多次版本升级,接下来我们把ProductPart附加到任何content type之上:
public int UpdateFrom1()
{
ContentDefinitionManager.AlterPartDefinition("ProductPart",
builder => builder.Attachable());
return 2;
}
这个新的migration方法为"UpdateFrom1", 这也是一个命名约定,后面的数字1表示从版本1进行升级。如果下面还有更改,那么名称应该就是"UpdateFrom2" 并且返回3了。
打开HelloWorld.csproj 增加:
<Compile Include="Migrations.cs" />
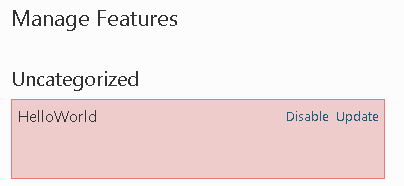
进入后台的Features 菜单,将会看到一个升级提示,点击"Update"升级模块,执行migrations。
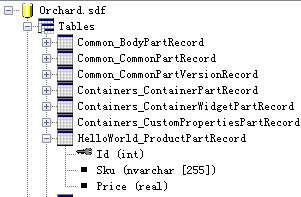
升级后我们查看数据库文件,可以看到多了一张表HelloWorld_ProductPartRecord:
增加handler
在Orchard中handler类似与ASP.NET MVC中的filter。Handler是一个代码块,当特定事件发生时触发执行。下面handler的代码并不复杂,希望以后类似代码可以通过在ProductPartRecord 通过属性声明来实现。增加handlers目录并添加文件ProductHandler.cs:
using Orchard.ContentManagement.Handlers;
using HelloWorld.Models;
using Orchard.Data;
namespace HelloWorld.Handlers
{
public class ProductHandler : ContentHandler
{
public ProductHandler(IRepository<ProductPartRecord> repository)
{
Filters.Add(StorageFilter.For(repository));
}
}
}
添加 driver
在Orchard中driver类似于ASP.NET MVC的controller,一个driver通常会重载显示和编辑行为,对于示例的product part而言,我们可以生成一个新的Drivers目录,并添加文件ProductDriver.cs:
using HelloWorld.Models;
using Orchard.ContentManagement.Drivers;
using Orchard.ContentManagement;
namespace HelloWorld.Drivers
{
public class ProductDriver : ContentPartDriver<ProductPart> {
protected override DriverResult Display(
ProductPart part, string displayType, dynamic shapeHelper)
{
return ContentShape("Parts_Product",
() => shapeHelper.Parts_Product(
Sku: part.Sku,
Price: part.Price));
}
//GET
protected override DriverResult Editor(ProductPart part, dynamic shapeHelper)
{
return ContentShape("Parts_Product_Edit",
() => shapeHelper.EditorTemplate(
TemplateName: "Parts/Product",
Model: part,
Prefix: Prefix));
}
//POST
protected override DriverResult Editor(
ProductPart part, IUpdateModel updater, dynamic shapeHelper)
{
updater.TryUpdateModel(part, Prefix, null, null);
return Editor(part, shapeHelper);
}
}
}
Editor方法生成一个叫做EditorTemplate的shape,这个shape有一个TemplateName来表示Orchard去哪里找显示模板(这里指定名称为Parts/Product,表示后面会建立Parts目录和Product.cshtml文件)。我们还指定这个模板的model。
Display方法生成前端展现的shape,这个shape有两个part:Sku 和Price。
在模块根目录下新建一个placement.info文件,指定plcaement
<Placement>
<Place Parts_Product_Edit="Content:3"/>
<Place Parts_Product="Content:3"/>
</Placement>
建立模板templates
最后一件事情就是写两个driver中指定的模板 (前端和后台)。
我们首先建立前端模板。在Views下生成一个Parts目录,添加文件Product.cshtml:
<br/>
@T("Price"): <b>$@Model.Price</b><br />
@Model.Sku<br/>
在Views下生成一个EditorTemplates\Parts 目录,添加文件Product.cshtml:
@model HelloWorld.Models.ProductPart
<fieldset>
<label class="sub" for="Sku">@T("Sku")</label><br />
@Html.TextBoxFor(m => m.Sku, new { @class = "text" })<br />
<label class="sub" for="Price">@T("Price")</label><br />
@Html.TextBoxFor(m => m.Price, new { @class = "text" })
</fieldset>
把这两个模板加入项目文件
<Content Include="Views\Parts\Product.cshtml" />
<Content Include="Views\EditorTemplates\Parts\Product.cshtml" />
把ProductPart放在一个content type来看看
我们可以新建一个Product content type来显示本示例结果,添加Product part,再添加一些常用的Part。在DataMigrations/SimpleCommerceDataMigration.cs 文件中添加UpdateFrom2方法:
public int UpdateFrom2()
{
ContentDefinitionManager.AlterTypeDefinition("Product", cfg => cfg
.WithPart("CommonPart")
.WithPart("RoutePart")
.WithPart("BodyPart")
.WithPart("ProductPart")
.WithPart("CommentsPart")
.WithPart("TagsPart")
.WithPart("LocalizationPart")
.Creatable());
return 3;
}
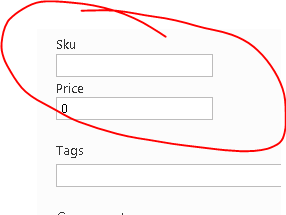
更新此模块之后,就可以看到控制面板多了一个Product,新增后添加内容面板上多了Sku和Price两个字段: 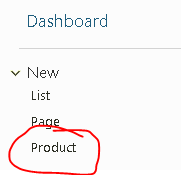
参考: Creating a module with a simple text editor
推荐:你可能需要的在线电子书
我的新浪围脖: http://t.sina.com.cn/openexpressapp
欢迎转载,转载请注明:转载自周金根 [ http://zhoujg.cnblogs.com/ ]