当需要画图时我们一般创建一个UIView子类, 重写其中的drawRect方法
再drawRect方法中利用UIBezierPath添加画图
UIBezierPath的使用方法:
#import "BezierView.h"

@implementation BezierView


- (void)drawRect:(CGRect)rect {
    // Drawing code

    //设置线条颜色
    UIColor *color = [UIColor redColor];
    [color set];

    //创建UIBezierPath
    UIBezierPath *apath = ({

        UIBezierPath *path = [UIBezierPath bezierPath];
        path.lineWidth     = 5.0f;              //设置线条宽度
        path.lineCapStyle  = kCGLineCapRound;   //设置拐角
        path.lineJoinStyle = kCGLineCapRound;  //终点处理
        //设置起始点
        [path moveToPoint:CGPointMake(100, 0)];

        //增加线条
        [path addLineToPoint:CGPointMake(200, 40)];
        [path addLineToPoint:CGPointMake(160, 140)];
        [path addLineToPoint:CGPointMake(40, 140)];
        [path addLineToPoint:CGPointMake(0, 40)];

        //关闭路径
        [path closePath];

        path;
    });

    //根据坐标连线
    [apath stroke];
}
然后把自定义的View添加到Controller中
#import "ViewController.h"
#import "BezierView.h"

#define SCREEN_WIDTH [UIScreen mainScreen].bounds.size.width
#define SCREEN_HEIGHT [UIScreen mainScreen].bounds.size.height

@interface ViewController ()

@end

@implementation ViewController

- (void)viewDidLoad {

    [super viewDidLoad];

    BezierView *beView     = [[BezierView alloc] initWithFrame:
                                CGRectMake(0, 0, SCREEN_WIDTH, SCREEN_HEIGHT)];

    beView.backgroundColor = [UIColor whiteColor];

    [self.view addSubview:beView];

}

@end
运行结果能看到一个多边形

如果把drawRect中最后一句话改为[apath fill];运行结果就是实心图

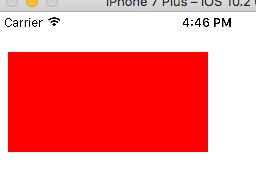
我们可以用UIBezierPath的bezierPathWithRect:CGRect(rect)方法来画矩形, 代码如下
- (void)drawRect:(CGRect)rect {
    // Drawing code

    //设置线条颜色
    UIColor *color = [UIColor redColor];
    [color set];

    //创建UIBezierPath
    UIBezierPath *apath = [UIBezierPath bezierPathWithRect:CGRectMake(10, 40, 200, 100)];

    //更具坐标连线
    [apath fill];
}
运行结果:
我们可以用UIBezierPath的bezierPathWithOvallInRect:CGRect(rect)方法来画圆形和椭圆, 代码如下
- (void)drawRect:(CGRect)rect {
    // Drawing code

    //设置线条颜色
    UIColor *color = [UIColor redColor];
    [color set];

    //创建UIBezierPath
    UIBezierPath *apath = [UIBezierPath bezierPathWithOvalInRect:CGRectMake(10, 40, 200, 100)];
    apath.lineWidth     = 5.0f;
    apath.lineCapStyle  = kCGLineCapRound;
    apath.lineJoinStyle = kCGLineCapRound;

    //更具坐标连线
    [apath stroke];
}
运行结果:

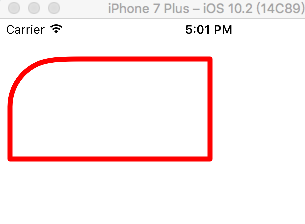
用下面这个方法画带指定远角的矩形
+ (instancetype)bezierPathWithRoundedRect:(CGRect)rect byRoundingCorners:(UIRectCorner)corners cornerRadii:(CGSize)cornerRadii;
上代码:
- (void)drawRect:(CGRect)rect {
    // Drawing code

    //设置线条颜色
    UIColor *color = [UIColor redColor];
    [color set];

    //创建UIBezierPath
    UIBezierPath *apath = [UIBezierPath bezierPathWithRoundedRect:CGRectMake(10, 40, 200, 100)
                                                byRoundingCorners:UIRectCornerTopLeft
                                                      cornerRadii:CGSizeMake(100, 100)];
    apath.lineWidth     = 5.0f;
    apath.lineCapStyle  = kCGLineCapRound;
    apath.lineJoinStyle = kCGLineCapRound;

    //更具坐标连线
    [apath stroke];
}
运行结果:
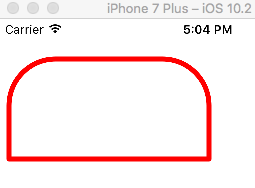
如果要设置多个圆角的话就给byRoundingCorners多设置几个角度, 角度可选如下
typedef NS_OPTIONS(NSUInteger, UIRectCorner) {
    UIRectCornerTopLeft     = 1 << 0,
    UIRectCornerTopRight    = 1 << 1,
    UIRectCornerBottomLeft  = 1 << 2,
    UIRectCornerBottomRight = 1 << 3,
    UIRectCornerAllCorners  = ~0UL
};
例如:
UIBezierPath *apath = [UIBezierPath bezierPathWithRoundedRect:CGRectMake(10, 40, 200, 100)
                                                byRoundingCorners:UIRectCornerTopLeft | UIRectCornerTopRight
                                                      cornerRadii:CGSizeMake(100, 100)];
就有两个圆角
也可以用下面这个方法画圆弧
+ (instancetype)bezierPathWithArcCenter:(CGPoint)center //圆心坐标
radius:(CGFloat)radius //半径
startAngle:(CGFloat)startAngle //弧形开始的角度
endAngle:(CGFloat)endAngle //弧形结束的角度
clockwise:(BOOL)clockwise; //正向还是反向画弧
上代码:
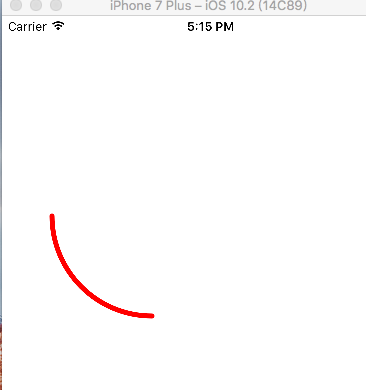
- (void)drawRect:(CGRect)rect {
    // Drawing code

    //设置线条颜色
    UIColor *color = [UIColor redColor];
    [color set];

    //创建UIBezierPath
    UIBezierPath *apath = [UIBezierPath bezierPathWithArcCenter:CGPointMake(150, 200)
                                                         radius:100 startAngle:M_PI / 2
                                                       endAngle:M_PI
                                                      clockwise:YES];
    apath.lineWidth     = 5.0f;
    apath.lineCapStyle  = kCGLineCapRound;
    apath.lineJoinStyle = kCGLineCapRound;

    //更具坐标连线
    [apath stroke];
}
运行结果如下
还可以直接在path中添加圆形段
[path addArcWithCenter:CGPointMake(100, 200)
                        radius:100 startAngle:M_PI / 2
                      endAngle:M_PI clockwise:YES];
最后附上UIBezierPath画圆弧时段坐标系

另外UIBezierPath可以画贝赛尔曲线
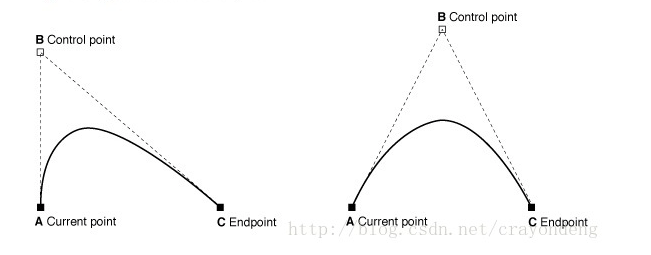
下面是添加二次贝赛尔曲线的方法
- (void)addQuadCurveToPoint:(CGPoint)endPoint controlPoint:(CGPoint)controlPoint;
上代码:
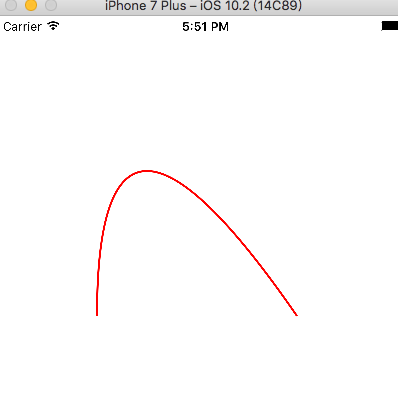
- (void)drawRect:(CGRect)rect {
    // Drawing code

    //设置线条颜色
    UIColor *color = [UIColor redColor];
    [color set];

    //创建UIBezierPath
    UIBezierPath *apath = ({

        UIBezierPath *path = [UIBezierPath bezierPath];
        path.lineWidth     = 2.0f;              //设置线条宽度
        //path.lineCapStyle = kCGLineCapRound;   //设置拐角

        //绘制二次贝赛尔曲线

        //设置起始点
        [path moveToPoint:CGPointMake(100, 300)];

        //设置EndPoint & Control Point
        [path addQuadCurveToPoint:CGPointMake(300, 300) controlPoint:CGPointMake(100, 10)];

        path;
    });


    //更具坐标连线
    [apath stroke];
}
运行结果为:
可以参照下面这张图看看每个点的定义
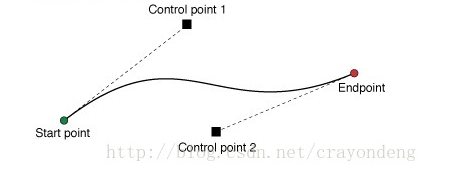
三次贝赛尔曲线会有2个控制点
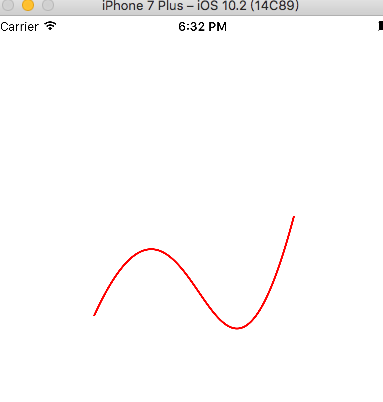
上代码:
- (void)drawRect:(CGRect)rect {
    // Drawing code

    //设置线条颜色
    UIColor *color = [UIColor redColor];
    [color set];

    //创建UIBezierPath
    UIBezierPath *apath = ({

        UIBezierPath *path = [UIBezierPath bezierPath];
        path.lineWidth     = 2.0f;              //设置线条宽度

        //绘制三次贝赛尔曲线

        //设置起始点
        [path moveToPoint:CGPointMake(100, 300)];

        //设置EndPoint & Control Point
        [path addCurveToPoint:CGPointMake(300, 200)
                controlPoint1:CGPointMake(200, 80)
                controlPoint2:CGPointMake(220, 500)];

        path;
    });


    //更具坐标连线
    [apath stroke];
}
运行结果: