一.Spark streaming Job 架构
SparkStreaming框架会自动启动Job并每隔BatchDuration时间会自动触发Job的调用。
Spark Streaming的Job 分为两大类:
-
每隔BatchInterval时间片就会产生的一个个Job,这里的Job并不是Spark Core中的Job,它只是基于DStreamGraph而生成的RDD的DAG而已;从Java角度讲相当于Runnable接口的实现类,要想运行Job需要将Job提交给JobScheduler,在JobScheduler内部会通过线程池的方式创建运行Job的一个个线程,当找到一个空闲的线程后会将Job提交到集群运行(其实是在线程中基于RDD的Action触发真正的作业的运行)。为什么使用线程池呢?
a.Job根据BatchInterval不断生成,为了减少线程创建而带来的效率提升我们需要使用线程池(这和在Executor中通过启动线程池的方式来执行Task有异曲同工之妙);
b.如果Job的运行设置为FAIR公平调度的方式,这个时候也需要多线程的支持;
-
上面Job提交的Spark Job本身。单从这个时刻来看,此次的Job和Spark core中的Job没有任何的区别。
理解Spark Streaming的Job的整个架构和运行机制对于精通Spark Streaming是至关重要的。
我们运行以下的程序,通过这个程序的运行过程进一步加深理解Spark Streaming流处理的Job的执行的过程,代码如下:
第一部分获取数据库连接代码:
import java.sql.Connection;
import java.sql.DriverManager;
import java.util.LinkedList;
public class ConnectionPool {
private static LinkedList<Connection> connectionQueue;
static {
try {
Class.forName("com.mysql.jdbc.Driver");
} catch (ClassNotFoundException e) {
e.printStackTrace();
}
}
public synchronized static Connection getConnection() {
try {
if(connectionQueue == null) {
connectionQueue = new LinkedList<Connection>();
for(int i = 0; i < 5; i++) {
Connection conn = DriverManager.getConnection(
"jdbc:mysql://Master:3306/sparkstreaming",
"root",
"778899..");
connectionQueue.push(conn);
}
}
} catch (Exception e) {
e.printStackTrace();
}
return connectionQueue.poll();
}
public static void returnConnection(Connection conn) {
connectionQueue.push(conn);
}
}
第二部分: 通过sparkstreaming 将网络产生的数据进行统计统计,并将结果写入mysql数据库
object OnlineForeachRDD2DB {
def main(args: Array[String]){
/**
* 第1步:创建Spark的配置对象SparkConf,设置Spark程序的运行时的配置信息,
* 例如说通过setMaster来设置程序要链接的Spark集群的Master的URL,如果设置
* 为local,则代表Spark程序在本地运行,特别适合于机器配置条件非常差(例如
* 只有1G的内存)的初学者
*/
val conf = new SparkConf() //创建SparkConf对象
conf.setAppName("OnlineForeachRDD") //设置应用程序的名称,在程序运行的监控界面可以看到名称
conf.setMaster("spark://Master:7077") //此时,程序在Spark集群
conf.setMaster("local[6]")
//设置batchDuration时间间隔来控制Job生成的频率并且创建Spark Streaming执行的入口
val ssc = new StreamingContext(conf, Seconds(5))
val lines = ssc.socketTextStream("Master", 9999)
val words = lines.flatMap(_.split(" "))
val wordCounts = words.map(x => (x, 1)).reduceByKey(_ + _)
wordCounts.foreachRDD{ rdd =>
rdd.foreachPartition{ partitionOfRecords => {
// ConnectionPool is a static, lazily initialized pool of connections
val connection = ConnectionPool.getConnection()
partitionOfRecords.foreach(record => {
val sql = "insert into streaming_itemcount(item,count) values('" + record._1 + "'," + record._2 + ")"
val stmt = connection.createStatement();
stmt.executeUpdate(sql);
})
ConnectionPool.returnConnection(connection) // return to the pool for future reuse
}}
}
/**
* 在StreamingContext调用start方法的内部其实是会启动JobScheduler的Start方法,进行消息循环,
* 在JobScheduler的start内部会构造JobGenerator和ReceiverTacker,并且调用JobGenerator和
* ReceiverTacker的start方法:
* 1,JobGenerator启动后会不断的根据batchDuration生成一个个的Job
* 2,ReceiverTracker启动后首先在Spark Cluster中启动Receiver(其实是在Executor中先启动
* ReceiverSupervisor),在Receiver收到数据后会通过ReceiverSupervisor存储到Executor并且把
* 数据的Metadata信息发送给Driver中的ReceiverTracker,在ReceiverTracker内部会通过
* ReceivedBlockTracker来管理接受到的元数据信息每个BatchInterval会产生一个具体的Job,
* 其实这里的Job不是Spark Core中所指的Job,它只是基于DStreamGraph而生成的RDD的DAG
* 而已,从Java角度讲,相当于Runnable接口实例,此时要想运行Job需要提交给JobScheduler,
* 在JobScheduler中通过线程池的方式找到一个单独的线程来提交Job到集群运行(其实是在线程中
* 基于RDD的Action触发真正的作业的运行),
* 为什么使用线程池呢?
* 1,作业不断生成,所以为了提升效率,我们需要线程池;这和在Executor中通过线程池执行Task
* 有异曲同工之妙;
* 2,有可能设置了Job的FAIR公平调度的方式,这个时候也需要多线程的支持。
*/
ssc.start()
ssc.awaitTermination()
}
}
代码中以注释的方式描述了Spakr job 启动的过程,下面结合源码做进一步分析
StreamingContext的start()方法:
/**
 * Start the execution of the streams.
 *
 * @throws IllegalStateException if the StreamingContext is already stopped.
 */
def start(): Unit = synchronized {
  state match {
    case INITIALIZED =>
      startSite.set(DStream.getCreationSite())
      StreamingContext.ACTIVATION_LOCK.synchronized {
        StreamingContext.assertNoOtherContextIsActive()
        try {
          validate()

          // Start the streaming scheduler in a new thread, so that thread local properties
          // like call sites and job groups can be reset without affecting those of the
          // current thread.
          ThreadUtils.runInNewThread("streaming-start") {
            sparkContext.setCallSite(startSite.get)
            sparkContext.clearJobGroup()
            sparkContext.setLocalProperty(SparkContext.SPARK_JOB_INTERRUPT_ON_CANCEL, "false")
            savedProperties.set(SerializationUtils.clone(
              sparkContext.localProperties.get()).asInstanceOf[Properties])
            scheduler.start()
          }
          state = StreamingContextState.ACTIVE
        } catch {
          case NonFatal(e) =>
            logError("Error starting the context, marking it as stopped", e)
            scheduler.stop(false)
            state = StreamingContextState.STOPPED
            throw e
        }
        StreamingContext.setActiveContext(this)
      }
      shutdownHookRef = ShutdownHookManager.addShutdownHook(
        StreamingContext.SHUTDOWN_HOOK_PRIORITY)(stopOnShutdown)
      // Registering Streaming Metrics at the start of the StreamingContext
      assert(env.metricsSystem != null)
      env.metricsSystem.registerSource(streamingSource)
      uiTab.foreach(_.attach())
      logInfo("StreamingContext started")
    case ACTIVE =>
      logWarning("StreamingContext has already been started")
    case STOPPED =>
      throw new IllegalStateException("StreamingContext has already been stopped")
  }
}
可以看到StreamingContext的start()的方法中调用了scheduler.start()(上述代码标红的部分),其scheduler 是JobScheduler的对象,该对象在StreamingContext创建是被实例化:
private[streaming] val scheduler = new JobScheduler(this)
接下来在JobScheduler.start()内部实例化EventLoop,并执行EventLoop.start()进行消息循环,在JobScheduler.start()内部构造ReceiverTacker,并且调用JobGenerator和ReceiverTacker的start方法:
def start(): Unit = synchronized {
  if (eventLoop != null) return // scheduler has already been started

  logDebug("Starting JobScheduler")
  eventLoop = new EventLoop[JobSchedulerEvent]("JobScheduler") {
    override protected def onReceive(event: JobSchedulerEvent): Unit = processEvent(event)

    override protected def onError(e: Throwable): Unit = reportError("Error in job scheduler", e)
  }
  eventLoop.start()

  // attach rate controllers of input streams to receive batch completion updates
  for {
    inputDStream <- ssc.graph.getInputStreams
    rateController <- inputDStream.rateController
  } ssc.addStreamingListener(rateController)

  listenerBus.start()
  receiverTracker = new ReceiverTracker(ssc)
  inputInfoTracker = new InputInfoTracker(ssc)
  executorAllocationManager = ExecutorAllocationManager.createIfEnabled(
    ssc.sparkContext,
    receiverTracker,
    ssc.conf,
    ssc.graph.batchDuration.milliseconds,
    clock)
  executorAllocationManager.foreach(ssc.addStreamingListener)
  receiverTracker.start()
  jobGenerator.start()
  executorAllocationManager.foreach(_.start())
  logInfo("Started JobScheduler")
}
/** Start generation of jobs */
def start(): Unit = synchronized {
  if (eventLoop != null) return // generator has already been started

  // Call checkpointWriter here to initialize it before eventLoop uses it to avoid a deadlock.
  // See SPARK-10125
  checkpointWriter

  eventLoop = new EventLoop[JobGeneratorEvent]("JobGenerator") {
    override protected def onReceive(event: JobGeneratorEvent): Unit = processEvent(event)

    override protected def onError(e: Throwable): Unit = {
      jobScheduler.reportError("Error in job generator", e)
    }
  }
  eventLoop.start()

  if (ssc.isCheckpointPresent) {
    restart()
  } else {
    startFirstTime()
  }
}
最终调用generateJobs()方法不断生成job:
/** Generate jobs and perform checkpoint for the given `time`.  */
private def generateJobs(time: Time) {
  // Checkpoint all RDDs marked for checkpointing to ensure their lineages are
  // truncated periodically. Otherwise, we may run into stack overflows (SPARK-6847).
  ssc.sparkContext.setLocalProperty(RDD.CHECKPOINT_ALL_MARKED_ANCESTORS, "true")
  Try {
    jobScheduler.receiverTracker.allocateBlocksToBatch(time) // allocate received blocks to batch
    graph.generateJobs(time) // generate jobs using allocated block
  } match {
    case Success(jobs) =>
      val streamIdToInputInfos = jobScheduler.inputInfoTracker.getInfo(time)
      jobScheduler.submitJobSet(JobSet(time, jobs, streamIdToInputInfos))
    case Failure(e) =>
      jobScheduler.reportError("Error generating jobs for time " + time, e)
  }
  eventLoop.post(DoCheckpoint(time, clearCheckpointDataLater = false))
}
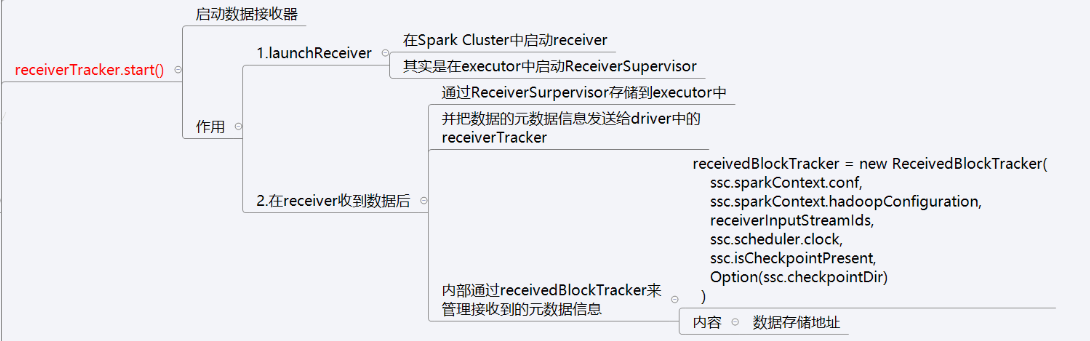
ReceiverTracker启动后首先在Spark Cluster中启动Receiver(其实是在Executor中先启动 ReceiverSupervisor),在Receiver收到数据后会通过ReceiverSupervisor存储到Executor并且把数据的Metadata信息发送给Driver中的ReceiverTracker,在ReceiverTracker内部会通过ReceivedBlockTracker来管理接受到的元数据信息.过程如图所示:
源码如下:(注意红色字体部分代码)
/** Start the endpoint and receiver execution thread. */
def start(): Unit = synchronized {
  if (isTrackerStarted) {
    throw new SparkException("ReceiverTracker already started")
  }

  if (!receiverInputStreams.isEmpty) {
    endpoint = ssc.env.rpcEnv.setupEndpoint(
      "ReceiverTracker", new ReceiverTrackerEndpoint(ssc.env.rpcEnv))
    if (!skipReceiverLaunch) launchReceivers()
    logInfo("ReceiverTracker started")
    trackerState = Started
  }
}
每个BatchInterval会产生一个具体的Job,其实这里的Job不是Spark Core中所指的Job,它只是基于DStreamGraph而生成的RDD的DAG而已,从Java角度讲,相当于Runnable接口实例,此时要想运行Job需要提交给JobScheduler, 在JobScheduler中通过线程池的方式找到一个单独的线程来提交Job到集群运行(其实是在线程中 基于RDD的Action触发真正的作业的运行)
二 Spark Streaming Job容错架构和运行机制
Spark容错分为Driver级别的容错和Executor级别的容错。
- 在Driver级别的容错具体为DAG生成的模板,即DStreamGraph,RecevierTracker中存储的元数据信息和JobScheduler中存储的Job进行的进度情况等信息,只要通过checkpoint就可以了,每个Job生成之前进行checkpoint,在Job生成之后再进行checkpoint,如果出错的话就从checkpoint中恢复。
- 在Executor级别的容错具体为接收数据的安全性和任务执行的安全性。在接收数据安全性方面,一种方式是Spark Streaming接收到数据默认为MEMORY_AND_DISK_2的方式,在两台机器的内存中,如果一台机器上的Executor挂了,立即切换到另一台机器上的Executor,这种方式一般情况下非常可靠且没有切换时间。另外一种方式是WAL(Write Ahead Log),在数据到来时先通过WAL机制将数据进行日志记录,如果有问题则从日志记录中恢复,然后再把数据存到Executor中,再进行其他副本的复制。WAL这种方式对性能有影响,在生产环境中不常用,一般使用Kafka存储,Spark Streaming接收到数据丢失时可以从Kafka中回放。在任务执行的安全性方面,靠RDD的容错。
Spark Streaming的容错机制是基于RDD的容错机制。
主要表现为:
1 checkpoint
2 基于血统(lineage)的高度容错机制
3 出错了之后会从出错的位置从新计算,而不会导致重复计算
备注:
本博客部分内容源自王家林老师spak课程