pushState/replaceState/popstate 解析
HTML5提供了对history栈中内容的操作。通过history.pushState/replaceState实现添加地址到history栈中。
pushState/replaceState() 方法
pushState() 需要三个参数: 一个状态对象, 一个标题 (目前被忽略), 和 (可选的) 一个URL. 让我们来解释下这三个参数详细内容:
状态对象 — 状态对象state是一个JavaScript对象,通过pushState () 创建新的历史记录条目。无论什么时候用户导航到新的状态,popstate事件就会被触发,且该事件的state属性包含该历史记录条目状态对象的副本。
状态对象可以是能被序列化的任何东西。原因在于Firefox将状态对象保存在用户的磁盘上,以便在用户重启浏览器时使用,我们规定了状态对象在序列化表示后有640k的大小限制。如果你给 pushState() 方法传了一个序列化后大于640k的状态对象,该方法会抛出异常。如果你需要更大的空间,建议使用 sessionStorage 以及 localStorage.
标题 — Firefox 目前忽略这个参数,但未来可能会用到。在此处传一个空字符串应该可以安全的防范未来这个方法的更改。或者,你可以为跳转的state传递一个短标题。
URL — 该参数定义了新的历史URL记录。注意,调用 pushState() 后浏览器并不会立即加载这个URL,但可能会在稍后某些情况下加载这个URL,比如在用户重新打开浏览器时。新URL不必须为绝对路径。如果新URL是相对路径,那么它将被作为相对于当前URL处理。新URL必须与当前URL同源,否则 pushState() 会抛出一个异常。该参数是可选的,缺省为当前URL。
改变历史记录条目
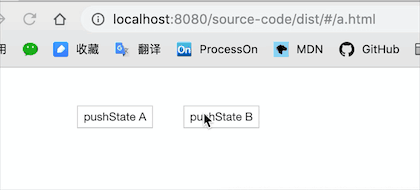
@clickA
history.pushState({ page: 1 }, "", "a.html");
@clickB
history.pushState({ page: 2 }, "", "b.html");
当历史记录条目更改时,将触发popstate事件。如果被激活的历史记录条目是通过对history.pushState()的调用创建的,或者受到对history.replaceState()的调用的影响,popstate事件的state属性包含历史条目的状态对象的副本。
需要注意的是调用history.pushState()或history.replaceState()不会触发popstate事件。只有在做出浏览器动作时,才会触发该事件,如用户点击浏览器的回退按钮(或者在Javascript代码中调用history.back())
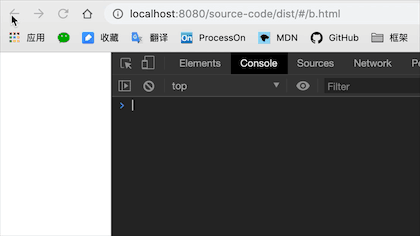
触发浏览器回退按钮
window.addEventListener('popstate', ()=>{
console.log(location.href)
})
vue-router 实现原理
总体来说就是使用了history的方法来控制浏览器的路由,结合vue实现数据与视图更新。上面我们已经讲了history的使用原理,接下来结合vue-router具体来看一下
安装 vue-router
install.js
通过 Object.defineProperty 将 _router 挂载在 Vue 原型的 $router 属性的 get 函数上。这样可以通过 this.$router 来调用 _router。使用get的好处是,保证了安全性,只能读不能修改 $router。
// 项目内可以通过 this.$router 来获取到
Object.defineProperty(Vue.prototype, '$router', {
get () { return this._routerRoot._router }
})
然后,在 Vue.mixin 中注入 beforeCreate 钩子函数,每个组件都会调用 registerInstance , 通过 Vue.util.defineReactive 将 _route 进行监听,这样每次进入到新的页面就会设置当前的路由。
// 在 `beforeCreate` 中调用了 `registerInstance`
// 其实就是调用了 router-view 组件中的 registerRouteInstance 方法
const registerInstance = (vm, callVal) => {
let i = vm.$options._parentVnode
if (isDef(i) && isDef(i = i.data) && isDef(i = i.registerRouteInstance)) {
i(vm, callVal)
}
}
Vue.mixin({
beforeCreate () {
if (isDef(this.$options.router)) {
this._routerRoot = this
this._router = this.$options.router
// 初始化设置监听 popstate
// 并将 this._route = route
this._router.init(this)
// 亮点在这!!!
// 将 _route 添加监听,当修改 history.current 时就可以触发更新了
Vue.util.defineReactive(this, '_route', this._router.history.current)
} else {
this._routerRoot = (this.$parent && this.$parent._routerRoot) || this
}
// 注册实例,调用 router-view 中的方法,修改 route 值,从而更新视图
registerInstance(this, this)
},
destroyed () {
// 销毁注册实例,因为注册的实例是 undefined
registerInstance(this)
}
})
router-view 实现视图更新
router-view 是一个函数式组件,页面中 beforeCreate 钩子调用registerRouteInstance 来修改当前 route 实例,由于 _route 已经被监听了,所以当 matched.instances[name] 发生变化的时候,会重新触发 render 更新视图。
components/view.js
data.registerRouteInstance = (vm, val) => {const current = matched.instances[name]
// 注册路由实例,如果与当前路由与原来路由相等则不变,如果不相等则更新实例
if (
(val && current !== vm) ||
(!val && current === vm)
) {
// 修改当前路由实例
matched.instances[name] = val
}
}
创建 route 对象
创建路由 createRoute,通过解析location等操作,返回一个route对象
src/util/route.js
export function createRoute (record: ?RouteRecord,
location: Location,
redirectedFrom?: ?Location,
router?: VueRouter
): Route {
const stringifyQuery = router && router.options.stringifyQuery
let query: any = location.query || {}
try {
query = clone(query)
} catch (e) {}
const route: Route = {
name: location.name || (record && record.name),
meta: (record && record.meta) || {},
path: location.path || '/',
hash: location.hash || '',
query,
params: location.params || {},
fullPath: getFullPath(location, stringifyQuery),
matched: record ? formatMatch(record) : []
}
if (redirectedFrom) {
route.redirectedFrom = getFullPath(redirectedFrom, stringifyQuery)
}
return Object.freeze(route)
}
这里主要讲了,vue-router 的 install,router-view 实现视图渲染,create-route 创建路由实例,还有如何实现与vue的结合,实现数据绑定等。由于篇幅的问题,再多细节的东西就没有讲了,有兴趣大家可以翻翻源码。
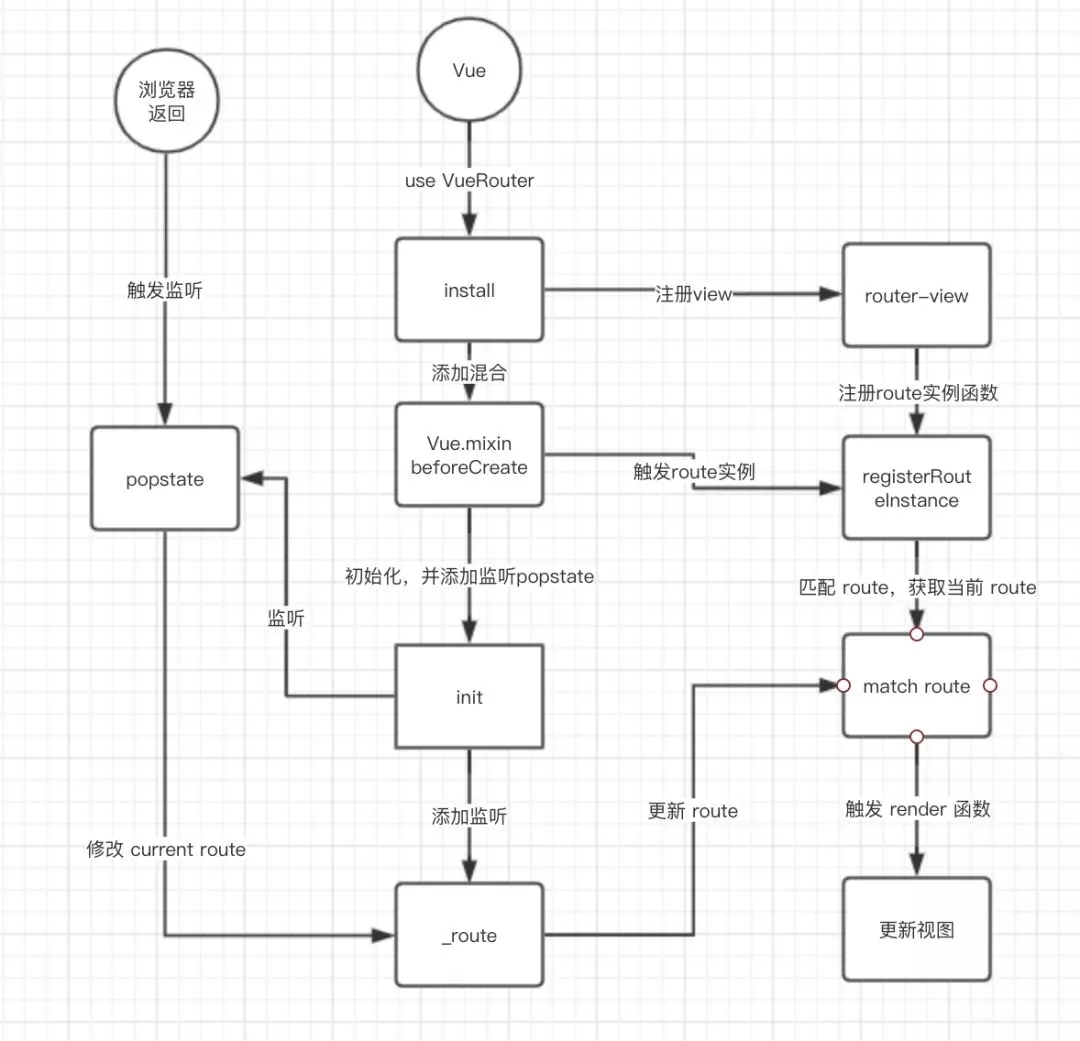
流程图
route 跟 router 的区别
讲完原理给大家捋一下 route 跟 router 的区别,通过源码很容易看出他们的不同
$router 是VueRouter的一个对象,通过Vue.use(VueRouter)和VueRouter构造函数得到一个router的实例对象,这个对象中是一个全局的对象,他包含了所有的路由包含了许多关键的对象和属性。
$route 就是一个路由的对象,我们通过 createRoute 创建出来的 route 对象,里面包括
-
path字符串,等于当前路由对象的路径,会被解析为绝对路径,如 "/home/news" 。 -
params对象,包含路由中的动态片段和全匹配片段的键值对 -
query对象,包含路由中查询参数的键值对。例如,对于 /home/news/detail/01?favorite=yes ,会得到$route.query.favorite == 'yes' 。 -
router路由规则所属的路由器(以及其所属的组件)。 -
matched数组,包含当前匹配的路径中所包含的所有片段所对应的配置参数对象。 -
name当前路径的名字,如果没有使用具名路径,则名字为空。
通过路由元信息,设置登录
原理是在路由的 meta 里设置 auth 属性,进入路由之前判断 meta.auth 是否为 true ,如果为 true 再判断,是否已经登陆,没有登陆的话调 login 方法去登陆,登陆成功后 回调 code === 0 继续进入页面
const beforeEnter = (to, from, next) => {
if (to.meta && to.meta.auth) {
// 未登陆走登陆逻辑
if (!isLogin()) {
const nextPage = (res) => {
if (res.code === 0) {
next(true)
} else {
next(false)
}
};
let targetUrl = location.href.split('#')[0] + '#' + to.fullPath
// 这里是你的登陆逻辑
login({
// 回调后进入页面
callback: nextPage,
// 目标页面,登陆成功后进入目标页面
targetUrl: targetUrl
});
} else {
next(true)
}
} else {
next(true)
}
}
在 Foo 组件设置登陆
const routes = [
{
path: '/Foo',
name: 'Foo',
meta: {
auth: true,
},
component: () => ('Foo.vue'),
},
{
path: '/Bar',
name: 'Bar',
component: () => ('Bar.vue'),
},
]
设置滚动行为
设置滚动行为,并添加路由,如果有 savedPosition 说明是第二次进入并已经触发过滚动,所以会滚动到之前打开的位置,如果是第一次进入没有savedPosition则滚动到最顶层。
const router = new Router({
scrollBehavior(to, from, savedPosition) {
if (savedPosition) {
return savedPosition
} else {
return { x: 0, y: 0 }
}
},
routes
})
vue 路由 按需 keep-alive
<keep-alive> 包裹动态组件时,会缓存不活动的组件实例,而不是销毁它们。和 <transition> 相似,<keep-alive> 是一个抽象组件:它自身不会渲染一个 DOM 元素,也不会出现在父组件链中。
当组件在 <keep-alive> 内被切换,它的 activated 和 deactivated 这两个生命周期钩子函数将会被对应执行。
<!-- 需要缓存的视图组件 -->
<router-view v-if="$route.meta.keepAlive">
</router-view>
</keep-alive>
<!-- 不需要缓存的视图组件 -->
<router-view v-if="!$route.meta.keepAlive">
</router-view>
路由配置
const routers = [
{
path: '/list',
name: 'list',
component: () => import('./views/keep-alive/list.vue'),
meta: {
keepAlive: true
}
}
]
因为在我们项目里面经常会有列表跳详情,然后又详情返回列表的情况,所以我们可以根据项目需求来判断是否需要被缓存,如果被缓存了就会出现下面的情况需要注意
watch 监听路由变化
有时我们需要通过给页面传参来判断页面展示什么内容,比如详情页 #/detail?infoId=123456,我们需要根据 infoId 来展示不同的内容
我们一般习惯会这样写
async created() {
const res = await this.pullData()
}
async pullData () {
return this.$http.get('http://test.m.com/detail', { infoId })
}
当我们通过列表再次进入详情页时,虽然infoId已经变了infoId=234567,但是页面并没有改变,是因为该页面被keep-alive了,created不会再次触发,created只在创建的时候执行一次。
为了解决这个问题,我们就需要对 $route 进行监听,只要 route 发生变化我们就更新页面
watch: {
'$route': {
// 页面初始化时立即触发一次
immediate: true,
handler(to, from) {
// 只有进入当前页面的时候,拉取数据
if(to.path === '/detail') {
this.pullData();
}
}
}
}
如何检测物理键返回
为什么要检测物理返回键?比如你有这样列表页,点击进去是一个详情页,然后返回的时候列表刷新了,找不到原来的位置,这种时候对用户的体验非常不好。我们看一下例子。

那么我们如何去优化它?
思路就是在用户返回到列表页的时候不刷新数据,只有在用户主动进入列表的时候才会刷新数据,我们看一下效果

下面是实现的代码,原理就是监听 popstate,当浏览器返回的时候会触发 popstate,这时我们标记 isBack 为 ture。在 setTimeout 0 之后判断 isBack(是否为浏览器返回),如果不是浏览器返回的再刷新数据。
@Component
export default {
data() {
return {
// 用来判断是否是通过返回键返回的
isBack: false
}
},
created () {
// 如果是物理键返回的就设置 isBack = true
this.$_onBack(()=>{
this.isBack = true;
});
},
watch: {
'$route': {
immediate: true,
handler(to, from) {
// 每次进入路由重置 isBack = false
this.isBack = false;
if(to.path === '/list') {
// 等待路由的 popstate 监听结束
setTimeout(()=>{
!this.isBack && this.pullData();
})
}
}
}
}
}
_onBack 实现,就是监听了 popstate ,因为vue-router是操作了history的状态,而浏览器返回的时候就会触发 popstate ,利用这个特性来判断是否为浏览器返回键返回
_onBack(cb) {
window.addEventListener(
"popstate",
(e) => {
if(typeof cb === 'function') {
if(e.state) {
cb(true)
}
}
},
false
);
};
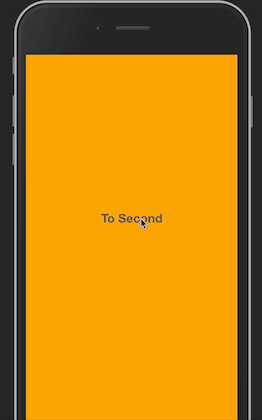
如何做出翻书效果
利用的是 vue 的 transition 组件,结合 vue-router,在路由上做一些过渡效果。先看图说话
<template>
<div class="wrap">
<transition :name="transitionName">
<router-view class="child-view"></router-view>
</transition>
</div>
</template>
<script>
export default {
data() {
return {
transitionName: 'turning-down'
}
},
watch: {
'$route' (to, from) {
if(to.path > from.path) {
// 进入下一页
this.transitionName = 'turning-up';
}else{
// 返回上一页
this.transitionName = 'turning-down';
}
}
}
}
</script>
<style scoped lang="scss">
.child-view {
position: absolute;
left: 0;
top: 0;
100%;
height: 100%;
transition: all 4s ease;
transform-origin: 0% center;
}
.turning-down-enter{
opacity: 1;
transform-origin: left;
transform-style: preserve-3d;
-webkit-transform: perspective(1000px) rotateY(-180deg);
transform: perspective(1000px) rotateY(-180deg);
}
.turning-up-leave-active {
transform-style: preserve-3d;
transform: perspective(1000px) rotateY(-180deg);
z-index: 100;
}
</style>
配置路由
export default [
{
path: '/Home',
name: 'home',
component: () =>
import('../views/vue/vue-router/Home.vue'),
children: [
{
path: '/Home/First',
name: 'Home-First',
component: () =>
import('../views/vue/vue-router/First.vue'),
},
{
path: '/Home/Second',
name: 'Home-Second',
component: () =>
import('../views/vue/vue-router/Second.vue'),
}
]
}
]
通过监听 Home 页面的路由变化,来改变 transitionName,路由切换时切换 transition 组件的 enter/leave-active 样式,因此可以在路由切换时做到翻书效果。
如何做一个优雅的路由分区
随着项目的增大,项目中的页面可能达到好几十个,甚至更多,那么如何将这些页面进行管理呢?我们的做法就是,将路由按照功能进行区分。
比如我们分了5个区间,每个区间有个数不同的路由
-- a.js
-- b.js
-- c.js
-- d.js
-- e.js
我们需要将这五个路由分别引进来,并进行结合
import a from 'routers/a'
import b from 'routers/b'
import c from 'routers/c'
import d from 'routers/d'
import e from 'routers/e'
const routers = [].concat(a, b, c, d, e)
以后我们每次建一个新的分区,都要手动加上相应的逻辑,这样看起来很不方便,那么我们有没有好的解决办法呢?
下面是我做的路由分区,利用 webpack 的 require.context 方法,将所有需要的路径导出来,require.context 有三个参数
第一个参数,匹配的路径目录,(从当前目录开始算起)第二个参数,是否需要深层遍历第三个参数,正则匹配,匹配出你需要的路径
需要注意的点,require 不能直接导出变量名
例如,下面的例子会报错
const a = './route/a.js'
// 会报错,a 不是一个模块
require(a)
所以 require 中只能加字符串或者使用字符串拼接
const a = 'a.js'
require('./route/' + a)
这样webpack会把 ./route/ 下所有文件打包成模块,你才可以使用 require 去引用
import Vue from 'vue'
import Router from 'vue-router'
Vue.use(Router)
const routes = []
const context = require.context('./router', true, //[w]+.(js|ts)$/)
context.keys().forEach(_ => {
const path = _.replace('./', '')
routes.push(...require('./router/' + path).routes)
})
export default new Router({
routes: [
{ path: '/', redirect: '/Home' },
...routes
]
})