Flask源码流程分析:
1.项目启动:
1.实例化Flask对象
1. 重要的加载项:
	* url_rule_class = Rule
    * url_map_class = Map
    * session_interface = SecureCookieSessionInterface()
    * def __init__:
        * self.static_url_path = static_url_path
        * self.config = self.make_config(instance_relative_config)
        * self.view_functions = {}
        * self.before_request_funcs = {}
        * self.before_first_request_funcs = []
        * self.after_request_funcs = {}
1.1url_rule_class的作用:
1. 作用是封装"endporint"和"url"

2.当加载路由的时候:@app.route('/index')

3. 执行这个方法:self.add_url_rule(rule, endpoint, f, **options);这里"urle"就是上边route中的"/index",是一个url路径;看源码就能发现这是一个装饰器;

4. 里边执行了"rule = self.url_rule_class(rule, methods=methods, **options)"方法;这个方法就是实力化"Rule"这个类;"rule"是那个url路径,"methods"里边是请求方法;"**options"里边是一个字典,键是"endporint",值是别名;然后在这个类中进行封装操作;
1.2url_map_class的作用:
1.在Map类中加载的时候又这么一个类属性: self._rules = []

2.当加载路由的时候:@app.route('/index')

3. 执行这个方法:self.add_url_rule(rule, endpoint, f, **options);这里"urle"就是上边route中的"/index",是一个url路径;看源码就能发现这是一个装饰器;

4. 这个方法中执行了:self.url_map.add(rule)方法;

5.在"add"这个方法中执行的"self._rules.append(rule)",就是将传入的那个"rule"实例化的对象增加到"self._rules = []"列表中;
1.3static_url_path的作用:
1. 这个是静态文件的路径;
1.4config的作用:
1. 相当于一个空的字典
1.5view_functions`的作用:
1. 在"add_url_rule()"方法中,操作了个空字典:
	self.view_functions[endpoint] = view_func
    这个字典的键是视图的别名,对应的值是视图函数
1.6before_request_funcs的作用:
1. 首先说一下"@app.before_request",这个是处理路由规则对应的 view_function 之前执行的函数;
2. 初始化是一个空的字典,这是一个存放对应函数的空字典;
    def before_request(self, f):
        self.before_request_funcs.setdefault(None, []).append(f)
        return f
    可以看出这个里边的键是一个"None",值是一个列表,列表里边是"@app.before_request"下的函数的函数名;
1.7before_first_request_funcs的作用:
1. 这个列表中保存的是函数是在用户请求进来第一个执行,但是只执行一次;
1.8after_request_funcs的作用:
1. 在请求最后需要发送给浏览器的时候才执行这个下边的函数;
2.加载配置文件
2.1app.config.from_object("xxx.xx.x")的作用:
1. 首先需要传一个文件的相对路径;下边是它的逻辑代码;
    def from_object(self, obj):
        if isinstance(obj, string_types):
            obj = import_string(obj)
        for key in dir(obj):
            if key.isupper():
                self[key] = getattr(obj, key)

2.  obj = import_string(obj),其实就是对括号内的字符串进行拆分,把.之前的路径取出来,引入这个文件目录,再把文件名引入进来去调用里面的各个配置(类似于importlib模块)

再回到from_object函数中,最后self[key] = getattr(obj, key),将所有配置以字典形式存储,键为大写字母.值为键在配置文件中所对应的内容.

这样就读取到了配置文件的内容到内存中,放到了app.config的字典中了.
3.加载@app.route('/index'):
-
作用:
1. 这个装饰器里边是将当这个视图函数中的信息进行一个封装; self.add_url_rule(rule, endpoint, f, **options) 2. 这个方法中有将"route('/index')"中的信息封装成一个对象,并且将这个对象添加到"Map"类中的"self._rules = []"列表中: 3. 将函数和endpoint放到"view_functions"字典中,键是endpoint,值是函数名; -
代码执行:
# 下边的是app.py中Flask类中的:
def add_url_rule(
        self,
        rule,
        endpoint=None,
        view_func=None,
        provide_automatic_options=None,
        **options):
    rule = self.url_rule_class(rule, methods=methods, **options)
    # 将rule添加到Map类的列表中
    self.url_map.add(rule)
    # 将endpoint和函数添加到字典中
    self.view_functions[endpoint] = view_func

self.url_map = self.url_map_class()
url_map_class = Map

# 下边的是routing.py文件中的Map类:
def add(self, rulefactory):
   for rule in rulefactory.get_rules(self):
      rule.bind(self)
      self._rules.append(rule)
      self._rules_by_endpoint.setdefault(rule.endpoint, []).append(rule)
   self._remap = True


class Map(object):
     def __init__():
	 	self._rules = []
4.程序启动
-
执行
app.run()1. 这个方法中都是一些判断ip和端口等信息的逻辑代码; 2. 最后执行了"run_simple(host, port, self, **options)"这个方法启动程序,等待请求到来,这个中的"self"是当前实例化的app对象;
2.请求到来之后
1.执行__call__()方法
1. 这个方法是在请求进来之后触发的,并且传入两个参数,触发这个方法的是werkzeug.serving:WSGIRequestHandler的 run_wsgi 中的一段代码:
    def execute(app):
    application_iter = app(environ, start_response)
    try:
        for data in application_iter:
            write(data)
        if not headers_sent:
            write(b'')
    finally:
        if hasattr(application_iter, 'close'):
        application_iter.close()
        application_iter = None


def __call__(self, environ, start_response):
    return self.wsgi_app(environ, start_response)

    # 可以看到 application_iter = app(environ, start_response) 就是调用代码获取结果的地方,触发"__call__()"方法;

2. 两个参数都是什么:
	* "environ":里边是用户请求相关的信息;
  	* "start_response" 是在应用执行完成后发送给浏览器的信息;
2.执行wsgi_app(self, environ, start_response)方法的内部解析:
2.1创建RequestContext(self, environ)对象:
1. 这个"RequestContext"类中将"request"和"session"封装到这个对象中,但是现在的"session"是空的
代码:
def __init__(self, app, environ, request=None, session=None):
    self.app = app
    if request is None:
        # 获取request;
        request = app.request_class(environ)
    self.request = request
    self.session = session
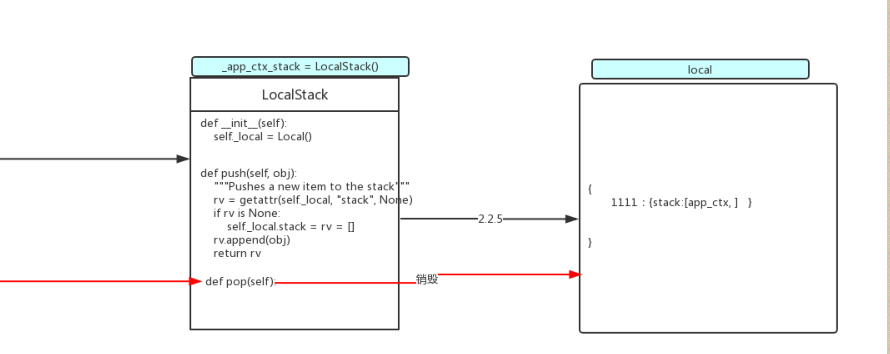
2.2执行ctx.push()方法(将app_ctx保存到栈中)
首先创建app_context()的实例化对象
def push(self):
    app_ctx = self.app.app_context()
    app_ctx.push()
实例化AppContext()类:
def __init__(self, app):
    self.app = app
	# g是一个对象,先放着,后边有用;
    self.g = app.app_ctx_globals_class()
然后执行这个对象中的app_ctx.push()
def push(self):
    _app_ctx_stack.push(self)
    appcontext_pushed.send(self.app)
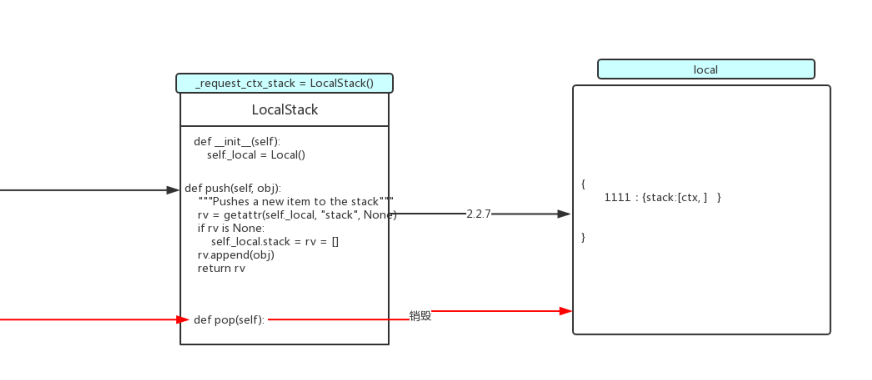
这个方法中执行了_app_ctx_stack.push(self)方法,这个_app_ctx_stack是LocalStack()实例化对象;
_app_ctx_stack = LocalStack()
上边就相当于是执行了LocalStack()中的push()方法;
def push(self, obj):
    rv = getattr(self._local, "stack", None)
    if rv is None:
        self._local.stack = rv = []
    rv.append(obj)
    return rv
这个代码触发了self._local属性,这个属性是Local类的实例化对象;
def __init__(self):
    self._local = Local()
并且在执行self._local.stack的时候触发了Local类中的__setattr__方法;
def __setattr__(self, name, value):
    ident = self.__ident_func__()
    storage = self.__storage__
    try:
        storage[ident][name] = value
    except KeyError:
        storage[ident] = {name: value}
这个__storage__是一个字典,这里给这个字典添加一个键值对,键是获取到的当前线程唯一标识ident,值是一个字典,这个字典中的键是固定的stack,值是一个列表,然后将这个app_ctx对象添加到这个列表中;
上边也是请求上下文的开始;
执行ctx.push()方法(保存ctx保存到栈中)
这里的保存方式和上边的app_ctx保存是一样的;
def push(self):
    # 这个self就是ctx
    _request_ctx_stack.push(self)
这个方法就是将当前这个ctx对象添加到请求上下文的名为__storage__的字典中的对应的线程id后边的stack后的列表中;
2.3然后再执行self.full_dispatch_request()方法;
这个方法里边就是执行相关的视图函数,
代码如下:
def full_dispatch_request(self):
    # 触发所有的before_first_request函数;
    # 只有启动程序后,第一个请求到来时执行;
    self.try_trigger_before_first_request_functions()
    try:
        # 信号
        request_started.send(self)
        # 视图之前,执行所有的before_request_funcs
        rv = self.preprocess_request()
        if rv is None:

            # 执行视图函数
            rv = self.dispatch_request()
    except Exception as e:
        rv = self.handle_user_exception(e)

    # 视图函数执行完之后:
   		1. 执行所有的after_request_funcs
        2. 保存session
    return self.finalize_request(rv)
2.4执行ctx.auto_pop(error)代码的作用:
这个是作为最后执行完毕视图后,销毁ctx和app_ctx;
代码如下:
def auto_pop(self, exc):
    self.pop(exc)

def pop(self, exc=_sentinel):

    app_ctx = self._implicit_app_ctx_stack.pop()

    rv = _request_ctx_stack.pop()
_request_ctx_stack是LocalStack()的实例化对象;执行pop()方法就是执行这个类中的方法;这个方法就是将保存在哪个栈中的信息删掉;