一. 前言说明
Android Wear大部分显示形式是卡片的形式,而最简单地支持Android Wear方式就是用通知**Notification**。而实现最简单的,非高度自定义的通知,则只需要在手机端做一些处理,不需要进行手表端应用的开发,可以说是开发成本特别低。
本节主要讲解的就是简单的Wear特色卡片通知。
二. 环境配置
- 工程引用新版的Support-V4。
-
使用到的主要有以下3个类。
import android.support.v4.app.NotificationCompat;
import android.support.v4.app.NotificationManagerCompat;
import android.support.v4.app.NotificationCompat.WearableExtender;
三. 普通的通知栏
效果图
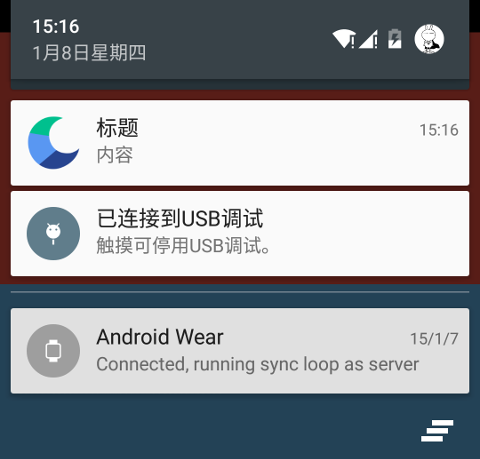
- 手机:普通的通知栏在手机上的效果应该都不陌生,这里就不展开说明
- 手表:手表端的效果是由2张卡片构成的,第一张是手机通知栏的信息组成,第二张是点击开发手机应用,具体的效果与手机通知栏的点击事件一致,也就是说,如果通知栏没有设置点击事件,那么就不会有第二张卡片。另外,默认的背景色是由应用图标所决定的,是取主要的颜色值。
代码实现
public void sendClassicNotify() {

    Notification.Builder builder = new Notification.Builder(this);

    // 1.设置显示信息

    builder.setContentTitle("标题");

    builder.setContentText("内容");

    builder.setSmallIcon(R.drawable.ic_launcher);


    // 2.设置点击跳转事件,若不设置,则手表没有第二张卡片

    Intent intent = new Intent(this, PhoneActivity.class);

    PendingIntent pendingIntent = PendingIntent.getActivity(this, 0,

            intent, 0);

    builder.setContentIntent(pendingIntent);


    // 3.设置通知栏其他属性

    builder.setAutoCancel(true);

    builder.setDefaults(Notification.DEFAULT_ALL);


    NotificationManager manager = (NotificationManager) getSystemService(Context.NOTIFICATION_SERVICE);

    manager.notify(0, builder.build());

}
问题
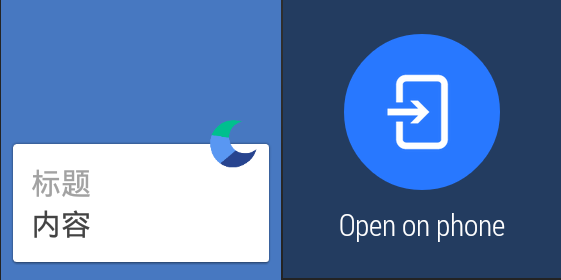
以上是最原始的通知栏效果,没有进行手表端适配处理的。看起来还不错,但会存在什么问题呢?
比如下面的效果,如果内容太长,就会很难看,这只是一部分,它还可以继续滚动。
四. 添加Wear扩展属性的通知栏
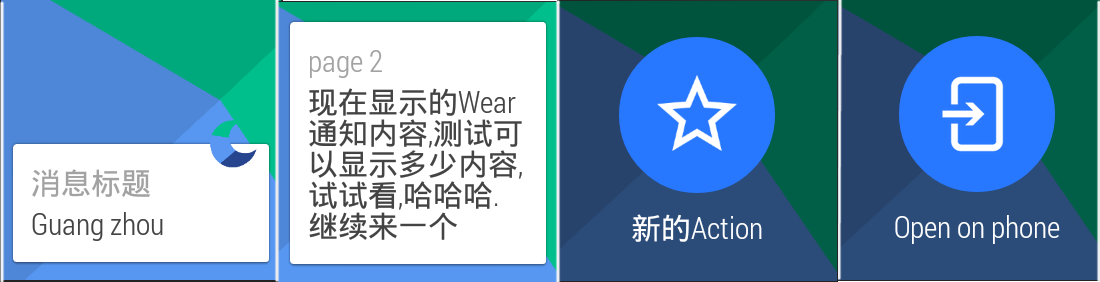
效果图
扩展属性
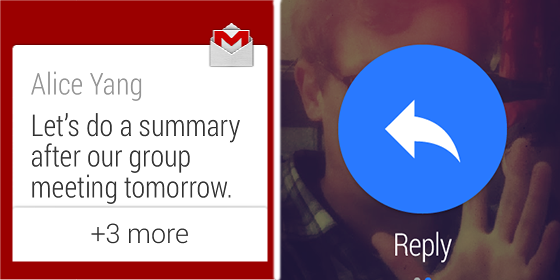
- 多张卡片:如第一张图片的第二张卡片
- 自定义动作按钮:如第一张图片的第二张卡片
- 设置背景:如第一张图片的的背景
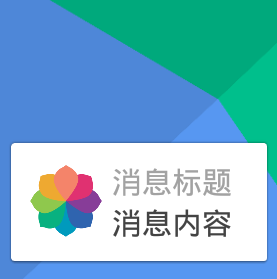
- 堆叠多张卡片:如第二张图片的第一张卡片
- 语音回复:如第二张图片的第二张卡片
代码实现
public void sendWearNotify() {

    NotificationCompat.Builder builder = new NotificationCompat.Builder(

            this);

    // 1.设置显示内容

    builder.setContentTitle("消息标题");

    builder.setContentText("消息内容");

    // 若只设置了SmallIcon,而没设置LargeIcon,则在通知栏左侧会显示SmallIcon设置的图标;若同时设置了LargeIcon,则左侧显示LargeIcon,右侧显示SmallIcon

    builder.setSmallIcon(R.drawable.ic_launcher);

    // 若设置了LargeIcon,则Wear背景会变成LargeIcon.

    // builder.setLargeIcon(BitmapFactory.decodeResource(getResources(),

    // R.drawable.default_background_sunny_day_bg));


    // 2.设置跳转属性

    Intent intent = new Intent(this, PhoneActivity.class);

    PendingIntent pendingIntent = PendingIntent.getActivity(this, 0,

            intent, 0);

    // 设置了ContentIntent后,通知栏有了点击效果,而wear滑动到最右侧时,多了一个Open on phone的页面

    builder.setContentIntent(pendingIntent);


    // 3.设置通知属性

    builder.setAutoCancel(true);

    builder.setDefaults(Notification.DEFAULT_ALL);


    // 4.设置手表特有属性

    builder.extend(extendWear(builder));


    mNotificationManager.notify(1, builder.build());

}
接下来对以上代码第四点(4.设置手表特有属性)进行拓展。
0. 方法结构
private NotificationCompat.WearableExtender extendWear(

        NotificationCompat.Builder builder) {

    NotificationCompat.WearableExtender wearableExtender = new NotificationCompat.WearableExtender();


    //TODO:具体属性设置代码


    return wearableExtender;


}
接下来的功能点都插入在TODO后面。
1. 设置背景
    BitmapFactory.Options options = new BitmapFactory.Options();

    // 官方文档提示 : http://developer.android.com/training/wearables/notifications/creating.html

    /**

     * Note: The bitmap that you use with setBackground() should have a

     * resolution of 400x400 for non-scrolling backgrounds and 640x400 for

     * backgrounds that support parallax scrolling. Place these bitmap

     * images in the res/drawable-nodpi directory of your handheld app.

     * Place other non-bitmap resources for wearable notifications, such as

     * those used with the setContentIcon() method, in the res/drawable-hdpi

     * directory of your handheld app.

     */

    // 可滚动,背景则为640x400,否则为400x400.

    // 若设置了背景,则LargeIcon在Wear端失效

    options.outWidth = 640;

    options.outHeight = 400;

    Bitmap wearBgBitmap = BitmapFactory.decodeResource(getResources(),

            R.drawable.wallpaper_1, options);

    // 设置了Bg后,LargeIcon便失效

    wearableExtender.setBackground(wearBgBitmap);
图片存放位置:通用的图标放在res/hdpi目录下,Wear独有的图片放在res/nodpi目录下
背景图片大小:可滚动的背景则为640x400,不可滚动的尺寸400x400 (px为单位).
属性冲突:使用了setBackground方法,同时设置了builder.setLargeIcon方法,那么手机显示的是setLargeIcon的,而手表显示的为setBackground的。
2. 添加独有的Action按钮


    // 2. 为Wear添加独有的action

    Intent intent = new Intent(this, PhoneActivity.class);

    PendingIntent pendingIntent = PendingIntent.getActivity(this, 0,

            intent, 0);

    NotificationCompat.Action action = new NotificationCompat.Action(

            R.drawable.action, "新的Action", pendingIntent);

    wearableExtender.addAction(action);
3. 调整首页图标
// 3. 调整首页的图标

    // 隐藏默认应用图标

    wearableExtender.setHintHideIcon(true);

    // 设置跟ContentText跟随的图标

    wearableExtender.setContentIcon(R.drawable.mycolors);

    // 只支持Start和End标签,默认是End

    wearableExtender.setContentIconGravity(Gravity.START);
- 设置setHintHideIcon为true后,原本右上角的应用图标便会隐藏。
-
Gravity只能设置Start和End标签,前者对应Left,后者对应Right。
笔者之前做过RTL(右到左语言)的适配,如阿拉伯语,波斯语等,就是从右向左读的语言,要把整个界面的左对齐变成右对齐,而Android 4.2提供了Start和End标签,用来自动适配对齐方式,在LTR(左到右)语言中,Start→Left,End→Right;而在RTL(右到左)语言中,Start→Right,End→Left。我们这里就不展开来讲了,之后有时间会将笔记上传博客,有兴趣的同学届时可以参考下。
4. 添加第二页卡片
    // 4. 添加第二页卡片

    Notification secondPageNotification = new NotificationCompat.Builder(

            this).setContentTitle("page 2")

            .setContentText("现在显示的Wear通知内容,测试可以显示多少内容,试试看,哈哈哈.继续来一个")

            .build();

    wearableExtender.addPage(secondPageNotification);
关于堆叠多张卡片和语音回复的内容,由于较少用到,笔者就没继续研究。
若读者有兴趣,可上开发者官网学习,其实也不难。
堆叠多张卡片地址
语音回复地址
以上就是笔者在做简单卡片适配的总结,更多属性的使用,可以阅读Samples for SDK目录下的wear/Notifications工程,这个Sample在通知栏基本上的所有功能都有涉及到。