可以使用三种注解来引入DAO层的接口到spring容器中。
1.@Mapper,写在每一个DAO层接口上,如下:
2.@MapperScan和@ComponentScan两者之一。前者的意义是将指定包中的所有接口都标注为DAO层接口,相当于在每一个接口上写@Mapper。后者则是代替所有
//指定这是一个操作数据库的mapper
@Mapper
public interface DepartmentMapper {
@Select("select * from department where id=#{id}")
public Department getDeptById(Integer id);
@Delete("delete from department where id=#{id}")
public int deleteDeptById(Integer id);
@Options(useGeneratedKeys = true,keyProperty = "id")
@Insert("insert into department(departmentName) values(#{departmentName})")
public int insertDept(Department department);
@Update("update department set departmentName=#{departmentName} where id=#{id}")
public int updateDept(Department department);
}
使用MapperScan批量扫描所有的Mapper接口;
@MapperScan(value = "com.atguigu.springboot.mapper")
@SpringBootApplication
public class SpringBoot06DataMybatisApplication {
public static void main(String[] args) {
SpringApplication.run(SpringBoot06DataMybatisApplication.class, args);
}
}
第二种
配置文件版
mybatis:
config‐location: classpath:mybatis/mybatis‐config.xml 指定全局配置文件的位置
mapper‐locations: classpath:mybatis/mapper/*.xml 指定sql映射文件的位置
自定义MyBatis的配置规则;给容器中添加一个ConfigurationCustomizer;
给下列文件设置驼峰命名法
@org.springframework.context.annotation.Configuration
public class MyBatisConfig {
@Bean
public ConfigurationCustomizer configurationCustomizer(){
return new ConfigurationCustomizer(){
@Override
public void customize(Configuration configuration) {
configuration.setMapUnderscoreToCamelCase(true);
}
};
}
}
整合SpringData JPA
SpringData简介
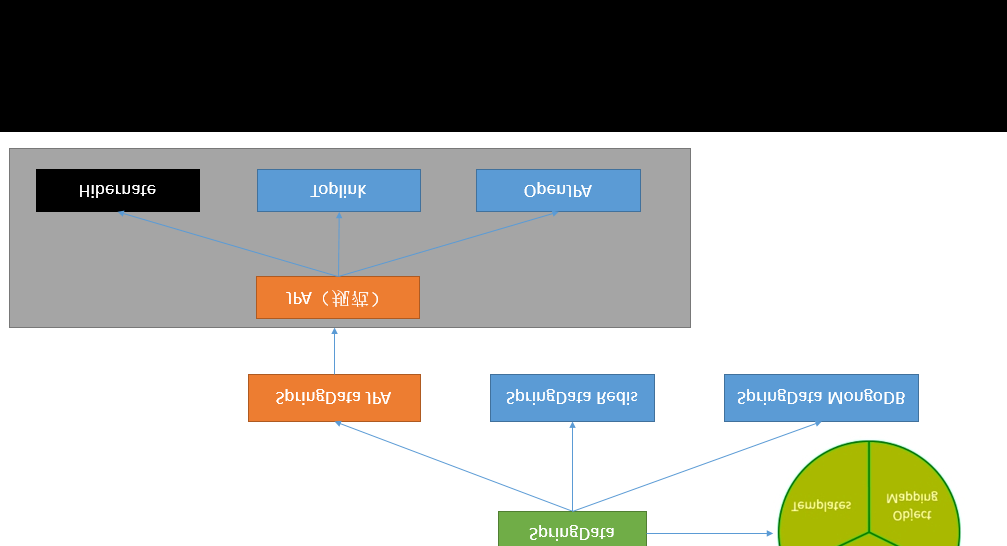
JPA:ORM(Object Relational Mapping);
1)、编写一个实体类(bean)和数据表进行映射,并且配置好映射关系;
//使用JPA注解配置映射关系
@Entity //告诉JPA这是一个实体类(和数据表映射的类)
@Table(name = "tbl_user") //@Table来指定和哪个数据表对应;如果省略默认表名就是user;
public class User {
@Id //这是一个主键
@GeneratedValue(strategy = GenerationType.IDENTITY)//自增主键
private Integer id;
@Column(name = "last_name",length = 50) //这是和数据表对应的一个列
private String lastName;
@Column //省略默认列名就是属性名
private String email;
编写一个Dao接口来操作实体类对应的数据表(Repository)
//继承JpaRepository来完成对数据库的操作
public interface UserRepository extends JpaRepository<User,Integer> {
}
pom 文件的基本配置
spring:
jpa:
hibernate:
# 更新或者创建数据表结构
ddl‐auto: update
# 控制台显示SQL
show‐sql: true
=================================================
springboot与缓存
Java Caching定义了5个核心接口,分别是
CachingProvider,
定义了创建、配置、获取、管理和控制多个CacheManager。一个应用可以在运行期访问多个CachingProvider。
CacheManager,
定义了创建、配置、获取、管理和控制多个唯一命名的Cache,这些Cache存在于CacheManager的上下文中。一个CacheManager仅被一个CachingProvider所拥有。
Cache,
是一个类似Map的数据结构并临时存储以Key为索引的值。一个Cache仅被一个CacheManager所拥有。
Entry
是一个存储在Cache中的key-value对。
Expiry。
每一个存储在Cache中的条目有一个定义的有效期。一旦超过这个时间,条目为过期的状态。一旦过期,条目将不可访问、更新和删除。缓存有效期可以通过ExpiryPolicy设置。

spring缓存抽象
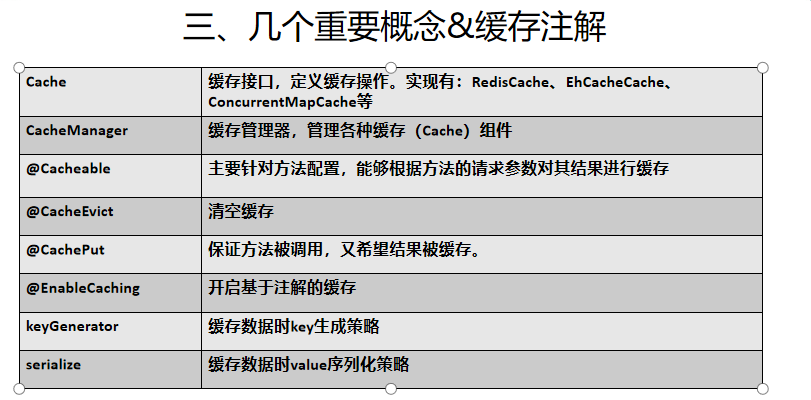
Spring从3.1开始定义了org.springframework.cache.Cache 和org.springframework.cache.CacheManager接口来统一不同的缓存技术; 并支持使用JCache(JSR-107)注解简化我们开发;
Cache接口为缓存的组件规范定义,包含缓存的各种操作集合; Cache接口下Spring提供了各种xxxCache的实现;如RedisCache,EhCacheCache , ConcurrentMapCache等;
简单点说就是,Cache接口中是所有的缓存功能的集合
每次调用需要缓存功能的方法时,Spring会检查检查指定参数的指定的目标方法是否已经被调用过;如果有就直接从缓存中获取方法调用后的结果,如果没有就调用方法并缓存结果后返回给用户。下次调用直接从缓存中获取。 使用Spring缓存抽象时我们需要关注以下两点; 1、确定方法需要被缓存以及他们的缓存策略 2、从缓存中读取之前缓存存储的数据


我们从这四个方面来介绍缓存
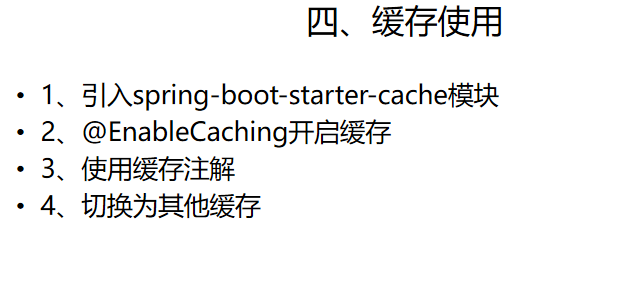
1.引入 spring-boot stater-cache
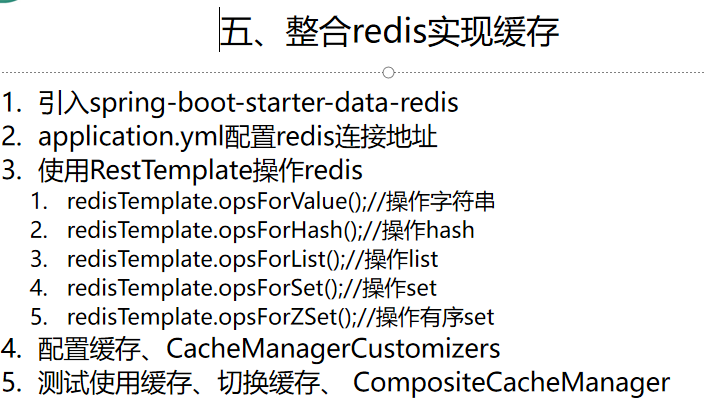
整合redis 实现缓存
如果redis忘记了基本内容可以看我学习到的入门知识(https://www.cnblogs.com/zhulina-917/p/10660930.html)
先写一个简单例子
新建一个SpringBoot+web+mysql+mybatis+cache+jdbc
遇到的问题1;
如果你想使用jdbc的驱动已经导入了jdbc的场景启动器,可以在写配置文件的时候还是不能找到jdbc的路径这个时候你需要加入一个这时候就可以了
        <dependency>
            <groupId>org.springframework.boot</groupId>
            <artifactId>spring-boot-starter-jdbc</artifactId>
        </dependency>
<dependency>
    <groupId>mysql</groupId>
    <artifactId>mysql-connector-java</artifactId>
    <version>8.0.11</version>
</dependency>
使用两个实体类


spring.datasource.driver-class-name=com.mysql.cj.jdbc.Driver
spring.datasource.url=jdbc:mysql://localhost:3306/spring_cache
spring.datasource.username=root
spring.datasource.password=root
# 开启驼峰命名匹配
mybatis.configuration.map-underscore-to-camel-case=true
# 打印sql
logging.level.com.cuzz.cache.mapper=debug
# 可以打印配置报告
debug=true
package myproject.redisproject.entry;

import lombok.Data;
import lombok.NoArgsConstructor;

import java.io.Serializable;

/**
 * Description: redis-project
 * Created by lenovo on 2019/5/2 17:30
 */
@Data
@NoArgsConstructor
public class Department implements Serializable {
    private Integer id;
    private String deptName;
}
package myproject.redisproject.entry;

import lombok.Data;
import lombok.NoArgsConstructor;

import java.io.Serializable;

/**
 * Description: redis-project
 * Created by lenovo on 2019/5/2 17:31
 */
@Data
@NoArgsConstructor
public class Employee implements Serializable {
    private Integer id;
    private String lastName;
    private String gender;
    private String email;
    private Integer dId;
}
package myproject.redisproject.mapper;

import myproject.redisproject.entry.Employee;
import org.apache.ibatis.annotations.Delete;
import org.apache.ibatis.annotations.Mapper;
import org.apache.ibatis.annotations.Select;
import org.apache.ibatis.annotations.Update;

/**
 * Description: redis-project
 * Created by lenovo on 2019/5/2 17:32
 */
@Mapper
public interface EmployeeMapper {
    @Select("SELECT * FROM employee WHERE id = #{id}")
    Employee getEmployeeById(Integer id);

    @Update("UPDATE employee SET last_name=#{lastName},email=#{email},gender=#{gender},d_id=#{dId} WHERE id=#{id}")
    void updateEmp(Employee employee);

    @Delete("DELETE FROM employee WHERE employee.id=#{id}")
    void deleteEmp(Integer id);

    @Select("SELECT * FROM employee WHERE last_name=#{lastName}")
    Employee getEmpByLastName(String lastName);
}
如果你不想每一个接口都是用@Mapper这个注解那么就需要在主启动类中加上MapperScan("包名 ")
package myproject.redisproject;

import org.mybatis.spring.annotation.MapperScan;
import org.springframework.boot.SpringApplication;
import org.springframework.boot.autoconfigure.SpringBootApplication;
import org.springframework.cache.annotation.EnableCaching;

@SpringBootApplication
@MapperScan("myproject.redisproject.mapper.EmployeeMapper")
@EnableCaching //开启缓存
public class RedisprojectApplication {

    public static void main(String[] args) {
        SpringApplication.run(RedisprojectApplication.class, args);
    }

}
接下来就要写具体的Service 方法将我们对数据库擦搜做的结果进行缓存,以后再由相同的数据直接从缓存中进行获取而不需要再次调用方法
CacheManager中管理多个Cache组件,对缓存的真正CRUD操作在Cache组件中,每个缓存组件都有自己的唯一名字;
属性:
- CacheName/value:指定存储缓存组件的名字
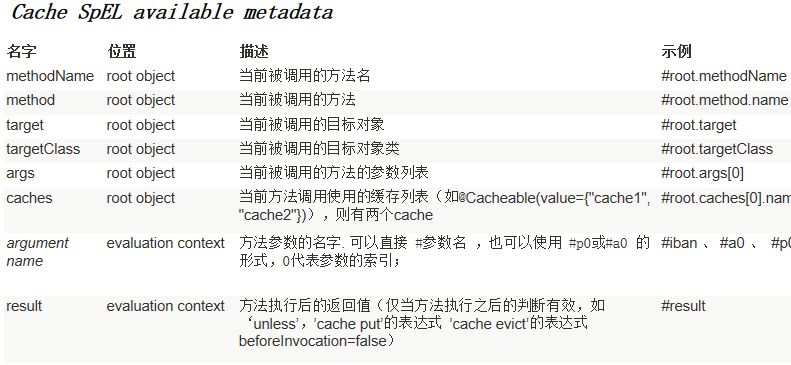
- key:缓存数据使用的key,可以使用它来指定。默认是使用方法参数的值,1-方法的返回值
- 编写Spel表达式:#id 参数id的值, #a0/#p0 #root.args[0]
- keyGenerator:key的生成器,自己可以指定key的生成器的组件id
- key/keyGendertor二选一使用
- cacheManager指定Cache管理器,或者cacheReslover指定获取解析器
- condition:指定符合条件的情况下,才缓存;
- unless:否定缓存,unless指定的条件为true,方法的返回值就不会被缓存,可以获取到结果进行判断
- sync:是否使用异步模式,unless不支持
首先呢,如果你不小心加上了redis 的启动器那么你就要设置远程连接的主机和端口号,否则就会报错
这时你可以将redis的场景启动器去掉。
还有一点需要注意
logging.level.myproject.redisproject.mapper=debug
这个是你自定一个的包的名不需要加上类。
这个是结果
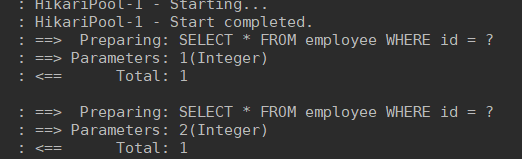
当没有查询过数据就会执行sql语句当已经使用过的数据就会从缓存中查找。
缓存原理
CacheAutoConfiguration
@Configuration
@ConditionalOnClass(CacheManager.class)
@ConditionalOnBean(CacheAspectSupport.class)
@ConditionalOnMissingBean(value = CacheManager.class, name = "cacheResolver")
@EnableConfigurationProperties(CacheProperties.class)
@AutoConfigureAfter({ CouchbaseAutoConfiguration.class, HazelcastAutoConfiguration.class,
        HibernateJpaAutoConfiguration.class, RedisAutoConfiguration.class })
@Import(CacheConfigurationImportSelector.class)
public class CacheAutoConfiguration {
@Import(CacheConfigurationImportSelector.class)点开发现
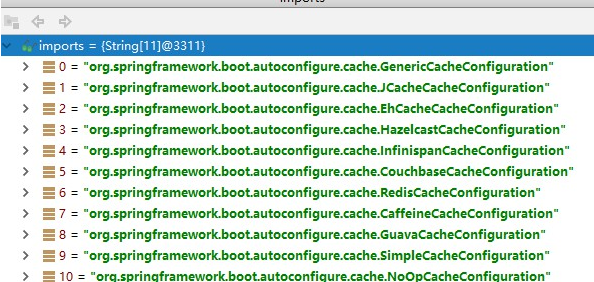
现在找那个缓存组件生效
SimpleCacheConfiguration生效@Configuration @ConditionalOnMissingBean(CacheManager.class) @Conditional(CacheCondition.class) class SimpleCacheConfiguration { private final CacheProperties cacheProperties; private final CacheManagerCustomizers customizerInvoker;
SimpleCacheConfiguration(CacheProperties cacheProperties, CacheManagerCustomizers customizerInvoker) { this.cacheProperties = cacheProperties; this.customizerInvoker = customizerInvoker; } @Bean public ConcurrentMapCacheManager cacheManager() { ConcurrentMapCacheManager cacheManager = new ConcurrentMapCacheManager(); List<String> cacheNames = this.cacheProperties.getCacheNames(); if (!cacheNames.isEmpty()) { cacheManager.setCacheNames(cacheNames); } return this.customizerInvoker.customize(cacheManager); } }
给容器注册一个CacheManager:ConcurrentMapCacheManager
可以获取和创建ConcurrentMapCache,作用是将数据保存在ConcurrentMap中
如果缓存组件的名字是空的,那么就会给一个默认值
运行流程
方法运行之前,先查Cache(缓存组件),按照cacheName的指定名字获取;
cacheManager 会先获取缓存组件,如果没有缓存组件就创建一个
然后从Cache中查找相应的key 默认key就是方法的参数名
key是按照某种策略生成的,默认是使用keyGenerator生成的,默认使用SimpleKeyGenerator生成key
没有参数 key=new SimpleKey()
如果有一个参数 key=参数值
如果多个参数 key=new SimpleKey(params);
public class SimpleKeyGenerator implements KeyGenerator {

    @Override
    public Object generate(Object target, Method method, Object... params) {
        return generateKey(params);
    }

    /**
     * Generate a key based on the specified parameters.
     */
    public static Object generateKey(Object... params) {
        if (params.length == 0) {
            return SimpleKey.EMPTY;
        }
        if (params.length == 1) {
            Object param = params[0];
            if (param != null && !param.getClass().isArray()) {
                return param;
            }
        }
        return new SimpleKey(params);
    }
没有查到缓存就调用目标方法
将目标方法的返回结果放在缓存中
方法执行之前,@Cacheable先来检查缓存中是否有数据,按照参数的值作为key去查询缓存,如果没有,就运行方法,存入缓存,如果有数据,就取出map的值。
然后我们就可以自定义keyGenerator
注意一点,如果你以前曾自定义过keyGenerator 要注意当你的工程还存在时时,要注意keyGenerator 的名字是不是重复
package myproject.redisproject.config;

import org.springframework.cache.interceptor.KeyGenerator;
import org.springframework.context.annotation.Bean;
import org.springframework.context.annotation.Configuration;

import java.lang.reflect.Method;
import java.util.Arrays;

/**
 * Description: redis-project
 * Created by lenovo on 2019/5/2 19:27
 */
@Configuration
public class MyKeyGenerator {


    @Bean("myKeyGenerator1")
    public KeyGenerator keyGenerator(){

        return new KeyGenerator() {
            @Override
            public Object generate(Object target, Method method, Object... params) {


                return method.getName() + "[" + Arrays.asList(params) + "]";

            }
        };

    }


}
package myproject.redisproject.service;

import myproject.redisproject.entry.Employee;
import myproject.redisproject.mapper.EmployeeMapper;
import org.springframework.beans.factory.annotation.Autowired;
import org.springframework.cache.annotation.Cacheable;
import org.springframework.stereotype.Service;

/**
 * Description: redis-project
 * Created by lenovo on 2019/5/2 18:07
 */
@Service
public class EmployeeService {
    @Autowired
    EmployeeMapper employeeMapper;

    @Cacheable(cacheNames = "emp",keyGenerator = "myKeyGenerator1")
    public Employee getEmployee(Integer id) {
        System.out.println("----> 查询" + id + "号员工");
        return employeeMapper.getEmployeeById(id);
    }
}
  @Cacheable(cacheNames = "emp",keyGenerator = "myKeyGenerator1")
cacheName是缓存组件的名字   keyGenerator 是自定义key生成器的类
讲解Cache 的那些注解
1.cacheput 即调用方法也对结果进行缓存
修改数据库的某个数据,同时更新缓存
运行时机
先运行方法,再将目标结果缓存起来
service
@CachePut(value = {"emp"})
public Employee updateEmployee(Employee employee) {
    System.out.println("---->updateEmployee"+employee);
    employeeMapper.updateEmp(employee);
    return employee;
}
controller
@GetMapping("/emp")
public Employee update(Employee employee) {
    return employeeService.updateEmployee(employee);
}
要注意一点就是
cacheable的key是不能使用result的参数的

所以要使@CachePut使用@Cacheable使用相同的key
@CachePut(value = {"emp"}, key = "#result.id")
public Employee updateEmployee(Employee employee) {
    System.out.println("---->updateEmployee"+employee);
    employeeMapper.updateEmp(employee);
    return employee;
}
CacheEvict
清除缓存
service

@CacheEvict(value = "emp",key = "#id")
public  void  deleteEmployee(Integer id){
    System.out.println("---->删除的employee的id是: "+id);
}

controller

@GetMapping("/delete")
public String delete(Integer id) {
    employeeService.deleteEmployee(id);
    return "success";
}
allEntries = true,代表不论清除那个key,都重新刷新缓存
beforeInvocation=true 方法执行前,清空缓存,默认是false,如果程序异常,就不会清除缓存
Caching定义组合复杂注解
CacheConfig抽取缓存的公共配置
组合
- Cacheable
- CachePut
- CacheEvict
CacheConfig抽取缓存的公共配置
 @Caching(
        cacheable = {
            @Cacheable(value = "emp",key = "#lastName")
        },
        put = {
            @CachePut(value = "emp",key = "#result.id"),
            @CachePut(value = "emp",key = "#result.gender")
        }
    )
    public Employee getEmployeeByLastName(String lastName) {
        return employeeMapper.getEmpByLastName(lastName);
    }
如果查完lastName,再查的id是刚才的值,就会直接从缓存中获取数据
4、CacheConfig抽取缓存的公共配置

@CacheConfig(cacheNames = "emp") // 这样饿哦们就不需要在每一个方法上都声明 cacheName
@Service
public class EmployeeService {
2、Redis的Template
Redis的常用五大数据类型
String【字符串】、List【列表】、Set【集合】、Hash【散列】、ZSet【有序集合】
分为两种一种是StringRedisTemplate,另一种是RedisTemplate
根据不同的数据类型,大致的操作也分为这5种,以StringRedisTemplate为例
  <dependency>
      <groupId>org.springframework.boot</groupId>
      <artifactId>spring-boot-starter-cache</artifactId>
      <version>2.1.3.RELEASE</version>
    </dependency>
    <dependency>
      <groupId>org.springframework.boot</groupId>
      <artifactId>spring-boot-starter-data-redis</artifactId>
      <version>2.1.3.RELEASE</version>
    </dependency>
spring:
  redis:
    host: 192.168.111.130
    port: 6379
    password: xxx
RestTemplate 查看源码可以分析点东西出来
  // @param <K> the Redis key type against which the template works (usually a String)
  // @param <V> the Redis value type against which the template works
public class RedisTemplate<K, V> extends RedisAccessor implements RedisOperations<K, V>, BeanClassLoaderAware {

   private boolean enableTransactionSupport = false;
   private boolean exposeConnection = false;
   private boolean initialized = false;
   private boolean enableDefaultSerializer = true;
   private @Nullable RedisSerializer<?> defaultSerializer;
   private @Nullable ClassLoader classLoader;

   @SuppressWarnings("rawtypes") private @Nullable RedisSerializer keySerializer = null;
   @SuppressWarnings("rawtypes") private @Nullable RedisSerializer valueSerializer = null;
   @SuppressWarnings("rawtypes") private @Nullable RedisSerializer hashKeySerializer = null;
   @SuppressWarnings("rawtypes") private @Nullable RedisSerializer hashValueSerializer = null;
   private RedisSerializer<String> stringSerializer = RedisSerializer.string();

   private @Nullable ScriptExecutor<K> scriptExecutor;

   // cache singleton objects (where possible)
   private @Nullable ValueOperations<K, V> valueOps;
   private @Nullable ListOperations<K, V> listOps;
   private @Nullable SetOperations<K, V> setOps;
   private @Nullable ZSetOperations<K, V> zSetOps;
   private @Nullable GeoOperations<K, V> geoOps;
   private @Nullable HyperLogLogOperations<K, V> hllOps;
模板中的Redis key的类型(通常为String)如:RedisTemplate<String, Object>
注意:如果没特殊情况,切勿定义成RedisTemplate<Object, Object>,否则根据里氏替换原则,使用的时候会造成类型错误 。
RedisTemplate中定义了对5种数据结构操作
redisTemplate.opsForValue();//操作字符串
redisTemplate.opsForHash();//操作hash
redisTemplate.opsForList();//操作list
redisTemplate.opsForSet();//操作set
redisTemplate.opsForZSet();//操作有序set
先说一下序列化规则;
StringRedisTemplate 和RedisTemplate的序列化规则不一样
-
两者的关系是StringRedisTemplate继承RedisTemplate。
-
两者的数据是不共通的;也就是说StringRedisTemplate只能管理StringRedisTemplate里面的数据,RedisTemplate只能管理RedisTemplate中的数据。
-
SDR默认采用的序列化策略有两种,一种是String的序列化策略,一种是JDK的序列化策略。
StringRedisTemplate默认采用的是String的序列化策略,保存的key和value都是采用此策略序列化保存的。
RedisTemplate默认采用的是JDK的序列化策略,保存的key和value都是采用此策略序列化保存的。
redisTemplate 的序列化配置
==================================================
镜像下载不下来 我就不使用镜像
 <dependency>
            <groupId>org.springframework.boot</groupId>
            <artifactId>spring-boot-starter-data-redis</artifactId>
        </dependency>
spring.redis.host=192.168.111.130
spring.redis.password=xxx
package myproject.redisproject;

import myproject.redisproject.entry.Employee;
import myproject.redisproject.mapper.EmployeeMapper;
import org.junit.Test;
import org.junit.runner.RunWith;
import org.springframework.beans.factory.annotation.Autowired;
import org.springframework.boot.test.context.SpringBootTest;
import org.springframework.data.redis.core.RedisTemplate;
import org.springframework.data.redis.core.StringRedisTemplate;
import org.springframework.test.context.junit4.SpringRunner;

@RunWith(SpringRunner.class)
@SpringBootTest
public class RedisprojectApplicationTests {

    /*那两种对象都不需要声明了,可以直接进行调用*/
    @Autowired
    StringRedisTemplate stringRedisTemplate;

    @Autowired
    RedisTemplate redisTemplate;

    @Autowired
    EmployeeMapper employeeMapper;

    @Test
    public void contextLoads() {
        stringRedisTemplate.opsForValue().set("k1","v1");
        System.out.println(stringRedisTemplate.opsForValue().get("k1"));

    }

    @Test
    public void tedt02(){

        Employee emp = employeeMapper.getEmployeeById(2);
        redisTemplate.opsForValue().set("emp-01", emp);
        System.out.println();


    }

}
这样应该就没有问题了
然后如果你想存入一个对象不加上序列化是不会正常显示的
所以这个时候需要做两步
1.你的实体类要实现序列化
2.你要写上 一个配置文件里面是你定义的序列化 这个是分两种的, 1,StringRedisTemplate 2,RedisTemplate
我测试的是RedisTemplate
package myproject.redisproject.config;

import myproject.redisproject.entry.Employee;
import org.springframework.context.annotation.Bean;
import org.springframework.context.annotation.Configuration;
import org.springframework.data.redis.connection.RedisConnectionFactory;
import org.springframework.data.redis.core.RedisTemplate;
import org.springframework.data.redis.serializer.Jackson2JsonRedisSerializer;

import java.rmi.UnknownHostException;

/**
 * Description: redis-project
 * Created by lenovo on 2019/5/2 22:00
 */
@Configuration
public class MyRedisConfig  {


   @Bean
   public RedisTemplate<Object,Employee> redisTemplate(RedisConnectionFactory redisConnectionFactory){
       RedisTemplate<Object, Employee> template = new RedisTemplate<Object, Employee>();
       template.setConnectionFactory(redisConnectionFactory);
       /*定义一种序列化规则*/
       Jackson2JsonRedisSerializer<Employee> jsonRedisSerializer = new Jackson2JsonRedisSerializer<Employee>(Employee.class);
     /*将这中序列化规则应用到我们的redisTemplate上*/
       template.setDefaultSerializer(jsonRedisSerializer);
       return template;
   }


}
你的测试类中 只需要加上泛型就可以了
 @Autowired
    RedisTemplate<Object,Employee> redisTemplate;
@Test
public void tedt02(){

    Employee emp = employeeMapper.getEmployeeById(2);
    redisTemplate.opsForValue().set("emp-01", emp);
    System.out.println();
}
你可以在你的Linux中看到,这个就是json序列化后的结果,这种方式只是将我们的对象名称正常显示了出来,但是我们的数据还是不能正常显示
OK
127.0.0.1:6379> keys *
1) ""emp-01""
127.0.0.1:6379>
需要在配置文件中加上一些配置才能让我们的数据正常显示
在springboot2.0以前使用的是这种写法
@Bean
    public RedisCacheManager employeeCacheManager(RedisTemplate<Object, Employee> empRedisTemplate) {
        RedisCacheManager cacheManager = new RedisCacheManager(empRedisTemplate);
        // 使用前缀,默认将CacheName作为前缀
        cacheManager.setUsePrefix(true);

        return cacheManager;
    }
但是springboot2.0之后进行了改进去除了下面的构造方法
@SuppressWarnings("rawtypes")
 public RedisCacheManager(RedisOperations redisOperations) {
      this(redisOperations, Collections.<String> emptyList());
  }
如果在进行配置会报错
RedisCacheManager rcm = new RedisCacheManager(redisTemplate);
解决办法
    @Bean
    public CacheManager cacheManager(RedisConnectionFactory factory) {
        RedisSerializer<String> redisSerializer = new StringRedisSerializer();
        Jackson2JsonRedisSerializer jackson2JsonRedisSerializer = new Jackson2JsonRedisSerializer(Object.class);

        //解决查询缓存转换异常的问题
        ObjectMapper om = new ObjectMapper();
        om.setVisibility(PropertyAccessor.ALL, JsonAutoDetect.Visibility.ANY);
        om.enableDefaultTyping(ObjectMapper.DefaultTyping.NON_FINAL);
        jackson2JsonRedisSerializer.setObjectMapper(om);

        // 配置序列化(解决乱码的问题)
        RedisCacheConfiguration config = RedisCacheConfiguration.defaultCacheConfig()
                .entryTtl(timeToLive)//设置有效期
                .serializeKeysWith(RedisSerializationContext.SerializationPair.fromSerializer(redisSerializer))
                .serializeValuesWith(RedisSerializationContext.SerializationPair.fromSerializer(jackson2JsonRedisSerializer))
                .disableCachingNullValues();

        RedisCacheManager cacheManager = RedisCacheManager.builder(factory)
                .cacheDefaults(config)
                .build();
        return cacheManager;
    }

}
测试结果很成功啊
{
  "id": 2,
  "lastName": "lisi",
  "gender": null,
  "email": "lisi@qq.com",
  "did": 2
}
其实2.0的升级也是很好的,这样我们就不需要每次创建一个类都要写一个具体类型的配置简化了开发
使用缓存时,默认使用的是ConcurrentMapCache,将数据保存在ConcurrentMap中,开发中使用的是缓存中间件,redis、memcached、ehcache等
starter启动时,有顺序,redis优先级比ConcurrentMapCache更高,CacheManager变为RedisCacheManager,所以使用的是redis缓存
传入的是RedisTemplate<Object, Object>
默认使用的是jdk的序列化保存
SpringBoot的消息中间件

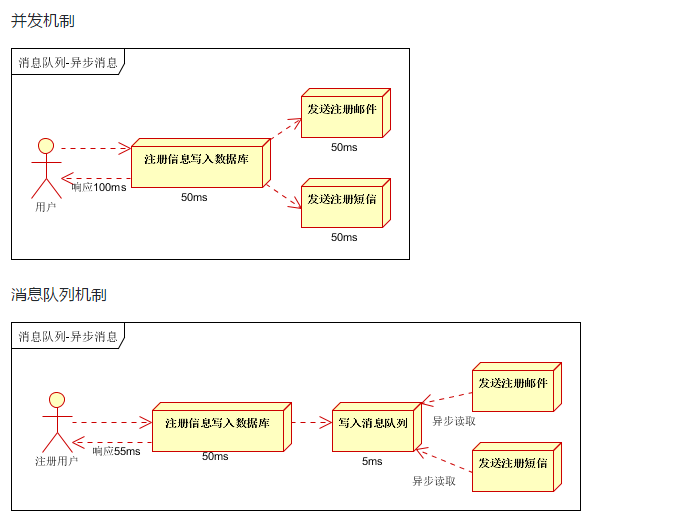

1、大多数应用,可以通过消息服务中间件来提升系统的异步通信、拓展解耦能力
2、消息服务中的两个重要概念:
消息代理(message broker)和目的地(destination),当消息发送者发送消息以后,将由消息代理接管,消息代理保证消息传递到指定的目的地。
3、消息队列主要的两种形式的目的地
1)、队列(queue):点对点消息通信【point-to-point】,取出一个没一个,一个发布,多个消费
2)、主题(topic):发布(publish)/订阅(subscribe)消息通信,多人【订阅者】可以同时接到消息
4、JMS(Java Message Service) Java消息服务:
- 基于JVM消息规范的代理。ActiveMQ/HornetMQ是JMS的实现
5、AMQP(Advanced Message Queuing Protocol)
- 高级消息队列协议,也是一个消息代理的规范,兼容JMS
- RabbitMQ是AMQP的实现

6、SpringBoot的支持
spring-jms提供了对JMS的支持
spring-rabbit提供了对AMQP的支持
需要创建ConnectionFactory的实现来连接消息代理
提供JmsTemplate,RabbitTemplate来发送消息
@JmsListener(JMS).@RabbitListener(AMQP)注解在方法上的监听消息代理发布的消息
@EnableJms,@EnableRabbit开启支持
7、SpringBoot的自动配置
- JmsAutoConfiguration
- RabbitAutoConfiguration
2、RabbitMQ简介
AMQP的实现
1、核心概念
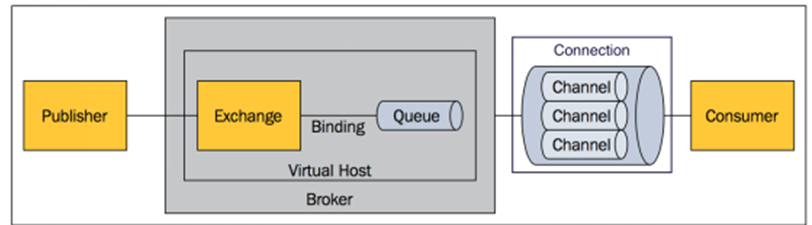
Message:消息头和消息体组成,消息体是不透明的,而消息头上则是由一系列的可选属性组成,属性:路由键【routing-key】,优先级【priority】,指出消息可能需要持久性存储【delivery-mode】
Publisher:消息的生产者,也是一个向交换器发布消息的客户端应用程序
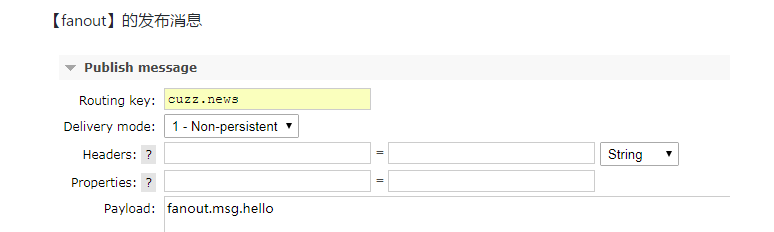
Exchange:交换器,用来接收生产者发送的消息并将这些消息路由给服务器中的队列
Exchange的4中类型:direct【默认】点对点,fanout,topic和headers, 发布订阅,不同类型的Exchange转发消息的策略有所区别
Queue:消息队列,用来保存消息直到发送给消费者,它是消息的容器,也是消息的终点,一个消息可投入一个或多个队列,消息一直在队列里面,等待消费者连接到这个队列将数据取走。
Binding:绑定,队列和交换机之间的关联,多对多关系
Connection:网络连接,例如TCP连接
Channel:信道,多路复用连接中的一条独立的双向数据流通道,信道是建立在真是的TCP链接之内的虚拟连接AMQP命令都是通过信道发送出去的。不管是发布消息,订阅队列还是接受消息,都是信道,减少TCP的开销,复用一条TCP连接。
Consumer:消息的消费者,表示一个从消息队列中取得消息的客户端的 应用程序
VirtualHost:虚拟主机,表示一批交换器、消息队列和相关对象。虚拟主机是共享相同的身份认证和加密环境的独立服务器域。每个 vhost 本质上就是一个 mini 版的 RabbitMQ 服务器,拥有自己的队列、交换器、绑定和权限机制。vhost 是 AMQP 概念的基础,必须在连接时指定,RabbitMQ 默认的 vhost 是 / 。
Broker:表示消息队列 服务实体
2、RabbitMQ的运行机制
Exchange分发消息时根据类型的不同分发策略有区别,目前共四种类型:direct、fanout、topic、headers 。headers 匹配 AMQP 消息的 header 而不是路由键, headers 交换器和 direct 交换器完全一致,但性能差很多,目前几乎用不到了,所以直接看另外三种类型:
direct:根据路由键直接匹配,一对一

fanout:不经过路由键,直接发送到每一个队列
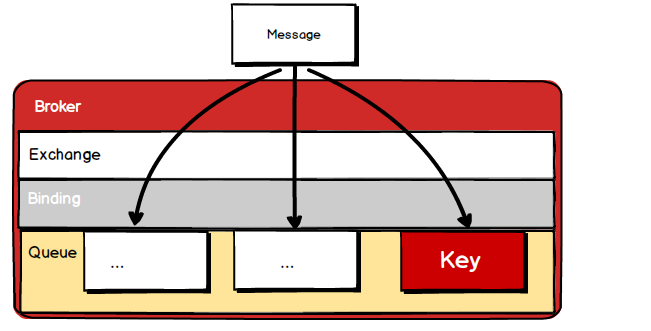
topic:类似模糊匹配的根据路由键,来分配绑定的队列
RabbitMQ安装测试
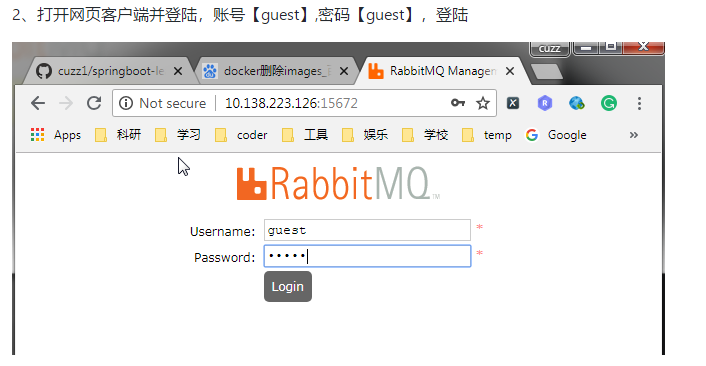
1、打开虚拟机,在docker中安装RabbitMQ

#1.安装rabbitmq,使用镜像加速
docker pull registry.docker-cn.com/library/rabbitmq:3-management
[root@node1 ~]# docker images
REPOSITORY                                     TAG                 IMAGE ID            CREATED             SIZE
registry.docker-cn.com/library/rabbitmq        3-management        e1a73233e3be        11 days ago         149 MB
#2.运行rabbitmq
##### 端口:5672 客户端和rabbitmq通信 15672:管理界面的web页面

docker run -d -p 5672:5672 -p 15672:15672 --name myrabbitmq e1a73233e3be

#3.查看运行
docker ps
打开网页客户端并登陆,账号【guest】,密码【guest】,登陆
https://i.cnblogs.com/EditPosts.aspx?postid=10505453
上面也是我做过的笔记,我只需要添加新学习到的知识
Connection就是建立一个TCP连接,生产者和消费者的都是通过TCP的连接到RabbitMQ Server中的,这个后续会再程序中体现出来。


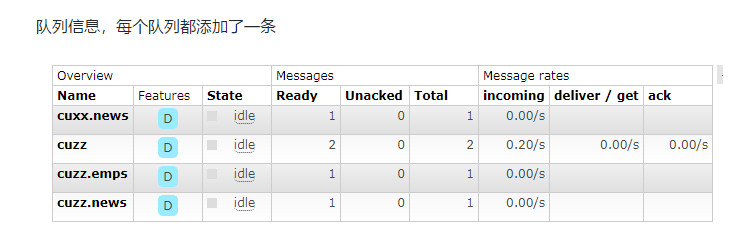
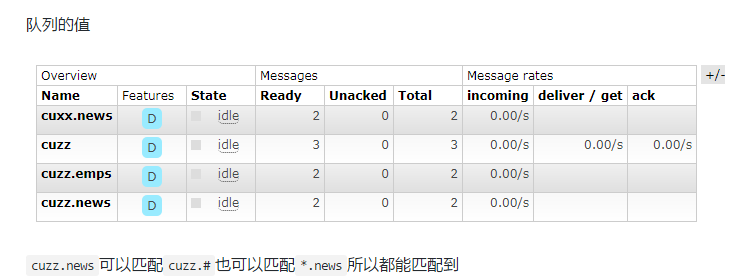
然后将剩下的三个交换机的类型都绑定上队列
/*: 代表匹配1个单词
/#:代表匹配0个或者多个单词
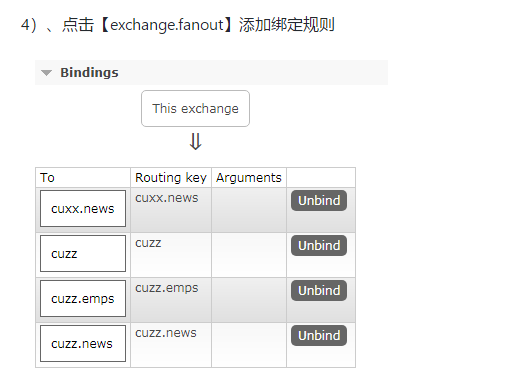


点开后

创建工程整合
1、RabbitAutoConfiguration 2、自动配置了连接工厂 ConnectionFactory 3、RabbitProperties封装了 RabbitMQ 4、RabbitTemplate:给RabbitMQ发送和接受消息的 5、AmqpAdmin:RabbitMQ的系统管理功能组件
1、新建SpringBoot工程,SpringBoot1.5+Integeration/RabbitMQ+Web
2、RabbitAutoConfiguration文件
3、编写配置文件application.properties
spring.rabbitmq.host=192.168.124.136
spring.rabbitmq.port=5672
spring.rabbitmq.username=guest
spring.rabbitmq.password=guest
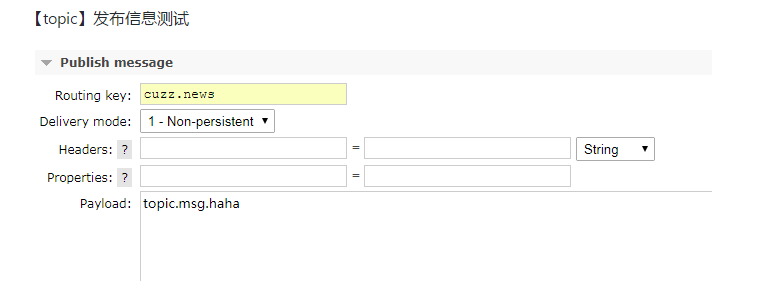
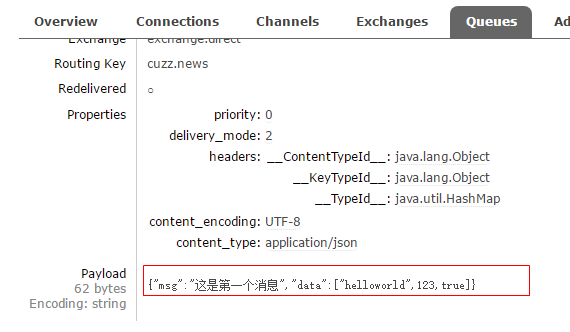
  @Autowired
    RabbitTemplate rabbitTemplate;
    @Test
    public void contextLoads() {
   /**
    *需要构建一个message 包含消息体和消息头
    * Object 默认当成消息体,只需要传入要发送的对象,自动化序列发送给rabbitmq;
    *
    */
        HashMap<String, Object> hashMap = new HashMap<>();
        hashMap.put("msg","这是第一个消息");
        hashMap.put("data", Arrays.asList("helloworld",123,true));

        //对象默认被序列化好以后发送出去
        rabbitTemplate.convertAndSend("exchange.direct","cuzz.news",hashMap);
    }

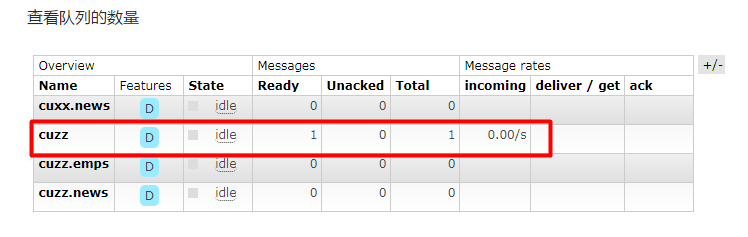
取出队列中的值, 取出队列中数据就没了
  @Test
    public void receiveandConveter(){

        Object receiveAndConvert = rabbitTemplate.receiveAndConvert("cuzz.news");

        System.out.println(receiveAndConvert.getClass());
        System.out.println(receiveAndConvert);
    }

执行结果
class java.util.HashMap
{msg=这是第一个消息, data=[helloworld, 123, true]}
7、使用Json方式传递,并传入对象Book
1)、MyAMQPConfig,自定义一个MessageConverter返回Jackson2JsonMessageConverter
刚才我们的rabbitmq 的官网上显示的数据我们都看不懂现在把它转化为json
就需要修改配置文件
@Configuration
public class MyAMQPConfig {

    @Bean
    public MessageConverter messageConverter(){

        return new Jackson2JsonMessageConverter();
    }
}
可以看到,这里面得到的消息已经转化为了我们能看的动的消息体。
2)、编写Book实体类
/**
 * @Author: cuzz
 * @Date: 2018/9/27 14:22
 * @Description:
 */
@Data
public class Book {
    private String  bookName;
    private String author;

    public Book(){
    }

    public Book(String bookName, String author) {
        this.bookName = bookName;
        this.author = author;
    }
}
3)、测试类
@Test
public void test() {
    // 对象被默认序列以后发送出去
    rabbitTemplate.convertAndSend("exchange.direct","cuzz.news", new Book("Effect java", "Joshua Bloch"));
}
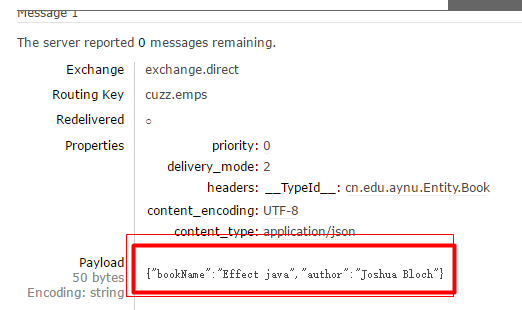
取出数据
    @Test
    public void test02(){
        Object o = rabbitTemplate.receiveAndConvert("cuzz.emps");

        System.out.println(o.getClass());
        System.out.println(o);

    }
结果
class cn.edu.aynu.Entity.Book
Book(bookName=Effect java, author=Joshua Bloch)
开启基于注解的方式
新建一个bootService
@Service
public class BookService {
    @RabbitListener(queues = "cuzz.news")
    public void receive(Book book){
        System.out.println(book);
    }

    @RabbitListener(queues = "cuzz")
    public void receive02(Message message){
        System.out.println(message.getBody());
        System.out.println(message.getMessageProperties());
    }
}
主程序开启RabbitMQ的注解
@EnableRabbit // 开启基于注解的rabbitmq
@SpringBootApplication
public class Springboot10AmqpApplication {

    public static void main(String[] args) {
        SpringApplication.run(Springboot10AmqpApplication.class, args);
    }
}
AmqpAdmin
创建和删除 Exchange 、Queue、Bind
创建Exchange
@Autowired
AmqpAdmin amqpAdmin;
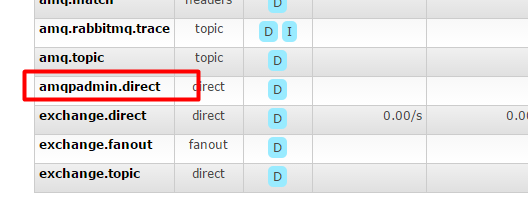
@Test
    public void test03(){
         amqpAdmin.declareExchange(new DirectExchange("amqpadmin.direct"));
         System.out.println("create finish");

    }
创建Queue
@Autowired
AmqpAdmin amqpAdmin;
 @Test
    public void test04(){

        String declareQueue = amqpAdmin.declareQueue(new Queue("amqpadmin.queue", true));
        System.out.println("Creat finish");
    }

3)、创建Bind规则
bind 需要指定绑定 队列,绑定的交换机,绑定的类型,还有需要的路由键
 @Test
    public void createBind(){

        amqpAdmin.declareBinding(new Binding("amqpadmin.queue",Binding.DestinationType.QUEUE , "amqpadmin.direct", "amqp.haha", null));

    }
结果

删除
 @Test
    public void deleteChange(){
         //删除交换机
          amqpAdmin.deleteExchange("amqpadmin.direct");
         // 删除队列
        //amqpAdmin.deleteQueue("amqpadmin.queue");
        System.out.println("delete finish");

    }
SpringBoot的检索
ElasticSearch简介
ElasticSearch是一个基于Lucene的搜索服务器。它提供了一个分布式多用户能力的全文搜索引擎,基于RESTful web接口。Elasticsearch是用Java开发的,并作为Apache许可条款下的开放源码发布,是当前流行的企业级搜索引擎。设计用于云计算中,能够达到实时搜索,稳定,可靠,快速,安装使用方便。
2、ElasticSearch的安装
1、安装java最新版本
- 下载linux的.tar.gz
- 解压到指定目录
- 配置环境变量
2、安装Docker(非必须这是是在Docker中安装)
1、查看centos版本
# uname -r
3.10.0-693.el7.x86_64
要求:大于3.10
如果小于的话升级*(选做)
# yum update
2、安装docker
# yum install docker
3、启动docker
# systemctl start docker
# docker -v
4、开机启动docker
# systemctl enable docker
5、停止docker
# systemctl stop docker
3、安装ElasticSearch的镜像
docker pull registry.docker-cn.com/library/elasticsearch
4、运行ElasticSearch

-e ES_JAVA_OPTS="-Xms256m -Xmx256m" 表示占用的最大内存为256m,默认是2G
[root@node1 ~]# docker run -e ES_JAVA_OPTS="-Xms256m -Xmx256m" -d -p 9200:9200 -p 9300:9300 --name ES01 5acf0e8da90b
5、测试是否启动成功
http://192.168.124.136:9200/ 查看是否返回json数据
{
  "name" : "Albion",
  "cluster_name" : "elasticsearch",
  "cluster_uuid" : "HUHGrosDQD2R6cubcwHLUQ",
  "version" : {
    "number" : "2.4.6",
    "build_hash" : "5376dca9f70f3abef96a77f4bb22720ace8240fd",
    "build_timestamp" : "2017-07-18T12:17:44Z",
    "build_snapshot" : false,
    "lucene_version" : "5.5.4"
  },
  "tagline" : "You Know, for Search"
}
3、Elastic的快速入门
最好的工具就是官方文档,以下操作都在文档中进行操作。(https://www.elastic.co/guide/cn/elasticsearch/guide/current/index.html)
1、基础概念
面向文档,JSON作为序列化格式,ElasticSearch的基本概念
索引(名词):
如前所述,一个 索引 类似于传统关系数据库中的一个 数据库 ,是一个存储关系型文档的地方。 索引 (index) 的复数词为 indices 或 indexes 。
索引(动词):
索引一个文档 就是存储一个文档到一个 索引 (名词)中以便它可以被检索和查询到。这非常类似于 SQL 语句中的 INSERT 关键词,除了文档已存在时新文档会替换旧文档情况之外。
类型:相当于数据库中的表
文档:相当于数据库中的行,即每条数据都叫一个文档
属性:相当于数据库中的列,即文档的属性
SpringBoot+ElasticSearch
1、新建项目SpringBoot1.5+Web+Nosql-->ElasticSearch
2、springBoot默认支持两种技术和ES进行交互
1、Jest【需要导入使用】
利用JestClient和服务器的9200端口进行http通信
2、SpringData ElasticSearch【默认】
1)、客户端:Client节点信息: clusterNodes: clusterName
2)、ElasticsearchTemplate操作es
3)、编写ElasticsearchRepository子接口
步骤:
1、Jest
1、注释SpringDataElasticSearch的依赖,并导入Jest【5.xx】的相关依赖
<!--<dependency>-->
            <!--<groupId>org.springframework.boot</groupId>-->
            <!--<artifactId>spring-boot-starter-data-elasticsearch</artifactId>-->
        <!--</dependency>-->
        <dependency>
            <groupId>io.searchbox</groupId>
            <artifactId>jest</artifactId>
            <version>5.3.3</version>
        </dependency>
2、修改配置文件application.properties
spring.elasticsearch.jest.uris= http://192.168.124.136:9200
3.建立一个实体类
package cn.edu.aynu.ENtity;

import io.searchbox.annotations.JestId;
import lombok.Data;

/**
 * Description: elasticsearch-project
 * Created by lenovo on 2019/5/4 10:12
 */
@Data
public class Article {
    @JestId
    private Integer id;
    private String autor;
    private String title;
    private String content;


}
4.建立一个测试类
package cn.edu.aynu;

import cn.edu.aynu.ENtity.Article;
import io.searchbox.client.JestClient;
import io.searchbox.core.Index;
import org.junit.Test;
import org.junit.runner.RunWith;
import org.springframework.beans.factory.annotation.Autowired;
import org.springframework.boot.test.context.SpringBootTest;
import org.springframework.test.context.junit4.SpringRunner;

import java.io.IOException;

@RunWith(SpringRunner.class)
@SpringBootTest
public class ElasticsearchApplicationTests {

      @Autowired
      JestClient jestClient;


    @Test
    public void contextLoads() throws IOException {
        //给elasticsearch中索引 (保存一个文档)
        Article article = new Article();

        article.setId(1);
        article.setTitle("Effect Java");
        article.setAutor("Joshua Bloch");
        article.setContent("Hello World");
        //构建一个索引功能
        Index index = new Index.Builder(article).index("db").type("article").build();

        //执行
        jestClient.execute(index);

    }

}
5.执行结果

查询数据
@Test
public void search(){
    // 查询表达式
    String json = "{
" +
        "    "query" : {
" +
        "        "match" : {
" +
        "            "content" : "Hello"
" +
        "        }
" +
        "    }
" +
        "}";
    // 构建搜索操作
    Search search = new Search.Builder(json).addIndex("cuzz").addType("article").build();

    // 执行
    try {
        SearchResult result = jestClient.execute(search);
        System.out.println(result.getJsonString());
    } catch (IOException e) {
        e.printStackTrace();
    }
}
执行结果

2、SpringData-Elastic
1、下载对应版本的ElasticSearch
如果版本不适配,会报错,解决方案:升级SpringBoot版本,或者安装合适的ES

2、在Docker中安装适合版本的ES【2.4.6】
docker pull elasticsearch:2.4.6
docker run -e ES_JAVA_OPTS="-Xms256m -Xmx256m" -d -p 9201:9200 -p 9301:9300 --name ES02 id
3、编写配置文件
spring:
  data:
    elasticsearch:
      cluster-name: elasticsearch
      cluster-nodes: 10.138.223.126:9301
4、修改pom文件,把使用data-elasticsearch,把刚才注释删除
       <dependency>
            <groupId>org.springframework.boot</groupId>
            <artifactId>spring-boot-starter-data-elasticsearch</artifactId>
        </dependency>
5、操作ElasticSearch有两种方式
1)、编写一个ElasticsearchRepositry
2)、编写一个ElasticsearchTemplate
6、ElasticsearchRepositry的操作
1)、新建一个bean/Book类,注意:@Document(indexName = "cuzz", type="book")
@Document(indexName = "cuzz",type="book")
@Data
public class Book {
    private Integer id;
    private String bookName;
    private String auto;


    public Book() {
        super();
    }

    public Book(Integer id, String bookName, String auto) {
        super();
        this.id = id;
        this.bookName = bookName;
        this.auto = auto;
    }
}
2)、新建一个repositry/BookRepositry
public interface BookRepository extends ElasticsearchRepository<Book, Integer> {
    //自定义查询方法
    public List<Book> findByBookNameLike(String bookName);
}
3)、编写测试类
@Autowired
BookRepositry bookRepositry;
@Test
public void testSearch(){
    for (Book book : bookRepositry.findByBookNameLike("Effect")) {
        System.out.println(book);
    }
}
SpringBoot的任务
1、异步任务
先开启异步注解,添加@EnableAsync
@EnableAsync
@SpringBootApplication
public class Springboot12TaskApplication {

    public static void main(String[] args) {
        SpringApplication.run(Springboot12TaskApplication.class, args);
    }
}
service,在方法上添加@Async
@Service
public class AsynSerivce {

    @Async
    public void hello() {
        try {
            Thread.sleep(3);
        } catch (InterruptedException e) {
            e.printStackTrace();
        }
        System.out.println("处理数据中...");
    }
}
controller
@RestController
public class AsynController {

    @Autowired
    AsynSerivce asynSerivce;

    @GetMapping("/hello")
    public String hello() {
        asynSerivce.hello();
        return "success";
    }
}
http://localhost:8080/hello
当我们访问时,发现我们睡眠的3秒没有起作用,而是直接就执行了这个方法,不会被阻塞在这里异步处理hello请求
2、定时任务
项目开发中经常需要执行一些定时任务,比如需要在每天凌晨时候,分析一次前一天的日志信息。Spring为我们提供了异步执行任务调度的方式,提供TaskExecutor 、TaskScheduler 接口。
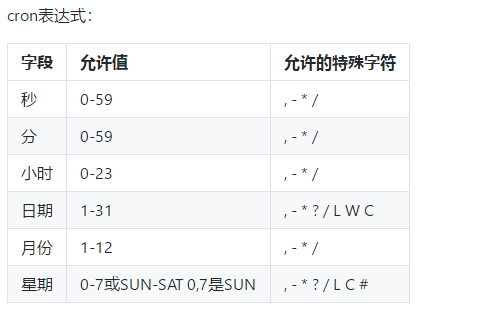
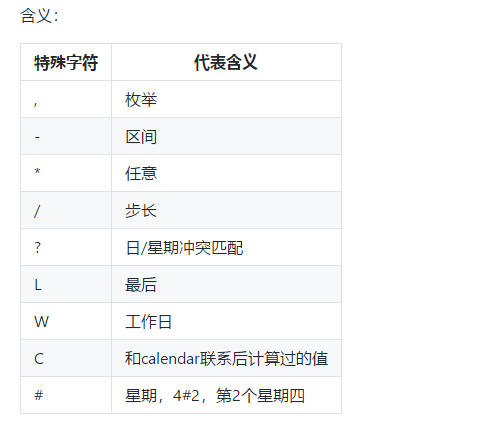
主要有@Scheduled注解,cron()方法
底层源码
public @interface Scheduled {

    /**
     * A cron-like expression, extending the usual UN*X definition to include triggers
     * on the second as well as minute, hour, day of month, month and day of week.
     * <p>E.g. {@code "0 * * * * MON-FRI"} means once per minute on weekdays
     * (at the top of the minute - the 0th second).
     * @return an expression that can be parsed to a cron schedule
     * @see org.springframework.scheduling.support.CronSequenceGenerator
     */
    String cron() default "";
}
可以写上一个测试类
@Service
public class ScheduledService {

    // 表示周一到周六当秒为0时执行一次
    @Scheduled(cron = "0 * * * * MON-SAT")
    public void hello() {
        SimpleDateFormat sdf = new SimpleDateFormat("yyyy-MM-dd HH:mm:ss");
        String date = sdf.format(new Date());
        System.out.println(date + "  hello...");
    }
}
开启定时任务注解@EnableScheduling
@EnableScheduling
@SpringBootApplication
public class Springboot12TaskApplication {

    public static void main(String[] args) {
        SpringApplication.run(Springboot12TaskApplication.class, args);
    }
}
很有意思的事情是就是只需要加上三个注解,一个是@Service ,一个是在主启动类上开启定时任务,另外一个就是执行你的定时时间
它就自动的进行了执行。
3、邮件任务
1、邮件发送需要引入spring-boot-starter-mail
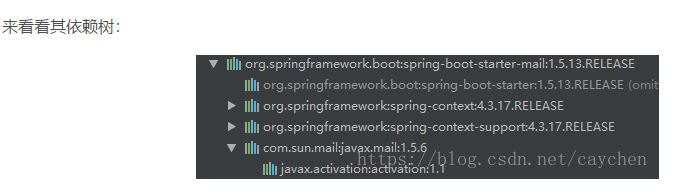
可以看到spring-boot-starter-mail-xxx.jar对Sun公司的邮件api功能进行了相应的封装。
MailSenderAutoConfiguration
@Configuration
@ConditionalOnClass({ MimeMessage.class, MimeType.class, MailSender.class })
@ConditionalOnMissingBean(MailSender.class)
@Conditional(MailSenderCondition.class)
@EnableConfigurationProperties(MailProperties.class)
@Import({ MailSenderJndiConfiguration.class, MailSenderPropertiesConfiguration.class })
public class MailSenderAutoConfiguration {

    /**
     * Condition to trigger the creation of a {@link MailSender}. This kicks in if either
     * the host or jndi name property is set.
     */
    static class MailSenderCondition extends AnyNestedCondition {

        MailSenderCondition() {
            super(ConfigurationPhase.PARSE_CONFIGURATION);
        }
        @ConditionalOnProperty(prefix = "spring.mail", name = "host")
        static class HostProperty {

        }
        @ConditionalOnProperty(prefix = "spring.mail", name = "jndi-name")
        static class JndiNameProperty {
        }
    }
}
首先,它会通过注入Mail的属性配置类MailProperties:
@ConfigurationProperties(prefix = "spring.mail")
public class MailProperties {

    private static final Charset DEFAULT_CHARSET = StandardCharsets.UTF_8;

    /**
     * SMTP server host. For instance, `smtp.example.com`.
     */
    private String host;

    /**
     * SMTP server port.
     */
    private Integer port;

    /**
     * Login user of the SMTP server.
     */
    private String username;

    /**
     * Login password of the SMTP server.
     */
    private String password;

    /**
     * Protocol used by the SMTP server.
     */
    private String protocol = "smtp";

    /**
     * Default MimeMessage encoding.
     */
    private Charset defaultEncoding = DEFAULT_CHARSET;

    /**
     * Additional JavaMail Session properties.
     */
    private Map<String, String> properties = new HashMap<>();

    /**
     * Session JNDI name. When set, takes precedence over other Session settings.
     */
    private String jndiName;

    public String getHost() {
        return this.host;
    }

    public void setHost(String host) {
        this.host = host;
    }

    public Integer getPort() {
        return this.port;
    }

    public void setPort(Integer port) {
        this.port = port;
    }

    public String getUsername() {
        return this.username;
    }

    public void setUsername(String username) {
        this.username = username;
    }

    public String getPassword() {
        return this.password;
    }

    public void setPassword(String password) {
        this.password = password;
    }

    public String getProtocol() {
        return this.protocol;
    }

    public void setProtocol(String protocol) {
        this.protocol = protocol;
    }

    public Charset getDefaultEncoding() {
        return this.defaultEncoding;
    }

    public void setDefaultEncoding(Charset defaultEncoding) {
        this.defaultEncoding = defaultEncoding;
    }

    public Map<String, String> getProperties() {
        return this.properties;
    }

    public void setJndiName(String jndiName) {
        this.jndiName = jndiName;
    }

    public String getJndiName() {
        return this.jndiName;
    }

}
在MailSenderAutoConfiguration自动配置类中,创建了一个Bean,其类为JavaMailSenderImpl,它是Spring专门用来发送Mail邮件的服务类,SpringBoot也使用它来发送邮件。它是JavaMailSender接口的实现类,通过它的send()方法来发送不同类型的邮件,主要分为两类,一类是简单的文本邮件,不带任何html格式,不带附件,不带图片等简单邮件,还有一类则是带有html格式文本或者链接,有附件或者图片的复杂邮件。
原文:https://blog.csdn.net/caychen/article/details/82887926
通用配置application.properties:
# 设置邮箱主机
spring.mail.host=smtp.qq.com

# 设置用户名
spring.mail.username=xxxxxx@qq.com

# 设置密码,该处的密码是QQ邮箱开启SMTP的授权码而非QQ密码
spring.mail.password=pwvtabrwxogxidac

# 设置是否需要认证,如果为true,那么用户名和密码就必须的,
# 如果设置false,可以不设置用户名和密码,当然也得看你的对接的平台是否支持无密码进行访问的。
spring.mail.properties.mail.smtp.auth=true

# STARTTLS[1]  是对纯文本通信协议的扩展。它提供一种方式将纯文本连接升级为加密连接(TLS或SSL),而不是另外使用一个端口作加密通信。
spring.mail.properties.mail.smtp.starttls.enable=true
spring.mail.properties.mail.smtp.starttls.required=true

mail.from=${spring.mail.username}
mail.to=yyyyyy@qq.com
由于使用QQ邮箱的用户占多数,所以这里选择QQ邮箱作为测试。还有注意的是spring.mail.password这个值不是QQ邮箱的密码,而是QQ邮箱给第三方客户端邮箱生成的授权码。具体要登录QQ邮箱,点击设置,找到SMTP服务:


默认SMTP服务是关闭的,即默认状态为关闭状态,如果是第一次操作,点击开启后,会通过验证会获取到授权码;而我之前已经开启过SMTP服务,所以直接点击生成授权码后通过验证获取到授权码。
下面是一个测试的例子
<dependency>
    <groupId>org.springframework.boot</groupId>
    <artifactId>spring-boot-starter-mail</artifactId>
</dependency>
2、Spring Boot 自动配置MailSenderAutoConfiguration
3、定义MailProperties内容,配置在application.properties中
spring.mail.username=3176497244@qq.com
#设置密码是qq邮箱生成的授权码
spring.mail.password=yhgwerqdhdjmdche
#设置邮箱主机
spring.mail.host=smtp.qq.com

spring.mail.properties.mail.stmp.ssl.enable=true
4、自动装配JavaMailSender
 @Autowired
  JavaMailSenderImpl javaMailSender;

  @Test
  public void test03(){

      SimpleMailMessage simpleMailMessage = new SimpleMailMessage();

       /*设置主题*/
      simpleMailMessage.setSubject("Hello World");
      simpleMailMessage.setText("text");

      simpleMailMessage.setTo("");
      simpleMailMessage.setFrom("3176497244@qq.com");
      javaMailSender.send(simpleMailMessage);


  }
5、测试邮件发送
这里有一个详细的连接对于我们了解mail
(https://blog.csdn.net/caychen/article/details/82887926)
十三、SpringBoot的安全
Spring Security是针对Spring项目的安全框架,也是Spring Boot底层安全模块默认的技术选型。他可以实现强大的web安全控制。对于安全控制,我们仅需引入spring-boot-starter-security模块,进行少量的配置,即可实现强大的安全管理。
1、几个类
- WebSecurityConfigurerAdapter:自定义Security策略
- AuthenticationManagerBuilder:自定义认证策略
- @EnableWebSecurity:开启WebSecurity模式
2、基本概念
- 应用程序的两个主要区域是“认证”和“授权”(或者访问控制)。这两个主要区域是Spring Security 的两个目标。
- “认证”(Authentication),是建立一个他声明的主体的过程(一个“主体”一般是指用户,设备或一些可以在你的应用程序中执行动作的其他系统)。
- “授权”(Authorization)指确定一个主体是否允许在你的应用程序执行一个动作的过程。为了抵达需要授权的店,主体的身份已经有认证过程建立。
- 这个概念是通用的而不只在Spring Security中
官方文档(https://docs.spring.io/spring-security/site/docs/current/guides/html5/helloworld-boot.html)
练习页面下载(https://github.com/cuzz1/springboot-learning/tree/master/supporting/SpringSecurity实验)
你需要自定义角色进行认证,授权
package cn.edu.aynu.security.config;

import org.springframework.security.config.annotation.authentication.builders.AuthenticationManagerBuilder;
import org.springframework.security.config.annotation.web.builders.HttpSecurity;
import org.springframework.security.config.annotation.web.configuration.EnableWebSecurity;
import org.springframework.security.config.annotation.web.configuration.WebSecurityConfigurerAdapter;
import org.springframework.security.crypto.bcrypt.BCryptPasswordEncoder;

@EnableWebSecurity
public class MySecurityConfig extends WebSecurityConfigurerAdapter {


    @Override
    protected void configure(HttpSecurity http) throws Exception {
        /*定制请求的授权规则 只能访问首页其他页面拒绝访问*/
        http.authorizeRequests().antMatchers("/").permitAll()
                .antMatchers("/level1/**").hasRole("VIP1")
                .antMatchers("/level2/**").hasRole("VIP2")
                .antMatchers("/level3/**").hasRole("VIP3");


        /*开启登入功能,如果有权限就来到登录页面 自动开启配置登录功能 提醒你登录*/
        //表单的name属性就是user pwd
        http.formLogin().usernameParameter("user").passwordParameter("pwd").loginPage("/userlogin");
        //login 来到登录页
        //重定向到/login?error表示登录失败
        //更多详细规定
       //默认post形式的/login代表处理登录
        //一旦定制loginPage 那么loginPage 的post请求就是登录


        /*开启自动配置的注销功能*/
        http.logout().logoutSuccessUrl("/");//注销成功后要去哪的地址
     //   http.logout();//注销成功后要去哪的地址
        //访问/logout 注销用户清空session
        //注销成功 会返回/login?logout页面


        /*有效期是14天*/
        http.rememberMe().rememberMeParameter("remeber");
    }
    @Override
    protected void configure(AuthenticationManagerBuilder auth) throws Exception {
        // super.configure(auth);

        auth.inMemoryAuthentication().passwordEncoder(new BCryptPasswordEncoder()).withUser("user1").password(new BCryptPasswordEncoder().encode("123456")).roles("VIP1","VIP2");
    }


}
先说一下,为什么Thymeleaf 会直接解析login.html进入到他的源码就会知道了
打开HttpSecurity 这个类
public AnonymousConfigurer<HttpSecurity> anonymous() throws Exception {
        return getOrApply(new AnonymousConfigurer<>());
    }

    /**
     * Specifies to support form based authentication. If
     * {@link FormLoginConfigurer#loginPage(String)} is not specified a default login page
     * will be generated.
     *
     * <h2>Example Configurations</h2>
     *
     * The most basic configuration defaults to automatically generating a login page at
     * the URL "/login", redirecting to "/login?error" for authentication failure. The
     * details of the login page can be found on
     * {@link FormLoginConfigurer#loginPage(String)}
     *
可以参考<https://www.jianshu.com/p/246e4fec1469>
另外一定要注意版本的问题,springboot springSecurity 如果有不能识别的标签的错误,那很可能就是版本的问题了。
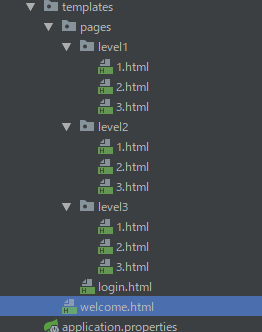
<!DOCTYPE html>
<html xmlns:th="http://www.thymeleaf.org"
      xmlns:sec="http://www.thymeleaf.org/thymeleaf-extras-springsecurity4">
<head>
    <meta http-equiv="Content-Type" content="text/html; charset=UTF-8">
    <title>Insert title here</title>
</head>
<body>
<h1 align="center">欢迎光临武林秘籍管理系统</h1><!--没有认证-->
<div sec:authorize="!isAuthenticated()">
    <!--未登录,点击 <a th:href="@{/login}">登录</a>-->
    <h2 align="center">游客您好,如果想查看武林秘籍 <a th:href="@{/userlogin}">请登录</a></h2>
</div><!--如果认证了-->
<div sec:authorize="isAuthenticated()">
    <h2> <span sec:authentication="name"> </span>你好,你的角色有:
        <span sec:authentication="principal.authorities"></span></h2>
    <form th:action="@{/logout}" method="post">
        <input type="submit" value="注销">

    </form>
</div>


<hr>
<div sec:authorize="hasRole('VIP1')">

    <h3>普通武功秘籍</h3>
    <ul>
        <li><a th:href="@{/level1/1}">罗汉拳</a></li>
        <li><a th:href="@{/level1/2}">武当长拳</a></li>
        <li><a th:href="@{/level1/3}">全真剑法</a></li>
    </ul>
</div>
<div sec:authorize="hasRole('VIP2')">


    <h3>高级武功秘籍</h3>
    <ul>
        <li><a th:href="@{/level2/1}">太极拳</a></li>
        <li><a th:href="@{/level2/2}">七伤拳</a></li>
        <li><a th:href="@{/level2/3}">梯云纵</a></li>
    </ul>
</div>
<div sec:authorize="hasRole('VIP3')">

    <h3>绝世武功秘籍</h3>
    <ul>
        <li><a th:href="@{/level3/1}">葵花宝典</a></li>
        <li><a th:href="@{/level3/2}">龟派气功</a></li>
        <li><a th:href="@{/level3/3}">独孤九剑</a></li>
    </ul>
</div>


</body>
</html>
<!DOCTYPE html>
<html xmlns:th="http://www.thymeleaf.org">
<head>
<meta http-equiv="Content-Type" content="text/html; charset=UTF-8">
<title>Insert title here</title>
</head>
<body>
    <a th:href="@{/}">返回</a>
    <h1>罗汉拳</h1>
    <p>罗汉拳站当央,打起来不要慌</p>
</body>
</html>
<!DOCTYPE html>
<html xmlns:th="http://www.thymeleaf.org">
<head>
<meta http-equiv="Content-Type" content="text/html; charset=UTF-8">
<title>Insert title here</title>
</head>
<body>
    <a th:href="@{/}">返回</a>
    <h1>武当长拳</h1>
    <p>长一点在长一点</p>
</body>
</html>
<!DOCTYPE html>
<html xmlns:th="http://www.thymeleaf.org">
<head>
<meta http-equiv="Content-Type" content="text/html; charset=UTF-8">
<title>Insert title here</title>
</head>
<body>
    <a th:href="@{/}">返回</a>
    <h1>梯云纵</h1>
    <p>踩自己的脚往上跳</p>
</body>
</html>
<!DOCTYPE html>
<html xmlns:th="http://www.thymeleaf.org">
<head>
<meta http-equiv="Content-Type" content="text/html; charset=UTF-8">
<title>Insert title here</title>
</head>
<body>
    <a th:href="@{/}">返回</a>
    <h1>太极拳</h1>
    <p>
           一个西瓜圆又圆 劈它一刀成两半 你一半来 给你你不要 给他他不收 那就不给 把两人撵走 他们不走你走 走啦,一挥手,伤自尊
                  不买西瓜别缠我,缓慢纠缠様 两人缠我赖皮,手慢动作左右挥动 看我厉害,转头缓步拍苍蝇状 拍死了,手抱西瓜状+奥特曼十字手+广播操准备运动的站立
    </p>
</body>
</html>
<!DOCTYPE html>
<html xmlns:th="http://www.thymeleaf.org">
<head>
<meta http-equiv="Content-Type" content="text/html; charset=UTF-8">
<title>Insert title here</title>
</head>
<body>
    <a th:href="@{/}">返回</a>
    <h1>七伤拳</h1>
    <p>练这拳的人全都死了</p>
</body>
</html>
<!DOCTYPE html>
<html xmlns:th="http://www.thymeleaf.org">
<head>
<meta http-equiv="Content-Type" content="text/html; charset=UTF-8">
<title>Insert title here</title>
</head>
<body>
    <a th:href="@{/}">返回</a>
    <h1>全真剑法</h1>
    <p>全都是真的</p>
</body>
</html>
<!DOCTYPE html>
<html xmlns:th="http://www.thymeleaf.org">
<head>
<meta http-equiv="Content-Type" content="text/html; charset=UTF-8">
<title>Insert title here</title>
</head>
<body>
    <a th:href="@{/}">返回</a>
    <h1>葵花宝典</h1>
    <p>欲练神功,挥刀自宫</p>
</body>
</html>
<!DOCTYPE html>
<html xmlns:th="http://www.thymeleaf.org">
<head>
<meta http-equiv="Content-Type" content="text/html; charset=UTF-8">
<title>Insert title here</title>
</head>
<body>
    <a th:href="@{/}">返回</a>
    <h1>龟派气功</h1>
    <p>龟-派-气-功-波</p>
</body>
</html>
<!DOCTYPE html>
<html xmlns:th="http://www.thymeleaf.org">
<head>
<meta http-equiv="Content-Type" content="text/html; charset=UTF-8">
<title>Insert title here</title>
</head>
<body>
    <a th:href="@{/}">返回</a>
    <h1>独孤九剑</h1>
    <p>欲练此剑,必先犯贱</p>
</body>
</html>
package cn.edu.aynu.security.Controller;

import org.springframework.stereotype.Controller;
import org.springframework.web.bind.annotation.GetMapping;
import org.springframework.web.bind.annotation.PathVariable;

@Controller
public class KungfuController {
    private final String PREFIX = "pages/";
    /**
     * 欢迎页
     * @return
     */
    @GetMapping("/")
    public String index() {
        return "welcome";
    }

    /**
     * 登陆页
     * @return
     */
    @GetMapping("/userlogin")
    public String loginPage() {
        return PREFIX+"login";
    }


    /**
     * level1页面映射
     * @param path
     * @return
     */
    @GetMapping("/level1/{path}")
    public String level1(@PathVariable("path")String path) {
        return PREFIX+"level1/"+path;
    }

    /**
     * level2页面映射
     * @param path
     * @return
     */
    @GetMapping("/level2/{path}")
    public String level2(@PathVariable("path")String path) {
        return PREFIX+"level2/"+path;
    }

    /**
     * level3页面映射
     * @param path
     * @return
     */
    @GetMapping("/level3/{path}")
    public String level3(@PathVariable("path")String path) {
        return PREFIX+"level3/"+path;
    }


}